Page is loading ...

PANCAKE GENERATOR
Installation, Operation
and Maintenance Manual
A Regal Brand
A Regal Brand
100 E. Randolph Street (54401)
PO Box 8003
Wausau, WI 54402-8003 U.S.A.
PH: 715-675-3359
FAX: 715-675-8026
www.marathonelectric.com
©2015 Regal Beloit Corporation MANUAL GPN016 7892J-NP/???/07-15/??? Printed in the U.S.A.

TABLE OF CONTENTS
INTRODUCTION . . . . . . . . . . . . . . . . . . . . . . . . . . . . . . . . . . . . . . . . . . . . . . . . . 2
SAFETY . . . . . . . . . . . . . . . . . . . . . . . . . . . . . . . . . . . . . . . . . . . . . . . . . . . . . 2
INSTALLATION . . . . . . . . . . . . . . . . . . . . . . . . . . . . . . . . . . . . . . . . . . . . . . . . . . 2
Location/Environment. . . . . . . . . . . . . . . . . . . . . . . . . . . . . . . . . . . . . . . . . . . . . . . . . 2
Mounting . . . . . . . . . . . . . . . . . . . . . . . . . . . . . . . . . . . . . . . . . . . . . . . . . . . . . . . 3
CONNECTION DIAGRAMS . . . . . . . . . . . . . . . . . . . . . . . . . . . . . . . . . . . . . . . . . . . . 4
OPERATION . . . . . . . . . . . . . . . . . . . . . . . . . . . . . . . . . . . . . . . . . . . . . . . . . . . 7
Initial Pre-Start Inspection . . . . . . . . . . . . . . . . . . . . . . . . . . . . . . . . . . . . . . . . . . . . . . . 7
Initial Start-Up . . . . . . . . . . . . . . . . . . . . . . . . . . . . . . . . . . . . . . . . . . . . . . . . . . . . . 7
Shut Down Procedures . . . . . . . . . . . . . . . . . . . . . . . . . . . . . . . . . . . . . . . . . . . . . . . . 8
MAINTENANCE . . . . . . . . . . . . . . . . . . . . . . . . . . . . . . . . . . . . . . . . . . . . . . . . . 8
Routine Maintenance . . . . . . . . . . . . . . . . . . . . . . . . . . . . . . . . . . . . . . . . . . . . . . . . . 8
Drying Generator Windings . . . . . . . . . . . . . . . . . . . . . . . . . . . . . . . . . . . . . . . . . . . . . . 8
SERVICE . . . . . . . . . . . . . . . . . . . . . . . . . . . . . . . . . . . . . . . . . . . . . . . . . . . . . 8
General . . . . . . . . . . . . . . . . . . . . . . . . . . . . . . . . . . . . . . . . . . . . . . . . . . . . . . . . 8
Restoring Residual Magnetism (Flashing the Exciter Field) . . . . . . . . . . . . . . . . . . . . . . . . . . . . . . 9
Testing the Rotating Recifier Assembly . . . . . . . . . . . . . . . . . . . . . . . . . . . . . . . . . . . . . . . . 9
SPARE PARTS. . . . . . . . . . . . . . . . . . . . . . . . . . . . . . . . . . . . . . . . . . . . . . . . . . . 9
RETURNED GOODS . . . . . . . . . . . . . . . . . . . . . . . . . . . . . . . . . . . . . . . . . . . . . . . 9
TROUBLESHOOTING PROCEDURES . . . . . . . . . . . . . . . . . . . . . . . . . . . . . . . . . . . . . . . 9
WARNINGS AND CAUTIONS. . . . . . . . . . . . . . . . . . . . . . . . . . . . . . . . . . .Inside Back Cover

INSTALLATION, OPERATION, AND MAINTENANCE MANUAL
ELECTRONIC VOLTAGE REGULATED BRUSHLESS GENERATOR
INTRODUCTION
Thank you for choosing a MARATHON ELECTRIC PANCAKE Generator. Please read the installation and service
sections of this manual carefully. A clean environment and proper installation are critical to generator performance. If
you have any difficulty in installing or servicing your Marathon Generator, our service and technical staff will be happy
to help you. We are confident that by following these guidelines, you will get many years of reliable service from your
Marathon generator.
General Data
Construction: Brushless, Revolving Field
Number of Poles: 4
Frequency: Frequency is model specific. Consult the generator name plate or the factory for
your generator’s designed frequency.
Synchronous Speeds: 60 Hz – 1800 rpm
Cooling: Fan cooled
Enclosure: IP20
Max. Ambient Temp: 40°C
Insulation Class: (See generator nameplate)
Initial Inspection
Your Marathon Pancake generator has been carefully inspected and tested before leaving the factory. However, it
is wise to examine the generator before installation. Carefully unpack and examine the unit. If there is any shipping
damage, file a damage claim with the shipper or agent immediately. Save all packing materials for inspection by agent.
SAFETY
PLEASE REMEMBER SAFETY FIRST. If you are unsure of
the instructions or procedures contained in this manual,
seek qualified help before continuing. WHEN IN DOUBT,
ASK.
This manual emphasizes the safety precautions necessary
during the installation, operation, and maintenance of
your Pancake generator. Each section has caution and
warning messages. These messages are for your safety
and the safety of the equipment involved. If any of the
cautions or warnings are not readily understood, seek
clarification from qualified personnel before proceeding.
Before any service work is done, disconnect all
external power sources and, where appropriate, lock
out all controls to prevent an unexpected start-up
of the generator set driver. Proper grounding
(earthing) in compliance with local and national
electrical codes and standards must be provided.
These safety precautions are necessary to prevent
potential serious personal injury or even death.
The hazards associated with lifting or moving your
generator are pointed out in the installation and service
sections. Incorrect lifting or moving can result in personal
injury or damage to the unit. Prior to start-up of the unit,
insure that all generator leads are properly connected
and insulated.
Always assume that there will be voltage present at
the generator terminals whenever the generator’s
shaft is rotating, and proceed accordingly. Residual
voltage is present at the generator terminals, and at
the automatic voltage regulator panel connections,
even with the regulator fuse removed. Caution must
be exercised, or serious injury or death can result.
This manual is not intended to be a substitute for properly
trained personnel. Installation and repairs should only be
conducted by qualified, trained people. The cautions
and warnings point out known conditions and situations
that are potentially hazardous. Each installation may well
create its own set of hazards. No manual can cover every
possible situation.
INSTALLATION
Location/Environment
The engine-generator set must be installed in a protected
environment with minimal exposure to fumes, moisture,
dust, and dirt. THE AMBIENT AIR TEMPERATURE MUST
NOT EXCEED 40°C (104°F) FOR CONTINUOUS DUTY
WITHOUT A RECOMMENDED REDUCTION IN RATING.
2

a.
DO NOT obstruct the generator intake and outlet
air passages.
b. Provide sufficient air circulation around the set to
remove engine heat and to provide ample generator
cooling.
c. Hot air from the radiator or engine should not pass
through the generator.
d. Check the mounting surface to be sure that it is rigid
enough to keep vibration and noise to a minimum.
Mounting
Mount the generator to the driver securely. Before
tightening hold-down bolts, use shims as necessary under
generator feet for uniform support. If this is not done, the
frame may become distorted resulting in excess vibration
that could damage the generator.
Assembly of a Single Bearing Generator to an Engine
To mount a single bearing generator to an engine (See
Figure 1 for component identification):
a. If the engine is equipped with electric start,
disconnect the positive (+) terminal from battery.
b. Place a jack or other support under the engine
flywheel housing.
c. Remove the pot cover or control box cover from
back of generator and disconnect all incoming
power leads.
d. Detach main rotor leads from the red and black
threaded studs on rectifier assembly (See Figure 2
on page 9.
e. Remove exciter armature (rotor) mounting bolt from
center of shaft, marking position of the rotor to aid
in re-assembly.
f. Remove exciter rotor from the shaft.
Take care not to damage the laminations or coil
end turns.
g. Remove exhaust screen band.
h. Place a strap around generator rotor assembly and
support from hoist.
i. With the exciter armature removed, pull the rotor
assembly from the frame.
Do not scratch or cut the copper stator windings.
k. Insure that the flex discs are flush (flat) against the
register of the flywheel. Bolt drive disk to engine
flywheel, using proper sized flat washers and SAE
grade 8 bolts. Consult engine manufacturer for
proper torque value.
I. Push generator frame assembly carefully back over
rotor.
m. Mount frame assembly to engine flywheel housing
with proper size bolts, lock washers, and nuts.
Figure 1- General Arrangement
POT
COVER
EXCITER
ROTOR
RETAINING
BOLT
EXCITER
STATOR
BEARING
BRACKET
MAIN
ROTOR
DRIVE
DISKS
FAN
MAIN
ROTOR
LEADS
SCREEN
BAND
ASSEMBLY
FRAME & MAIN
STAOR ASSEMBLY
3

n. Remount exhaust screen band.
o. To reassemble the armature, pull main rotor leads
through the holes in the exciter rotor.
DO NOT PINCH ROTOR LEADS.
p. Replace the mounting bolt, lock washer, and
Belleville washer. Using a 9/16” socket on a torque
wrench, torque the mounting bolt to 30 to 35 ft-lb.
q. Reconnect main rotor leads to proper connections.
r. Reconnect all incoming power leads as shown on
wiring diagram.
s. Replace pot cover or control box cover.
t. Remove jack support from under engine flywheel
housing.
u. See preceding paragraph “a.” If necessary, reconnect
positive (+) lead to the engine cranking battery.
NOTE: INSURE THAT ALL ELECTRICAL CONNECTIONS ARE CORRECT BEFORE STARTING GENERATOR.
REFER TO THE AUTOMATIC VOLTAGE REGULATOR (AVR) MANUAL FOR SPECIFIC INSTRUCTIONS FOR
CONNECTING THE AVR.
SINGLE PHASE CONNECTION - DUAL VOLTAGE SERIES
VOLTAGE
L-L L-N
60 HZ 240 120
SINGLE PHASE CONNECTION - SINGLE VOLTAGE PARALLEL
VOLTAGE
L-L
60 HZ 120
DEDICATED 4 LEAD SINGLE PHASE GENERATOR CONNECTIONS.
4

OPERATION
Initial Pre-Start Inspection
Before starting the unit for the first time, the following
inspections and checks are recommended:
a. Clear the site area of any loose parts, connections,
or foreign materials such as cut off tie wrap ends,
scrap insulating tape, tools, hardware, etc.
b. Insure that the set turns freely. Bar the set over by
hand for at least 2 revolutions to be sure that there
is no interference. Do not use the generator’s fan as
a fulcrum to bar over the set. If the generator rotor
seems to bind, check for clearance in the generator
and exciter air gap.
c. Check all wiring against the proper connection
diagrams, and insure that all connections and
terminations are tight and properly insulated
PANCAKE GENERATORS MAY HAVE VOLTAGE
PRESENT AT THEIR LEAD TERMINALS WHEN THE
SHAFT IS ROTATING. DO NOT PERMIT OPERATION
OF THE UNIT UNTIL ALL LEADS HAVE BEEN
CONNECTED AND INSULATED. FAILURE TO DO THIS
MAY RESULT IN PERSONAL INJURY OR EQUIPMENT
DAMAGE.
d. Insure that all equipment is properly grounded
(earthed).
e. Inspect for any remaining packing materials, and
remove any loose debris, building materials, rags,
etc., which could be drawn into the generator.
f. Check all fasteners for tightness.
g. Check all access plates, covers, screens, and
guards. If they have been removed for assembly or
inspection, reinstall and check for security.
h. Review all prime mover manufacturer’s pre start-up
instructions, and insure that all recommended steps
and procedures have been followed.
i. Remove any paint masking material from the
generator nameplate and warning/caution decals.
Initial Start-Up
The following procedure should be followed for starting-
up the generator set for the first time:
a. The generator output must be disconnected from
the load. Be sure that the main circuit breaker or
fused disconnect is in the open position.
b. Open the input power to the automatic voltage
regulator (AVR). Remove the fuse or disconnect and
insulate one of the AVR input power leads (see AVR
manual)
c. Insure that all prime mover manufacturer’s pre-start-
up and start-up procedures have been followed.
d. Start the prime mover, and adjust it for proper speed
(frequency). (See generator nameplate.)
e. The purpose of this initial test with the AVR out of
the circuit is to detect any wiring mistakes without
exposing the unit to undue risk. Check all Line-
to-Line and Line-to-Neutral voltages for balanced
voltage. At this point, with the AVR de-energized,
the residual voltage should be about 10% to 25% of
rated value. If voltages are unbalanced, shut down
the equipment and check for improper wiring. Re-
start the set, and again check for voltage balance. If
the problem persists, consult the factory. If everything
checks good, shut down the set and reconnect the
AVR. It is recommended that the residual voltage,
together with driver rpm, be recorded for use as a
future troubleshooting benchmark
f. Start the set and adjust the terminal voltage to
the desired value by means of the AVR voltage
adjustment device. If the AVR is equipped with a
stability adjust, follow the instructions in the AVR
manual to adjust the stability. Again, check all line-
to-line and line-to-neutral voltages for balance.
It is recommended practice to record the no load
excitation (DC voltage across F+ and F-) together
with line-to-line voltage and driver rpm as a bench
mark for future troubleshooting
THIS PROCEDURE MUST BE CONDUCTED BY
QUALIFIED ELECTRICAL PERSONNEL. LETHAL
VOLTAGE MAY WELL BE PRESENT AT BOTH. THE
GENERATOR AND VOLTAGE REGULATOR TERMINALS
DURING THIS PROCEDURE. CAUTION MUST BE
EXERCISED NOT TO COME INTO PERSONAL
CONTACT WITH LIVE TERMINALS, LINKS, OR STUDS.
SERIOUS INJURY OR DEATH COULD RESULT.
g. Close the main circuit breaker to the load. If the unit
is equipped with space heaters, insure that they are
turned off.
h. Monitor the generator output current to verify that it
is at or below nameplate value.
i. Check generator frequency (speed) under load.
Adjust as necessary. (Refer to prime mover/governor
manuals)
5

Shut down procedures.
There are no specific instructions for shut down of the
generator; however, several good engineering practices
should be observed to prolong equipment life.
a. It is advisable to disconnect all loads (open main
circuit breaker or disconnect) prior to shut down.
This is especially important if loads can be damaged
by low voltage and/or frequency conditions during
generator “coast down”.
b. Isolate any condition that could allow the generator
to see a voltage at its terminals while at rest.
Failure to do this could result in personnel injury or
equipment damage
MAINTENANCE
Routine Maintenance
Your Marathon Pancake generator has been designed to
be as reliable and trouble free as is possible. However,
costly repairs and down time can be minimized by
operating the unit under conditions that are compatible
with those at which the equipment was designed to
operate (See OPERATION section). The following
maintenance procedures should be followed to insure
long equipment life and satisfactory performance
a. Routinely check intake and exhaust air screens to
insure that they are clean and free of debris. Clogged
intake air screens will reduce cooling airflow and
may result in the unit operating at dangerously
high temperatures which reduce the generator’s
life. This inspection and cleaning should be done in
conjunction with prime mover air filter cleaning and/
or change-out
b. Periodically (approximately every one thousand
[1000] operating hours) check the bearing(s). Pancake
generators are equipped with prelubricated-for-life
bearings which do not require routine lubrication.
c. Periodically inspect the unit for buildup of
contamination (dirt, oil, etc.) on the windings. If
the wound components have become coated with
heavy concentrations of oil and grime, the unit
should be disassembled and thoroughly cleaned.
This operation is not one that can be accomplished
effectively on site, but rather one that should
be conducted by an authorized service center
equipped with the appropriate apparatus and
solvents necessary to properly clean and dry the
generator.
d. Periodically, about once every 2000 operating
hours, or in conjunction with scheduled engine
maintenance, check the DC no load excitation
voltage. Compare this voltage with the value
recorded during initial startup. If this value of no
load excitation voltage is markedly higher than the
benchmark reading, it is an indication of problems
in either the exciter field, main field, or possibly the
rotating rectifier assembly. Insure that voltage and
rpm is the same as initial test condition.
Drying Generator Windings
Generators in service may inadvertently have their
windings exposed to splashing or sprayed water. Units
that have been in transit or storage for long periods of
time may be subjected to extreme temperature and
moisture changes causing excessive condensation.
Regardless of the source of moisture, wet windings
should be thoroughly dried out before operating the
unit. If this precaution is not taken, serious damage to
the generator can result. The following procedures may
be used to effectively dry the unit’s windings:
a. Electric space heaters can be installed inside the
generator frame. When energized from a power
source other than the generator itself, they will heat
and dry the inside of the generator. If an alternate
source of electricity is not available, enclose the unit
with a covering, and insert heating units to raise the
machine’s temperature 15°F to 18°F (8°C to 10°C)
above the outside temperature. Leave a hole at
the top of the enclosure to permit the escape of
moisture
b. If the windings are damp, but not saturated, run the
set for approximately 1 to 2 hours with excitation
off (AVR power supply open). If the windings have
been saturated, a portable air heater can be used
by directing heat into the air intake openings, and
running the set with no load and the excitation off
for several hours. Heat at point of entry should not
exceed 150°F (66°C).
SERVICE
General
The service procedures given in this section are
those which can reasonably be conducted on-site
with a minimum of special tools and equipment. All
service procedures should be conducted by qualified
maintenance personnel.
6

Restoring Residual Magnetism (Flashing the Exciter
Field)
To restore the small amount of residual magnetism
necessary to begin voltage buildup, connect a 12-volt
battery to the exciter field while the generator set is at
rest as follows:
a. Remove exciter field leads F+ and F- from the AVR.
Failure to remove the exciter field leads from
the automatic voltage regulator during flashing
procedures may destroy the regulator.
b. Connect exciter field lead F+ to the positive pole
of the battery. Holding the F- lead by the insulated
portion of the lead wire, touch exciter field lead F-
to the negative pole of the battery for about 3 to
5 seconds. Remove the lead . You should see an
inductive arc. If no arc is drawn when removing the
F- lead, repeat the procedure.
c. Reconnect F+ and F- to the AVR, re-start the unit,
and observe voltage build-up. Repeat the procedure
if build-up fails to develop.
Testing the Rotating Rectifier Assembly
The complete assembly consists of two semi-circular sub-
assemblies (see Figure 2). The half assembly having white
leads on the diodes contains three “Forward” stud type
diodes, and the half assembly having black leads on the
diodes contains three “Reverse” stud type diodes.
The diodes may be tested in the field without removing
them from the heat sinks. Electrically isolate the
individual diodes by removing each of exciter rotor lead
flag terminals from the quick connect diode terminals,
and remove the two main rotor leads from the main rotor
terminal posts. Test each sub-assembly separately. An
ohmmeter or a battery light continuity tester may be used
to find an open or shorted condition in the diode. Place
one tester probe on the main post. In succession, touch
the other test probe to each diode terminal. Reverse the
probes and repeat the procedure. You have now tested
the three diodes on this sub-assembly. Repeat the test
on the second sub-assembly. These tests should indicate
one of three conditions:
a. Good diode: Will have a much greater resistance
in one direction than the other. Typical reverse
resistance will be 30,000 - 300,000 ohms or greater,
while typical forward resistance will be less than 10
ohms. The battery-light tester will have the light
“on” in one direction, and “off” in the other.
b. Shorted condition: Ohmmeter reading will be zero
or very low in both directions. The continuity tester
will have the light “on” in both directions.
c. Open condition: Ohmmeter will have a maximum
(infinity) reading in both directions. Continuity tester
light will be dark (off) in both directions.
Diode failure after approximately a 25
hour “run-in” period is generally traceable
to external causes such as lightning
strike, over-heating, reverse current fed
into the unit, line voltage spikes, etc.
All 6 diodes are essentially in the same
circuit. When one or more diodes have
been stressed to failure, there is no easy
method to determine how badly stressed
the remaining diodes may have been.
Therefore, to avoid possible continued
failures and increased down time, it is
recommended practice to replace the
entire assembly rather than to replace
only the individual failed diodes. If the
rectifier assembly is to be repaired, the
assembly must be removed from the unit.
BLACK LEADS FROM EXCITER ROTOR TO
CONNECT TO RECTIFIER MTG PLATE ASY
HAVING THE "BLACK" MARKED SCREW END
WHITE LEADS FROM EXCITER ROTOR TO
CONNECT TO RECTIFIER MTG PLATE ASY
HAVING THE "RED" MARKED SCREW END
REF. LEAD No.
(RED) SCREW END
(BLACK) SCREW END
Figure 2 - Rotating Rectifier Assembly
7

SPARE PARTS
Always include the name of the part, the quantity of each
part ordered, and the serial and model numbers from the
generator nameplate when ordering parts. For ordering
information, contact:
Marathon
100 E. Randolph St
P.O.Box 8003
Wausau, WI 54402-8003
Phone: 715.675.8257 (or) 800.477.6362, ext. 8257
RETURNED GOODS
Consult Marathon at the address above for authorization
prior to returning any product. We cannot be responsible
for any items returned without authorization.
Single bearing generators must have their rotor
assembly properly secured to prevent damage during
transit to the factory or to an authorized service
center
TROUBLESHOOTING PROCEDURES
General
This section is intended to suggest a systematic approach
to locating and correcting generator malfunctions. The
section is arranged according to the symptoms of the
problem. The steps have been arranged in an attempt
to (1);do the easy checks first, and (2); prevent further
damage when troubleshooting a disabled machine.
HIGH VOLTAGES MAY BE PRESENT AT THE
GENERATOR TERMINALS WHEN THE UNIT IS
RUNNING. TOOLS, CLOTHING, AND YOUR BODY
MUST BE KEPT CLEAR OF ROTATING PARTS AND
ELECTRICAL CONNECTION.
SPECIAL PRECAUTION MUST BE TAKEN DURING
TROUBLESHOOTING SINCE PROTECTIVE COVERS
AND SAFETY DEVICES MAY BE REMOVED OR
DISABLED TO GAIN ACCESS AND MAKE TESTS. BE
CAREFUL. SERIOUS PERSONAL INJURY OR DEATH
CAN RESULT FROM THESE HAZARDS! CONSULT
QUALIFIED PERSONNEL WITH ANY QUESTIONS.
Speed Deviations
The generator speed should be maintained at
rated nameplate value during all operating tests. The
frequency of the generator depends upon rotative speed.
Most AVRs used with our Pancake generators have built
in underfrequency protection such that if the speed is
reduced more than 5%, the voltage will drop off rather
rapidly with further reductions in speed (see AVR Manual.
PRODUCT SPECIFICATIONS
Model No
Standard
AVR
kW Hz
Exciter
Stator Ω
Exciter
Rotor Ω
Main Stator
Main
Rotor Ω
L-L Res. Ω
(Series)
E1-E4
Res. Ω
331CSA/CSB3018 SE350EL 8 60 23.7 0.49 0.5 0.5 1.48
332CSA/CSB3020 SE350EL 10 60 24.5 0.49 0.395 n/a 1.581
333CSA/CSB3024 SE350EL 15 60 28 0.55 0.2 n/a 1.88
334CSA/CSB3027 SE350EL 17.5 60 31.7 0.55 0.162 n/a 2.08
334CSA/CSB3028 SE350EL 20 60 31.7 0.55 0.162 n/a 2.08
8

SYMPTOM: GENERATOR PRODUCES NO VOLTAGE, OR RESIDUAL VOLTAGE
CAUSE CHECK AND REMEDY
AVR fuse blown. Check fuse with ohmmeter. Replace if bad. Refer to AVR manual.
Voltmeter Off. Check meter selector switch to insure it is not in the Off position.
Defective voltmeter. Check voltage with separate meter at the generator terminals.
AVR is not getting power. Measure voltage at input. If no voltage, check for input line-to-line
residual voltage.
Loss of residual magnetism. Flash the field. See “Restoring Residual Magnetism” on page 7 of
the SERVICE section.
AVR protective circuit is operating. Consult AVR manual.
AVR inoperative. Adjust or replace AVR. Refer to AVR manual.
Open in stator windings. Check for continuity in the windings. Return to factory or take to
service shop if open.
Defective diodes. Check rectifier assembly (page 7). Replace if defective.
Broken or shorted exciter or main rotor leads. Test and repair or replace.
Defective exciter windings. Inspect for damaged or burned exciter or main rotor. Check
resistance with Kelvin bridge. Megger for short to core. Return to
factory or take to service shop to effect repairs.
SYMPTOM: GENERATOR PRODUCES LOW VOLTAGE, NO LOAD
CAUSE CHECK AND REMEDY
Faulty metering. Check voltage with separate meter at generator terminals.
Low Speed. Check driver for proper speed. Adjust as necessary. Check sheave
ratio if belt driven.
Incorrect generator lead connections. Verify generator connection. See drawings supplied with the unit
or appropriate connection diagram in this manual.
Defective connections. Inspect all wiring for grounds, open circuits, short circuits, or
loose/dirty connections.
AVR adjustments. Adjust AVR per AVR manual. Check exciter field voltage.
Faulty diodes. Check rectifier assembly (page 9). Replace if defective.
Faulty main rotor. Check main rotor pole windings. If winding appears to bulge
mid-way down body of pole, refer to service shop, or return to
factory for service.
SYMPTOM: GENERATOR PRODUCES LOW VOLTAGE WHEN LOAD APPLIED
CAUSE CHECK AND REMEDY
Driver speed droop, or belt slip. Check driver. If belt driven, check belt tension. Check “corner
frequency” on AVR. Under frequency voltage roll-off may be acti-
vated.
Excessive load. Reduce load. The load on each leg should be as evenly
balanced as possible, and it should not exceed rated current on
any leg.
Line voltage drop. If voltage is proper at generator terminals, but low at load
terminals, increase external lead size. This is especially true if
external leads are long.
Low load power factor. Reduce lagging power factor load. Some AC motors draw approx-
imately the same current regardless of load. Do not use motors of
larger capacity than is necessary to carry the load.
9

SYMPTOM: GENERATOR PRODUCES FLUCTUATING VOLTAGE (May be indicated by light flicker)
CAUSE CHECK AND REMEDY
Irregular engine speed. Check engine for malfunction, or load for fluctuation
AVR stability. Adjust AVR stability. Refer to AVR manual.
Loose terminal or load connections. Make better connection both mechanically and electrically.
Defective bearing causing uneven air gap. Replace worn bearing. Check bearing bore in the bearing bracket
for wear. Replace as necessary.
SYMPTOM: GENERATOR PRODUCES HIGH VOLTAGE
CAUSE CHECK AND REMEDY
Faulty metering. Check voltage with separate meter at generator terminals.
Excessive speed. Check engine for malfunction. If belt driven, check sheave ratio.
Incorrect connections. Verify generator connections. Refer to drawings supplied with unit
or with drawings in this manual.
Incorrect AVR sensing. Consult AVR manual.
AVR adjustments. Adjust AVR (consult AVR manual).
Defective AVR. Replace AVR.
SYMPTOM: GENERATOR IS OVERHEATING
CAUSE CHECK AND REMEDY
Generator is overloaded. Reduce load. Check with ammeter and compare with nameplate
rating.
Clogged ventilating screens. Clean air passages.
High ambient temperature or altitude. Improve ventilation, or reduce load.
Insufficient circulation of cooling air. Provide cross-ventilation.
Dry bearing. Replace bearing.
SYMPTOM: GENERATOR PRODUCES MECHANICAL NOISE
CAUSE CHECK AND REMEDY
Defective bearing. Replace bearing.
Loose or misaligned coupling. Tighten or realign.
Belt slap or loose guards. Check belt tensioning. Check belt guard fasteners.
SYMPTOM: GENERATOR PRODUCES SHOCK WHEN TOUCHED
CAUSE CHECK AND REMEDY
Static charge. Ground generator frame.
Grounded armature or field coil. Take to service shop or return to factory for repair.
10

G:\Marketing_Generators\ProductApplicationData‐SmallGenerators\ServicePro cedures‐WordFiles\Pancake\AVR\PancakeGeneratorTrouble
ShootingGuide(SP0022).docx3/8/2016TRS
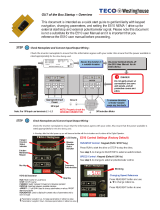
Trouble Shooting Pancake Generators
The Marathon PANCAKE is a 4 lead, brushless, AVR regulated generator. They are small, dedicated,
single phase generators between 8kW – 20kW. Normal output voltage is either 240Vac or 120Vac. A
complete listing of models and specifications is included at the end of this trouble shooting guide.
An PANCAKE generator is simple to trouble shoot with 6 main components: the exciter stator and
exciter rotor windings, a voltage regulator, a rectifier assembly, and the main stator and main
rotor windings. For tools you will need a good multi-meter – a Fluke works very well – a ratchet set,
and a set of screwdrivers. You can make an analog style meter work as well.
Figure1
This trouble shooting guide is intended to address the most common causes of low or no output
voltage, usually 5V – 25V either Line-to-Line or Line-to-Neutral as measured at the generator output
terminal strip located in the connection box mounted on top of the generator.
If the generator has been sitting, unused, for 3 – 6 months, or longer it may have lost its residual
magnetic field required to build voltage. If you suspect this is the case, refer to the section on
Restoring Residual Magnetism near the end of this trouble shooting guide.
Start trouble shooting in the connection box mounted on the top of the generator. It gives easy access
to the exciter stator leads ( F+ & F- ) especially when the generator is mounted in a gen-set.

G:\Marketing_Generators\ProductApplicationData‐SmallGenerators\ServicePro cedures‐WordFiles\Pancake\AVR\PancakeGeneratorTrouble
ShootingGuide(SP0022).docx3/8/2016TRS
SAFETY NOTE – Dangerous Voltage May Be Present During Testing
Step 1 : Check Exciter Stator Continuity and Resistance
SAFETY NOTE –Testing the exciter stator must be done with the gen-set shut down.
Disconnect exciter stator leads F+ & F- from the voltage regulator – white leads in Figure 2.
Using digital multimeter or analog meter check continuity between F+ & F-. If you have NO
continuity between F+ & F- , you have a failed exciter stator winding.
Switch meter to auto-ranging Ohms setting check continuity between F+ and generator ground.
You should have at least 5-10 megOhms of resistance between the exciter stator and ground. A
new unit will have > 100 megOhms or more. If you HAVE continuity between F+ and
generator ground, or < 5 megOhms of resistance, you have a failed exciter stator
winding.
Figure2
Using digital multimeter or analog meter, switch meter to auto-ranging Ohms setting and check
resistance between F+ & F-. Refer to Specifications Table for resistance by model.
If exciter stator resistance does not match table value within ± 5 Ohms, you have a failed
exciter stator winding.
Failed exciter stator cannot be repaired. Replace Exciter Stator

G:\Marketing_Generators\ProductApplicationData‐SmallGenerators\ServiceProcedures‐WordFiles\Pancake\AVR\PancakeGeneratorTrouble
ShootingGuide(SP0022).docx3/8/2016TRS
Step 2 : Constant Excitation Test
SAFETY NOTE – The Constant Excitation test MUST be done with the gen-set running.
Disconnect exciter stator leads F+ & F- from the voltage regulator – white leads in Figure 1 and
observing polarity, connect to a 12V battery. The gen-set starting battery can be used as the
source of constant excitation.
Run the get-set, no-load with all breakers switched off. Measure output voltage at terminals 1 &
3 shown in Figure 1. A well-charged battery should give full output voltage – 240Vac or 120Vac
depending on generator connection – or possibly a bit more. Voltage should be equally
balanced L1 - N and L2 – N.
Possible Constant Excitation Test Results
Test Voltage Possible Corrective Action
216 – 252
Or
108 – 126
Output voltage is within expected range. Exciter stator appears good.
Voltage Regulator has failed and must be replaced.
≤ 200
Or
≤ 100
Output voltage is below expected range. Exciter stator appears good.
One or more diodes have failed. Replace Exciter Rotor and Integral
Rectifier Assembly.
≤ 50
Multiple component failures. Replace generator.
Unbalanced Voltage
Main stator has failed. Replace generator.
Step 3 : Check the Main Stator Winding
The main stator windings are very low resistance which makes them difficult to test. Set meter
to the lowest possible Ohms scale. Connect one side to T1 and the other side to T3 – Black
Leads in Figure 1. You must have good continuity and should have a resistance reading
between .1 to .5 Ohms. Refer to Specifications Table for resistance by model.
If you have NO continuity or you have a significantly higher ohm reading – anything higher than
about 2 ohms you have a failed main stator winding.
Set meter to the highest possible Ohms scale. Check for continuity between T1 & T3 and the
ground terminal. Resistance should be greater than 2 megohms or infinite. If you have continuity
or < 2 megOhms resistance between the main stator leads and the ground terminal the main
stator is faulted to ground.
Failed main stator windings cannot be repaired. Replace generator.
If testing STEPS 1 - 3 have not found any faults or defects, move to the opposite drive end of the
generator to check the diodes on the rectifier assembly. You will need to remove the back cover to gain
access to the rectifier assembly which is integral with the exciter rotor. It is not necessary to remove
the exciter rotor.

G:\Marketing_Generators\ProductApplicationData‐SmallGenerators\ServicePro cedures‐WordFiles\Pancake\AVR\PancakeGeneratorTrouble
ShootingGuide(SP0022).docx3/8/2016TRS
Step 4 : Checking Diodes / Rectifier Assembly
The diodes may be tested in place. The White leads connect to three FORWARD stud type
diodes, and the Black leads connect to three REVERSE stud type diodes.
Remove each of the exciter rotor leads from the quick-connect diode terminals and remove the
mail rotor leads from the main rotor terminals – note location of each for proper reassembly.
Figure3
Multimeter Diode Test : Switch multimeter to diode test mode, place one lead on the top of a
diode, the other lead in contact with corresponding main terminal post. Test each of the three
FORWARD diodes in turn. Reverse test leads and repeat. A good diode will have no voltage
reading in one direction and 0.4 – 0.5Vdc in the other.
Repeat testing procedure for the three REVERSE diodes.
No voltage in either direction or voltage in both directions indicates a failed diode.
OR
Analog Meter: Place one lead on top of a diode, the other lead in contact with corresponding
main terminal post. Test each of the three FORWARD diodes in turn. Reverse test leads and
repeat. A good diode will have much greater resistance in one direction. Typical forward
resistance is under 100 Ohms. Typical resistance in the reverse direction is over 30,000 ohms.
Repeat testing procedure for the three REVERSE diodes.
Continuity with little or no resistance in both directions or very high resistance in both
directions indicates a failed diode.
Failed diodes must be replaced. Replace Integral Rectifier Assembly.

G:\Marketing_Generators\ProductApplicationData‐SmallGenerators\ServicePro cedures‐WordFiles\Pancake\AVR\PancakeGeneratorTrouble
ShootingGuide(SP0022).docx3/8/2016TRS
Field Flashing / Restoring Residual Magnetism
If the generator has been sitting, unused, for 3 – 6 months, or longer it may have lost its residual
magnetic field required to build voltage.
12V Dynamic Field Flash
SAFETY NOTE
– The Dynamic Field Flash MUST be done with the gen-set running.
Disconnect sensing & power leads 3 & 4 from the voltage regulator – black leads in Figure 4.
Insulate and isolate leads for safety.
Disconnect exciter stator leads F+ & F- from the voltage regulator – white leads in Figure 4 and
observing polarity, connect to a 12V battery. The gen-set starting battery can be used.
Run the get-set, no-load with all breakers switched off. Measure output voltage at terminals 1 &
3 shown in Figure 4. A well-charged battery should give full output voltage – 240Vac or 120Vac
depending on generator connection – or possibly a bit more.
If output voltage comes up to normal range, run generator for 15 minutes to build residual
magnetism.
Figure4

G:\Marketing_Generators\ProductApplicationData‐SmallGenerators\ServiceProcedures‐WordFiles\Pancake\AVR\PancakeGeneratorTrouble
ShootingGuide(SP0022).docx3/8/2016TRS
Pancake Generator Specifications
Current Production Models - 3/2/16
Model No
Standard
AVR
kW Hz
Exciter
Stator
Ω
Exciter
Rotor
Ω
Main Stator
Main
Rotor Ω
L-L Res. Ω
(Series)
331CSA / CSB3018 SE350EL 8 60 23.7 0.49 0.50 1.48
332CSA / CSB3020 SE350EL 10 60 24.5 0.49 0.395 1.58
333CSA / CSB3024 SE350EL 15 60 28 0.55 0.20 1.88
334CSA / CSB3027 SE350EL 17.5 60 31.7 0.55 0.162 2.08
334CSA / CSB3028 SE350EL 20 60 31.7 0.55 0.162 2.08
334CDA3028 SE350EL 20 60 31.7 0.55 0.162 2.08
Legacy Models - 3/2/16
Model No
Standard
AVR
kW Hz
Exciter
Stator
Ω
Exciter
Rotor
Ω
Main Stator
Main
Rotor Ω
L-L Res. Ω
(Series)
331RSA / RSB3002 VR63-4A 8 60 23.7 0.49 0.50 1.48
332RSA / RSB3004 VR63-4A 10 60 24.5 0.49 0.395 1.58
333RSA / RSB3008 VR63-4A 15 60 28 0.55 0.20 1.88
334RSA / RSB3010 VR63-4A 17.5 60 31.7 0.55 0.162 2.08
334RDA3028 VR63-4A 20 60 31.7 0.55 0.162 2.08
332CSA5204 VR63-4A 10 60 24.1 0.47 0.39 1.61
333CSA / CSB5205 VR63-4A 15 60 28 0.55 0.202 1.94
334CSA / CSB5207 VR63-4A 17.5 60 28 0.54 0.169 2.08
337CSB5209 VR63-4A 20 60 28.6 0.56 0.143 2.36
332RSA5017 VR63-4A 10 60 24.1 0.47 0.39 1.61
333RSA / RSB5048 VR63-4A 15 60 28 0.55 0.202 1.94
334RSA5003 VR63-4A 17.5 60 28 0.54 0.169 2.08
337RSB5012 VR63-4A 20 60 28.6 0.56 0.143 2.36

This document is not intended to provide operational instructions. Appropriate Marathon instructions provided with the generator and
precautions attached to the generator should be read carefully prior to installation, operations and/or maintenance of the equipment. Injury
to personnel or generator failure may be caused by improper installation, maintenance or operation.
The following and information is supplied for your protection and to provide you with many years of
trouble free and safe operation of your Marathon generator.
• Buyer shall be solely responsible for determining the adequacy of the product for any and all uses to which Buyer shall apply
the product. The application by Buyer shall not be subject to any implied warranty of fitness for a particular purpose.
• For safety, Buyer or User should provide protective guards over all shaft extensions and any moving apparatus mounted
thereon. The User is responsible for checking all applicable safety codes in his area and providing suitable guards. Failure
to do so may result in bodily injury and/or damage to equipment.
• Hot oil can cause severe burns. Use extreme care when removing lubrication plugs.
• Disconnect power and lock out drive equipment before working on a generator.
• Always keep hands and clothing away from moving parts.
• The lifting eyes on the generator are not to be used to lift the entire generator set. Only the generator may be safely lifted
by the lifting eyes. Do not use the conduit box for lifting or support of the generator.
• Install and ground the generator per local and national codes.
• Discharge all capacitors before servicing the generator.
• Misapplication of a generator in a hazardous environment can cause fire or an explosion and result in serious injury.
• Never attempt to measure the temperature rise of a generator by touch. Temperature rise must be measured by
thermometer, resistance, imbedded detector or thermocouple.
• Operation of a generator at higher than its nameplate ratings may result in fire, damage to equipment or serious injury to
personnel.
• Do not apply any force to the generator fan when rotating the generator rotor.
• Mounting bolts should be routinely checked to ensure that the unit is firmly anchored for proper operation.
• Consult qualified personnel with questions. All electrical repairs must be performed by trained and qualified personnel only.
• Generators should not be operated faster than their rated speed.
• For inverter applications, follow the inverter manufacturer’s installation guidelines.
• Make sure the generator is properly secured and aligned before operation.
• When installing the generator, insure that loose parts or tools do not fall inside the generator.
• When connecting the generator, be sure to follow the correct wiring diagram for the desired voltage. Insure that the
voltage regulator is connected per the wiring diagram.
RESALE OF GOODS
In the event of the resale of any of the goods, in whatever form, Resellers/Buyers will include the following language in a conspicuous place and in
a conspicuous manner in a written agreement covering such sale:
The manufacturer makes no warranty or representations, express or implied, by operation of law or otherwise, as to the
merchantability or fitness for a particular purpose of the goods sold hereunder. Buyer acknowledges that it alone has
determined that the goods purchased hereunder will suitably meet the requirements of their intended use. In no event will the
manufacturer be liable for consequential, incidental or other damages. Even if the repair or replacement remedy shall be deemed
to have failed of its essential purpose under Section 2-719 of the Uniform Commercial Code, the manufacturer shall have no
liability to Buyer for consequential damages.
Resellers/Buyers agree to also include this entire document including the cautions and warnings above in a conspicuous place and in a
conspicuous manner in writing to instruct users on the safe usage of the product.
This information should be read together with all other printed information supplied by Marathon.
For more information contact: Marathon, Regal Beloit America, Inc., 100 E. Randolph St., Wausau, WI 54401
Phone: 715-675-3359 or Fax: 715-675-8026
IMPORTANT INFORMATION
Please Read Carefully
WARNING
CAUTION
WARNING
CAUTION
WARNING
CAUTION
11

NOTES
12

PANCAKE GENERATOR
Installation, Operation
and Maintenance Manual
A Regal Brand
A Regal Brand
100 E. Randolph Street (54401)
PO Box 8003
Wausau, WI 54402-8003 U.S.A.
PH: 715-675-3359
FAX: 715-675-8026
www.marathonelectric.com
©2015 Regal Beloit Corporation MANUAL GPN016 7892J-NP/???/07-15/??? Printed in the U.S.A.
/