Page is loading ...

2600T Series Pressure Transmitters
266 Models
FOUNDATION Fieldbus
Operating Instruction OI/266/FF-EN Rev. B
Engineered solutions for all
applications

2 OI/266/FF-EN Rev. B | 2600T Series Pressure transmitters
The Company
We are an established world force in the design and manufacture of measurement products for industrial process control, flow
measurement, gas and liquid analysis and environmental applications.
As a part of ABB, a world leader in process automation technology, we offer customers application expertise, service and support
worldwide.
We are committed to teamwork, high quality manufacturing, advanced technology and unrivalled service and support.
The quality, accuracy and performance of the Company’s products result from over 100 years experience, combined with
acontinuous program of innovative design and development to incorporate the latest technology.

2600T Series Pressure transmitters | OI/266/FF-EN Rev. B 3
Contents
Index
1. Introduction ........................................................... 5
1.1 Instruction manual structure ......................................5
1.2 Models covered by this manual..................................5
1.3 Product description ...................................................5
2. Safety .................................................................... 6
2.1 General safety information .........................................6
2.2 Improper use ............................................................6
2.3 Technical limit values .................................................6
2.4 Warranty prevision ....................................................6
2.5 Use of instruction ...................................................... 6
2.6 Operator liability ........................................................ 7
2.7 Qualified personnel ...................................................7
2.8 Returning devices .....................................................7
2.9 Disposal ...................................................................7
2.10 Information on WEEE Directive 2002/96/EC .............7
2.11 Transport and storage .............................................7
2.12 Safety information for electrical installation ...............7
2.13 Safety information for inspection and maintenance ...7
3. Transmitter overview ............................................. 8
3.1 Transmitter components overview .............................. 8
3.2 Range & Span consideration .....................................9
4. Opening the box .................................................. 10
4.1 Identification ........................................................... 10
4.2 Optional wired-on SST plate (I1) ..............................11
4.3 Handling .................................................................11
4.4 Storage ..................................................................11
5. Mounting ............................................................. 12
5.1 General ..................................................................12
5.2 IP protection & designation ......................................12
5.3 Mounting the transmitter .........................................12
5.3.1 Transmitter factory configuration consideration . 12
5.3.2 Hazardous area considerations ........................ 12
5.4 Pressure Equipment Directive (PED) (97/23/CE) ........13
5.4.1 Devices with PS >200 ......................................13
5.4.2 Devices with PS ≤200 bar ................................13
5.5 Mounting a DP sensor transmitter ...........................13
5.5.1 Bracket mounting (optional) .............................. 14
5.5.2 B2 Pipe and wall mounting bracket details ........17
5.5.3 B5 Flat type bracket details ..............................18
5.6 Mounting a P style pressure transmitter ...................19
5.6.1 B1 and B2 Barrel housing bracket details .......... 21
5.6.2 B2 DIN Housing bracket details ........................22
5.7 Transmitter housing rotation ....................................23
5.8 Integral display rotation ...........................................23
5.9 Impulse piping connection for standard instruments .23
5.10 Process connections considerations ......................24
5.11 Kynar inserts connection .......................................24
5.12 Screw torques for models with Kynar inserts ..........24
5.13 Installation recommendations ................................25
5.13.1 Steam or clean liquids flow measurement ........ 25
5.13.2 Gas or liquid flow measurement ......................25
5.13.3 Level measurements on closed tanks (dry leg) .26
5.13.4 Level measurement on closed tanks (wet leg) ..26
5.13.5 Liquid level measurement with open tanks .......26
5.13.6 Pressure measurement of a tank ..................... 27
5.13.7 Pressure measurement of a liquid in a pipe ......27
5.13.8 Pressure measurement of vapor in a pipe ........28
5.13.9 Pressure measurement of a gas in a pipe ........28
6. Device introduction ............................................. 29
6.1 Fieldbus Foundation communication protocol ...........29
6.2 Feature overview .....................................................29
6.3 Registration details .................................................29
6.4 FF device structure .................................................29
6.5 Device Application Process (DAP) ............................29
6.6 Control Application Process (CAP) ...........................29

4 OI/266/FF-EN Rev. B | 2600T Series Pressure transmitters
Contents
7. Transmitter wiring
................................................ 30
7.1 Cable connection .................................................... 30
7.2 FOUNDATION Fieldbus wiring ..................................30
7.3 Simple FF network and system architecture .............31
7.4 Wiring procedure ....................................................31
7.5 Electrical connection via connectors ........................31
7.6 Grounding ..............................................................32
7.7 Protective Grounding ..............................................32
7.8 Integrated lightning protection (optional)...................32
8. Electronics ........................................................... 33
8.1 Fault protection ......................................................33
8.2 On board switches .................................................. 33
8.3 Factory default configuration ...................................33
9. Local pushbuttons ............................................... 34
9.1 Installing/Removing the external pushbuttons ...........34
9.2 Operations .............................................................34
9.2.1 Wet Ranging operation – SW 3 = 1 ...................35
9.2.2 PV Scaling operation – SW 3 = 0 ......................35
10. HMI local indicator ............................................ 36
10.1 Conventional version (L1 option) ............................36
10.2 TTG (Trough The Glass) version (L5 option) ............36
10.3 Installing/Removing the LCD display ......................36
10.4 Operations ............................................................36
10.5 HMI as Variable Indicator ...................................... 36
10.6 LCD structure .......................................................37
10.7 LCD setting ..........................................................37
10.8 HMI as Diagnostic Indicator ................................... 37
10.8.1 Detailed diagnostic info from HMI....................38
10.9 Activation procedure .............................................38
10.10 HMI as Feedback of the local push button ............38
10.11 HMI as configuration tool .....................................38
10.12 LCD (L1 option) Activation considerations. ...........38
10.13 TTG (L5 option) Activation considerations.............38
10.14 Activation procedure for TTG (L5) and LCD (L1) .... 38
10.15 HMI menu structure ............................................39
11. Maintenance ...................................................... 45
11.1 Returns and removal .............................................45
11.2 Pressure transmitter sensor ...................................45
11.3 Removing/Installing the process flanges ................. 45
11.4 Pressure transducer replacement ...........................46
12. Hazardous Area considerations ........................ 47
12.1 Ex Safety aspects and IP Protection (Europe) .........47
12.1.1 Entities for “L5” option ...................................51
12.2 Ex Safety Aspects (North America) .........................51
12.2.1 Applicable standards ...................................... 51
12.2.2 Classifications ................................................ 51
Trouble Sheet .......................................................... 52
Return Report .......................................................... 53
EC Declaration of Conformity ................................. 54

2600T Series Pressure transmitters | OI/266/FF-EN Rev. B 5
1 Introduction
1. Introduction
1.1 Instruction manual structure
The present manual provides information on installing, operating,
troubleshooting the 266 pressure transmitter. Every section of
the present manual is specifically dedicated to the specific phase
of the transmitter lifecycle starting from the receipt of the
transmitter and its identification, passing to the installation, to the
electrical connections, to the configuration and to the
troubleshooting and maintenance operations.
1.2 Models covered by this manual
The present manual can be used for all the 266 models with
exception done for the 266C (multivariable version).
1.3 Product description
The pressure transmitters model 266 is a modular range of field
mounted, microprocessor based electronic transmitters,
multiple sensor technologies. Accurate and reliable
measurement of differential pressure, gauge and absolute
pressure, flow and liquid level is provided, in the even most
difficult and hazardous industrial environments. Model 266 can
be configured to provide specific industrial output signals
according to 4...20mA with HART digital communication.

6 OI/266/FF-EN Rev. B | 2600T Series Pressure transmitters
2 Safety notes
2. Safety
2.1 General safety information
The “Safety” section provides an overview of the safety aspects
to be observed for operation of the device.
The device has been constructed in accordance with the state
of the art and is operationally safe. It has been tested and left
the factory in perfect working conditions. The information in the
manual, as well as the applicable documentation and
certificates, must be observed and followed in order to maintain
this condition throughout the period of operation.
Full compliance with the general safety requirements must be
observed during operation of the device. In addition to the
general information, the individual sections in the manual
contain descriptions of processes or procedural instructions
with specific safety information.
Only by observing all of the safety information can you reduce
to the minimum the risk of hazards for personnel and/or
environment. These instructions are intended as an overview
and do not contain detailed information on all available models
or every conceivable event that may occur during setup,
operation, and maintenance work.
For additional information, or in the event of specific problems
not covered in detail by these operating instructions, please
contact the manufacturer. In addition, ABB declares that the
contents of this manual are not part of any prior or existing
agreements, commitments, or legal relationships; nor are they
intended to amend these.
All obligations of ABB arise from the conditions of the relevant
sales agreement, which also contains the solely binding
warranty regulations in full. These contractual warranty
provisions are neither extended nor limited by the information
provided in this manual.
Caution. Only qualified and authorized specialist personnel should
be charged with installation, electrical connection, commissioning,
and maintenance of the transmitter. Qualified personnel are persons
who have experience in installation, electrical wiring connection,
commissioning, and operation of the transmitter or similar devices,
and hold the necessary qualifications such as:
— Training or instruction, i.e., authorization to operate and
maintain devices or systems according to safety engineering
standards for electrical circuits, high pressures, and
aggressive media
— Training or instruction in accordance with safety engineering
standards regarding maintenance and use of adequate safety
systems.
For safety reasons, ABB draws your attention to the fact that only
sufficiently insulated tools conforming to DIN EN 60900 may be
used.
Since the transmitter may form part of a safety chain, we
recommend replacing the device immediately if any defects are
detected. In case of use in Hazardous Area non sparking tools only
must be employed.
In addition, you must observe the relevant safety regulations
regarding the installation and operation of electrical systems,
and the relevant standards, regulations and guidelines about
explosion protection.
Warning. The device can be operated at high levels of pressure and
with aggressive media. As a result, serious injury or significant
property damage may occur if this device is operated incorrectly.
2.2 Improper use
It is prohibited to use the device for the following purposes:
— As a climbing aid, e.g., for mounting purposes
— As a support for external loads, e.g., as a support for pipes.
— Adding material, e.g., by painting over the name plate or
welding/soldering on parts
— Removing material, e.g., by drilling the housing.
Repairs, alterations, and enhancements, or the installation of
replacement parts, are only permissible as far as these are
described in the manual. Approval by ABB must be requested
for any activities beyond this scope. Repairs performed by
ABB-authorized centers are excluded from this.
2.3 Technical limit values
The device is designed for use exclusively within the values
stated on the name plates and within the technical limit values
specified on the data sheets.
The following technical limit values must be observed:
— The Maximum Working Pressure may not be exceeded.
— The Maximum ambient operating temperature may not be
exceeded.
— The Maximum process temperature may not be
exceeded.
— The housing protection type must be observed.
2.4 Warranty prevision
Using the device in a manner that does not fall within the scope
of its intended use, disregarding this manual, using
underqualified personnel, or making unauthorized alterations,
releases the manufacturer from any liability for any resulting
damage. This makes the manufacturer’s warranty null and void.
2.5 Use of instruction
Danger – <Serious damage to health/risk to life>. This message
indicates that an imminent risk is present. Failure to avoid this will
result in death or serious injury.
Caution – <Minor injuries>. This message indicates a potentially
dangerous situation. Failure to avoid this could result in minor
injuries. This may also be used for property damage warnings.
Important. This message indicates indicates operator tips or
particularly useful information. It does not indicate a dangerous or
damaging situation.

2600T Series Pressure transmitters | OI/266/FF-EN Rev. B 7
2 Safety notes
Warning – <Bodily injury>. This message indicates a potentially
dangerous situation. Failure to avoid this could result in death or
serious injury
Attention – <Property damage>. This message indicates a
potentially damaging situation. Failure to avoid this could result in
damage to the product or its surrounding area.
2.6 Operator liability
Prior to using corrosive and abrasive materials for
measurement purposes, the operator must check the level of
resistance of all parts coming into contact with the materials to
be measured.
ABB will gladly support you in selecting the materials, but
cannot accept any liability in doing so.
The operators must strictly observe the applicable national
regulations with regard to installation, function tests, repairs,
and maintenance of electrical devices.
2.7 Qualified personnel
Installation, commissioning, and maintenance of the device
may only be performed by trained specialist personnel who
have been authorized by the plant operator. The specialist
personnel must have read and understood the manual and
comply with its instructions.
2.8 Returning devices
Use the original packaging or suitably secure shipping package
if you need to return the device for repair or recalibration
purposes. Fill out the return form (see the end of the document)
and include this with the device.
According to EC guidelines and other local laws for hazardous
materials, the owner of hazardous waste is responsible for its
disposal. The owner must observe the proper regulations for
shipping purposes.
All devices sent back to ABB must be free from any hazardous
materials (acids, alkalis, solvents, etc.).
2.9 Disposal
ABB actively promotes environmental awareness and has an
operational management system that meets the requirements
of DIN EN ISO 9001:2000, EN ISO 14001:2004, and OHSAS
18001. Our products and solutions are intended to have
minimum impact on the environment and persons during
manufacturing, storage, transport, use and disposal.
This includes the environmentally friendly use of natural
resources. ABB conducts an open dialog with the public
through its publications.
This product/solution is manufactured from materials that can
be reused by specialist recycling companies.
2.10 Information on WEEE Directive 2002/96/EC
(Waste Electrical and Electronic Equipment)
This product or solution is not subject to the WEEE Directive
2002/96/EC or corresponding national laws (e.g., the ElektroG
- Electrical and Electronic Equipment Act - in Germany).
Dispose of the product/solution directly at a specialist recycling
facility; do not use municipal garbage collection points for this
purpose.
According to the WEEE Directive 2002/96/EC, only products
used in private applications may be disposed of at municipal
garbage facilities. Proper disposal prevents negative effects on
people and the environment, and supports the reuse of
valuable raw materials. ABB can accept and dispose of returns
for a fee.
2.11 Transport and storage
— After unpacking the pressure transmitter, check the device
for transport damage.
— Check the packaging material for accessories.
— During intermediate storage or transport, store the
pressure transmitter in the original packaging only.
For information on permissible ambient conditions for storage
and transport, see “Technical data”. Although there is no limit
on the duration of storage, the warranty conditions stipulated
on the order acknowledgment from the supplier still apply.
2.12 Safety information for electrical installation
Electrical connections may only be established by authorized
specialist personnel in accordance with the electrical circuit
diagrams. The electrical connection information in the manual
must be observed; otherwise, the applicable protection type
may be affected. Ground the measurement system according
to requirements.
2.13 Safety information for inspection and
maintenance
Warning – Risk to persons. There is no EMC protection or
protection against accidental contact when the housing cover is
open. There are electric circuits within the housing which are
dangerous if touched. Therefore, the auxiliary power must be
switched off before opening the housing cover.
Warning – Risk to persons The device can be operated at high
pressure and with aggressive media. Any process media released
may cause severe injuries. Depressurize the pipeline/tank before
opening the transmitter connection.
Corrective maintenance work may only be performed by trained
personnel.
— Before removing the device, depressurize it and any
adjacent lines or containers.
— Check whether hazardous materials have been used as
materials to be measured before opening the device.
Residual amounts of hazardous substances may still be
present in the device and could escape when the device is
opened.
— Within the scope of operator responsibility, check the
following as part of a regular inspection:
Pressure-bearing walls/lining of the pressure device
Measurement-related function
Leak-tightness
Wear (corrosion)

8 OI/266/FF-EN Rev. B | 2600T Series Pressure transmitters
3 Transmitter overview
3. Transmitter overview
3.1 Transmitter components overview
Figure 1: Differential pressure transmitter components
Figure 2: Gauge / absolute pressure transmitter components
1
2
1 - LCD display with keypad (L1 option)
2 - TTG display with keypad (L5 option)
3 - Standard LCD display (L9 option)
Important. These two pictures show only two different kinds of transmitters equipped with Barrel type housing. Please consider that DIN
housings are available.
3
1
2
3

2600T Series Pressure transmitters | OI/266/FF-EN Rev. B 9
3 Transmitter overview
3.2 Range & Span consideration
The 2600T Transmitter Specification Sheets provide all
information concerning the Range and Span limits in relation to
the model and the sensor code.
The terminology currently used to define the various
parameters is as follows:
URL: Upper Range Limit of a specific sensor. The highest
value of the measured value that the transmitter can
be adjusted to measure.
LRL: Lower Range Limit of a specific sensor. The lowest
value of the measured value that the transmitter can
be adjusted to measure.
URV: Upper Range Value. The highest value of the
measured value to which the transmitter is calibrated.
LRV: Lower Range Value. The lowest value of the
measured value to which the transmitter is calibrated.
SPAN: The algebraic difference between the Upper and
Lower Range Values. The minimum span is the
minimum value that can be used without degradation
of the specified performance.
TD: (or Turn Down Ratio)is the ratio between the
maximum span and the calibrated span.
The transmitter can be calibrated with any range between the
LRL and the URL with the following limitations:
LRL ≤ LRV ≤ (URL - CAL SPAN)
CAL SPAN ≥ MIN SPAN
URV ≤ URL

10 OI/266/FF-EN Rev. B | 2600T Series Pressure transmitters
4 Opening the box
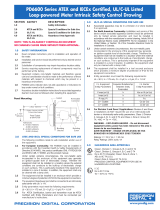
Figure 3: Product identification
Local keys below label
PRODUCT CODE
SEAL-H
SEAL-L
SPEC.REQUEST
LRL/URL
SPAN LIMITS
POWER SUPPLY
OUTPUT SIGNAL
ABB S.p.A.
Made in Italy
TS
PS
SERIAL\NUMBER
SENSOR DIAPH.-FILL
FLANGE/CONN.-GASKET/S
H DIAPH.-FILL
L DIAPH.-FILL
SEAL
HW Rev.
MD:
PED:
MWP/OVP
IS/Sec. Intrinseque (Entity) CL I, ZONE 0 AEx/Ex ia IIC T6,T5,T4
CL I/DIV1/GP ABCD IS - CL II/DIV1/GP EFG - CLIII DIV1 when
conn. per dwg DH 3173 ENCL 4X "FISCO Field Instrument"-"DUAL SEAL"
II 1 G Ex ia IIC T6 - II 1/2 G Ex ia IIC T6 -
II 1 D Ex iaD 20 T85°C and II 1/2 D Ex iaD 21 T85°C
for electrical parameters see cert. FM09ATEX0024X
IP67 - IECEx FME09.0003X "FISCO Field Instrument"
II 3 G Ex nL IIC T6 - II 3 D Ex tD A22 IP67 T85°C
Ui = 42Vdc Ii < 25mA Ci < 13nF Li < 0,22mH
for electrical parameters see cert. FM09ATEX0025X
IECEx FME09.0004X "FNICO Field Instrument"
General Purpose IP67 Max.Supply Voltage 42 Vdc
XP (US) CL I/DIV1/GP ABCD, DIP CL II, III /DIV1/GP EFG,
XP (Canada) CL I/DIV1/GP BCD, DIP CL II, III /DIV1/GP EFG,
CL I, ZONE 1, AEx/Ex d IIC T4 -50°C<Ta<+85°C
ENCL 4X T AMB=85°C "Seal not required" - "DUAL SEAL"
ABB S.p.A.
Lenno (Co) Italy
0474
0722
APPROVED
FM
II 1/2 G Ex d IIC T6 - II 1/2 D Ex tD A21 IP67
T85°C FM09ATEX0023X - IECEx FME09.0002X
(-50°C<Ta<+75°C) POWER SUPPLY 42 Vdc/2W Max
CUS
CL I, ZONE 2 AEx nC IIC T6,T5,T4
CL I, ZONE 2 Ex nL IIC T6,T5,T4
CL I/DIV2/GP ABCD NIFW when connected per drawing
DH 3173 ENCL 4X "FNICO Field Instrument" - "DUAL SEAL"
APPROVED
FM
CUS
APPROVED
FM
CUS
A
B
C
2600T
Tag
Number
Calib.
Range
PRESSURE TRANSMITTER
4. Opening the box
4.1 Identification
The instrument is identified by the data plates shown in Figure 3.
The certification plate (ref. A): contains the certification related
parameters for use in Hazardous area.
The Nameplate (ref.B) provides information concerning the
model code, maximum working pressure, range and span
limits, power supply , output signal, diaphragms material, fill
fluid, range limit, serial number, maximum process working
pressure (PS) and temperature (TS).
Please refer to the serial number when making enquiries to
ABB service department.
The optional additional SST Tag plate (ref. C - code I2) also
provides customer tag number and calibrated range. The
instrument may be used as a pressure accessory (category III)
as defined by the Pressure Equipment Directive 97/23/EC. In
this case, near the CE mark, you will find the number of the
notified body (0474) that have verified the compliance. 266
pressure transmitters are in compliance with
EMC 2004/108/CE*.
The certification plate (ref.A) shown here is issued by ABB
S.p.A, 22016 Lenno, Italy, with the numbers:
— FM09ATEX0023X or IECEx FME 09.0002X (Ex d)
— FM09ATEX0024X or IECEx FME 09.0003X (Ex ia)
— FM09ATEX0025X or IECEx FME 09.0004X (Ex nL)
CE-Identification number of the notified bodies to Pressure
Equipment Directive: 0474, to ATEX certification: 0722, to
IECEx certification: IT/CES/QAR07.0001/02.
The certification plate (ref.A) shown here may also be issued
for ABB-APR, 32425 Minden, Germany, with the numbers:
— FM09ATEX0068X or IECEx FME 09.0002X (Ex d)
— FM09ATEX0069X or IECEx FME 09.0003X (Ex ia)
— FM09ATEX0070X or IECEx FME 09.0004X (Ex nL)
CE-Identification number of the notified bodies to Pressure
Equipment Directive: 0045, to ATEX certification: 0044, to
IECEx certification: DE/TUN/QAR06.0012/01.
The same certification plate (ref.A) can be issued for ABB India
Limited, 560058 Bangalore, India, with the numbers:
— FM11ATEX0035X (Ex ia)
— FM11ATEX0036X (Ex d)
— FM11ATEX0037X (Ex nL)
CE-Identification number of the notified bodies to ATEX
certification: 1725.
ABB Engineering Limited, Shanghai 201319, P.R. China, can
issue this certification plate (ref. A), as well. The numbers are:
— FM11ATEX0046X or IECEx FMG 11.0019X (Ex ia)
— FM11ATEX0047X or IECEx FMG 11.0018X (Ex d)
— FM11ATEX0048X or IECEx FMG 11.0020X (Ex nL)
CE-Identification number of the notified bodies to ATEX
certification: 1725.
*
C and F sensors on gauge and absolute pressure transmitters are in compliance with IEC61000-4-6 with B criteria

2600T Series Pressure transmitters | OI/266/FF-EN Rev. B 11
4 Opening the box
4.2 Optional wired-on SST plate (I1)
The 266 transmitter can be supplied with the optional “Wired
On Stainless Steel plate” (figure 4) which is permanently laser
printed with a custom text specified in phase of order. The
available space consists in 4 lines with 32 characters per line.
The plate will be connected to the transmitter with a Stainless
Steel wire.
AAAAAAAAAAAAAAAAAAAAAAAAAAAAAAAA
BBBBBBBBBBBBBBBBBBBBBBBBBBBBBBBB
CCCCCCCCCCCCCCCCCCCCCCCCCCCCCCCC
DDDDDDDDDDDDDDDDDDDDDDDDDDDDDDDD
Figure 4: 4-line layout of the optional wired-on Stainless Steel plate
4.3 Handling
The instrument does not require any special precautions during
handling although normal good practice should be observed.
4.4 Storage
The instrument does not require any special treatment if stored
as dispatched and within the specified ambient conditions.
There is no limit to the storage period, although the terms of
guarantee remain as agreed with the Company and as given in
the order acknowledgement.

12 OI/266/FF-EN Rev. B | 2600T Series Pressure transmitters
5 Mounting
5. Mounting
5.1 General
Study these installation instructions carefully before
proceeding. Failure to observe the warnings and instructions
may cause a malfunction or personal hazard. Before installing
the transmitter, check whether the device design meets the
requirements of the measuring point from a measurement
technology and safety point of view.
This applies in respect of the:
— Explosion protection certification
— Measuring range
— Gauge pressure stability
— Temperature
— Operating voltage
The suitability of the materials must be checked as regards
their resistance to the media. This applies in respect of the:
— Gasket
— Process connection, isolating diaphragm, etc.
In addition, the relevant directives, regulations, standards, and
accident prevention regulations must be observed (e.g., VDE/
VDI 3512, DIN 19210, VBG, Elex V, etc.). Measurement
accuracy is largely dependent on correct installation of the
pressure transmitter and, if applicable, the associated
measuring pipe(s). As far as possible, the measuring setup
should be free from critical ambient conditions such as large
variations in temperature, vibrations, or shocks.
Important. If unfavorable ambient conditions cannot be avoided for
reasons relating to building structure, measurement technology, or
other issues, the measurement quality may be affected. If a remote
seal with capillary tube is installed on the transmitter, the additional
operating instructions for remote seals and the related data sheets
must be observed.
5.2 IP protection & designation
The housings for 266 transmitters are certified as conforming
to protection type IP66 / IP67 (according tonIEC 60529) or
NEMA 4X (according to NEMA 250).
The first number indicates the type of protection the integrated
electronics have against the entry of foreign bodies, including
dust.
“6” means that the housing is dust-proof (i.e., no ingress of
dust). The second number indicates the type of protection
the integrated electronics have against the entry of water.
“6” means that the housing is protected against water;
specifically, powerful jets of water under standardized
conditions.
“7” means that the housing is protected against water;
specifically, against the effects of temporary immersion in
water under standardized water pressure and temporal
conditions.
5.3 Mounting the transmitter
5.3.1 Transmitter factory configuration consideration
The 266 pressure transmitter in your hands has been factory
calibrated to reflect the published declared performance
specification; no further calibration is required in normal
condition. ABB typically configures 266 pressure transmitters
according to the user requirements. A typical configuration
includes:
— TAG number
— Calibrated span
— Output linearization
— LCD display configuration
5.3.2 Hazardous area considerations
The transmitter must be installed in hazardous area only if it is
properly certified. The certification plate is permanently fixed on
the neck of the transmitter top housing. The 266 Pressure
Transmitter Line can have the following certifications:
ATEX INTRINSIC SAFETY
— II 1 G Ex ia IIC T4/T5/T6 and II 1/2 G Ex ia IIC T4/T5/T6
— II 1 D Ex iaD 20 T85°C and II 1/2 D Ex iaD 21 T85°C
ATEX EXPLOSION PROOF
— II 1/2 G Ex d IIC T6 and II 1/2 D Ex tD A21 IP67 T85°C
ATEX TYPE “N” / EUROPE:
— II 3 G Ex nL IIC T4/T5/T6 and II 3 D Ex tD A22 IP67 T85°C
COMBINED ATEX, ATEX FM and FM Canada
— See detailed classifications
FM Approvals US and FM Approvals Canada:
— Explosionproof (US): Class I, Div. 1, Groups A, B, C, D
— Explosionproof (Canada): Class I, Div. 1, Groups B, C, D
— Dust ignitionproof: Class II, Div. 1, Groups E, F, G
— Nonincendive: Class I, Div. 2, Groups A, B, C, D
— Intrinsically safe: Class I, II, III, Div. 1, Groups A, B, C, D,
E, F, G
— Class I, Zone 0, AEx ia IIC T6/T4 (FM US)
— Class I, Zone 0, Ex ia IIC T6/T4 (FM Canada)
IEC (Ex):
— See detailed classifications
INTRINSIC SAFETY/CHINA
— NEPSI approval Ex ia IIC T4-T6
FLAMEPROOF/CHINA
— NEPSI approval Ex d IIC T6
GOST (Russia), GOST (Kazakistan), Inmetro (Brazil)
— based on ATEX.

2600T Series Pressure transmitters | OI/266/FF-EN Rev. B 13
5 Mounting
Figure 5: 266 nameplate with PED data
Local keys below label
PRODUCT CODE
SEAL-H
SEAL-L
SPEC.REQUEST
LRL/URL
SPAN LIMITS
POWER SUPPLY
OUTPUT SIGNAL
ABB S.p.A.
Made in Italy
TS
PS
SERIAL\NUMBER
SENSOR DIAPH.-FILL
FLANGE/CONN.-GASKET/S
H DIAPH.-FILL
L DIAPH.-FILL
SEAL
HW Rev.
MD:
PED:
MWP/OVP
Important. This message indicates indicates operator tips or
particularly useful information. It does not indicate a dangerous or
damaging situation.
Important. In case of a High Static differential pressure transmitter,
please notice that the Vent/Drain valves can be configured only on
the process axis (V1).
5.4.2 Devices with PS ≤200 bar
Devices with a permissible pressure PS ≤200 bar correspond
to article 3 paragraph (3). They have not been subject to a
conformity validation. These instruments were designed and
manufactured acc. to SEP Sound Engineering Practices.
5.5 Mounting a DP sensor transmitter
(266DS/266MS/266PS/266DR/266PR/266MR)
The pressure transmitter models 266DS, 266MS and 266PS
can be mounted directly on the manifold. A mounting bracket
for wall or pipe mounting (2” pipe) is also available as an
accessory. For models 266DR, 266PR and 266MR always
mounting brackets should be used. Ideally, the pressure
transmitter should be mounted in a vertical position to prevent
subsequent zero shifts.
Important. If the transmitter is installed inclined with respect to the
vertical, the filling liquid exerts hydrostatic pressure on the
measuring diaphragm, resulting in a zero shift. In such an event, the
zero point can be corrected via the zero push-button or via the “set
PV to zero” command. Please refer to the [configuration section] for
further details. For transmitters without diaphragm seals, please
read the following considerations on the Vent/Drain.
Attention − Potential damage to transmitter. In case of a High
Static differential pressure transmitter (266DSH.x.H) please always
open the equalization valve of the manifold (if installed) before
applying pressure to the transmitter. High Static pressure can
damage the sensor causing a zero shift and a serious decrease of
the total performance in terms of accuracy. In this case, please
perform a full sensor trim.
Figure 6: Drain/vent valves configuration (respectively V1, V2, V3)
5.4 Pressure Equipment Directive (PED) (97/23/CE)
5.4.1 Devices with PS >200
Devices with a permissible pressure PS >200 bar have been
subject to a conformity validation. The data label includes the
following specifications:
It is important to mount the transmitter and to lay the process
piping so that gas bubbles, when measuring liquids, or
condensate when measuring gases, will flow back to the
process and not enter the transmitter measuring chamber.
Optional Vent/drain valves (code V1/V2/V3) on the transmitter
are located on the sensor flanges.
The transmitter has to be positioned so that these drain/vent
valves will be located higher than the taps on liquid service in
order to allow the venting of entrapped gas or below the taps
on gas service in order to allow the air to vent off or
condensate to drain off. For safety reasons, take care of the
drain/vent valves position so that when the process fluid is
removed during the drain/vent operation it is directed down
and away from technicians. It is recommended to mount the
transmitter to prevent this possible source of damage for
unskilled operators.

14 OI/266/FF-EN Rev. B | 2600T Series Pressure transmitters
5 Mounting
5.5.1 Bracket mounting (optional)
Different mounting brackets are available please refer to the relevant installation drawing below:
89 (3.48)
142 (5.59)
(*)
179 (7.02)
91 (3.58)
116 (4.57)
29 (1.14)
18 (0.71)
18 (0.71)
210 (8.28)
11
(0.43)
113 (4.45)
72 (2.83)
66 (2.60) with plug
78 (3.07) with d/v valve
58 (2.28)
55 (2.17)
Figure 7: Differential Pressure Style transmitter with barrel housing installed on a horizontal pipe with optional bracket (B2)
96.8 (3.81)
100 (3.94) for NACE bolting
179 (7.02)
91 (3.58)
145 (5.70)
54 (2.13)
78 (3.07) with d/v valve
29 (1.14)
18 (0.71)
18 (0.71)
210 (8.28)
58 (2.28)
55 (2.17)
66 (2.60) with plug
41.3 (1.63)
65 (2.53)
102 (4.02)
29 (1.12)
9 (0.35)
Figure 8: Differential Pressure Style transmitter (High Static option)

2600T Series Pressure transmitters | OI/266/FF-EN Rev. B 15
5 Mounting
142 (5.59)
(*)
179 (7.02)
91 (3.58)
123 (4.86)
113 (4.43)
29 (1.14)
18 (0.71)
18 (0.71)
210 (8.28)
113 (4.45)
11 (0.43)
72 (2.83)
66 (2.60) with plug
78 (3.07) with d/v valve
58 (2.28)
55 (2.17)
Figure 9: Differential Pressure Style transmitter with barrel housing installed on a vertical pipe with optional bracket (B2)
129 (5.06)
197 (7.73)
72 (2.83)
116 (4.57)
136 (5.35)
178 (6.99)
183 (7.19)
29 (1.14)
18 (0.71)
55 (2.17)
113 (4.45)
87 (3.42)
18 (0.71)
Figure 10: Differential Pressure Style transmitter with DIN housing installed on a Vertical pipe with optional bracket (B2) installation for
AIR/GAS measurements

16 OI/266/FF-EN Rev. B | 2600T Series Pressure transmitters
5 Mounting
65 (2.54)
83 (3.28)
136 (5.35)
116 (4.57)
29 (1.14)
18 (0.71)
55 (2.17)
183 (7.19)
87 (3.42)
18 (0.71)
4.4 (0.17)
Figure 11: Differential Pressure Style transmitter with barrel housing and Kynar inserts installed on a horizontal pipe with optional
bracket (B2)
91 (3.58)
179 (7.02)
54 (2.13)
116 (4.57)
29 (1.14)
18 (0.71)
113 (4.45)
72 (2.83)
210 (8.28)
18 (0.71)
58 (2.28)
55 (2.17)
89 (3.48)
1/4 or
1/2 NPT
Figure 12: Differential Pressure Style transmitter with barrel housing and Kynar inserts installed on a vertical pipe with optional bracket (B2)

2600T Series Pressure transmitters | OI/266/FF-EN Rev. B 17
5 Mounting
Figure 14: Pipe and wall mounting bracket kit (B2)
1 – U-bolt
2 – U-bolt fixing bolt and washer
3 – Transmitter fixing bolts
4 – B2 bracket
54 (2.13)
123 (4.86)
113 (4.43)
179 (7.02)
91 (3.58)
29 (1.14)
18 (0.71)
18 (0.71)
55 (2.17)
58 (2.28)
210 (8.28)
113 (4.45)
72 (2.83)
Figure 13: Differential Pressure Style transmitter with barrel housing and Kynar inserts installed on a vertical pipe with optional bracket (B2)
5.5.2 B2 Pipe and wall mounting bracket details
All the bolts and nuts supplied are necessary for the installation on pipe. In case of panel or wall installation, the U-bolt and the
U-bolt nuts and washers will not have to be used.
The bolts for panel mounting are not within the scope of supply.
4
1
3
2

18 OI/266/FF-EN Rev. B | 2600T Series Pressure transmitters
5 Mounting
142 (5.59)
(*)
70 (2.75)
179 (7.02)
91 (3.58)
166 (6.53)
70 (2.75)
84 (3.31)
117 (4.60)
29 (1.14)
18 (0.71)
18 (0.71)
11 (0.43)
210 (8.28)
58 (2.28)
55 (2.17)
95 (3.72)
174 (6.86)
Figure 15: Differential Pressure Style transmitter with barrel housing installed on a box pipe with optional bracket for SST housing (B5)
5.5.3 B5 Flat type bracket details
1 – U-bolt
2 – U-bolt fixing bolt and washer
3 – Transmitter fixing bolts
4 – B5 bracket
1
3
4
2
Figure 16: Flat type mounting bracket kit (B5)

2600T Series Pressure transmitters | OI/266/FF-EN Rev. B 19
5 Mounting
5.6 Mounting a P style pressure transmitter
(266G, 266A, 266H, 266N)
The pressure transmitter can be mounted directly on the
manifold.
A mounting bracket for wall or pipe mounting (2” pipe) is also
available as an accessory.
Ideally, the pressure transmitter should be mounted in a
vertical position to prevent subsequent zero shifts.
Figure 17: Model 266H or 266N High overload resistant P-Style transmitter with 1/2-14 NPT male process connection and barrel housing
installed on a 2”pipe with optional bracket (B1 carbon steel or B2 Stainless Steel 316L)
Important. If the transmitter is installed inclined with respect to the
vertical, the filling liquid exerts hydrostatic pressure on the
measuring diaphragm, resulting in a zero shift. In such an event, the
zero point can be corrected via the zero push-button or via the “set
PV to zero” command. Please refer to the [configuration section] for
further details. For transmitters without diaphragm seals the Vent /
Drain considerations below should be taken into consideration.
91 (3.58)
72 (2.83)
18 (0.71)
113 (4.45) 29 (1.14)
18 (0.71)
145 (5.71)
18 (0.71)
16 (0.63)
36 (1.42)
108 (4.25)
49 (1.93)
19 (0.75)
32 (1.26) width across
flats of exagon
18 (0.71)
113 (4.45) 29 (1.14)
18 (0.71)
145 (5.71)
91 (3.58)
18 (0.71)
16 (0.63)
108 (4.25)
72 (2.83)
39 (1.54)
49 (1.93)
54 (2.13)
1/2 - 14 NPT
32 (1.26) width across
flats of exagon
Figure 18: Model 266H or 266N High overload resistant P-Style transmitter with 1/2-14 NPT female process connection and barrel
housing installed on a 2”pipe with optional bracket (B1 carbon steel or B2 Stainless Steel 316L)

20 OI/266/FF-EN Rev. B | 2600T Series Pressure transmitters
5 Mounting
Figure 20: Model 266G or 266A P-Style transmitter with barrel housing installed on a 2”pipe with optional bracket
(B1 carbon steel or B2 Stainless Steel 316L)
29 (1.14)
18 (0.71) 18 (0.71)
145 (5.71)
19 (0.74)
Ø65 (2.56)
91 (3.58)
12 (0.45)
105 (4.12)
116 (4.57)
72 (2.83)
283 (11.12)
113 (4.45)
23 (0.9) width across
flats of exagon
113 (4.45) 29 (1.14)
18 (0.71) 18 (0.71)
145 (5.71)
91 (3.58)
1/2 - 14 NPT
Ø65 (2.56)
51 (1.99) Max.
105 (4.12)
116 (4.57)
72 (2.83)
283 (11.12)
27 (1.06) width across
flats of exagon
Figure 19: Model 266H or 266N High overload resistant P-Style transmitter with sensor Z with barrel housing installed on a 2”pipe with
optional bracket (B1 carbon steel or B2 Stainless Steel 316L)
Attention − Potential damage to transmitter. In case of an HART gauge pressure transmitter with 1050 bar/15000 psi sensor range
(266HSH.Z or 266GSH.Z) and 1/4” NPT process connection, please always perform sensor low trimming to remove possible zero shift and a
prevent serious decrease of the total performance in terms of accuracy. Sensor low trim can be performed via LCD, DTM or handheld terminals.
/