Page is loading ...

2
FCC Statement
This product has been tested and complies with the specifications for a Class B digital device, pursuant to Part 15 of the FCC Rules. These limits
are designed to provide reasonable protection against harmful interference in a residential installation.This equipment generates, uses, and can
radiate radio frequency energy and, if not installed and used according to the instructions, may cause harmful interference to radio
communications. However, there is no guarantee that interference will not occur in a particular installation. If this equipment does cause harmful
interference to radio or television reception, which is found by turning the equipment off and on, the user is encouraged to try to correct the
i
nterference by one or more of the following measures:
• Reorient or relocate the receiving antenna
• Increase the separation between the equipment or devices
•
Connect the equipment to an outlet other than the receiver's
• Consult a dealer or an experienced radio/TV technician for assistance
Changes or modifications not expressly approved by the party responsible for compliance could void the user's authority to operate the equipment.
FCC Radiation Exposure Statement
This equipment complies with FCC radiation exposure limits set forth for an uncontrolled environment. This equipment should be installed
and operated with minimum distance 20cm between the radiator and your body.
Industry Canada (Canada)
This device complies with Canadian ICES-003 and RSS210 rules. Cet appareil est conforme aux normes NMB-003 et RSS210 d'Industry Canada.

T
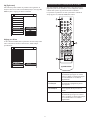
he lightning flash with arrowhead, within an equilateral
t
riangle, is intended to alert the user to the presence of
uninsulated “dangerous voltage” within the product’s
e
nclosure that may be of sufficient magnitude to
c
onstitute a risk of electric shock to persons.
C
aution: To prevent the risk of electric shock, do not
remove cover (or back). No user-serviceable parts
i
nside. Refer servicing to qualified service personnel.
T
he exclamation point within an equilateral triangle is
intended to alert the user to the presence of important
o
perating and maintenance (servicing) instructions in
the literature accompanying the appliance.
CAUTION
To prevent electric shock do not use this (polarized) plug with an extension cord, receptacle or other
o
utlet unless the blades can be fully inserted to prevent blade exposure.
WARNING
T
o reduce the risk of fire or electric shock, do not expose this appliance to rain or moisture.
I
MPORTANT SAFETY INSTRUCTIONS
1
. Read these instructions.
2
. Keep these instructions.
3
.
Heed all warnings.
4
. Follow all instructions.
5
. Do not use this apparatus near water — This apparatus shall not be exposed to dripping or
s
plashing, and no objects filled with liquids, such as vases, shall be placed on the apparatus.
6
. Clean only with dry cloth.
7
. Do not block any ventilation openings. Install in accordance with the manufacturer’s
instructions. The apparatus should not be situated on a bed, sofa, rug or similar surface that
may block
the v
entilation openings. T
he appar
atus must not be placed in a built
-in installation,
such as a closed bookcase or cabinet that may impede the flow of air through the ventilation
openings.Ventilation should not be impeded by cove
ring the openings with items such as
newspapers
,
tablecloths, curt
ains, etc.
8. Do not install near any heat sources such as radiators, heat registers, stoves, or other apparatus
(
including amplifiers) that produce heat.
9. N
o naked flame sources, such as lighted candles, should be placed on the apparatus.
10. Do not defeat the safety purpose of the polarized or grounding-type plug. A polarized plug has
two blades with one wider than the other. A grounding type plug has two blades and a third
gr
ounding pr
ong
. The wide blade or the third pr
ong are provided for your safety. If the provided
plug does not fit into your outlet, consult an electrician for the replacement of the obsolete
outlet.
11. Protect the power cord from being walked on or pinched — particularly at plugs, convenience
receptacles, and the point w
her
e the
y exit fr
om the apparatus.
12. Do not install in an area which impedes the access to the power plug. Disconnecting the power
plug is the only way to completely remove power to the product and must be readily
accessible at all times.
13. Power source — Use only power supplies of the type specified in the operating instructions or
as marked on the appliance. If a separ
ate power suppl
y is included with this appar
atus, do not
substitute with any other power suppl
y — use only manufacturer-provided power supplies.
14. Unplug this apparatus during lightning storms or when unused for long periods of time.
15.
R
efer all servicing to qualified service personnel. Servicing is required when the apparatus has
been damaged in any way, such as power-supply cord or plug is damaged, liquid has been
spilled or objects ha
v
e fallen into the apparatus, the apparatus has been exposed to rain or
moisture, does not operate normally, or has been dropped. For service, refer to qualified service
personnel, return to the dealer, or call the Altec Lansing service line for assistance.
16.
F
or pr
oducts w
hic
h incorporate batteries, please refer to local regulations for proper battery
disposal.
17. Only use attachments/accessories specified by the manufacturer.
18. Use only with the cart, stand, tripod, bracket, or table specified by the manufacturer
or sold with the apparatus. When a cart is used, use caution when moving the cart/
appar
atus combination to a
v
oid injury fr
om tip-over.
Altec Lansing One Year Limited Warranty
(Two-Year Limited Warranty in the European Union and Asia)
What Does The Warranty Cover?: Altec Lansing warrants that its products shall be free from defects
i
n materials or workmanship, with the exceptions stated below.
W
hat Is The Period Of Coverage?:
F
or units purchased in European Union or Asia, this warranty runs
for two years from the date of purchase. For units not purchased in Europe or Asia, this warranty
r
uns for one year from the date of purchase. The term of any warranties implied by law shall expire
w
hen your limited warranty expires. Some states and/or Member States in the European Union do
not allow limitations on how long an implied warranty lasts, so the above limitation may not apply
t
o you.
W
hat Does The Warranty Not Cover?:
T
his warranty does not cover any defect, malfunction or
f
ailure that occurs as a result of: improper installation; misuse or failure to follow the product
directions; abuse; or use with improper, unintended or faulty equipment. (For information on proper
i
nstallation, operation and use consult the manual supplied with the product. If you require a
replacement manual, you may download a manual from
www.alteclansing.com.) Also,
c
onsequential and incidental damages are not recoverable under this warranty. Some states do not
allow the exclusion or limitation of incidental or consequential damages, so the above limitation or
exclusion may not apply to you.
What Will Altec Lansing Do To Correct The Problem?: Altec Lansing will, at its option, repair or
r
eplace any product that proves to be defective in material or workmanship. If your product is no
l
onger being manufactured, or is out of stock, at its option, Altec Lansing may replace your product
w
ith a similar or better Altec Lansing product.
H
o
w To Get Warranty Service: To get a covered product repaired or replaced, you must contact Altec
L
ansing dur
ing the warranty period by email ([email protected]).You must include in your
email, your name, address, email address, telephone number, date of purchase and a complete
d
escription of the problem you are experiencing. In the United States, you may alternatively contact
A
ltec Lansing by telephone at 1-800-ALTEC88 — please be prepared to provide the same information.
I
f the problem appears to be related to a defect in material or workmanship, Altec Lansing will provide
you a return authorization and instructions for return shipment. Return shipments shall be at the
c
ustomer
’s
expense,
and the return must be accompanied by the original proof of purchase.You
should insur
e the shipment as appr
opriate because you are responsible for the product until it arrives
at
Al
tec Lansing.
How Will State Law Affect Your Rights?: This warranty gives you specific legal rights, and you may
als
o ha
ve other rights w
hic
h vary from state to state. Please note that in the European Union, you as
a consumer might have other legal rights under national legislation of European Union Member
States g
ov
erning the sale o
f Altec Lansing’s goods. Those rights are not affected by this guarantee.
The above limited warranties and remedies are sole warranties and remedies available to purchaser,
if
, and to the extent
, valid and enf
orceable under the applicable law.
Customer Service
The answer
s to most setup and performance questions can be found in the Troubleshooting guide.You
can also consult the FAQs in the customer support section of our Web site at www.alteclansing.com.
If you live in North America and still can’t find the information you need, please call our customer
service team f
or assistance before returning the speakers to your retailer under their return policy.
Tel: 800-258-3288
Email:
If you live outside of North America, please visit our website at
www.alteclansing.com and select
your region to locate your country’s distributor.
For the most up-to-date information, be sure to check our Web site at
www.alteclansing.com.
International Distribution
International customer
s:
For information regarding the distribution of Altec Lansing products in your
country, please visit
www.alteclansing.com and click on your region.
Disposal of Old Electrical & Electronic Equipment
This symbol on the product or on its packaging indicates that this product shall not be
treated as household waste. Instead it shall be handed over to the applicable collection
point for the recycling of electrical and electronic equipment. By ensuring this product is
disposed o
f corr
ectl
y, you will help prevent potential negative consequences for the
environment and human health, which could otherwise be caused by inappropriate waste
handling o
f this pr
oduct
. The recycling of materials will help to conserve natural resources. For more
detailed information about recycling of this product, please contact your local city office or your
household waste disposal service.
English
3

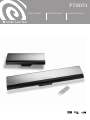
Thank you for purchasing the Altec Lansing PT8051 Wireless Surround
Sound System.
The PT8051 is designed to replace the traditional A/V receiver and
separate speakers and provide a complete, multi-channel surround
system sound from just two components using DTS and Dolby Digital
decoding to faithfully reproduce your favorite music and movie
soundtracks. The PT8051 system’s NXT Digital flat-panel driver
technology accurately reproduces the full frequency range and delivers
all the subtleties and spatial depth that today’s digital formats are
capable of. In addition, the PT8051’s advanced wireless transmission
means it’s easy to experience theater quality surround effects without
the need to run wires to the rear speakers.
T
he PT8051’s design is well suited for use with today’s large format
LCD and plasma flat panel displays and both components can be wall
mounted with them using the supplied brackets. A universal remote
control is included that allows you to consolidate remote controls from
various devices such as your TV, DVD player and VCR.
Contents
Refer to the PT8051 Quick Connect Card to identify these items.
• PT8051 main and rear surround units
• Remote control and batteries
• A/V Cable
• Wall mount bracket (hardware not included)
• User’s guide and quick connect instructions
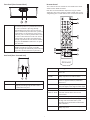
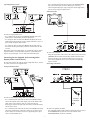
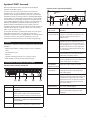
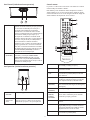
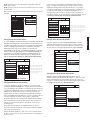
Controls and Connections for Your PT8051
Front Panel (Main Unit)
Rear Panel (Main Unit)
PT8051 Surround Sound System
1
2
3
4
5
1.VOLUME +/– Controls the volume level of all audio channels.
2. LEDs Displays information about the operational status.
3. INPUT
Press to switc
h between input sour
ces (D
VD,
TV/SAT,
A
UX, D
VD dig
ital, TV/SAT digital or AUX digital).
4. MODE Press to select the surround (DOLBY, DTS or PRO
LO
GIC II) or ster
eo (S
TEREO) mode.
5.
P
O
WER
Pr
ess to power on the system or switch to standb
y.
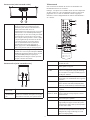
1. Power ON/OFF Switches power on or off.
2. AC Power Cord Connect to standard AC outlet. Refer to
frequency and voltage range for Power Source
as indicated on rear panel.
3. CONNECT Press this button to manually synchronize the
wireless audio link between the main and rear
surround units. Under most circumstances it is
not necessary to use this button as the units
automatically synchronize when powered on.
4.VIDEO OUT Used to display on-screen display information.
Connect to composite video input of TV.
5. SUBWOOFER OUT
Use to connect an optional subwoofer if
additional bass is required from the system.
6. DIGITAL INPUT:
COAXIAL (DVD IN)
Use to connect a DVD player that has a
coaxial digital output.
OPTICAL
(TV/SAT IN)
Use to connect a digital satellite tuner or cable
TV tuner that has an optical audio output.
OPTICAL (AUX IN)
Use to connect to an auxiliary sound source
such as a PVR or second TV tuner that has an
optical audio output. Can also be used to
connect a DVD player that has an optical
output but not a coaxial output.
7. AUDIO ANALOG
INPUT: DVD IN
Use to connect to a DVD player with audio
analog output.
TV/SA
T IN
Use to connect to a
TV or satellite tuner with
audio analo
g output.
1
2
3
4
5
6
7
PT8051
4

Front Panel (Rear Surround Unit)
Rear Panel (Rear Surround Unit)
Remote Control
This section describes the function of each control on the remote
control used to control the PT8051.
Note:You can also control other components using the remote
control once you set the appropriate remote control codes. See the
“Programming device remote control codes” section of this manual.
1. WIRELESS Illuminates in a steady state when the main and
rear surround speakers are synchronized to indicate
t
he wireless audio link is operating normally.
Synchronization between the main and rear units
w
ill occur automatically when main unit is powered
on provided the rear surround unit’s power switch
on the rear panel is in the on position. Flashes when
the wireless connection between the main and rear
surround speaker has become unsynchronized.To
manually resynchronize the main and rear surround
units press the CONNECT button on the rear panel
of the main unit.
2. STANDBY
Illuminates when unit is plugged in and the POWER
ON/OFF switch on the rear panel is in the ON
position. This light will automatically switch from red
to green once the main unit has been powered up.
1
2
1.
P
ower ON/OFF
S
witc
hes power on or off.
2.
A
C P
ower C
ord
C
onnect to standard
A
C outlet
. Refer to
frequenc
y and voltage range for Power Source
as indicated on rear panel.
1
2
3
4
5
6
7
8
9
10
1. POWER Use to toggle between On and Standby modes.
2.VOL +/– Increases or decreases the overall volume level
of the unit.
3.
3456
and
OK
Mov
e to highlight items in the on-scr
een display
(OSD) setup menu. Press OK to confirm.
4. AUDIO Sets the remote’s shared keys to control the
PT8051 as opposed to DVD, TV, SAT/CAB or
AUX devices.
5. INPUT Press to cycle through inputs – DVD, TV/SAT,
AUX, DVD digital, TV/SAT digital and AUX digital.
6. MUTE
Press to turn o
f
f or r
estore sound.
7. FRONT, CENTER,
REAR +/– LEVEL
Increases or decreases the volume level of the
individual channels for the main and rear
surround units.
8.
B
ASS
Enhances low fr
equency or bass output.
9. MODE Use to select between DTS, Dolby Digital, Dolby
Pro Logic II or stereo mode of the system
depending on the sound modes available from
your audio source.
10. OSD Press to enter or exit the on-screen display
(OSD) setup men
u.
1
2
English
5

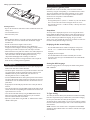
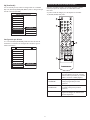
Installing the PT8051
T
his section provides guidelines for locating and installing your new
PT8051.
The PT8051 creates a realistic surround sound experience from just two
units. Usability is further enhanced by utilizing an advanced 2.4 GHz
wireless transmission system that eliminates the need to run wires to
the rear surround speakers. While placement is less critical than similar
systems, the following general guidelines should be followed where
possible to ensure best sound quality:
• Avoid placement where furniture or other items would obstruct the
g
rill area.
• Center the PT8051 below the TV so that dialogue appears to be
coming from it.
• The maximum allowable distance between the main and rear
s
urround units is approximately 40 feet (12.2 meters).
• The rear surround unit should be placed behind the primary listening
position to maximize the surround sound effects from the system.
For maximum sound quality it should be placed at or near ear level
when they are seated in the listening position.
• Avoid placing the PT8051 on or near surfaces that may vibrate.
Locating the PT8051
The PT8051’s front and rear units can be placed on suitable level
surfaces or mounted on the wall using the supplied wall mounting
brackets.
Safety Notes:
• Be sure to leave adequate ventilation space – at least 2 inches
(50mm) above both the main and r
ear surr
ound units.
• We do not recommend installing this unit so that it is directly on
the floor
.
•
The main unit o
f the PT8051 weighs appr
o
ximatel
y 18.1 lbs.
(8.2 kg)
and the r
ear surr
ound unit weighs appr
oximately 9.8 lbs. (4.4 kg.). Be
sur
e to secur
e it where it will not fall and where it is out of the reach
of children.
• Do not install the main or rear surround units directly above a
cathode-ray tube (CRT) TV as stray magnetic fields may distort the TV.
W
all Mounting
If you are mounting the PT8051 on the wall please follow these steps:
1
. Determine a suitable wall location for mounting each speaker unit
within reach of its AC cord.
2
. Position and level the supplied metal mounting bracket in the desired
location on the wall.
3. Being careful to avoid any items (wires, pipes, etc.) hidden inside the
wall secure the metal mounting bracket using appropriate fasteners
f
or the application. If you are unsure which type of fasteners to use
or are unable to determine if there are items within the wall that
c
ould be damaged please consult a licensed contractor.
4. Place the speaker on the mounting bracket by aligning the two
b
uttonholes on the rear of the speaker with the posts on the
mounting bracket. Check to make sure the wall mount bracket and
s
peaker are securely fixed in place.
Caution: The wall-mounting bracket should be installed only by
qualified personnel. The mounting bracket can be installed on many
different types of walls. When installed, the mounting bracket must
support at least 100 lbs. (45 kg.). The installer must be sure that the
installing surface can support the 100 lb. (45 kg.) weight requirement.
The qualified installer m
ust also determine and use the proper
hardware to obtain the weight requirements for the wall.
Placing the PT8051 on a Stand
You can mount your TV on a commercially-available stand and place
the main unit of the PT8051 under your TV. Ensure that the stand being
used can support the weight of the TV, the PT8051 and any other items
it will be required to support.
Note: Consult the instructions supplied with the stand for details on
how to install the stand and how to mount the PT8051 and the TV on
the stand.
NOTE: Placement of this product on wood surfaces with certain types
of finishes, such as clear varnish, may result in damage to the finish.
Consult the furniture manufacturer’s care instructions for direction as
to the types of objects that may safely be placed on the wood surface.
Altec Lansing shall not be responsible for any damage to wood surfaces
from contact with this product.
Setting Up the PT8051
Warning: Do not insert the PT8051’s power plug into a wall outlet until
you connect other sources such as your TV, DVD player, satellite tuner
or alternate audio source. Also, turn off audio sources before connecting
them to the PT8051.
The PT8051 is designed to connect external components such as your
DVD player, satellite TV tuner, cable TV tuner,VCR, game console and
TV. The PT 7031 can be connected to the source equipment (DVD, VCR,
etc.) using either a digital (coaxial or optical) or analog connection. In
cases where there are both digital and analog outputs such as a DVD
player we recommend using the digital output to ensure best sound
quality and optimal surr
ound sound reproduction.
C
onnecting De
vices E
quipped with a Dig
ital
A
udio
Output (DVD Player, DVR, etc.)
The PT8051 can accept digital input signals using standard,
commercially available optical or coaxial cables.
(50 mm)
2 inches
PT8051
<<
__
40 feet (12.2 meters)
6

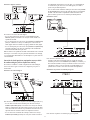
T
ypical Digital Connections
To connect a digital audio source:
• Use a coaxial cable to connect the COAXIAL IN (DVD) jack on the
PT8051 to the coaxial output jack on the DVD player.
• Use an optical cable to connect the OPTICAL IN (AUX) jack on the
PT8051 to the optical output jack on a digital audio source such as a
game console or digital video recorder.
• Use an optical cable to connect the OPTICAL IN (TV/SAT) jack on
the PT8051 to the optical output jack on the satellite tuner or cable
TV tuner.
Note: When connecting a DVD player we recommend using the coaxial
input found on the rear of the PT8051. However, if your DVD player
only has an optical output it can be connected to the AUX input.
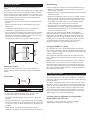
Connecting Devices Equipped with an Analog Audio
Output (V
CR or Similar Device)
To connect the PT8051 to a VCR or similar analog audio device, connect
the cables as shown in the diagram below.
Analog Audio Connections
T
o connect audio from an analo
g (V
CR, etc.) audio device:
•
Use a standar
d stereo audio cable to connect the A
UDIO IN (A
UX)
jac
ks on the PT8051 to the audio output jac
ks on the
VCR or similar
audio source. Ensure that the cables are connected correctly
observing left (white) and right (red) connections at both the PT8051
and the source device.
• Use a standard stereo audio cable to connect the AUDIO IN (TV/SAT)
jac
ks to the audio output jac
ks on the satellite TV or cable TV tuner.
If y
our satellite TV or cable TV tuner has a digital output this input
can be used for another device.
•
Use a standard stereo audio cable to connect the AUDIO IN (DVD)
jack to the audio output jack on the DVD player. If you have
connected your DVD player using an optical or coaxial digital cable
you can use this input for another device.
Video Connection
To connect the video out:
• Using the supplied A/V cable, connect one yellow end to connect the
VIDEO OUT on the PT8051 and the other yellow end to the video
input jack on the TV. This connection allows you to view the on-
screen display (OSD) on your TV screen when the corresponding
input is selected.
Connecting a Subwoofer
To connect an optional subwoofer:
• Use an optional commercially available mono audio cable to connect
the SUBWOOFER OUT jack on the rear of the PT8051 to the
SUB
WOOFER INPUT jack on the subwoofer.
S
ATELLITE
OR
CABLE TV
TUNER
O
PTICAL
DVD
PT8051
GAME
CONSOLE
OPTICAL
SATELLITE
OR
CABLE TV
TUNER
OPTICAL
VCR
AUDIO OUT
L
R
DVD
PT8051
T
V
VIDEO IN
AC IN
INPUT
PT8051
POWERED
SUBWOOFER
English
7

Setting up the Remote Control
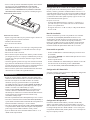
Installing Batteries
• Depress the latch on the back of the remote as shown to remove the
b
attery cover.
• Insert two AAA batteries.
• Close the battery cover.
Notes:
• Change all of the batteries if you notice that the operation range of
the remote decreases or the indicator does not blink or its light
becomes dim.
• Do not use old batteries together with new ones.
• Do not use different types of batteries such as alkaline and
manganese batteries together. Read the packaging carefully as these
different types of batteries may have the same shape and color.
• Exhausted batteries may leak. If the batteries have leaked, dispose of
them immediately. Avoid touching the leaked material or letting it
come into contact with skin or clothing. Clean the battery
compartment thoroughly before installing new batteries.
• Do not throw away batteries with general house waste. Dispose of
them correctly according to local regulations.
Basic Operation
• After all audio and video connections are secure; you can plug in the
PT8051’s AC cords into a suitable AC outlet.
• Turn on the power switch on the rear panel of the PT8051’s main and
rear surround units to the on position.The PT8051 will enter into
STANDBY mode.The power LED on front panel will turn red
indicating that the unit is in standb
y mode.
•
Pr
ess the P
O
WER button on the fr
ont panel to power on the PT8051.
The power LED will switc
h fr
om r
ed to green indicating the unit is on.
The LED on the r
ear unit will illuminate once the main unit has been
powered on.
• Begin playback on the DVD player or other device that you want to
listen to.
• Select the desired input using the INPUT button on the front panel or
r
emote control.
The corr
esponding LED will illuminate to indicate the
input that has been selected
•
Select the desired audio mode b
y using the MODE button on the
front panel or remote control. For most devices you can choose
between surround sound or stereo modes.
• Adjust the system volume using the VOL +/– buttons on the remote
control or front panel.
Advanced Operation
S
etting Channel (Speaker) Levels
I
ndividual levels can be set for front, center and rear or surround
channels by using the corresponding +/– level buttons on the remote.
T
hese levels should be adjusted so that all channels are at a similar
volume when the listener is seated using the Test Tone function as
d
escribed in the Setup Menu section that follows.
Adjustments are made by:
• Pressing LEVEL (Front +/–, Center +/– and Rear +/–) for each channel
to be set. The level of the channel will appear on the TV screen.
• The range for each level is -10 dB to +10 dB, in 1 dB steps. The initial
volume is 00 dB.
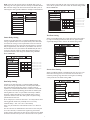
Setup Menu
The setup menu is displayed on your TV screen using the On-Screen
Display (OSD).The OSD will only work if a video connection has been
established as described in “video connection” section of this manual.
Y
ou can customize your PT8051 for language, TV type, test tone
setting, screen saver, and EQ.The setup menu can also be used to reset
the unit to factory default settings if necessary.
Displaying the On-
screen Display
• Press the OSD button on the remote to display the setup menu.
• Use the
3456 buttons on the remote to toggle through the
selections.
• Highlight your desired option.
• Press the OK button on the remote to confirm your selection.
• To exit the setup menu, press the OSD button or select EXIT SETUP
from the menu.
Setting the OSD Language
Select the language for on-screen display. The default setting for the
OSD is ENGLISH.
TV Type Setting
The color system of the DVD system, DVD and TV should match. Only
then will it be possible to play a D
VD on this system.
Bef
or
e c
hanging
the
TV system,
determine the color system of your TV.
The def
aul
t setting is NTSC
.
NTSC is used in several countries including
the United S
tates, Canada and Japan. PAL is used in most European and
Asian countries.
AUTO: Select this if the connected TV is compatible with both NTSC
and PAL. The output format will be in accordance with the video signal
of the DVD disc.
TEST TONE
SCREEN SAVER
CENTER DELAY
REAR DELAY
EQ
DEFAULTS
EXIT SETUP
SET OSD LANGUAGE
8

N
TSC:
S
elect this if the connected TV has the NTSC color system. It
will change the video signal of a PAL disc and output it to NTSC format.
PAL: Select this setting if the connected TV has the PAL color system. It
will change the video signal of an NTSC disc and output it to PAL format.
Center Delay Setting
Used to set the delay time that is used for the CENTER channel. This
setting is adjustable from 0 to 5 mS (milliseconds) in one millisecond
increments. This setting is useful if your PT8051 main unit cannot be
positioned near the TV. As a general rule one foot (30cm) is equal to a
delay of approximately 1mS. Therefore if your PT8051 main unit was
one foot from the screen you would set the CENTER delay for 1mS. It
can also be adjusted so that the sound coming from the PT8051 is
synchronized with the video image.The default setting is CENTER
DELAY TURNED OFF.
Rear Delay Setting
Used to set the delay time that is used for the REAR (surround)
channel. This setting is adjustable from 0 to 15mS (milliseconds) in
three millisecond increments.This setting is used to accurately
reproduce the surround information that is encoded on certain DVDs
as the producer intended by allowing you to tailor the sound to your
listening room size. In this case you would set the delay as follows;
The delay in milliseconds for the rear (surround) speaker setting is
equal to the number of feet closer that speaker is to your listening
position than the main unit.
For an example, let’s assume the main unit is 15 ft away from the main
listening position and the rear (surround) unit is 5 feet away.
Surround’s Delay = 15ft – 5ft = 10ft = 10mS of delay
In this case you would select 9 mS from the menu as it is closest to
10
mS.
The idea is to have the sound from the main and rear units reach your
ear
s at the same time,
in r
elation to the signal being sent to those
speaker
s.
F
or the speakers that are close to you, a delay has to be added
so that their sound reaches your ears at the same time as the speakers
t
hat are farther away from you, with respect to the music signal that is
sent to all the speakers at the same instant. The default setting is REAR
DELAY TURNED OFF.
Test Tone Setting
When set to the ON position, the system will test the speaker output
by using an internally generated test tone.The test signal is output
sequentially through various channels. The default setting is OFF.
Scr
een Saver Setting
When set to ON the PT8051 will automatically enter the screen saver
mode when no changes have been made after five minutes. This is
useful for preventing image burn from occurring that can damage
certain plasma TVs. The default setting is ON.
MENUSETUP
OSD LANG
TV TYPE
TEST TONE
SCREEN SAVER
CENTER DELAY
R
EAR DELAY
EQ
DEFAULTS
EXIT SETUP
A
UTO
N
TSC
PAL
OSD LANG
SCREEN SAVER
CENTER DELAY
REAR DELAY
EQ
DEFAULTS
EXIT SETUP
OSD LANG
TEST TONE
CENTER DELAY
REAR DELAY
EQ
DEFAULTS
EXIT SETUP
TEST TONE
SCREEN SAVER
CENTER DELAY
REAR DELAY
EQ
DEFAULTS
EXIT SETUP
SET CENTER DELAY
CENTER DELAY SET TO 5MS
CENTER DELAY SET TO 4MS
CENTER DELAY SET TO 3MS
CENTER DELAY SET TO 2MS
CENTER DELAY SET TO 1MS
CENTER DELAY OFF
TEST TONE
S
CREEN SAVER
C
ENTER DELAY
REAR DELAY
EQ
DEFAULTS
EXIT SETUP
SET SURROUND DELAY
SURROUND DELAY SET TO 15MS
SURROUND DELAY SET TO 12MS
SURROUND DELAY SET TO 9MS
SURROUND DELAY SET TO 6MS
SURROUND DELAY SET TO 3MS
SURROUND DELAY TURNED OFF
English
9

E
Q (Equalizer)
Use this function to select equalizer settings. Choose from CLASSIC,
POP, ROCK, or JAZZ. The default setting is CLASSIC.
Default Setting
If RESET is selected, all the items in the setup menu will be reset to the
factory default settings as previously indicated.
Operating the PT8051 Remote Control
In addition to controlling your PT8051 you can program the remote
c
ontrol to operate audio/video components from other manufacturers.
Codes can be set up for each device to be controlled: TV, SAT/CAB,
AUDIO, DVD, and AUX.
1
2
4
3
10
1. STATUS Indicates operation of remote when specific
buttons ar
e pressed. Illuminates continuously
to indicate remote is in program mode.
2. NUMERIC BUTTONS Use to enter preprogrammed remote codes
for other devices.
3. DEVICE BUTTONS Use to program or switch remote modes
for operating other devices.
4. PROGRAM Use to enter program mode when
programming remote control codes for
other devices.
OSD LANG
TEST TONE
CENTER DELAY
REAR DELAY
EQ
DEFAULTS
EXIT SETUP
O
SD LANG
TEST TONE
CENTER DELAY
REAR DELAY
DEFAULTS
EXIT SETUP
CLASSIC
POP
JAZZ
SCREEN SAVER
E
Q

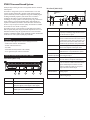
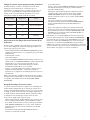
Default Preprogrammed Remote Control Codes
Your PT8051 remote control is preset to the default codes listed in the
table below. If your component is not listed please consult the list in
the Preprogrammed Remote Control Codes section.You can also use the
s
earch procedure in the Searching for Remote Control Codes section of
this manual.
Programming Device Remote Control Codes
Find the brand, model and code number of your components in the
Preprogrammed Remote Control Codes section of this manual, then
follow these steps:
• While holding down the PROGRAM button, press the button for the
device to be programmed, i.e., TV or DVD or CAB/SAT or AUX.
• The Status LED illuminates.
• Release both buttons.
• Enter the CODE NUMBER using the numeric buttons on the remote.
If the CODE NUMBER is valid the LED will flash twice and then turn
off, indicating the code has been programmed. If the code number is
not valid the LED flashes twice and turns on;
• Check to see that the remote can control the device that was
programmed by using the CH+/– or similar button to control the
device that was programmed. If it does not control the device, repeat
this procedure.
Note: If you want to leave the setup mode, press the device button
(TV, SAT/CAB, DVD, etc.). If you do not press any buttons after 10
seconds, SETUP MODE exits automatically.
Searching for Remote Control Codes
If you cannot find a code n
umber fr
om the Preprogrammed Remote
C
ontrol Codes section of this manual that matches your equipment, the
PT8051 remote can search its database for a suitable control code from
the codes programmed into the remote. The PT8051 remote control
will find the best possible component code f
or an
y audio sour
ce.
To search for codes follow these steps:
• Turn the device (TV, SAT/CAB, DVD, AUX, etc) that you wish to locate
the r
emote contr
ol code for to the on position.
• On the PT8051 remote press and hold the PROGRAM button while
pr
essing the device button you wish to search for (TV, SAT/CAB, DVD,
AUX, etc).
• The STATUS LED on the PT8051 will illuminate and remain on.
• Press and release the PROGRAM button again. The LED will flash to
indicate that the remote has entered the search mode.
• Aiming the PT8051 remote at the device you want to control
repeatedly and slowly press and release the POWER button.The
PT8051 will send a different POWER code to the device each time
the P
OWER button is pressed.
•
Once the device you wish to control powers off, immediately stop
pressing the POWER button and press the device (TV, SAT/CAB, DVD,
AUX, etc) button again.
• The PT8051 should now be programmed to control your device.
• You can verify this by turning the device on, and entering other
applicable commands such as PLAY or STOP for a DVD player or
CHANNEL +/– for a SATELLITE TV box.
Note: While the POWER button was used for searching here, you can
use other commands such as the PLAY button for devices that do not
h
ave a POWER button. In this case the PT8051 uses the PLAY button to
search. Simply use the PLAY button instead of the POWER button as
described below ensuring that the device you wish to control is ready
to enter the play mode and has a DVD or tape loaded, is on, etc.
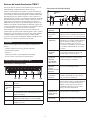
Remote Button Initial code Equipment
TV 082 Philips TV
SAT/CAB 039 Philips Cable Box
AUDIO 900 Altec Lansing PT8051
AUX 144 Panasonic VCR
DVD 124 Sony DVD
English
11

Troubleshooting
Symptom Possible Problem Solution
No power. One or both power cords are not connected or the main
or rear surround units have not been turned on.
Plug the PT8051’s AC cords into a suitable AC outlet. Then, turn on the PT8051
by pushing the on/off switch in the rear of the unit for both the main and rear
surround units.
Power switch on the back panel is not turned on for one
or both units.
Turn it on.
A safety mechanism powered down the PT8051. Unplug the PT8051 from the AC outlet briefly and then plug it in again so it will
reset itself.
No sound
comes from
the PT8051.
The volume is set too low. The “+/–” buttons on the top of the PT8051 remote are the master volume controls.
Press and hold the “+” button to increase the volume.
Loose or no cable connections on the PT8051 or source
equipment.
Check that the cables are correctly and firmly seated on both the PT8051 and the
source equipment.
MUTE is on. Be sure mute function is not activated.
No on-screen
display.
Video cable is loose or not connected. Check that the video cable is connected and properly seated at both the PT8051
VIDEO OUTPUT and the TV input.
The wrong input is selected on the TV. Select the correct input on the TV, the one that corresponds to where the VIDEO
OUT cable from the PT8051 is connected.
No sound is
coming from the
rear surround unit.
Power switch on the back panel is not turned on for one
or both units.
Turn it on.
There is no surround information on the DVD soundtrack. It is normal not to have surround sound information present at all times.
The REAR +/– level is set too low.
Increase the REAR +/– level by using the remote control.
The rear surround unit has lost synchronization with the
main unit. This is indicated by a blinking green WIRELESS
light on the rear surround unit.
Make sure that the front and rear units are within 40 feet (12.2 meters) of each
other.To manually resynchronize the main and rear surround units press the
CONNECT button on the rear of the front unit. Once synchronization has occurred
the WIRELESS light on the rear surround unit will stop blinking and remain lit in a
steady on state.
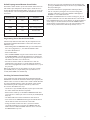
Specifications
Power Supply Rating
120 V AC/60 Hz
Power Consumption 25W (Main Unit) 20W (Rear Surround Unit)
Signal-to-Noise Ratio (A-weighted
) >75dB
Dimensions (W x H x D) 40" x 6
3
⁄4" x 6" (1016mm x 170mm x 152mm)
22" x 6
3
⁄4" x 6" (560mm x 170mm x 152mm) (Rear Surround Unit)
Weight 18.1 lbs. (8.2 kg) (Main Unit)
9.8 lbs. (4.4 kg.) (Rear Surround Unit)
Output Power 125 Watts (5 x 25) Continuous Average Power
Drivers Three NXT Digital 2" x 8" (50mm x 200mm) Flat Panel Drivers (Main Unit)
2.3" x 4" (58mm x 100mm) (Rear Surround Unit)
Digital Audio Inputs Two Optical/One Coaxial
Analo
g Audio Inputs
S
tereo x 3
Analo
g Audio Outputs
Subwoo
fer x 1
Video Output Composite x 1
F
r
equenc
y r
esponse
70 Hz
–
20 kHz +/
–
3dB
Wireless Transmission Frequency 2.4 GHz
Wireless Transmission Range (Maximum) 40 Feet (12.2 Meters)
Specifications are subject to change without notice. Trademark of New Transducers Limited.
12
Page is loading ...
Page is loading ...
Page is loading ...
Page is loading ...
Page is loading ...
Page is loading ...
Page is loading ...
Page is loading ...
Page is loading ...
Page is loading ...
Page is loading ...
Page is loading ...
Page is loading ...
Page is loading ...
Page is loading ...
Page is loading ...
Page is loading ...
Page is loading ...
Page is loading ...
Page is loading ...
Page is loading ...

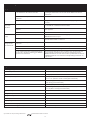
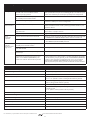
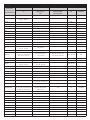
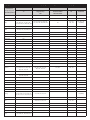
34
ABC
008, 017, 018, 019, 023,
032 040, 049, 130, 140
Acre 135(DVD)
Acoustic Research 044
ADC 045, 046
ADCOM 038
Addsion 081
Admiral 063, 136, 177, 180, 206, 207 066
Adventura 160 038
Aelanta 089
AEON 055
Aiko 103
Aiwa 006, 007, 008
032, 034, 035, 036,
038, 107, 108, 120
050, 069 109
Akai 113, 114, 164, 181, 190
033, 057, 084, 100, 111,
112, 113, 114, 115, 143
016, 139
Akiba 119
Alfa Gold
185
Alleron 136
Amark 178, 179, 202
Ambassador 098
American High 045, 072
Amstrad 030, 098 107, 038
Amusewell 116
Anam 068, 083, 148, 177, 253
Anitech 119
Anvision 022, 042, 046
AOC
005,
014,
029, 048, 100, 113,
136, 152, 176, 177, 188, 190,
200, 202, 204, 214
AP
O
067
Archer 202 069
ASA 045, 047
Asha 103
ASIA Giant 054, 064, 166
Asuka 047
ATLE 052
A
udio D
ynamics
025,
109,
113,
142
A
udiov
o
x
177,
202
047,
109
AWA 040, 082, 193
Baird 019, 038
Basic Line 119
Beaumark 103
BESTLINK 051, 091
Belcor 100, 114
Bell & Howell 063, 136, 177, 195 019, 020, 066
Preprogrammed Remote Control Codes/Codes de contrôle préprogrammés/Códigos de control remoto preprogramados
Brand/Device
Marque/Appareil
M
arca/Dispositivo
TV AUX SAT/CAB DVD/CD/VCD
TV
VCR
Magnétoscope
V
CR
SATELLITE/CABLE
SATELLITE/CÂBLE
S
ATÉLITE/CABLE
CD DVD/VCD

35
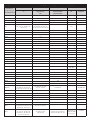
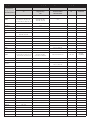
BENJAMIN 151
Blaupunkt 006, 083
Blue Star 054
BPL 054
Bradford 177
Brockwood 100
Broksonic 177, 202, 234 055, 056, 110, 112
Bush 119
Cablestar 022, 042, 046
California Audio Lab 003
Calix 047
Canon 072,
137
Candle/Citizen
086, 103, 113, 114, 132, 148,
160, 171, 176, 178, 188, 209
038, 046, 047, 072, 103,
109, 138, 139, 141
048
Capehart 139
Caravell 077 (VCD)
Carver 037, 060 045, 144 069
CASIO 138
CCE 119
Celebrity 046
Centurion 114, 175
Century
075
CGE 038
Changhong 018
Channel Master 096
Chaparral 210
Ch
un Yun
005, 014, 029, 041, 076, 089,
100, 113, 121, 202, 204, 214, 242
Ch
ung Hsin
005,
014,
020, 024, 073,
081, 121, 190, 204
049
Cimline 119
Clair
tone
048
Colortyme 113, 149, 176 025, 109
Colour Voice 005
C
ol
t
119
Concerto 113, 176
C
ontec
/C
on
y
048, 107, 148, 157
173, 177, 192, 201
034
C
or
onado
178,
179
Craig 148, 177 047, 070, 103, 119, 141
Crown 177, 178 119
Cur
tis Mathes
037, 051, 063, 065, 113, 114,
129,
140,
171,
175,
176,
178,
180, 195
025,
051,
072,
094,
109,
111, 120, 121, 137, 141
Preprogrammed Remote Control Codes/Codes de contrôle préprogrammés/Códigos de control remoto preprogramados
Brand/Device
Marque/Appareil
M
arca/Dispositivo
TV AUX SAT/CAB DVD/CD/VCD
TV
VCR
Magnétoscope
V
CR
SATELLITE/CABLE
SATELLITE/CÂBLE
S
ATÉLITE/CABLE
CD DVD/VCD

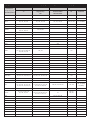
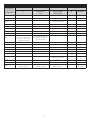
CXC 148, 177
Cybernex 103
Dae Ryung 019
Daewoo
086, 100, 103, 113, 114, 118,
153, 167 174, 176, 178, 188, 190,
194, 214, 217, 235, 251, 252
020, 105, 106, 138,139,
150, 152, 153, 154, 155
133 (DVD)
Dansai 119
Daytron
100, 103, 113, 114,
175, 176, 178, 188
105
DBS 169
DB
X
025,
109, 113, 142
Decca 038, 045
De Graaf 064
Denon 001
Diamond 043, 133
Disco Vision
115
Distar 061 115
Drake
082, 083, 084, 096, 126,
127, 147, 160, 161
DSS 168
Dual 113
Dumont 100, 236 103, 150
Dynamic Bass 039
Dynatech 038, 066, 097, 107, 109, 120
Eagle 009, 019, 030, 042, 046, 141
Eastern
041, 059, 060, 061,
062, 070, 156
EchoStar
092, 097, 099, 100,
101,
102, 1003
Electroband 046, 048
Electrohome
044, 046, 048, 068, 100, 113,
176, 178, 188, 190, 195
047, 049, 100, 103
Electr
ohonic
047
Emer
ex
060
Emerson
048, 054, 084, 097, 098, 100,
112, 113, 137,138, 139, 141136,
148,
157,
158169,
176,
177,
178179, 188, 195, 206, 209, 234
035, 038, 046, 047, 049, 052,
055, 056, 072, 079, 098, 099,
100, 101, 102, 107, 110, 111,
112, 116, 120, 130, 131, 132,
133, 134, 135, 136, 140, 150
038
Envision 113, 114, 176
Ether 089, 100, 202
EUROSTAR 150
Everquest 016
Ferguson 113
Fidelity 038
Finlandia 019, 045
Finlux 136 019, 038, 045, 064, 107
Firstline 049, 119, 150
Preprogrammed Remote Control Codes/Codes de contrôle préprogrammés/Códigos de control remoto preprogramados
Brand/Device
Marque/Appareil
M
arca/Dispositivo
TV AUX SAT/CAB DVD/CD/VCD
TV
VCR
Magnétoscope
V
CR
SATELLITE/CABLE
SATELLITE/CÂBLE
S
ATÉLITE/CABLE
CD DVD/VCD
36

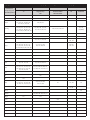
Fisher 117, 168, 195
019, 020, 047, 070,
088, 092, 093, 117
029
Fortec Star 186, 187
Fuji 060, 072, 083, 084
Funai/Fullness
011, 029, 030, 039, 040,
042, 136, 148, 177
038, 039, 040, 103,
107, 119, 120
Funtach 170, 171
Futuretech 177
GAB 119
Garrard 038
G.E.
051,
0
54, 061, 065, 068, 083, 100,
108,
113, 131, 141, 143, 145, 146,
176, 180, 184, 187, 222, 235
051, 072, 085, 086, 094,
098, 103, 137, 141
GEC 045
Gemini 016, 131, 132,134, 135
General (Fujitsu) 033, 136 043 017, 023, 093, 120, 130
General Instrument/
Jerrold
001, 003, 011, 012, 013, 014, 016,
017, 023, 050, 093, 125, 128, 129,
130, 135, 140, 163, 180
Gibralter
100, 114
Gintai 205
GMI 052, 071, 073, 142, 155
Golden 030
Goldstar
096, 100, 113, 157, 171, 175, 176,
178 179, 184, 188, 190, 191, 223
025, 046, 047, 091, 109
030 015
Goodmans 136 037, 038, 047, 119
Go Video
103
Gradiente 038
Graetz 113
Gr
anada
164 066,
072
Gr
andin
054,
177
038,
047,
119
Gr
undig
045 069
Gr
unp
y
136,
177
Haitai 105
Hallmark 100, 113, 136, 176
Hamlin 010,
019,
020, 123, 133
Harley Davidson 038
Harman K
ar
don
025,
109
Harvard 100, 136, 177 119
Harwood 119
Hawaii 117
HCM 054
Head Quarter 020
Hinar
i
136 103,
119
Hi-Q 070
Hisa
w
a
054
Preprogrammed Remote Control Codes/Codes de contrôle préprogrammés/Códigos de control remoto preprogramados
Brand/Device
Marque/Appareil
M
arca/Dispositivo
TV AUX SAT/CAB DVD/CD/VCD
TV
VCR
Magnétoscope
V
CR
SATELLITE/CABLE
SATELLITE/CÂBLE
S
ATÉLITE/CABLE
CD DVD/VCD
37

Hitachi
004, 014, 019, 034, 069, 086,
095, 099, 100, 107, 113, 157,
162, 164, 173, 176, 178, 179,
184, 188, 201, 203, 204, 207,
214, 224, 225, 238
011, 038, 064, 065, 069,
095, 107, 113, 120
023, 032, 119, 121 017, 038 115
Hwalin 124, 164
Hypson 054
Hyundai 118
IEEC 009, 058, 065, 066, 141
Ima 177
IMC 173
Imperial 038
Infinity 037, 082, 167
Inkei 007
Instant Replay 067, 072
Interfunk 045
ITT 019, 020, 103, 113
Janeil 160
Jasco 048, 069
JBL 037, 082, 160, 167 078, 079
JCB 046
JCL 072
JC Penney
047, 050, 051, 065, 100, 101,
113, 114, 131, 141, 145, 171,
175, 176, 178, 180, 184, 187,
190, 201, 202
006, 025, 047, 064, 067, 072,
088, 095 103, 109, 127, 128,
137, 141, 142
Jean
014, 057, 089, 100,
202, 204, 205, 214
JEBSEE 047, 068
J
ensen
113,
176
062,
113
JVC
022,
023,
024,
067,
075,
081, 093, 107, 129, 157,
165, 166, 187, 201
016,
017,
018,
020,
025,
030,
046, 062, 087, 088, 096, 109,
113, 127, 139, 142, 151
008, 027, 031 129 (DVD)
K
aisui
054 119
Kale vision 134
Kawasho 113, 176
KEC 171, 177 047
Kenwood 100, 113, 114, 176
020,
025,
030, 062, 088, 096,
109,
113,
127,
139,
142
018,
019,
028,
051
059,060,
130 (D
VD)
KLH 119
Kloss Nov
abeam
060,
109,
114,
160
KMC 178, 179, 188
K
odak
047,
072
K
OKA
055,
057,
118,
144
Kolin
005, 014, 020, 024, 041,
073, 081, 121, 190, 204
K
ONKA
243
Preprogrammed Remote Control Codes/Codes de contrôle préprogrammés/Códigos de control remoto preprogramados
Brand/Device
Marque/Appareil
M
arca/Dispositivo
TV AUX SAT/CAB DVD/CD/VCD
TV
VCR
Magnétoscope
V
CR
SATELLITE/CABLE
SATELLITE/CÂBLE
S
ATÉLITE/CABLE
CD DVD/VCD
38

Krell 069
KTV
048, 113, 114, 128, 177,
178, 179, 188, 209
Kyocera 046
Legend 099
LEON 052
LG 114, 156, 179, 223, 248 046 052
Lloyd 038, 107, 109, 116, 119, 120
Lloytron 178
Loewe 082
L
odgenet 063
Logik 063, 177 119
Luxman 113, 176 032
Luxor 019, 020, 037, 049
LXI
037, 057, 065, 082, 100,
101, 175, 195, 206
038, 046, 047
Macom 081, 096, 119, 120
Magnavox
037, 060, 082, 100, 109, 113,
114, 127, 131, 132, 162, 163
167, 175, 176, 178, 179
045, 047, 072, 075,
123, 137, 144
004, 005, 006, 007, 008,
037, 038, 039, 042, 046
022, 056, 069 059
Magnin 103
Majestic 063, 236
Marantz
037, 060, 082, 109, 113,
114, 125, 176, 190
025, 045, 072, 088, 109,
127, 129, 142, 144
003, 040, 069
Marta 025, 046, 047
Matsui 098,178 055, 116 069
Matsushita 045, 072
MCS 003
Megatron 100, 164, 202
MEI 048 072
Memor
ex
063,
100,
195
019, 020, 038, 046, 047, 066,
070, 072, 103, 107, 108, 120
024
Metz 006
MGA/Mitsubishi
005, 020, 021, 044, 090, 097,
100,
113,
114,
117, 136, 141, 175,
176, 188, 190, 206, 226, 227
014, 015, 029, 030, 049,
062,
063,
064,
087, 089,
090, 096, 100
158 025 131 (D
VD)
MGN Technology 103
Micro Formula 107
Midland 065, 178, 187, 236 085
Mina 157
Minolta 064, 095
Mission 069
Motor
ola
037,
083,
187,
206
066,
072
Montgomery Ward 066, 097
Movie
Time
016
Min
utz
131,
184
MTC 048, 100, 113, 114, 171, 176, 190 038, 103, 107, 120, 141
Preprogrammed Remote Control Codes/Codes de contrôle préprogrammés/Códigos de control remoto preprogramados
Brand/Device
Marque/Appareil
M
arca/Dispositivo
TV AUX SAT/CAB DVD/CD/VCD
TV
VCR
Magnétoscope
V
CR
SATELLITE/CABLE
SATELLITE/CÂBLE
S
ATÉLITE/CABLE
CD DVD/VCD
39

MultiTech 136, 177 038, 085, 107, 119, 120, 141
Multivision 124
Myland 119, 120
NAD 057, 092, 100, 101
NEC
031, 032, 041, 061, 068, 079,
080, 100, 113, 114, 160, 175,
176, 187, 190
019, 020, 025, 026, 030, 041,
042, 046, 062, 088, 096, 109,
113, 121, 126, 127, 129, 139, 142
033
Nesco 136
Newave 089, 106, 205, 206 046
Nikko 100, 103, 114 047
Noblex 103
Nokia 019, 020, 103 188
Novavision 019, 040, 089
Nordmende 113
NSC 036, 134
NSM 069
NTC 103
OAK 033, 034, 139
Olympus 072
Omega 016
Onking 209
Onkyo 010, 011, 012, 013
Onwa 177
Optimus 092, 195, 207
019, 047, 066
019, 039, 041,
042, 043
125 (DVD)
Optonica 206, 207 037
ORBIT 095
Or
ion
136,
177, 234
035,
055, 110, 112, 116
PACE 500 183
P
A
CE 5000
184
PACIFIC 178
Panasonic 010, 015, 016, 017 006, 007, 008, 012 003, 019, 024 003, 020 061, 062, 112
(National)
028, 037, 050, 058, 068, 082,
083, 088, 089, 094, 108, 122,
130,
145,
159, 161, 167, 187, 247
027, 028, 031, 050, 067,
072, 112, 118, 137
114, 148, 175 121 (DVD), 122
P
anda
108
Pansat 094
Paragon (Zenith) 021, 024, 117
PATHER 009
PBI 107
Pentax 064, 095
Philco
037,
060,
068,
082, 100, 109,
113, 114, 127, 132, 154, 157, 162,
163,
167,
176,
178,
179,
190
045, 072, 075, 123, 137
Philips
036,
037,
056,
060,
068,
082,
100, 109, 113, 114, 122, 132,
154, 156, 157, 162, 163, 167,
176,
179,
198,
215, 216
037, 045, 067, 072,
144, 145, 146
004, 005, 006, 007, 008, 037,
038, 039, 042, 046, 122, 152
068 (Tuner), 070
(REC) 071 (VCD)
022,
052, 069
071 (DVD)
Preprogrammed Remote Control Codes/Codes de contrôle préprogrammés/Códigos de control remoto preprogramados
Brand/Device
Marque/Appareil
M
arca/Dispositivo
TV AUX SAT/CAB DVD/CD/VCD
TV
VCR
Magnétoscope
V
CR
SATELLITE/CABLE
SATELLITE/CÂBLE
S
ATÉLITE/CABLE
CD DVD/VCD
40

Pilco 072
Pilot 114, 171, 178 047
Pioneer
074, 092, 100, 108, 113,
123, 176, 187, 228
030, 044, 062, 064, 074,
091, 123, 139, 142
002, 022, 115,116 004, 020, 140
059, 064, 065, 098,
115, 125(DVD)
Polestar 103
Popular Mechanic 068
Portland
100, 103, 113, 176,
178, 179, 188, 190
105, 138, 139
Praxis 211
Premier 035
Priceclub 171
Primestar 093
Proline 038
Prosat 088
Protec 119
Proton
014, 041, 076, 100, 104, 113,
126, 157, 176, 178, 188, 196,
202, 204, 205, 214
006, 067 069
Prism 083, 187
Pulsar 100, 103, 236 047, 103 024, 030
Pulser 100, 103, 236
QED 069
Quarter 020
Quartz 020, 088
Quasar 050, 068, 083, 108, 146, 187 006, 072, 137 003, 020
RAMPAGE 174
Randex 047
Radio Shack
051,
065, 087, 107, 114, 148,
157, 175, 177, 178, 195, 207
037,
038, 047, 066, 070, 072, 088,
093, 097, 100, 103, 107, 120
023
Radix 047
Randtek 042, 046
RCA
047, 051, 065, 066, 068, 100,
105, 113, 143, 152, 176, 180,
190, 206, 213, 222, 229, 230
051, 064, 066, 067, 069, 071,
072, 086, 094, 095, 103, 118,
120, 124, 141, 148, 149
044, 086, 114, 168, 182 029, 038
058,
127 (D
VD)
132 (DVD)
RC
-AK
095
Realistic
100, 107, 114, 169, 175,
177, 178, 195, 207
019, 020, 037, 038, 046, 047,
066, 070, 072, 088, 093, 097,
100, 103, 107, 120, 137
110
038, 039,
040, 041
Regal 019, 020, 123, 133
R
eg
enc
y
037,
041,
123
Rembrandt 017, 134
Rhapsody 048
Ricoh 072, 083
R
O
TEL
047,
048
Runco 114, 171, 236 047 024
SABA 113
SAE 069
Preprogrammed Remote Control Codes/Codes de contrôle préprogrammés/Códigos de control remoto preprogramados
Brand/Device
Marque/Appareil
M
arca/Dispositivo
TV AUX SAT/CAB DVD/CD/VCD
TV
VCR
Magnétoscope
V
CR
SATELLITE/CABLE
SATELLITE/CÂBLE
S
ATÉLITE/CABLE
CD DVD/VCD
41

Saisho 098 101
Salora 089
Sampo
024, 041, 042, 052, 073, 086,
100, 106, 113, 114, 142, 175,
176, 178, 205, 206, 214
023, 066, 097
Samsung
070, 100, 107, 113, 114, 140,
144, 157, 167, 170, 171, 175,
176, 178, 179, 188, 189, 190,
197, 200, 214, 237, 240, 249, 250
059, 085, 086, 103, 104,
111, 115, 133, 141, 150
004, 022, 030, 098, 134
110,113,
128 (DVD)
Samsux 178
Sanky 066
S
ansui 062, 113, 119, 122, 142
021, 035,
069,
137
Sanyo
014, 024, 025, 026, 027, 034,
035, 040, 041, 049, 051, 110,
117, 120, 168, 173, 175, 186,
195, 204, 214, 218, 231, 232, 241
019, 020, 021, 022,
068, 070, 088, 103
022, 036,
039, 055
Schaub Lorenz
113
Scientific Atlanta
013, 019, 040, 089, 112, 113, 172
Scimitsu 100
Scotch 100
Scott
100, 114, 136, 137, 148,
157, 175, 177, 178
049, 063, 079, 089, 101,
110, 112, 132, 134, 150
Sears
030, 037, 051, 057, 065, 067,
100, 101, 110, 111, 113, 117,
136, 168, 171, 175, 176, 178,
179, 195, 201, 235
019, 020, 046, 047, 064, 070,
072, 088, 092, 093, 095, 117
Sega 115
SEI 045
SET 098
Sharp
009, 038, 043, 059, 087, 106,
113, 133, 157, 173, 176, 178,
179,
188,
192,
206,
207,
208
024, 037, 058, 066,
097, 100, 138
137 019, 040 111
Sherwood
007, 023, 040,
053,
54
Shinco 107
Shintom 038, 064, 083, 084, 103, 119
Sho
gun
100 103
Sigma 034
Signal 016, 030
Signature 037, 063, 065, 100 017, 023
Simpson 060, 114, 132
Singer 187 047, 103, 119
Sinudyne 098
Preprogrammed Remote Control Codes/Codes de contrôle préprogrammés/Códigos de control remoto preprogramados
Brand/Device
Marque/Appareil
M
arca/Dispositivo
TV AUX SAT/CAB DVD/CD/VCD
TV
VCR
Magnétoscope
V
CR
SATELLITE/CABLE
SATELLITE/CÂBLE
S
ATÉLITE/CABLE
CD DVD/VCD
42
Page is loading ...
Page is loading ...
Page is loading ...
Page is loading ...
Page is loading ...
Page is loading ...
-
 1
1
-
 2
2
-
 3
3
-
 4
4
-
 5
5
-
 6
6
-
 7
7
-
 8
8
-
 9
9
-
 10
10
-
 11
11
-
 12
12
-
 13
13
-
 14
14
-
 15
15
-
 16
16
-
 17
17
-
 18
18
-
 19
19
-
 20
20
-
 21
21
-
 22
22
-
 23
23
-
 24
24
-
 25
25
-
 26
26
-
 27
27
-
 28
28
-
 29
29
-
 30
30
-
 31
31
-
 32
32
-
 33
33
-
 34
34
-
 35
35
-
 36
36
-
 37
37
-
 38
38
-
 39
39
-
 40
40
-
 41
41
-
 42
42
-
 43
43
-
 44
44
-
 45
45
-
 46
46
-
 47
47
-
 48
48


Altec Lansing PT8051 User manual
- Type
- User manual
- This manual is also suitable for
Ask a question and I''ll find the answer in the document
Finding information in a document is now easier with AI
in other languages
- français: Altec Lansing PT8051 Manuel utilisateur
- español: Altec Lansing PT8051 Manual de usuario
Related papers
-
Altec Lansing PT7031 User manual
-
Altec Lansing FX3022 Owner's manual
-
Altec Lansing VS1520 User manual
-
 Altec Lansing VS2420 User manual
-
-
Altec Lansing Muzx Core User manual
-
 Altec Lansing VS3151R User manual
-
 Altec Lansing 3151 User manual
-
 Altec Lansing PT6021 User manual
-
 Altec Lansing VS2121 User manual