Page is loading ...

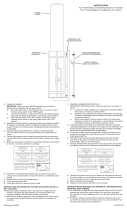
RIGID STEM MOUNT INSTALLATION
1) Passwirethroughstemandscrewstemintocouplingontopofxture
body. NOTE: Thread locking compound must be applied to all stem
threads as noted with symbol (3) to prevent accidental rotation of
xtureduringcleaning,relamping,etc.
2) Passxturewirethroughremainingstemsandscrewstemstogether.
3) Screw short threaded pipe into top of stem.
4) Pass hole in canopy over end of threaded pipe on top of stem.
5) Sliplockwasheroverendofthreadedpipeandscrewhexnutontoend
ofthreadedpipe.Tightenhexnuttosecurecanopytoxture.
6) TURN OFF POWER.
IMPORTANT:Beforeyoustart,NEVERattemptanyworkwithout
shutting off the electricity until the work is done.
a) Gotothemainfuse,orcircuitbreaker,boxinyourhome.Place
the main power switch in the “OFF” position.
b) Unscrewthefuse(s),orswitch“OFF”thecircuitbreakerswitch(s),
thatcontrolthepowertothextureorroomthatyouareworkingon.
c) Placethewallswitchinthe“OFF”position.Ifthexturetobe
replacedhasaswitchorpullchain,placethoseinthe“OFF”
position.
7) Find the appropriate threaded holes on mounting strap. Assemble
mounting screws into threaded holes.
8) Attachmountingstraptooutletbox.(Screwsnotprovided)Mounting
strapcanbeadjustedtosuitpositionofxture.
9) Makewireconnections(connectorsnotprovided).Referencechart
below for correct connections and wire accordingly.
10)Pushxturetoceiling,carefullypassingmountingscrewsthroughholes
in canopy.
11)Securexturetoceilingwiththreadedballs.
12) Lower inner glass down over socket.
13) Lower outer glass down over inner glass.
14) Insert recommended bulb.
INSTALLATION MONTAGE TIGE RIGIDE
1) Acheminerlelduluminaireparlatigeetvisserlatigeenhautduluminaire.
REMARQUE : appliquerlefreinletsurtouslesletsdelatige
indiqués par le symbole (3) pour empêcher la rotation accidentelle
duluminairependantlenettoyage,remplacementdelampe,etc.
2) Acheminerlelduluminaireparlestigesrestantesetvisserlestiges
ensemble.
3) Visserunpetittubeletédansl’extrémitédelatigesupérieure.
4) Passerletroudanslecachesurl’extrémitédutubeleté.
5) Passerlarondelledeblocagepar-dessusletubeletéetvisserl’écrou
hexagonalsurletubeleté.Serrerl’écrouhexagonalpourxerlecache.
6) COUPER LE COURANT.
IMPORTANT:TOUJOURScouperl’électricitéavantdecommencerle
travail.
a) Localiserlecoffretàfusiblesouledisjoncteurdudomicile.Mettre
l’interrupteurprincipalenpositiond’Arrêt.
b) Dévisser le ou les fusibles (ou mettre le disjoncteur sur Arrêt) qui
contrôlentl’alimentationversleluminaireoulapiècedans
laquelle le travail est effectué.
c) Mettrel’interrupteurmuralenpositiond’Arrêt.Sileluminaireà
remplacerestdotéd’uninterrupteuroud’unechaîneconnectéeà
l‘interrupteur,placercesélémentsenpositiond’Arrêt.
7) Trouverlestrousletésappropriéssurlesupportdemontage.Visser
les vis de montage dans les trous taraudés.
8) Fixerlesupportdemontagesurlaboîteàprises.(Visnonfournies).Le
supportdemontagepeutêtrerégléandepositionnercorrectementle
luminaire.
9) Connecterlesls(connecteursnonfournis).Sereporterautableau
ci-dessouspourfairelesconnexions.
10)Appliquerl’armatured’éclairageauplafondenintroduisantprudemment
lesvisdexationdanslestrous.
11)Visserlelustreauplafondál’aidedesrondelles-freinetdesboulesletées.
12) Abaissez le verre intérieure vers le bas sur la douille.
13)Abaisserleverreextérieurverslebassurlavitreintérieure.
14)Insérezl’ampoulerecommandée.
Date Issued: 3/9/12 IS-42549-CB
RIGID STEM MOUNT
MONTAGE TIGE RIGIDE
3
3
SEE OTHER SIDE FOR LOOP/CHAIN LINK
MOUNT INSTALLATION.
VOIR L’INSTALLATION DES LIENS EN BOUCLE/
MAILLON AU VERSO.
Connect Black or
Red Supply Wire to:
Connect
White Supply Wire to:
Black White
*Parallel cord (round & smooth) *Parallel cord (square & ridged)
Clear, Brown, Gold or Black
without tracer
Clear, Brown, Gold or Black
with tracer
Insulated wire (other than green)
with copper conductor
Insulated wire (other than green)
with silver conductor
*Note: When parallel wires (SPT I & SPT II)
are used. The neutral wire is square shaped
or ridged and the other wire will be round in
shape or smooth (see illus.)
Neutral Wire
INSTRUCTIONS
For Assembling and Installing Fixtures in Canada
Pour L’assemblage et L’installation Au Canada
Connecter le fil noir ou
rouge de la boite
Connecter le fil blanc de la boîte
A Noir A Blanc
*Au cordon parallèle (rond et lisse)
*Au cordon parallele (à angles droits el strié)
Au bransparent, doré, marron, ou
noir sans fil distinctif
Au transparent, doré, marron, ou
noir avec un til distinctif
Fil isolé (sauf fil vert) avec
conducteur en cuivre
Fil isolé (sauf fil vert) avec
conducteur en argent
*Remarque: Avec emploi d’un fil paralléle
(SPT I et SPT II). Le fil neutre est á angles
droits ou strié et l’autre fil doit étre rond ou
lisse (Voir le schéma).
Fil Neutre
MOUNTINGSTRAP
PATTE DE FIXATION
CANOPY
CACHE
STEM
TIGE
THREADED BALL
BOULE FILETÉ
INNER GLASS
VERRE
INTÉRIEURE
3
OUTER GLASS
VERREEXTÉRIEUR
BULB
AMPOULE

LOOP/CHAIN LINK MOUNT INSTALLATION
1) Pass wire through stem and screw stem into coupling on top of
xturebody.NOTE: Thread locking compound must be applied to all
stem threads as noted with symbol (3) to prevent accidental rotation of
xtureduringcleaning,relamping,etc.
2) Passxturewirethroughremainingstemsandscrewstemstogether.
3) Screw small loop on to top of stem.
4) Pass threaded pipe through hole in canopy.
5) Slip lockwasher over threaded pipe protruding from inside of canopy.
Screwhexnutontothreadedpipe.
6) Attach chain link to small loop at end of stem and to loop on canopy.
7) TURN OFF POWER.
IMPORTANT:Beforeyoustart,NEVERattemptanyworkwithout
shutting off the electricity until the work is done.
a) Gotothemainfuse,orcircuitbreaker,boxinyourhome.Place
the main power switch in the “OFF” position.
b) Unscrewthefuse(s),orswitch“OFF”thecircuitbreakerswitch(s),
thatcontrolthepowertothextureorroomthatyouareworkingon.
c) Placethewallswitchinthe“OFF”position.Ifthexturetobe
replacedhasaswitchorpullchain,placethoseinthe“OFF”
position.
8) Find the appropriate threaded holes on mounting strap. Assemble
mounting screws into threaded holes.
9) Attachmountingstraptooutletbox.(Screwsnotprovided)Mounting
strapcanbeadjustedtosuitpositionofxture.
10)Makewireconnections(connectorsnotprovided).Referencechart
below for correct connections and wire accordingly.
11) Pushxturetoceiling,carefullypassingmountingscrewsthroughholes
in canopy.
12)Securexturetoceilingwiththreadedballs.
13) Lower inner glass down over socket.
14) Lower outer glass down over inner glass.
15) Insert recommended bulb.
INSTALLATION DES LIENS EN BOUCLE/MAILLON
1) Acheminerlelduluminaireparlatigeetvisserlatigeenhautduluminaire.
REMARQUE : appliquerlefreinletsurtouslesletsdelatige
indiqués par le symbole (3) pour empêcher la rotation accidentelle
duluminairependantlenettoyage,remplacementdelampe,etc.
2) Acheminerlelduluminaireparlestigesrestantesetvisserlestiges
ensemble.
3) Visserlapetitebouclesurledessusdechaquetige.
4) Passerletubeletéàl’extrémitédelapetiteboucheparletrousitué
dans le cache.
5) Passerlarondelledeblocagesurletubeletésortantdel’intérieurdu
cache.Visserl’écrouhexagonalsurletubeleté.
6) Attacherlemaillondelachaîneàlapetitebouclesituéeàl’extrémitéde
latigeainsiqu’àlabouclesituéesurl’abat-jour.
7) COUPER LE COURANT.
IMPORTANT:TOUJOURScouperl’électricitéavantdecommencerle
travail.
a) Localiserlecoffretàfusiblesouledisjoncteurdudomicile.Mettre
l’interrupteurprincipalenpositiond’Arrêt.
b) Dévisser le ou les fusibles (ou mettre le disjoncteur sur Arrêt) qui
contrôlentl’alimentationversleluminaireoulapiècedans
laquelle le travail est effectué.
c) Mettrel’interrupteurmuralenpositiond’Arrêt.Sileluminaireà
remplacerestdotéd’uninterrupteuroud’unechaîneconnectéeà
l‘interrupteur,placercesélémentsenpositiond’Arrêt.
8) Trouverlestrousletésappropriéssurlesupportdemontage.Visser
les vis de montage dans les trous taraudés.
9) Fixerlesupportdemontagesurlaboîteàprises.(Visnonfournies).Le
supportdemontagepeutêtrerégléandepositionnercorrectementle
luminaire.
10)Connecterlesls(connecteursnonfournis).Sereporterautableau
ci-dessouspourfairelesconnexions.
Connect Black or
Red Supply Wire to:
Connect
White Supply Wire to:
Black White
*Parallel cord (round & smooth) *Parallel cord (square & ridged)
Clear, Brown, Gold or Black
without tracer
Clear, Brown, Gold or Black
with tracer
Insulated wire (other than green)
with copper conductor
Insulated wire (other than green)
with silver conductor
*Note: When parallel wires (SPT I & SPT II)
are used. The neutral wire is square shaped
or ridged and the other wire will be round in
shape or smooth (see illus.)
Neutral Wire
SEE OTHER SIDE FOR RIGID STEM MOUNT IN-
STALLATION.
VOIR AU VERSO POUR LES INSTRUCTIONS
D’INSTALLATION MONTAGE TIGE RIGIDE.
LOOP/CHAIN LINK
LAZO/ ESLABÓN DE CADENA
3
Date Issued: 3/9/12 IS-42549-CB
INSTRUCTIONS
For Assembling and Installing Fixtures in Canada
Pour L’assemblage et L’installation Au Canada
SMALLLOOP
PETITE BOUCLE
11)Appliquerl’armatured’éclairageauplafondenintroduisantprudemment
lesvisdexationdanslestrous.
12)Fixerleluminaireauplafondál’aidedesrondelles-freinetdesboules
letées.
13) Abaissez le verre intérieure vers le bas sur la douille.
14)Abaisserleverreextérieurverslebassurlavitreintérieure.
15)Insérezl’ampoulerecommandée.
MOUNTINGSTRAP
PATTE DE FIXATION
STEM
TIGE
THREADED BALL
BOULE FILETÉ
CHAIN LINK
MAILLONDELACHAÎNE
CANOPY
CACHE
Connecter le fil noir ou
rouge de la boite
Connecter le fil blanc de la boîte
A Noir A Blanc
*Au cordon parallèle (rond et lisse)
*Au cordon parallele (à angles droits el strié)
Au bransparent, doré, marron, ou
noir sans fil distinctif
Au transparent, doré, marron, ou
noir avec un til distinctif
Fil isolé (sauf fil vert) avec
conducteur en cuivre
Fil isolé (sauf fil vert) avec
conducteur en argent
*Remarque: Avec emploi d’un fil paralléle
(SPT I et SPT II). Le fil neutre est á angles
droits ou strié et l’autre fil doit étre rond ou
lisse (Voir le schéma).
Fil Neutre
3
INNER GLASS
VERRE
INTÉRIEURE
OUTER GLASS
VERRE
EXTÉRIEUR
BULB
AMPOULE
3
/