Page is loading ...

MiniView™
2/4-Port Multi-Function USB 2.0 KVM Switch
User Manual (GCS1772 / GCS1774)
®

Thank you for purchasing one of the most feature-rich KVM with USB peripheral sharing, audio, and built-in
Ethernet switch. You can save money and space by eliminating the need for multiple monitors, keyboards, mice,
and USB peripheral devices such as printers, scanners, and more. Up to 127 USB devices can be daisy
chained from this KVMP switch. Sharing speakers and a microphone also offers extra value and convenience
for the users. To top it off, the built-in Ethernet switch allows you to easily network and share Internet with your
computers.
USB and KVM technology together makes cross-platform management easy. A single USB console can control
a PC and a MAC workstation, and share peripherals and audio between the computers.
We hope you enjoy using your new IOGEAR USB KVMP switch, yet another first-rate connectivity solution from
IOGEAR!
©2005 IOGEAR. All Rights Reserved. M0314
IOGEAR, the IOGEAR logo, are trademarks or registered trademarks of IOGEAR, Inc. Microsoft and Windows are registered trademarks of Microsoft
Corporation. IBM is a registered trademark of International Business Machines, Inc. Macintosh, G3/G4 and iMac are registered trademarks of Apple
Computer, Inc. All other brand and product names are trademarks or registered trademarks of their respective holders. IOGEAR makes no warranty of any
kind with regards to the information presented in this document. All information furnished here is for informational purposes only and is subject to change
without notice. IOGEAR, Inc. assumes no responsibility for any inaccuracies or errors that may appear in this document.
Welcome

Table of Contents
02
03
04
05
06
10
13
15
25
27
29
37
38
40
41
42
Package Contents
Overview
Features
System Requirements
Introduction
Installation
Basic Operation
Hotkey Operation
Keyboard Emulation
Ethernet Switch
Firmware Upgrade
Appendix – Troubleshooting
Specification
Technical Support
Radio & TV Interference Statement
Limited Warranty

2
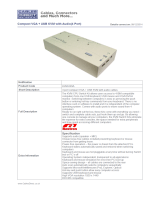
Package Contents
This package contains:
1 x GCS1772 or GCS1774 KVM Switch
2 x Custom 6’ KVM cables (for GCS1772)
4 x Custom 6’ KVM cables (for GCS1774)
1 x Firmware upgrade cable
1 x Power adapter
1 x User manual
1 x Quick start guide
Check to make sure that all the components are present and that nothing was damaged in shipping. If you
encounter a problem, contact your dealer.
Read this manual thoroughly and follow the installation and operation procedures carefully to prevent any
damage to the unit, and/or any of the devices that connect to it.

3
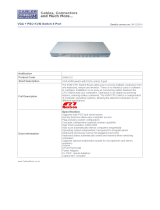
Overview
IOGEAR’s Symphony multi-function KVM Switch represents the new wave in KVM technology. The GCS1774
allows you to control four computers using a single VGA monitor, USB keyboard and mouse. In addition, it has
a built-in USB 2.0 hub, Ethernet 10/100 switch, and Audio sharing capabilities.
With its built-in USB 2.0 High Speed hub, slow transfer rates are a thing of the past. Fully compatible with USB
2.0 standards, this KVM allows you to share your USB peripherals and transfer data at up to 480 Mbps. In
addition, the audio ports allow you to connect one set of speakers and microphone, and share them among your
computers.
To complement your KVM setup, IOGEAR’s Symphony KVM sports a full-featured Ethernet 10/100 switch. This
built-in Ethernet switch allows you to easily add the computers in your KVM setup to your Ethernet network.
Among its many features, it supports auto-sensing, 10/100 Mbps speed, and is fully compliant with 802.3
networking standard.

4
Features
• Multi-function USB KVM switch integrates a USB 2.0 hub, Ethernet switch, and Audio
• Controls multiple computers with a single VGA monitor, USB keyboard and mouse
• Built-in USB 2.0 peripheral sharing to share printers, scanners, hard drives, etc., with data transfer rates
of up to 480 Mbps.
• Built-in Ethernet switch to expand your existing broadband network
• Share one set of speakers with all your computers
• Independent switching of KVM, USB peripherals, and audio focus
• Port selection via Hotkeys and front push-buttons
• Auto scan mode for monitoring all computers
• Power on detection – automatically switches to the first powered on port
• Superior video quality - up to 2048 x 1536
• Firmware upgradeable
• Easy installation – no software required
• Keyboard and mouse emulation for error-free boot up
• Hot pluggable – add or remove computers without powering down the switch
• Compatible with multiple operating platforms (PC, Mac, and Sun)
• All cables included

5
System Requirements
Console
• VGA or SVGA monitor
• USB mouse
• USB keyboard
Computer
• VGA or SVGA port
• USB port for keyboard/mouse cable
• USB 2.0 port for USB hub cable
• Supports Windows 98SE/ME/2000/XP; Mac OS 8.6 or higher; Solaris; Linux
Audio
• Requires powered speaker system

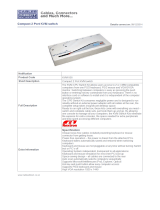
Front View
2. Ports LEDs
The Ports LEDs are built into the port selection
switches. The upper ones are the KVM port LEDs; the
lower ones are the USB LEDs.
1. Port selection buttons
• Switch console only - Press selection button for
less than two (2) seconds
to bring only the KVM
focus to the computer attached to its
corresponding port
• Switch everything - Press selection button for
longer than four (4) seconds
to bring KVM, Audio,
and USB Hub focus to the computer attached to
its corresponding port.
• Press and hold port selection switches 1 and 2
for more than two seconds to start Auto Scan
Mode.
1
2
3
4
KVM LEDs
• Lights DIM ORANGE to indicate that the
computer attached to the corresponding port is
up and running (On Line)
6
Introduction

• Lights BRIGHT ORANGE to indicate that the
computer attached to its corresponding port is
the one that has the KVM focus (Selected)
• Flashes to indicate that the computer attached to
its corresponding port is being accessed under
Auto Scan mode.
USB LED
• Lights DIM GREEN to indicate that there is a
USB cable connection to the computer attached
to its corresponding port. Does not light if there
is no USB connection to the computer
• Changes to BRIGHT GREEN to indicate that the
computer attached to its corresponding port is
the one that has access to the USB peripherals.
3. Ethernet LEDs
The Ethernet LEDs light to indicate data transmission
status of their corresponding ports on the built-in
Ethernet switch:
4. USB Hub
USB peripherals (printers, scanners, hard drives, etc.)
can plug into these ports
7
Introduction

Back View
1. Ethernet port
Connect CAT 5 LAN cables to these ports.
2. Console Audio jack
The cables from your microphone and speakers plug
in here. Each jack is color coded and marked with an
appropriate icon.
3. Firmware upgrade port
The included Firmware Upgrade cable that transfers
the firmware upgrade data from the administrator’s
computer to the KVM plugs into this connector. See
Firmware Upgrade section for more details.
to these ports.
4. Power Jack
The power adapters plugs into this jack.
8
Introduction

USB KVM Cable
5. Console port
Your USB keyboard, USB mouse, and VGA monitor
plug here.
6. CPU
The cables included with the KVM switch plug into
here and the other end to your computers.
Note: The 15-pin connectors on the KVM have
been specifically modified to work with the included
cables.
DO NOT attempt to connect any other ordinary 15-
pin cables into this unit.
9
Introduction
Cable
The USB KVM Cables are included in the package.

Before you Begin
1. Make sure that power to all the devices you will be connecting
up has been turned off. You must unplug the power cords of any
computers that have the Keyboard Power On function. Other-
wise, the switch will receive power from the computer.
2. To prevent damage to your installation, make sure that all
devices on the installation are properly grounded.
Step 1
Plug your USB keyboard and USB mouse into their
corresponding USB ports located on the KVM’s rear
panel.
Step 2
Plug your VGA monitor, microphone, and speaker
cables into the Console ports located on the unit’s
rear panel.
10
Installation

Step 3
Plug one of the included KVM cables to the CPU port
Step 4
Plug the other end of the KVM cable to the respective
ports on the computer that is part of your installation.
Step 5
Repeat steps 3 and 4 for any other computers you
are connecting
Step 6
Plug the USB peripherals that you want to be part of
your KVM setup into the front USB hub ports
Step 7
Plug network cable coming from your router to any
11
Installation

of the Ethernet ports on the switch, and plug
network cables to each of your computer’s
Ethernet ports
Step 8
Plug the power adapter cable into the switch’s
power jack, then plug the power adapter into an
AC power source
Step 9
Turn on the power to the computers
12
Installation

INTRODUCTION
Hot Plugging
The GCS1772/GCS1774 supports USB hot plugging
– components can be removed and added back into
the installation by unplugging their cables from the
USB hub ports without the need to shut the unit down.
Powering Off and Restarting
If it becomes necessary to Power Off the KVM unit,
before starting it back up you must do the following:
1. Shut down all the computers that are attached to
the switch.
2. Unplug power adapter cable from the switch
3. Wait 10 seconds, then plug the switch’s power
adapter cable back in.
4. After the switch is up, Power On the computers.
Port ID Numbering
Each CPU port on the GCS1772/GCS1774 switch is
assigned a port number (1 or 2 for GCS1772; 1 to 4 for
GCS1774). The port numbers are marked on the rear
panel of the switch.
The Port ID of a computer is derived from the CPU
port number it is connected to. For example, a
computer connected to CPU port 2 has a Port ID of 2.
The Port ID is used to specify which computer gets
the KVM USB peripheral and audio focus with the
Hotkey port selection method.
13
Operation

Port Switching
There are two ways to access the computers in your
KVM setup:
· Manual switching – pressing the push-buttons
on the unit’s front panel
· Hotkey switching – entering commands from
the keyboard
Manual Switching
1. Switch console only - Press selection button
for
less than two (2) seconds
to bring only the
KVM focus to the computer attached to its
corresponding port
2. Switch everything - Press selection button for
longer than four (4) seconds
to bring KVM,
Audio, and USB Hub focus to the computer
attached to its corresponding port.
3. Press and hold port selection switches 1 and
2 for more than two seconds to start Auto Scan
Mode.
Tip: To stop Auto Scan mode, simply press any of the
port selection switches on the KVM.
14
Operation

Hotkey Operation
The GCS1772/GCS1774 provides an extensive, easy-
to-use, hotkey function that makes it convenient to
control and configure your KVM installation from the
keyboard.
PC keyboard
Scroll Lock
NOTE: The table below assumes the use of a PC-
compatible keyboard with the
Scroll Lock
key. If you
are using a MAC keyboard (or a keyboard that does
not have Scroll Lock key), refer to the section in the
manual “
Change Port Switching Keys
” for information
on re-configuring the KVM’s hotkeys
15
Hotkey Operation

Port Switching
Note: The n stands for the computer’s Port ID number (1, 2, 3, or 4). Replace the n with the appropriate Port
ID when entering hotkey combinations.
16
Hotkey Operation

17
Hotkey Operation
Auto Scanning
Note:
• While Auto Scan is active, ordinary keyboard
and mouse functions are suspended – only
Auto Scan mode compliant keystrokes and
mouse clicks can be entered. You must exit
Auto Scan mode to regain normal console
control.
• Although the video focus switches from port to
port, the keyboard, mouse, and USB focus
doesn’t switch.

1918
Hotkey Operation
Invoking Hotkey Mode
For all Hotkey operations, you must use the
number
keypad
on the right side of your keyboard.
To Invoke Hotkey Mode:
(PC-Compatible keyboard)
1. Press and hold the Num Lock key
PC keyboard
Num Lock
Minus
2. Press and release the Minus key
3. Release the Num Lock key within one half
second after releasing
Minus
key; otherwise the
KVM will not go into Hotkey mode.
/