DirecTV HIRD-D01 User manual
- Category
- TV set-top boxes
- Type
- User manual

Models:
HIRD-D01
HIRD-D11
Digital Satellite Receiver
Owner’s Manual

A
Trademarks and Copyrights—
Software contained in the digital satellite receiver and this
manual is copyright © 1995, 1996, 1997, 1998 and 1999 by
Hughes Network Systems. Some features are patent
pending. WatchWord, PreSelect, TurboTune, and OneLine
Guide are trademarks of Hughes Network Systems.
DIRECTV and DIRECT TICKET are registered
trademarks of DIRECTV, Inc. a unit of Hughes Electronics
Corp., and are used with permission. USSB and USSB
Entertainment are registered trademarks of United States
Satellite Broadcasting Company, Inc. "NFL," the NFL
Shield and "NFL SUNDAY TICKET" are registered
trademarks of The National Football League and its
affiliates. NBA LEAGUE PASS is a trademark of NBA
Properties, Inc. NHL, the NHL Shield and NHL CENTER
ICE are registered trademarks of the National Hockey
League. ESPN Full Court and MLS/ESPN SHOOTOUT
are trademarks of ESPN, Inc. "MLB," "MLB EXTRA
INNINGS," "Major League Baseball" and the Major
League Baseball silhouetted batter logo are service marks
of Major League Baseball Properties, Inc. Major League
Baseball trademarks and copyright are used with
permission of Major League Baseball Properties, Inc. All
other trademarks and service marks are the property of their
respective owners.
This product is the subject of one or more U.S. or foreign
patents pending.
Disclaimer—Every effort has been made to ensure the
correctness and completeness of the material in this
document. No company shall be liable for errors contained
herein. The information in this document is subject to
change without notice. No warranty of any kind is made
with regard to this material, including, but not limited to,
the implied warranties of merchantability and fitness for a
particular purpose.
StarSight Information—StarSight
®
features licensed
under one or more of the following U.S. patents: 4,706,121;
5,151,789; 5,335,277; 5,353,121; 5,479,266; 5,479,268;
and 5,532,754. Use rights reserved.
Macrovision Information—This device incorporates an
anticopy process technology that is protected by U.S.
patents and other intellectual property rights. The anticopy
process is licensed for noncommercial, home use only.
Reverse engineering or disassembly is prohibited.
Note on Recording Programming—Most television
programs and films are copyrighted. This means that
someone has legal rights governing the reproduction and
distribution of this material. In certain circumstances,
copyright law may apply to private in-home taping of
copyrighted materials. In most cases, it is permissible to
record for personal use, as long as you do not sell the
material. You must act responsibly in this area — check
into the matter if you are unsure.
Some pay per view programs may be licensed from
producers as “view only” programs. These are copyrighted
programs and may not be copied or reproduced for any
purpose without the express written permission of the
copyright owner.
DIRECTV System Programming—For subscription
information, or to resolve problems related to DIRECTV
System programming, call the service providers, including
DIRECTV at 1-800-DIRECTV (347-3288) and USSB at
1-800-204-USSB (8772).
DIRECTV System Hardware and Installation—To
arrange for professional installation of your DIRECTV
System, ask questions, or to resolve problems related to
your DIRECTV System, contact your dealer. If additional
information is needed, please contact the Customer Care
Center toll free at 1-800-274-8995.
Hughes Customer Care Center
1-800-274-8995
Subscriptions and pay per view
1-800-DIRECTV or 1-800-204-USSB
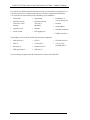
PLEASE MAKE NOTE OF THE FOLLOWING
INFORMATION FOR WARRANTY
System Model #: HSYS- D ___ _1_ ____ ____
Receiver Serial #: ___________________________
Access Card #: __________ __________ __________
LNB Serial #: ________________________________

B
IMPORTANT SAFETY INSTRUCTIONS
For your safety and protection, read this entire Owner’s Manual before you attempt to install or use your DIRECTV System. In
particular, read this safety section carefully. Keep this safety information where you can refer to it if necessary.
INSTALLATION
Polarization—This DIRECTV System product is
equipped with a plug that will fit into the power outlet only
one way. Do not modify the plug defeating this feature. If
the plug does not fit, contact your electrician to replace
your outlet. To prevent electric shock, do not use this plug
with an extension cord or outlet unless you can fully insert
the blades without blade exposure.
Power Sources—Operate this DIRECTV System product
only from the type of power source indicated on the
marking label. If you are not sure of the type of power
supply to your home, consult your DIRECTV System
dealer or local power company.
Ventilation—Do not block the ventilation slots and
openings in the case. Do not block these openings by
placing the product on a bed, sofa, rug, or other similar
surface. Do not place this product near or over a radiator or
heat register, or in a built-in installation such as a bookcase
or rack unless proper ventilation is provided.
For electrical safety, power line operated equipment or
accessories connected to this unit should bear the UL
listing mark or CSA certification mark and should not
be modified so as to defeat the safety features. This will
help avoid any potential hazard from electrical shock or
fire. If in doubt, contact qualified service personnel.
Accessories—To avoid personal injury or damage to the
digital satellite receiver, do not place the digital satellite
receiver on any unstable cart, stand, table, or bracket. Any
mounting of the product should follow the manufacturer’s
instructions.
Attachments—Do not use attachments unless
recommended by the DIRECTV System product
manufacturer as they may cause hazards.
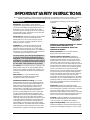
Satellite Dish Antenna Grounding—The outdoor
satellite dish antenna used to receive satellite signals and
the cable used to connect the satellite dish antenna to the
indoor receiving unit are required to comply with local
installation codes and the appropriate sections of the
National Electric Code (NEC) and in particular Article 810-
15, which covers proper installation and grounding of
television receiving equipment, as well as to Article 820-
33, which specifies that the satellite dish antenna cable
ground shall be connected to the grounding system of the
building as close to the point of cable entry as practical.
These codes require proper grounding of the metal structure
of the outdoor satellite dish antenna and grounding of the
connecting cable at a point where it enters the house (or
other building). If you are having a professional installer
make the installation, the installer must observe installation
codes. This manual contains instructions on how to make
the installation in compliance with the NEC. If additional
local installation codes apply, contact local inspection
authorities.
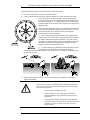
EXAMPLE OF ANTENNA GROUNDING ACCORDING
TO THE NATIONAL ELECTRICAL CODE
INSTRUCTIONS CONTAINED IN “RADIO AND
TELEVISION EQUIPMENT”
Water and Moisture—Do not use this DIRECTV
System product near water or moisture.
Television Antenna Information—Installing an
outdoor antenna can be hazardous and should be left to a
professional antenna installer. Do not locate the outside
antenna system in the vicinity of overhead power lines or
other electric light or power circuits, or where it can fall
into such power lines or circuits. When installing an outside
antenna system, take extreme care to keep from touching
such power lines or circuits as contact with them might be
fatal. If an outside antenna is connected to the digital
satellite receiver, be sure the antenna system is grounded so
as to provide some protection against voltage surges and
built-up static charges. Section 810 of the NEC, NFPA No.
70 1987, provides information with respect to proper
grounding of the mast and supporting structure, grounding
of the lead-in wire to an antenna discharge unit, size of the
grounding conductors, location of antenna discharge unit,
connection to grounding electrodes, and requirements for
the grounding electrode.
Power Lines—Extreme care must be taken when
installing and adjusting or maintaining the outdoor antenna
and connecting cable, especially in the vicinity of overhead
power lines, electric lights, or power circuits. When
installing the outdoor antenna or cable, extreme care should
be taken to keep from touching or approaching such power
lines or circuits, as contact with them might be fatal.
Cleaning—Unplug this DIRECTV System product from
the wall outlet before cleaning. Do not use liquid cleaners
or aerosol cleaners. Use a damp cloth for cleaning.
Object and Liquid Entry—Never push objects of any
kind into this DIRECTV System product through openings
as they may touch dangerous voltages or “short out” parts

C
that could result in a fire or electric shock. Never spill
liquid of any kind on the DIRECTV System product.
SERVICE
Servicing—Do not attempt to service this DIRECTV
System product yourself as opening or removing covers
may expose you to dangerous voltage or other hazards.
There are no user serviceable parts inside. Refer all
servicing to qualified service personnel.
Conditions Requiring Service—Unplug this
DIRECTV System from the wall outlet and refer servicing
to qualified personnel under the following conditions:
• When the power supply cord or plug is damaged.
• If liquid has been spilled on, or objects have fallen
into, the DIRECTV System product or it has been
exposed to water.
• If the DIRECTV System product does not operate
normally by following the operating instructions.
Adjust only those controls that are covered by the
operating instructions. Improper adjustment of other
controls may result in damage and will often require
extensive work by a qualified technician to restore the
DIRECTV System product to its normal operation.
• If the DIRECTV System product has been dropped or
the cabinet has been damaged.
• When the DIRECTV System product exhibits a
distinct change in performance.
Replacement Parts—When replacement parts are
required, have the technician verify that the replacements
being used have the same safety characteristics as the
original parts. Use of replacement parts specified by the
DIRECTV System product manufacturer can prevent fire,
electric shock, or other hazards.
Safety Check—Upon completion of any service or
repairs to this DIRECTV System product, ask the service
technician to perform safety checks recommended by the
manufacturer to determine that the DIRECTV System
product is in safe operating condition.
THESE ARE DEFINITIONS FOR ALERTS USED
IN THIS MANUAL
WARNING or CAUTION
Where you see this alert symbol
and the WARNING or CAUTION
heading, strictly follow the warning
instructions to avoid personal injury.
DANGER
Electric shock hazard: Where you
see these symbol and the DANGER
heading, strictly follow the warning
instructions to avoid electric shock
injury
THESE ALERTS APPEAR IN THIS MANUAL
WARNING
For your own safety, follow these important
safety rules:
• Perform as many functions as possible
on the ground.
• Do not install the satellite dish antenna
on a rainy or windy day.
• If you start to drop the satellite dish
antenna or mast assembly, get away
from it and let it fall.
DANGER
Do not select a location to install the satellite
dish antenna near power lines. You can be
killed if the satellite dish antenna comes into
contact with electric power lines.
• Do not contact overhead power lines
• Check the distance to any nearby power
lines before starting installation. Stay at
least 20 feet away from all power lines.
• If any part of the satellite dish antenna or
mast assembly comes into contact with a
power line, call your local power
company. Do not try to remove it
yourself. They will remove it safely.
CAUTION
Local electric codes and the National Electric
Code (NEC) require the satellite dish antenna
to be grounded. Grounding the satellite dish
antenna helps protect against damage caused
by static voltage buildup. Grounding can also
protect against voltage surges created by
nearby lightning strikes.

D
FEDERAL COMUNICATIONS COMMISSION (FCC)
REGULATORY INFORMATION
Federal Communications Commission (FCC)—The
HNS brand DIRECTV System complies with both Part 15
and Part 68 of the FCC rules.
Part 15 compliance—
This equipment has been tested and found to comply with
the limits for a Class B digital device, pursuant to Part 15
of the FCC rules. These limits are designed to provide
reasonable protection against harmful interference in a
residential installation. This equipment generates, uses and
can radiate radio frequency energy and, if not installed and
used in accordance with the instructions, may cause
harmful interference to radio communications.
However, there is no guarantee that interference will not
occur in a particular installation. If this equipment does
cause harmful interference to radio or television reception,
which can be determined by removing and applying power
to the equipment, the user is encouraged to try to correct
the interference by one or more of the following measures:
• Reorient or relocate the receiving satellite dish antenna.
• Increase the separation between the equipment and the
digital satellite receiver.
• Connect the equipment into an outlet on a circuit
different from that to which the digital satellite receiver
is connected.
• Consult the dealer or an experienced radio/TV technician
for help.
The user may find the following booklet, prepared by the
Federal Communications Commission, helpful: “How to
Identify and Resolve Radio and TV Interference
Problems.” This booklet is available from the U.S.
Government Printing Office, Washington, DC.
To meet FCC requirements, only peripherals (computer
input/output devices, terminals, printers, etc.) certified to
comply with the Class B limits may be attached to this
device. Operation with non-certified peripherals is likely to
result in interference to radio and TV reception.
To meet FCC requirements, shielded cables are required to
connect the device to a personal computer, peripheral, or
other Class B certified device.
Part 68 compliance—
1. The FCC has established Part 68 of the FCC Rules,
which permit this device to be directly connected to
the telephone network. Standardized jacks are used for
these connections. This equipment should not be used
on coin lines or party lines.
2. If this device is malfunctioning, it may also be causing
harm to the telephone network; this device should be
disconnected until the source of the problem can be
determined and until repair has been made. If this is
not done, the telephone company may temporarily
disconnect service.
3. The telephone company may make changes in its
technical operations and procedures; if such changes
affect the compatibility or use of this device, the
telephone company is required to give adequate notice
of the changes. You will be advised of your right to
file a complaint with the FCC.
4. If the telephone company requests information on
what equipment is connected to their lines, inform
them of:
• the telephone number this unit is connected to.
• the ringer equivalence number (REN). The number
can be found on a label located on the bottom of the
equipment.
• the Universal Service Order Code (USOC) jack
required. This equipment requires a USOC RJ11
jack.
• the FCC registration number. The number can be
found on a label located on the bottom of this
equipment.


TABLE OF CONTENTS
A FIRST LOOK AT THE DIRECTV DIGITAL
SATELLITE RECEIVER........................................1-1
What You Should Do First.................................1-1
How Does All This Work?.................................1-1
DIRECTV SYSTEM COMPONENTS........................1-2
The Satellite Dish Antenna ................................1-2
The Digital Satellite Receiver...........................1-2
The Remote Control............................................1-3
SETTING UP YOUR DIRECTV SYSTEM........2-1
INSTALLING REMOTE CONTROL BATTERIES.........2-1
CHOOSING THE BEST CONNECTION FOR YOUR
ENTERTAINMENT SYSTEM.......................................2-2
Hook Up the Audio/S-video Signals.................2-2
Hook Up the Audio/Video Signals....................2-3
Hook Up the RF Signals.....................................2-3
Hook Up to a Stereo System..............................2-4
Finishing Up.........................................................2-4
CONTROLLING THE DIGITAL SATELLITE
RECEIVER..................................................................3-1
FRONT PANEL VS. REMOTE CONTROL KEYS........3-1
BASIC NAVIGATION..................................................3-1
INSTALLING THE SATELLITE DISH
ANTENNA....................................................................4-1
DETERMINE WHERE TO POINT YOUR SATELLITE
DISH ANTENNA.........................................................4-2
The INSTALLATION screen..............................4-2
ALIGNMENT RESULT Pop-up Panel.............4-2
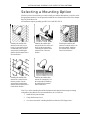
CHOOSING THE ANTENNA INSTALLATION SITE...4-2
SELECTING A MOUNTING OPTION..........................4-5
INSTALLING THE SATELLITE DISH ANTENNA ONTO
A WOODEN SURFACE...............................................4-6
INSTALLING THE SATELLITE DISH ANTENNA ONTO
A BRICK SURFACE ....................................................4-8
INSTALLING THE SATELLITE DISH ANTENNA ONTO
A CINDER BLOCK SURFACE ....................................4-9
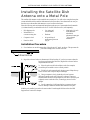
INSTALLING THE SATELLITE DISH ANTENNA ONTO
A METAL POLE ........................................................4-11
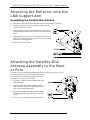
ATTACHING THE REFLECTOR ONTO THE LNB
SUPPORT ARM .........................................................4-12
Assembling the Satellite Dish Antenna.........4-12
ATTACHING THE SATELLITE DISH ANTENNA
ASSEMBLY TO THE MAST OR POLE ......................4-12
GROUNDING THE METAL POLE MOUNT ..............4-13
GROUNDING THE BASE PLATE..............................4-13
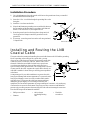
INSTALLING AND ROUTING THE LNB COAXIAL
CABLE.......................................................................4-14
CONNECTING THE COAXIAL CABLE TO THE
LNB..........................................................................4-15
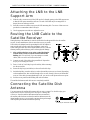
ATTACHING THE LNB TO THE LNB SUPPORT
ARM ..........................................................................4-16
ROUTING THE LNB CABLE TO THE SATELLITE
RECEIVER.................................................................4-16
CONNECTING THE SATELLITE DISH ANTENNA..4-16
POSITIONING THE SATELLITE DISH ANTENNA...4-17
The INSTALLATION Screen...........................4-17
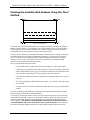
Pointing the Satellite Dish Antenna Using
the “Box” Method............................................4-18
AUTHORIZING YOUR SERVICE..............................4-20
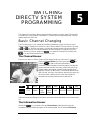
WATCHING DIRECTV SYSTEM
PROGRAMMING......................................................5-1
BASIC CHANNEL CHANGING...................................5-1
The Channel Banner...........................................5-1
The Information Banner.....................................5-1
The OneLine™ Guide.........................................5-2
TurboTune™........................................................5-2
AlphaTune™........................................................5-2
ALTERNATE SERVICES.............................................5-3
Alt. Audio..............................................................5-3
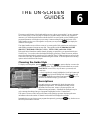
THE ON-SCREEN GUIDES...................................6-1
Choosing the Guide Style...................................6-1
Descriptions.........................................................6-1
General On-Screen Guide Features.................6-2
Using PreSelect™ to Schedule Programs for
Viewing.................................................................6-2
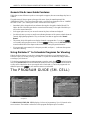
THE PROGRAM GUIDE (SM. CELL)................6-2
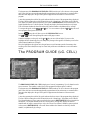
THE PROGRAM GUIDE (LG. CELL).................6-3
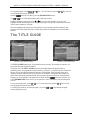
THE TITLE GUIDE..................................................6-4
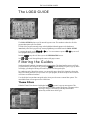
THE LOGO GUIDE..................................................6-5
FILTERING THE GUIDES............................................6-5
Theme Filters........................................................6-5
Channel List.........................................................6-6
Guide Times..........................................................6-6
Class Filters.........................................................6-7
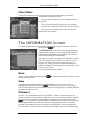
THE INFORMATION SCREEN..............................6-7
Done.......................................................................6-7
View.......................................................................6-7
PreSelect...............................................................6-7
Cancel PreSelect .................................................6-8
Buy $......................................................................6-8
Buy Options..........................................................6-8
Cancel Purchase..................................................6-8
Show Times...........................................................6-9
DIGITAL SATELLITE RECEIVER’S MENU
SYSTEM........................................................................7-1
Menu Overview....................................................7-1
MAIN MENU ..............................................................7-2
Setup......................................................................7-2
Scheduler..............................................................7-2

Check Mail...........................................................7-2
Purchases..............................................................7-2
Help........................................................................7-2
Lock/Unlock .........................................................7-2
SETUP MENU.............................................................7-3
Preferences...........................................................7-3
Limits.....................................................................7-3
Chan. Lists............................................................7-3
TurboTune™........................................................7-3
Installation...........................................................7-3
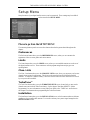
Current settings overview..................................7-4
SCHEDULER...............................................................7-4
Editing an event...................................................7-4
CHECK MAIL .............................................................7-5
Message.................................................................7-5
Page.......................................................................7-5
Erase......................................................................7-5
PURCHASES................................................................7-5
History/Upcoming...............................................7-5
Purchase History.................................................7-6
Upcoming Purchases..........................................7-6
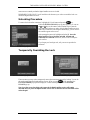
LOCK/UNLOCK..........................................................7-6
Locking Procedure..............................................7-7
Unlocking Procedure..........................................7-7
Temporarily Overriding the Lock.....................7-8
PREFERENCES............................................................7-8
Advanced..............................................................7-8
MultiColor............................................................7-9
Chan. Tags............................................................7-9
Chan. Sort.............................................................7-9
Scheme...................................................................7-9
Language..............................................................7-9
Filters....................................................................7-9
ADVANCED PREFERENCES.......................................7-9
Receiver ID........................................................7-10
Phone Prefix.......Error! Bookmark not defined.
Screen Ratio......................................................7-10
Channel Lock ....................................................7-10
Input Key............................................................7-10
Demo Mode........................................................7-10
Factory Defaults...............................................7-10
LIMITS.......................................................................7-11
TV Allow.............................................................7-11
Max Rating........................................................7-12
Max Spending...................................................7-12
CHANNEL LISTS.......................................................7-13
Rename...............................................................7-13
Auto Set..............................................................7-13
Clear...................................................................7-13
Set........................................................................7-13
Tag Boxes...........................................................7-14
TURBOTUNE™........................................................7-14
Set Channel.......................................................7-14
INSTALLATION........................................................7-15
System Test.........................................................7-15
Transponder #...................................................7-15
Position ..............................................................7-15
New Card...........................................................7-16
SYSTEM TEST ..........................................................7-16
Receiver Test.....................................................7-16
Cable Test..........................................................7-16
PROGRAMMING YOUR REMOTE CONTROL
.........................................................................................8-1
PROGRAMMING THE REMOTE CONTROL...............8-1
Programming Mode............................................8-1
Code Scan.............................................................8-1
Code Entry............................................................8-1
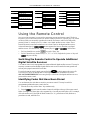
USING THE REMOTE CONTROL...............................8-3
Switching the Remote Control to Operate
Additional Digital Satellite Receiver...............8-3
Identifying Codes that Have Been Stored.......8-3

PAGE 1-1
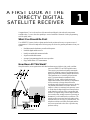
Congratulations! You’ve selected one of the most advanced digital video and audio components
available today. You now have the capability to receive hundreds of channels of video programming
and CD-quality audio.
What You Should Do First
Your DIRECTV System is both a sophisticated technical product and an easy-to-operate source of
entertainment. You should complete the following steps to achieve the greatest performance from your
system:
• Read this manual to familiarize yourself with the system.
• Install the digital satellite receiver.
• Install your satellite dish antenna and cable.
• Align the satellite dish antenna.
• Arrange for programming from the service providers.
• Enjoy endless hours of TV entertainment.
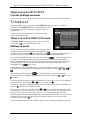
How Does All This Work?
Many film studios, news organizations and other broadcasters provide their video, audio, and data
services to DIRECTV and USSB uplink centers.
These service providers then digitally transmit the
signals 22,300 miles in space to a grouping of three
high-powered satellites built by Hughes Electronics.
These satellites are co-located in geosynchronous
orbit. This means that after installation of the
DIRECTV System, which includes aiming the
satellite dish antenna at the satellites, no adjustment
will be necessary to change channels because
everything comes from the same locations in the sky.
The satellite dish antenna never has to track the
satellite, so there's no waiting for the picture to come
in. From there the digital signals are beamed back to
earth where they are received by your satellite dish
antenna. The signals then go into the digital satellite
receiver where they undergo extensive processing to
determine if you are authorized to access them. The
signals are then reconverted into high-quality video
and audio that you can enjoy on your television. The
telephone connection is used by the digital satellite
receiver to report back to the service providers any
purchase activity.
A FIRST LOOK AT THE
DIRECTV DIGITAL
SATELLITE RECEIVER
1
The DIRECTV network

DIRECTV SYSTEM FROM HUGHES NETWORK SYSTEMS - OWNER’S MANUAL
PAGE 1-2
DIRECTV System Components
There are three main components of your DIRECTV System. They are the satellite dish antenna, the
digital satellite receiver, and the remote control. Take a few minutes to read about each one.
The Satellite Dish Antenna
The satellite dish antenna is the component that receives the digital signals. It must be mounted to a
solid outdoor surface that allows a clear view of the southern sky.
The large circular part is known as the reflector. At the end of a tubular arm that is attached to the
satellite dish antenna, there is a low noise block (LNB). The mounting bracket and base make
adjustments easy during installation. Once the satellite dish antenna has been properly positioned to
point towards the satellites, you should never need to adjust it again.
Satellite dish antennas will have either a single LNB or a dual LNB. The single LNB has one
connection, allowing use of a single digital satellite receiver. The dual LNB has two connections,
allowing use of two digital satellite receivers, or more if you are using a multi-switch.
The mounting bracket and base make adjustments easy during installation. Once the satellite dish
antenna has been properly positioned to point toward the satellites, you should never need to adjust.
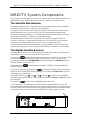
The Digital Satellite Receiver
This digital satellite receiver is one of the most compact available today. Nearly every feature of the
digital satellite receiver can be accessed from the front panel keys.
The power key ( ) is used to turn the digital satellite receiver on and off. The power light (located
in the center) will illuminate when the unit is on. Any off-air signal, such as cable TV or local
programming, connected to the IN FROM ANT jack is passed through to the OUT TO TV jack when
the digital satellite receiver power is off.
The information key ( ) is used to display descriptions of DIRECTV System programs and
channels on your TV screen.
At any time, pressing the program guide key ( ) will initiate the display of the on-screen guide,
where you can see a listing of all available programs, or will display the GUIDE MENU if pressed
while displaying a program guide.
The four directional keys, up ( ), down ( ), left ( ), and right ( ), are used to move the highlight
around the program guide and menus. They also provide access to the OneLine™ Guide when menus
aren’t displayed.
The select key ( ) is used to access a highlighted guide or menu item.
Your access card is located behind the door on the right side of the digital satellite receiver. This
special card contains information about your level of service and holds pay per view purchase activity.
This card should not be removed except to protect the digital satellite receiver from unauthorized use
or to replace the card when your service provider (DIRECTV or USSB) supplies a new one.
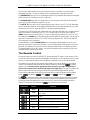
The rear of the digital satellite receiver.

A FIRST LOOK AT THE DIRECTV DIGITAL SATELLITE RECEIVER
PAGE 1-3
The rear of the digital satellite receiver has numerous jacks for connection to your audio/video
entertainment system. You will also find the power cord permanently connected to the back.
The SATELLITE IN F-type jack is for connecting the cable from your satellite dish antenna to the digital
satellite receiver. Be sure that you use RG-6 cable only.
The IN FROM ANT F-type jack is an input where you can connect the cable from an RF terrestrial
source such as an off-air antenna or cable TV service.
The OUT TO TV F-type jack is an RF output which you may connect to your TV or VCR (depending
on your entertainment system). Note that the CH3/CH4 switch on the upper left enables you to select
the channel for your TV on which the DIRECTV System programming appears.
The phono-type AUDIO output jacks, labeled and color coded (L is white, R is red) to indicate left and
right, can be used for connection to your TV, VCR, or audio system. The phono-type composite
VIDEO output jack is color-coded yellow. You may use this jack for connection to your TV or VCR.
The multiple-pin S-VIDEO jack is for high-quality output of DIRECTV System video. Use this jack to
achieve the clearest picture for your TV or VCR. Only newer high-end TVs, SVHS VCRs and Hi8
VCRs support S-video connections.
The standard RJ-11 modular PHONE JACK is for connecting the digital satellite receiver to your
phone line. This phone connection is necessary to access certain program offerings from your service
providers. The telephone line connection will not normally interfere with your telephone operation.
The digital satellite receiver will, however, call a toll-free number briefly to report any pay per view
programs that may have been purchased.
The Remote Control
The remote control can control your DIRECTV System and most TV brands, as well as many VCRs.
The remote control uses an invisible infrared light to send signals to your components when you press
the keys. You must aim the remote control toward the component for it to receive the command.
The mode keys across the top of the remote control enable you to specify the device you intend to
control. This is important since many devices share the same keys, such as the key and the
numeric keys. You must press the appropriate device key before pressing a command key to
make sure the remote control sends the right signal to the right device. The only keys that deviate
from the rule are the blue keys, as they are always associated with the digital satellite receiver.
The arch of keys immediately below the power and mode keys control frequently used, including
action ( ), information ( ), guide ( ), exit ( ), and favorite ( ) keys.
The key is unique because it does nothing by itself. Pressing it displays the action icon in the
upper left corner of your screen for a few seconds. During that time, other keys may be pressed to
access special functions indicated in yellow above the keys. Each will be described later in this
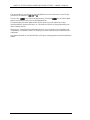
manual. The following chart describes the key functions for easy reference:
Key
Combination
Feature Function
MENU Displays the MAIN MENU from any screen
LIST
Displays the CHANNEL LISTS screen from
any screen
SERVICES
Displays the Alternate Services menu while in
video
MOVIES Filters the on-screen guide to movies only
SPORTS Filters the on-screen guide to sports only
NEWS Filters the on-screen guide to news only
ALL Resets the on-screen guide filters

DIRECTV SYSTEM FROM HUGHES NETWORK SYSTEMS - OWNER’S MANUAL
PAGE 1-4
Four directional keys will cause the on-screen highlight to move in the direction you want. The key
positions will be referred to as , , , and .
The select key ( ) is one of the most important keys. Pressing the key will tell the digital
satellite receiver that you wish to choose the highlighted item.
The remaining keys are either digital satellite receiver-specific keys and common device keys
including numbers, channel up and down, etc. The functions of these keys change depending on the
device currently selected.
Please refer to “Controlling the Digital Satellite Receiver” for more remote control capabilities and
“Programming Your Remote Control” for teaching your remote control about your other audio/video
components.
Descriptions and details of each individual key will be given in the appropriate sections throughout this
manual.

PAGE 2-1
Setting up your new DIRECTV System is much easier than assembling a train set or a bicycle. You
should be watching satellite programming in a very short time!
This chapter provides step-by-step instructions for setting up your DIRECTV System and connecting it
to your television or entertainment system. As you are reading this now, it is assumed that you have
already opened and unpacked the box.
The carton includes the digital satellite receiver itself, an access card (already installed in the digital
satellite receiver behind the door), a remote control (two batteries included), cables, and this manual.
Contact your dealer if anything is missing or damaged. Please save all packing materials until the
installation of your system is complete in case anything needs to be returned.
You now need to decide where you want to place the digital satellite receiver. Choose a location near
your TV where the power cord or cables will not be inadvertently disconnected. The location should
also be well ventilated. Do not set electronic components or other objects (including this manual) on
top of the digital satellite receiver or otherwise block its cooling vents.
It is recommended that you have your DIRECTV System professionally installed. This is due to safety
issues, electrical codes, and assurance of a quality installation. If you should choose to perform the
installation yourself, please pay special attention to the precautions in the front of this manual
and refer to the chapter “Installing and Pointing Your Satellite Dish Antenna." You may also
want to obtain the Do-It-Yourself Installation Kit, sold separately.
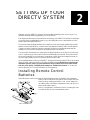
Installing Remote Control
Batteries
Before the remote control can be used, the supplied batteries need to be installed. First, unsnap the
battery cover from the back of the remote control. Install each fresh
battery as shown, making sure that the + and - on each battery line
up with the marks in the battery compartment. Next, snap the cover
back onto the remote control.
Refer to “Programming Your Remote Control” for setting the codes
to control the devices in your entertainment system.
SETTING UP YOUR
DIRECTV SYSTEM
2
Battery installation

DIRECTV SYSTEM FROM HUGHES NETWORK SYSTEMS - OWNER’S MANUAL
PAGE 2-2
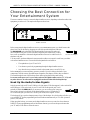
Choosing the Best Connection for
Your Entertainment System
There are a number of ways to connect the digital satellite receiver, depending on the other audio/video
equipment you wish to use. The simplest hookups are shown here.
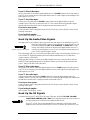
Before connecting the digital satellite receiver to your entertainment system, you should connect the
phone line. This can be done by plugging one end of the provided telephone cable into
the PHONE LINE jack on the back of the digital satellite receiver and the other end
into a telephone wall jack. If you do not have a telephone jack within reach, you may
have a new one installed or reorient the digital satellite receiver to be within reach of a
telephone wall jack.
You may need to purchase additional connectors and/or cables to suit specific needs from your dealer
or electronic hardware stores. Choose which hookup method to use based on:
• The capabilities of your TV and VCR.
• Your desire to pass local programming through the digital satellite receiver.
• Any other devices you want to include in the system (stereo, second VCR, etc.).
Before attempting to connect anything, position yourself so you are looking at the back of your
components. Note the various input and output receptacles, their shapes, and how they are labeled.
Then read through the rest of this hookup section before going ahead with actual hookup.
Do not turn on the power yet. For your safety, make sure the digital satellite receiver, TV, VCR, and
any other devices to be connected are unplugged from the wall outlet while hooking them up.
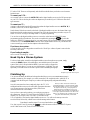
Hook Up the Audio/S-video Signals
Only the newest, high-end TVs and VCRs have S-video inputs. VCRs that support S-video include Hi8
and SVHS types. Look on the back of your TV and VCR for this special jack. It will
probably be labeled S-VIDEO IN. If you are unsure, you can see the type of connector
that you are looking for on the back of the digital satellite receiver. If neither the TV
nor VCR has this jack, proceed to the “Hook Up the Audio/Video Signals” section.
This hookup will give you the sharpest picture of any of the hookups. Also, this hookup will allow you
to view DIRECTV System programming and local broadcast simultaneously on TVs with “picture in
picture” (PIP) feature.
When using this hookup, you cannot use the digital satellite receiver as a switch to choose between
DIRECTV System programming and local broadcasts. Instead, you will use the input selection that
your TV and/or VCR offers to select the source.
Possible connections
The Phone line and jack
The S-video cable and jack

SETTING UP THE DIRECTV SYSTEM
PAGE 2-3
If your VCR has S-video input…
use an S-video cable to connect the digital satellite receiver’s S-VIDEO output to the S-video input on
your VCR. Also connect one pair of the digital satellite receiver’s audio outputs (Left and Right) to the
audio inputs on your VCR.
If your TV has S-video input…
connect an S-video cable from the S-VIDEO output (either from the digital satellite receiver if
available or the VCR) to the S-video input on the TV. Also connect the left and right audio outputs
from the same device that the S-video is coming from and connect them to the TV.
If you have a stereo system…
you may be able to achieve big speaker sound. See the “Hook Up to a Stereo System” section for the
necessary connections.
If your hookup is complete…
move on to the “Finishing Up” section.
Hook Up the Audio/Video Signals
Most high-end TVs and VCRs have phono-type audio and video inputs. Look at the back of your TV
and VCR for three jacks—possibly color coded yellow, white and red. They will
be labeled something like IN (L and R), AUDIO IN, and VIDEO IN. If you are
unsure, look at these connectors on the back of the digital satellite receiver. If
you have no jacks like these on your TV or VCR, skip this section and proceed
to the “Hook Up the RF Signals” section.
This video hookup will give you a clearer picture than an RF hookup. Also, this hookup will allow you
to view DIRECTV System programming and local broadcast simultaneously on TVs that offer a
“picture in picture” (PIP) feature.
When using this hookup, you cannot use the digital satellite receiver as a switch to choose between
DIRECTV System programming and local broadcasts. Instead, you will use the input selection that
your TV and/or VCR offer to select the source.
If your VCR has a video input…
use an audio/video cable to connect the digital satellite receiver’s VIDEO output to the video input on
your VCR. Also connect the pair of the digital satellite receiver’s audio outputs (Left and Right) to the
audio inputs on your VCR.
If your TV has a video input…
connect an audio/video cable from the VIDEO output (from either the digital satellite receiver, if
available, or the VCR) to the video input on the TV. Also, connect the left and right audio outputs from
the same device that the video is coming from and connect them to the TV.
If you have a stereo system…
you may be able to achieve big speaker sound. See the “Hook Up to a Stereo System” section for the
necessary connections.
If your hookup is complete…
move on to the “Finishing Up” section.
Hook Up the RF Signals
Look at the back of your TV and VCR for RF inputs. These may be labeled 75-OHM, 300-OHM,
CABLE, FROM ANTENNA, VHF or UHF. These could appear either as a pair of screws or
an F-type connector as on the back of the digital satellite receiver.
If your TV or VCR does not have threaded F-type connectors you will need to obtain
adapters which convert the round F-type RG-6 or RG-59 cable to the connectors on your
The phono-type video cable and jack
The RF cable and jack

DIRECTV SYSTEM FROM HUGHES NETWORK SYSTEMS - OWNER’S MANUAL
PAGE 2-4
TV and/or VCR. These are sold separately and should be available from your dealer or an electronics
hardware store.
To connect your VCR…
use a coaxial cable to connect the OUT TO TV from the digital satellite receiver to the RF input section
on your VCR. This is the first place where an adapter may be needed if your VCR doesn’t have the F-
type connector.
To connect your TV…
connect a coaxial cable from the RF output (from either the digital satellite receiver’s OUT TO TV, if
available, or the VCR) to the RF input on the TV.
Set the channel 3/4 selector switch on the back of the digital satellite receiver to the channel that is not
broadcast or has the weakest signal in your area. This will be the channel that you need to set your TV
and/or VCR to for viewing or recording DIRECTV System programming.
You can also use the digital satellite receiver as a switch to select between DIRECTV System
programming and local broadcasts. This can be accomplished by pressing the key while the
remote is in DIRECTV System mode. Also, you must connect your local signal, either from an antenna
or cable service, to the IN FROM ANT on the back of the digital satellite receiver. If your antenna wire
is not a coaxial type you will need an adapter as described earlier.
If you have a stereo system…
you may be able to achieve big speaker sound. See the “Hook Up to a Stereo System” section for the
necessary connections.
If your hookup is complete…
move on to the “Finishing Up” section.
Hook Up to a Stereo System
To achieve high-quality sound from the digital satellite receiver through a stereo system, simply
connect the AUDIO outputs (Left and Right) to an available input on your audio
system. First, look for an input labeled AUX. If you aren’t using a compact disc
player or laser disc player, you can use one of those inputs, if available. The only
input that you should not use is one that is specified for a turntable/phonograph.
Finishing Up
You can mix and match the different hookups described above to suit your entertainment system’s
available connections. For example, you could connect the VCR using audio/video, while the TV is
connected with the RF signal. Always try to achieve the highest quality and greatest flexibility
available.
Once all connections have been completed, plug in the TV, VCR
and digital satellite receiver to the wall outlet, appropriate extension
cord, or surge protector. See Important Safety Instructions
described in the front of this manual.
Once you have connected everything, you can begin powering up
the components. Turn the TV on and set it to the DIRECTV System
channel (3 or 4) or input (video or S-video). Do the same for the
VCR, if applicable. Now turn the digital satellite receiver on. You will see the start-up screen for
several seconds, followed by a black screen with the message at the bottom:
“Searching for satellite signal. To access related utilities, press .”
If so, this is good! If not, try pressing the key while the remote control is in DIRECTV System
mode. If that doesn’t work, check all of the connections.
The phono-type audio cable and jack
Note: If you have connected a VCR into your
entertainment system in a way that routes the cables
from the digital satellite receiver to your VCR before
the signal reaches the TV, you may experience a
distorted picture if you attempt to record a copy-
protected program. These programs are identified by a
“Can’t Tape” symbol in the banner area of the screen.
If this occurs, simply stop the recording process and
your picture will automatically correct itself.

PAGE 3-1
Now it’s time for you to take control. Take a few minutes to read through this chapter to begin to
understand how to operate your system. Let’s begin with a few simple rules. First, there is nothing that
you can do, using the front panel keys or the remote control keys, which could harm the digital satellite
receiver in any way. Once you understand the capabilities and options available in your receiver, you’ll
be able to undo any changes or settings that you make.
The next important rule is to have fun. The features of the digital satellite receiver are intended to
make watching TV more enjoyable. It isn’t necessary to know everything your system can do right
away. Learn the capabilities a little at a time. As you use the digital satellite receiver, the techniques
necessary to control it will become second nature.
Front Panel vs. Remote Control
Keys
The front panel provides all the basic controls needed to access and use the primary features of the
digital satellite receiver. The remote control has aditional keys to provide shortcuts or access to
extended features of the digital satellite receiver. Most of the remote control keys can also be used to
control other components in your entertainment system. For this reason, you must remember to press
the key, putting the remote control in digital satellite receiver mode, when you want to control
the digital satellite receiver.
Basic Navigation
The most common digital satellite receiver-related keys that you will use are , , , , and .
Four distinct keys on the digital satellite receiver front panel represent the direction keys. On the
remote control, the direction keys are represented by the top, bottom, left and right keys surrounding
the key. These keys are primarily used to move the highlight (also known as a cursor) around
the screen. The key should be pressed to indicate that a highlighted item is the one that you
wish to choose.
Another key you will be using frequently is the key, located on both the front panel of the
digital satellite receiver and on the remote control. This key is used when you want to display the
current on-screen guide. Once you are in the guide, pressing the key while a program title is
highlighted will display the Guide pop-up menu.
Another key appearing on both the front panel and the remote control is the key. This key is
used to retrieve descriptive information about a currently airing event and to provide access to
scheduling information (and purchasing information for pay per view) about highlighted programs in
the on-screen guide.
The final key that appears on both the remote control and the front panel is the key. Make sure
the remote control is in DIRECTV System mode for the key to apply to the digital satellite
receiver. When you power the digital satellite receiver off, it has not actually stopped using electricity.
Rather, it goes into a standby mode which enables it to continue monitoring data sent from the service
3
CONTROLLING THE
DIGITAL SATELLITE
RECEIVER

DIRECTV SYSTEM FROM HUGHES NETWORK SYSTEMS - OWNER’S MANUAL
PAGE 3-2
providers, call in status reports to the service providers, start and stop your VCR for programs you
have scheduled, receive messages, and perform other background activities. The only apparent changes
occurring in the standby mode are that the video goes black, the IN FROM ANTENNA connector
signals are passed through to the OUT TO TV connector, and the power light is off.
There are three keys on your remote control that most people use frequently. They are the ,
, and keys.
After you have established favorite channel lists, as described in the chapter “The Digital Satellite
Receiver’s Menu System,” you will want to cycle through them quickly and easily. Do so by pressing
the key. Each press will advance to the next list of channels. After stepping through the favorite
lists it will cycle back to “All Channels.”
At any time, you can exit the on-screen guide by selecting Video in the Guide pop-up menu. An even
faster way is to press the key.
The key is only useful if the digital satellite receiver is connected to your entertainment system
through the OUT TO TV connector, rather than VIDEO or S-VIDEO. If you are using OUT TO TV,
pressing the key will switch the output between DIRECTV System programming and local
broadcasts similar to the way the key works.
Knowing these few keys should enable to navigate through almost every digital satellite receiver
feature and menu.

PAGE 4-1
There’s a cluster of satellites way out there in space, and just as a telescope is pointed at a star, you
need to point your satellite dish antenna at the satellites. In this chapter we will explain the basic
process for determining where to mount and how to point your satellite dish antenna.
Read the contents of this chapter, as well as the important safety information in the front of this
manual. These instructions are intended for an installer experienced in performing the various
tasks described here. Depending on how you intend to install the antenna, you may be required to:
• Climb a ladder and work on your roof.
• Use a power drill to drill holes in your house.
• Determine if there are water pipes, electrical wiring, or gas lines hidden in the walls near
where you will be drilling.
• Route coaxial cable through the foundation wall, under floors, and through interior walls.
• Ground the antenna and coaxial cable as recommended in the National Electrical Code
(published by the National Fire Protection Association, Batterymarch Park, Quincy, MA
02269).
If you are unsure about your ability to perform these tasks or comply with installation
requirements, contact your DIRECTV System dealer for information regarding professional
installation.
Successfully installing and obtaining the satellite signals can be a time consuming and tedious
task. For that reason, it is highly recommended that you contact a professional installer to get you
up and running. The warranty covering your DIRECTV System assumes professional installation
and may not apply in self installation situations since improper installation could damage the
various components or cause undesired performance.
Your satellite dish antenna will need to be pointed at a satellite cluster located 22,300 miles in
orbit above the equator. To aim the satellite dish antenna at the satellites you need to know the
azimuth and elevation angles. The digital satellite receiver will assist you in determining these
angles. If you see the message:
“Searching for satellite signal. To access related utilities, press .”
press the key. Otherwise, press keys in the following order to navigate to the
INSTALLATION screen:
• to display the MAIN MENU
• or to move the highlight over the Setup Menu button
• to display the SETUP MENU
• or to move the highlight over the Installation button
• to display the INSTALLATION screen
INSTALLING THE
SATELLITE DISH
ANTENNA
4

DIRECTV SYSTEM FROM HUGHES NETWORK SYSTEMS - OWNER’S MANUAL
PAGE 4-2
Determine Where to Point Your
Satellite Dish Antenna
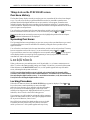
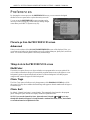
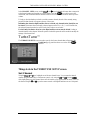
The INSTALLATION screen
When you press you will see a screen that assists you with the satellite dish antenna
pointing and signal strength utilities.
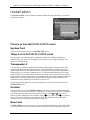
Move the highlight to the Position button and press . You
will need to determine your location by either ZIP code or by your
latitudinal and longitudinal position. Press the or keys on the
remote control or receiver front panel until your preferred selection
is highlighted. Then press .
You will now see a pop-up panel with space to enter your
information. Enter your location. If you are using the remote control,
press the key, followed by the five appropriate digits. From
the remote control or receiver front panel you can also use the or
keys to increase or decrease the highlighted digit value, and the
key to advance to the next digit. Use the key to back up to correct
any mistakes. When you are finished, highlight the OK button and
press to continue.
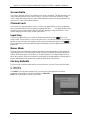
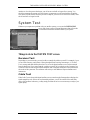
ALIGNMENT RESULT Pop-up Panel
The ALIGNMENT RESULT will display the proper elevation and azimuth for pointing the
satellite dish antenna calculated from the information you entered.
Take a moment to write down the pointing results.
ELEVATION: ______
AZIMUTH: ______
The values displayed are fairly accurate; however some fine-tuning
may be necessary. Use these values when choosing a mounting
location for your satellite dish antenna and remember that you will
need an unobstructed view in that direction.
Choosing the Antenna
Installation Site
WARNING
For your own safety, follow these important safety rules:
• Perform as many functions as possible on the ground.
• Do not install the antenna on a rainy or windy day.
• If you start to drop the antenna or mast assembly, get away
from it and let it fall.
The INSTALLATION screen
The ALIGNMENT RESULT screen
Page is loading ...
Page is loading ...
Page is loading ...
Page is loading ...
Page is loading ...
Page is loading ...
Page is loading ...
Page is loading ...
Page is loading ...
Page is loading ...
Page is loading ...
Page is loading ...
Page is loading ...
Page is loading ...
Page is loading ...
Page is loading ...
Page is loading ...
Page is loading ...
Page is loading ...
Page is loading ...
Page is loading ...
Page is loading ...
Page is loading ...
Page is loading ...
Page is loading ...
Page is loading ...
Page is loading ...
Page is loading ...
Page is loading ...
Page is loading ...
Page is loading ...
Page is loading ...
Page is loading ...
Page is loading ...
Page is loading ...
Page is loading ...
Page is loading ...
Page is loading ...
Page is loading ...
Page is loading ...
Page is loading ...
Page is loading ...
Page is loading ...
Page is loading ...
Page is loading ...
Page is loading ...
Page is loading ...
Page is loading ...
Page is loading ...
Page is loading ...
Page is loading ...
Page is loading ...
Page is loading ...
Page is loading ...
-
 1
1
-
 2
2
-
 3
3
-
 4
4
-
 5
5
-
 6
6
-
 7
7
-
 8
8
-
 9
9
-
 10
10
-
 11
11
-
 12
12
-
 13
13
-
 14
14
-
 15
15
-
 16
16
-
 17
17
-
 18
18
-
 19
19
-
 20
20
-
 21
21
-
 22
22
-
 23
23
-
 24
24
-
 25
25
-
 26
26
-
 27
27
-
 28
28
-
 29
29
-
 30
30
-
 31
31
-
 32
32
-
 33
33
-
 34
34
-
 35
35
-
 36
36
-
 37
37
-
 38
38
-
 39
39
-
 40
40
-
 41
41
-
 42
42
-
 43
43
-
 44
44
-
 45
45
-
 46
46
-
 47
47
-
 48
48
-
 49
49
-
 50
50
-
 51
51
-
 52
52
-
 53
53
-
 54
54
-
 55
55
-
 56
56
-
 57
57
-
 58
58
-
 59
59
-
 60
60
-
 61
61
-
 62
62
-
 63
63
-
 64
64
-
 65
65
-
 66
66
-
 67
67
-
 68
68
-
 69
69
-
 70
70
-
 71
71
-
 72
72
-
 73
73
-
 74
74


DirecTV HIRD-D01 User manual
- Category
- TV set-top boxes
- Type
- User manual
Ask a question and I''ll find the answer in the document
Finding information in a document is now easier with AI
Related papers
-
DirecTV HNS HIRD-B1 Receiver User manual
-
DirecTV HIRD-E61 Owner's manual
-
DirecTV HIRD-E1 User manual
-
DirecTV HNS HIRD-C2 Receiver User manual
-
-
DirecTV GAEB0 User manual
-
Mitsubishi HBH-SA User manual
-
Multi-Satellite Multi-Satellite Dish Antenna Owner's manual
-
-
DirecTV HNS HIRD-E86 Receiver User manual
Other documents
-
-
Hughes HIRD-D45 Owner's manual
-
-
-
Hughes HIRD-D25 Owner's manual
-
Samsung SIR-S60W Receiver Owner's manual
-
RCA DRD221RD Receiver Owner's manual
-
RCA Digital Satellite Receiver User manual
-
 Commercial Electric 217F WH User manual
-
