8109-AG

Crystorama 8109-AG User manual

  • I've reviewed the assembly instructions for the Crystorama 8109-AG light fixture. This document details the steps for installing the fixture, including how to mount it, connect the wiring, and assemble the various components such as the crystal bobeche and shade. It also highlights important safety warnings. I'm ready to help with any questions you have about this product.
  • What type of bulbs are required?
    What is the maximum wattage for the bulbs?
    Is this fixture rated for wet locations?
    What is the warning about lead?
How to Install
All electrical components must be
installed by a licensed electrician
in accordance with the National
Electric Code and the appropriate
local electrical codes.
WARNING: This product can expose you to Lead,
which is known to the State of California to cause cancer
and/or birth defects or reproductive harm. For more
information go to www.P65Warnings.ca.gov
®
You will need 8-Candelabra Bulb
60 watts Max Bulb not included
USE LED BULBS FOR EXTENDED USE
This fixture is DRY rated
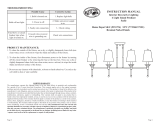
ASSEMBLY INSTRUCTION MODEL #8109-AG
16.8″
38″
9.5"8"
31.6″
Ø2″
3.Slide the crystal bobeche over the socket.
5.Screw the crystal ball into the bottom frame.
1.The mounting plate is fixed to
the ceiling with screws.
2.Lock the canopy on the mounting plate
and connect the wires.
crystorama.com
4.Put the shade on the candle sleeve,Install the
recommended bulbs into each socket.
Part Number
A.Mounting Hardware
(1)Mounting Plate
(3)Mounting Screws
(3)Wire Nut
(3)Wall anchor
(3)Wall anchor screws
(6)Screws
Part Numbers
PART NUMBER MODEL #8109-AG
B.(1)Canopy;21″x5″x0.75″h;XMO8109AGCAN21IN
A
C
G
H
J
I
K
C.(2)3IN Rod;Ø0.5″xL3";XMO8109AGROD3IN
H.(1)Fabric Shade;38″x16.8″x9.5″h;XMO8109SHA38IN
G.(4)Knurled Nut
I.(8)Socket
J.(8)Crystal bobeche
K.(3)Crystal ball
crystorama.com
B
D
E
F
D.(2)6IN Rod;Ø0.5″xL6";XMO8109AGROD6IN
E.(2)12IN Rod;Ø0.5″xL12";XMO8109AGROD12IN
F.(2)18IN Rod;Ø0.5″xL18";XMO8109AGROD18IN
/