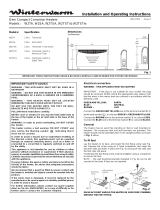
Dimensions
MODEL A B C D E F
LST050E 272mm 406mm 312mm 690mm 430mm 108mm
LST075E 272mm 406mm 312mm 690mm 430mm 108mm
LST100E 272mm 406mm 312mm 690mm 430mm 108mm
LST150E 272mm 504mm 328mm 860mm 430mm 108mm
IMPORTANT SAFETY ADVICE
When using electrical appliances, basic
precautions should always be followed to
reduce the risk of re, electrical shock, and
injury to persons, including the following:
IMPORTANT: The wall bracket supplied with
the appliance must be used.
WARNING: Do not use this heater in the
immediate surroundings of a bath, a shower
or a swimming pool.
IMPORTANT: If the heater is installed in a
room containing a bath or shower, it must be
so installed that switches and other controls
cannot be touched by a person using a bath
or shower.
WARNING: In order to avoid overheating, do
not cover the heater. Do not place material
or garments on the heater, or obstruct the
air circulation around the heater, for instance
by curtains or furniture, as this could cause
overheating and a re risk.
NEVER cover or obstruct in any way the heat
outlet slots at the top of the heater or the air
inlet slots in the base of the heater.
CAUTION: Some parts of this product can
become very hot and cause burns. Particular
attention has to be given where children and
vulnerable people are present.
This appliance can be used by children aged
from 8 years and above and by persons
with reduced physical, sensory or mental
capabilities or lack of experience and
knowledge if they have been given supervision
or instruction concerning use of the appliance
in a safe way and understand the hazards
involved.
Cleaning and user maintenance shall not be
carried out by children without supervision.
Children of less than 3 years should be kept
away unless continuously supervised.
Children aged from 3 years and less than 8
years shall only switch on/off the appliance
provided that it has been placed or installed
in its intended normal operating position and
they have been given supervision or instruction
concerning use of the appliance in a safe way
and understand the hazards involved.
Children aged from 3 years and less than 8
years shall not plug in, regulate and clean the
appliance or perform user maintenance.
Note that due care and consideration must be
taken when using this heater in series with a
thermal control, a program controller, a timer
or any other device that switches on the heat
automatically, since a re risk exists when the
heater is accidentally covered or displaced.
If the supply cord is damaged it must be
replaced by the manufacturer or service agent
or a similarly qualied person in order to avoid
a hazard
WARNING: Servicing and product repairs should
only be undertaken by the manufacturer’s
approved service agent or a similarly qualied
person, using only exact manufacturer approved
spare parts.
IMPORTANT: The supply circuit to the heater
must incorporate a double pole isolating switch
having a contact separation of at least 3mm.
This product contains a replaceable battery.
WARNING: KEEP BATTERIES OUT OF REACH
OF CHILDREN.
WARNING: Packaging should be disposed of
responsibly as it could be a potential choking
hazard for children.
WARNING: Do not locate the heater immediately
below a xed socket outlet or connection box.
THESE INSTRUCTIONS SHOULD BE READ CAREFULLY AND RETAINED FOR FUTURE REFERENCE
Installation and Operating Instructions
LSTE Panel Heater
(IP24)
300001893 ISSUE:2 Series: A
150mm
(min)
150mm
(min) ‘D’
‘E’
‘F’
150mm
(min)
150mm
(min)
Minimum front
clearance
300mm
Shelf/Obstruction
150mm
(min)
Fig. 1

Energy Related Product Directive
This product complies with Lot20 of the Energy Efciency Directive (2015/1188)
General Information
The heater is designed for wall mounting using the wall bracket supplied. It should only be operated when in the upright position as shown
- see Fig. 1. All models are splash proof to IP24. Before connecting the heater check that the supply voltage is the same as that stated on
the heater.
Wall Mounting
This guide is for quick reference only
To view the full manual, please scan this QR code using your smarphone or visit the product page at www.dimplex.co.uk
Model Identier(s): LST050E LST075E LST100E LST150E
Heat Output
Nominal heat output Pnom 0.50kW 0.75kW 1.00kW 1.50kW
Minimum heat output (indicative) Pmin N.A N.A N.A N.A
Maximum heat output Pmax,c 0.50kW 0.75kW 1.00kW 1.50kW
Auxiliary electricity consumption
At nominal heat output elmax 0.001 0.001 0.001 0.001
At minimum heat output elmin
0.001 0.001 0.001 0.001
In standby mode elSB 0.001 0.001 0.001 0.001
Type of heat output / room temperature control Type of heat output / room temperature control
Electronic heat charge control with room and / or outdoor
temperature feedback Yes
Other control options
Room temperature control, with open window detection Yes
With adaptive start control Yes
To mount the heater to the wall:
1. Remove wall mounting plate from the back of the heater by removing the M4x20 screw with a Pozi Head No.2 screwdriver see Fig 3
2. Fix the wall bracket securely to the wall through the four screw holes provided referring to dimensions in Fig. 1, Fig. 2.
3. Present the heater to the wall bracket and engage bottom slots in the back with bracket hooks.
4. Position the top slots onto the top hooks and slide the heater downwards until the slots come to a positive stop.
5. Re-insert the M4x20 screw in the M4 clinch nut on the wall bracket. This secures the heater to the wall plate.
WARNING:
This product is heavy and
care should be taken in
installation
IMPORTANT The wall bracket supplied with the heater must be used and the heater must be installed in the correct orientation. The
xings should be used to secure the bracket to the particular wall on which the heater will be installed. The heater should be positioned
observing the minimum clearances stated around the heater - see Fig. 1.
IMPORTANT:
During initial heat-up, some odour may be emitted due to the newness of materials
used in manufacture. This is normal and will disappear after a short period of use. It is
however advisable to keep the room well ventilated
Fig. 3
B
168 mm
A
234 mm
Minimum mounting clearance
C
Fig. 2

IMPORTANT: Please register your product without delay. Simply scan this QR code using your smartphone, or go to
https://www.dimplex.co.uk/register.
Quick Start Guide
How does the heater control work?
The control allows you to choose when you want heat and at what temperature. When using a timer mode (see below), Heating ON will display
on the home screen to tell you when the heater is maintaining the temperature displayed. Heating OFF will display when the heater is outside
of a timed heating period. When Manual, Eco or Frost modes are being used the heater will always maintain the temperature shown on the
home screen.
Set the Time
To set the date and time on the heater, press Menu, then press Enter with Time / Date highlighted. Press the up or down buttons until the correct
value is shown, then press Enter to conrm and move on to the next value. Repeat until all details are correct, and Set displays, then press Back.
The time is automatically adjusted in spring and autumn between Greenwich Mean Time (GMT) and British Summer Time (BST).
Set the Temperature
The temperature shown on the display is the room temperature set point (target room temperature). This is the temperature that the heater
will maintain during the heating periods. If the room temperature is above this temperature then the heater will not operate. The heater
leaves the factory with this temperature set at 21°C which represents a typical, comfortable room temperature. If you require a different room
temperature then press either up or down until the display shows the temperature you require.
Timer Modes
Timer Modes offer the most efcient mode of operation for a predictable heat demand. Each timer is broken down into 4 denable ‘Heating
On’ time periods and temperatures per day, for each day of the week. Each day consists of a 24-Hour period, starting and nishing at midnight.
‘Heating On’ periods are times when the heater is trying to achieve and maintain the target room temperature. To choose a timer mode, press
Menu from the home screen. Use the arrow keys to highlight ‘Modes’, then press Enter to select. ‘Timer Mode’ should be highlighted, press Enter
to select. A list of Timer Modes will be shown. Their default settings are shown in the table below.
Period 1 Period 2 Period 3 Period 4
User Timer 06:30 – 09:30 21 11:00 – 13:00 21 15:00 – 17:00 21 18:00 – 22:00 21
Home All Day 08:00 – 21:00 21
Out All Day 07:00 – 08:30 21 17:30 – 22:00 21
Away Mode Away Mode does not operate in the same way as the other Timers. See ‘Away Mode’.
Away Mode
Away Mode temporarily overrides the active mode before returning the Heater back to the previously active mode. This is handy if you are
temporarily away at the shops or on holiday and want your heating to resume as normal operation automatically when you return. While active,
Away Mode can maintain a minimum room temperature. By default, this is set to 7 °C (frost protection temperature). This can be modied when
Away mode is activated.
Child Lock
If you need to lock the controls so that the settings cannot be changed then activate the Child Lock. To lock the controls press and hold both
the Back button and Enter for three seconds. Child Lock will appear at the bottom of the screen. To unlock the control repeat the action by
pressing both the Back button and Enter for three seconds.
Advance
The Advance button is only used when a Timer Mode is active and allows the timer schedule to be changed temporarily. This button allows
a Heating ON period to begin or end early. This is useful if you are at home when you had not planned to be, or need to leave when you had
planned to have the heating on.
If the heater displays Heating OFF and heat is required, press the Advance button. If the heater is in Heating ON and heat is not required, press
the Advance button and the heater will stop heating until the beginning of the next Heating ON period.
This product is Dimplex Control capable * **.
Control and monitor your heating and hot water with Dimplex Control. Group heaters into zones to easily control and track their energy usage. Any
time. Anywhere
Search for Dimplex Control on your device’s app store.
*Requires additional hardware. Sold seperately. Visit Dimplex.co.uk for more information.
**A Dimplex Hub and RFM are required for this product to connect to Dimplex Control.

© Glen Dimplex. All rights reserved. Material contained in this publication may not be reproduced in whole or in part,
without prior permission in writing of Glen Dimplex.
www.dimplex.co.uk
Glen Dimplex Heating and Ventilation
Millbrook House, Grange Drive, Hedge End, Southampton, SO30 2DF
Glen Dimplex Europe, Airport Road, Cloghran, Co. Dublin K67 VE08
Your Guarantee
Your Product is manufactured by Glen Dimplex UK operating as Glen Dimplex Heating & Ventilation. GDHV designs and
manufactures products to ensure they deliver reliable service for normal use in domestic dwellings and, where specied by
us, in light commercial premises.
GDHV products are individually tested before leaving the factory, Your product comes with a 2 year parts and labour guarantee
for repair or replacement of faulty goods and/or partial refund in the event that a repair or replacement is not available.
Your guarantee is provided by Glen Dimplex UK Ltd operating as Glen Dimplex Heating & Ventilation Ltd, Millbrook House,
Grange Drive, Southampton SO30 2DF. Terms and conditions apply.
The GDHV guarantee does not in any way diminish or affect your statutory consumer rights in connection with your product.
If you experience a problem with your product during or after the guarantee period, visit our online
help centre:
support.dimplex.co.uk
Please note for support you will need the model and serial number of your product and a description
of the fault which has occurred.
To view the full guarantee terms and conditions scan this QR code using your smartphone or go to
https://www.gdhv.co.uk/guarantee-terms-and-conditions.
Important: For electrical products sold within the European Community. At the end of the electrical products
useful life it should not be disposed of with household waste. Please recycle where facilities exist. Check with
a Local Authority or retailer for recycling advice in your country. Batteries should be disposed of or recycled in
accordance with WEEE Directive 2012/19/EU. Packaging should be recycled where possible.
/