Dell PowerEdge 2600 User guide

Category
Household fans
Type
User guide
9D904fc5.fm Page 2 Wednesday, March 5, 2003 10:11 AM
www.dell.com | support.dell.com
Dell™ Systems
Microprocessor Upgrade
Installation Guide
9D904ebk5.book Page 1 Wednesday, March 5, 2003 1:42 PM
Notes, Notices, and Cautions
NOTE: A NOTE indicates important information that helps you make better use of your computer.
NOTICE: A NOTICE indicates either potential damage to hardware or loss of data and tells you
how to avoid the problem.
CAUTION: A CAUTION indicates a potential for property damage, personal injury,
or death.
Information in this document is subject to change without notice.
© 2002–2003 Dell Computer Corporation. All rights reserved.
Reproduction in any manner whatsoever without the written permission of Dell Computer Corporation is strictly forbidden.
Trademarks used in this text: Dell and the DELL logo are trademarks of Dell Computer Corporation.
Other trademarks and trade names may be used in this document to refer to either the entities claiming the marks and
names or their products. Dell Computer Corporation disclaims any proprietary interest in trademarks and trade names
other than its own.
March 2003 P/N 9D904 Rev. A05
9D904ebk5.book Page 2 Wednesday, March 5, 2003 1:42 PM
Microprocessor Upgrade Installation Guide 1-1
This document provides instructions about adding or replacing microprocessors. To take
advantage of future options in speed and functionality, you can add secondary
microprocessors or replace microprocessors in your system.
NOTICE: Before you add or replace a microprocessor, check the latest system BIOS
information on the Dell Support website at support.dell.com, and upgrade the BIOS if necessary.
Each microprocessor and its associated cache memory are contained in a pin-grid array
(PGA) package that is installed in a ZIF socket on the system board. The following
subsection describes how to install or replace the microprocessor in either the primary or
secondary microprocessor sockets.
NOTE: In a single microprocessor system, the microprocessor must be installed in the
primary microprocessor socket.
Adding or Replacing a Microprocessor
NOTICE: The secondary microprocessors must be the same speed as the primary
microprocessor.
In addition to the ZIF socket for the primary microprocessor on the system board, other
ZIF sockets might be present to accommodate secondary microprocessors.
The following items are included in the microprocessor upgrade kit:
A microprocessor
A heat sink
Heat-sink retention clip(s)
A VRM, if applicable
Your upgrade kit may also include a cooling fan.
CAUTION: Before you perform this procedure, read the safety instructions in
your System Information document.
1
Turn off the system, including any peripherals, and disconnect the power cable from
the electrical outlet.
2 Open the system doors, or remove the system cover (see your Installation and
Troubleshooting Guide).
CAUTION: See "Protecting Against Electrostatic Discharge" in the safety
instructions in the System Information document.
3
Remove the cooling shroud, if applicable (see your Installation and Troubleshooting
Guide).
9D904ebk5.book Page 1 Wednesday, March 5, 2003 1:42 PM
1-2 Microprocessor Upgrade Installation Guide
www.dell.com | support.dell.com
4 If you are upgrading an existing microprocessor, remove the microprocessor heat sink.
NOTE: If a cooling fan is mounted on the heat sink, you can remove the heat sink without
removing the fan. However, you can remove the fan to provide easier access to the heat-sink
retention clip(s). For information on removing a cooling fan, see your Installation and
Troubleshooting Guide.
a
Remove the retention clip(s) securing the heat sink to the microprocessor by
pressing down firmly on the retention clip tab, and then removing the clip from
the heat sink.
CAUTION: The microprocessor and heat sink can become extremely hot. Be sure
they have had sufficient time to cool before handling.
NOTICE: Never remove the heat sink from a microprocessor unless you intend to remove the
microprocessor. The heat sink is necessary to maintain proper thermal conditions.
NOTICE: After removing the heat sink, place it upside down on a flat surface to prevent the
thermal interface material from being damaged or contaminated.
b
Remove the heat sink. See your Installation and Troubleshooting Guide for
information on removing the heat sink.
5 Swing the socket release lever upward to the fully open position (see Figure 1-1).
NOTICE: Be careful not to bend any of the pins when removing the microprocessor. Bending
the pins can permanently damage the microprocessor.
6
Lift the microprocessor out of the socket and leave the release lever in the open
position so that the socket is ready for the new microprocessor.
NOTICE: Be careful not to bend any of the pins when unpacking the microprocessor. Bending
the pins can permanently damage the microprocessor.
7
Unpack the new microprocessor.
If any of the pins on the microprocessor appear bent, see "Getting Help" in your
Installation and Troubleshooting Guide.
9D904ebk5.book Page 2 Wednesday, March 5, 2003 1:42 PM
Microprocessor Upgrade Installation Guide 1-3
Figure 1-1. Removing and Replacing the Microprocessor
NOTICE: Positioning the microprocessor incorrectly can permanently damage the
microprocessor and the system when you turn on the system. When placing the microprocessor
in the ZIF socket, be sure that all of the pins on the microprocessor go into the corresponding
holes. Be careful not to bend the pins.
8
Install the microprocessor in the socket (see Figure 1-1).
a Ensure that the microprocessor socket release lever is in the fully open position.
b Align pin 1 on the microprocessor with pin 1 on the microprocessor socket.
c With pin 1 of the microprocessor and socket aligned, set the microprocessor
lightly in the socket and ensure that all pins are matched with the correct holes in
the socket.
Because the system uses a ZIF microprocessor socket, there is no need to use force
(which could bend the pins if the microprocessor is misaligned). When the
microprocessor is positioned correctly, it should drop down into the socket with
minimal pressure.
d When the microprocessor is fully seated in the socket, rotate the socket release
lever back down until it snaps into place, locking the microprocessor in the socket.
pin-1 locators
microprocessor
microprocessor socket
9D904ebk5.book Page 3 Wednesday, March 5, 2003 1:42 PM
1-4 Microprocessor Upgrade Installation Guide
www.dell.com | support.dell.com
9 Install the heat sink.
If the heat sink provided has a protective cover on the underside of the heat sink,
remove and discard the cover to expose the thermal grease or foil thermal interface
material, and then place the heat sink on the microprocessor.
If heat-sink thermal grease is provided, clean the heat sink and apply the thermal
grease before placing the heat sink on the microprocessor.
NOTICE: To avoid possible damage to the microprocessor, you must align the heat sink so that
the triangular mark on the heat sink points toward the triangular mark on the system board, if
applicable.
10
Orient the heat-sink retention clip as shown in your Installation and Troubleshooting
Guide.
11 Hook the end of the clip without the release tab over the tab on the edge of the socket.
12 Press down on the release tab until the hole on the clip latches onto the ZIF
socket tab.
NOTICE: If a cooling fan is provided with your upgrade kit, you must install the fan on the
microprocessor heat sink to provide proper thermal conditions. For information on installing a
cooling fan, see your Installation and Troubleshooting Guide.
13
If a cooling fan is provided with your upgrade kit or if you removed a cooling fan earlier
in this procedure, install the fan on the microprocessor heat sink.
14 If applicable, install the VRM(s):
a If you are adding a secondary microprocessor, examine the VRM to ensure that it
is the correct VRM for your system.
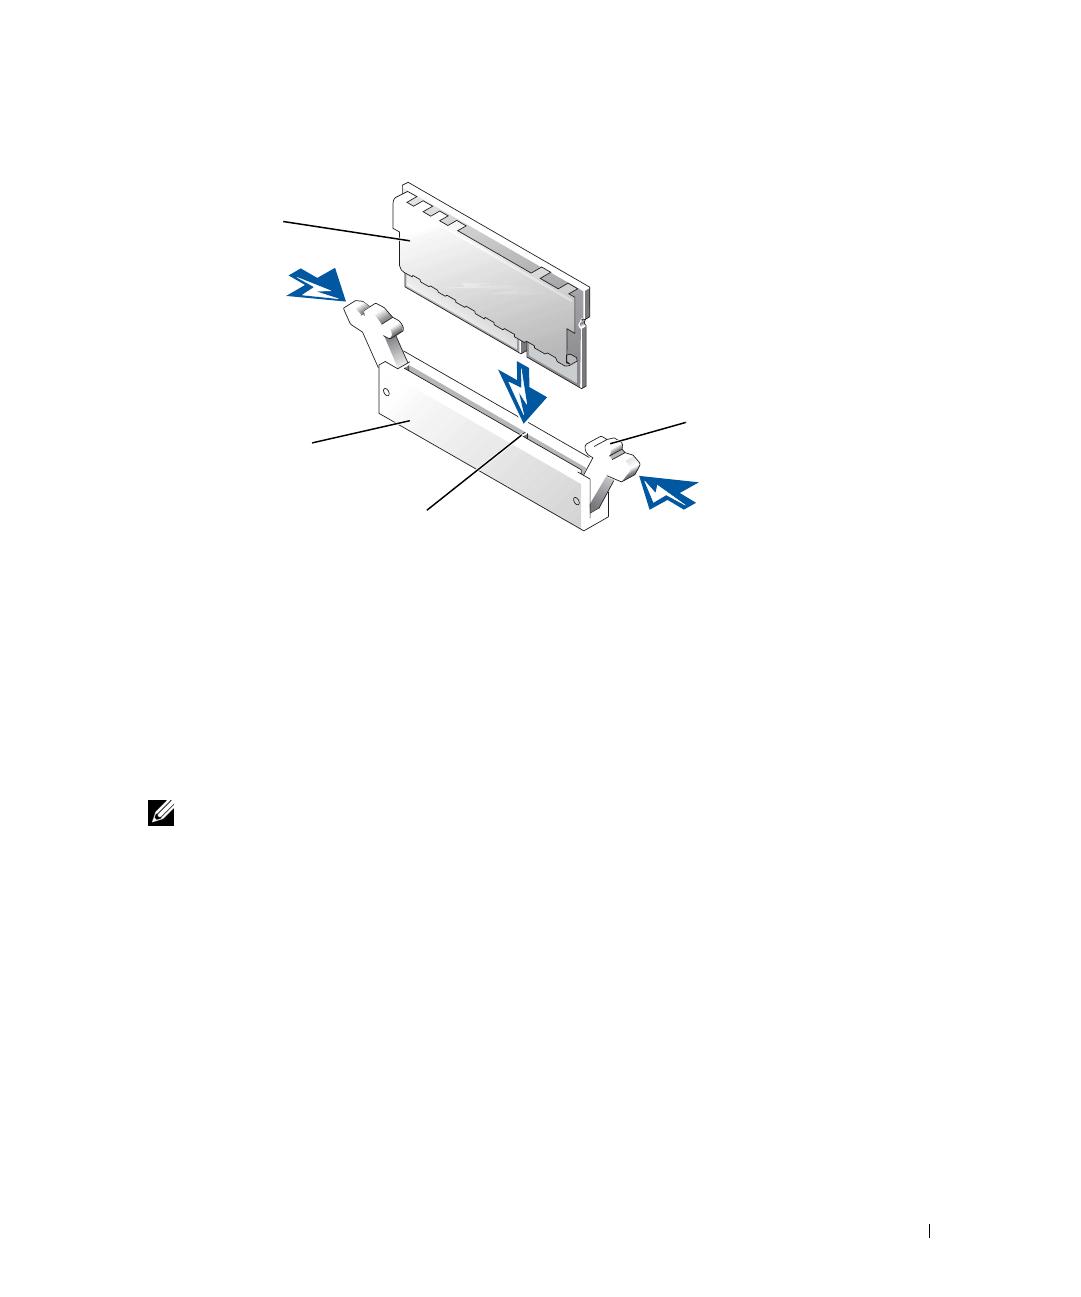
b Insert the VRM in the appropriate secondary VRM connector, ensuring that the
latches at each end of the connector engage (see Figure 1-2).
c If you received two VRMs with the upgrade kit, replace the primary VRM already
installed in the system with one of the VRMs from the upgrade kit.
NOTE: The system does not support mismatched VRMs.
9D904ebk5.book Page 4 Wednesday, March 5, 2003 1:42 PM
Microprocessor Upgrade Installation Guide 1-5
Figure 1-2. Installing a VRM
15
Replace the cooling shroud, if applicable (see your Installation and Troubleshooting
Guide).
16 Close the system doors, or replace the system cover (see your Installation and
Troubleshooting Guide).
17 Reconnect your system and peripherals to their electrical outlets, and turn them on.
As the system boots, it detects the presence of the new processor and automatically
changes the system configuration information in the System Setup program.
NOTE: After you access the inside of the system, the chassis intrusion detector will cause
an alert message to be displayed at the next system startup. This message is stored in the
system’s nonvolatile random-access memory (NVRAM). To clear this message log, see your
systems management software documentation.
18 Enter the System Setup program and ensure that the microprocessor categories match
the new system configuration. For instructions about using the System Setup
program, see your User’s Guide.
19 Run the system diagnostics to verify that the new microprocessor is operating
correctly. See your Installation and Troubleshooting Guide for information about
running the diagnostics and troubleshooting any problems that may occur.
VRM
VRM connector
latches (2)
connector key
9D904ebk5.book Page 5 Wednesday, March 5, 2003 1:42 PM
1-6 Microprocessor Upgrade Installation Guide
www.dell.com | support.dell.com
9D904ebk5.book Page 6 Wednesday, March 5, 2003 1:42 PM
www.dell.com | support.dell.com
Dell
系统
微处理器升级安装指南
9D904cbk5.book Page 1 Wednesday, March 5, 2003 10:43 AM
www.dell.com | support.dell.com
Systèmes Dell™
Guide d'installation pour la
mise à niveau du
microprocesseur
9D904fbk5.book Page 1 Wednesday, March 5, 2003 10:26 AM
3-6 Guide d'installation pour la mise à niveau du microprocesseur
www.dell.com | support.dell.com
9D904fbk5.book Page 6 Wednesday, March 5, 2003 10:26 AM
www.dell.com | support.dell.com
Dell™-Systeme
Installationshandbuch für
Mikroprozessor-Upgrades
9D904gbk5.book Page 1 Wednesday, March 5, 2003 1:33 PM
4-6 Installationshandbuch für Mikroprozessor-Upgrades
www.dell.com | support.dell.com
9D904gbk5.book Page 6 Wednesday, March 5, 2003 1:33 PM
www.dell.com | support.dell.com
Dell™ システム
マイクロプロセッサ
アップグレード取り付けガイド
9D904jbk5.book Page 1 Wednesday, March 5, 2003 10:38 AM
www.dell.com | support.dell.com
Dell
시스템
마이크로프로세서 업그레이드
설치 안내서
9D904kbk5.book Page 1 Wednesday, March 5, 2003 12:36 PM
6-6 마이크로프로세서 업그레이드 설치 안내서
www.dell.com | support.dell.com
9D904kbk5.book Page 6 Wednesday, March 5, 2003 12:36 PM
www.dell.com | support.dell.com
Sistemas Dell™
Guía de instalación para
actualización de
microprocesadores
9D904sbk5.book Page 1 Wednesday, March 5, 2003 10:32 AM
7-6 Guía de instalación para actualización de microprocesadores
www.dell.com | support.dell.com
9D904sbk5.book Page 6 Wednesday, March 5, 2003 10:32 AM
9D904am5.fm Page 1 Monday, March 3, 2003 4:44 PM
  • Page 1 1
  • Page 2 2
  • Page 3 3
  • Page 4 4
  • Page 5 5
  • Page 6 6
  • Page 7 7
  • Page 8 8
  • Page 9 9
  • Page 10 10
  • Page 11 11
  • Page 12 12
  • Page 13 13
  • Page 14 14
  • Page 15 15
  • Page 16 16
  • Page 17 17
  • Page 18 18
  • Page 19 19
  • Page 20 20
  • Page 21 21
  • Page 22 22
  • Page 23 23
  • Page 24 24
  • Page 25 25
  • Page 26 26
  • Page 27 27
  • Page 28 28
  • Page 29 29
  • Page 30 30
  • Page 31 31
  • Page 32 32
  • Page 33 33
  • Page 34 34
  • Page 35 35
  • Page 36 36
  • Page 37 37
  • Page 38 38
  • Page 39 39
  • Page 40 40
  • Page 41 41
  • Page 42 42
  • Page 43 43
  • Page 44 44
  • Page 45 45
  • Page 46 46
  • Page 47 47
  • Page 48 48
  • Page 49 49
  • Page 50 50
  • Page 51 51
  • Page 52 52
  • Page 53 53
  • Page 54 54
  • Page 55 55
  • Page 56 56
  • Page 57 57
  • Page 58 58
  • Page 59 59
  • Page 60 60
  • Page 61 61
  • Page 62 62
  • Page 63 63
  • Page 64 64

Dell PowerEdge 2600 User guide

Category
Household fans
Type
User guide

Ask a question and I''ll find the answer in the document

Finding information in a document is now easier with AI