english
SINGLE BOARD COMPUTER
Quick Reference Guide / Kurzübersicht / Guide de référence rapide
INSTALLATION INSTRUCTIONS
1) Switch the display off completely using the hard on/off switch or disconnect the equipment fully
from the mains.
2) The computer must be placed in the plug-in slot designed for this purpose. This is located on the
left hand side of the display near the carrying handle.
3) Remove the carrying handle by loosening the two Phillips-head screws.
4) Remove the cover panel over the plug-in slot by loosening the two Phillips-head screws.
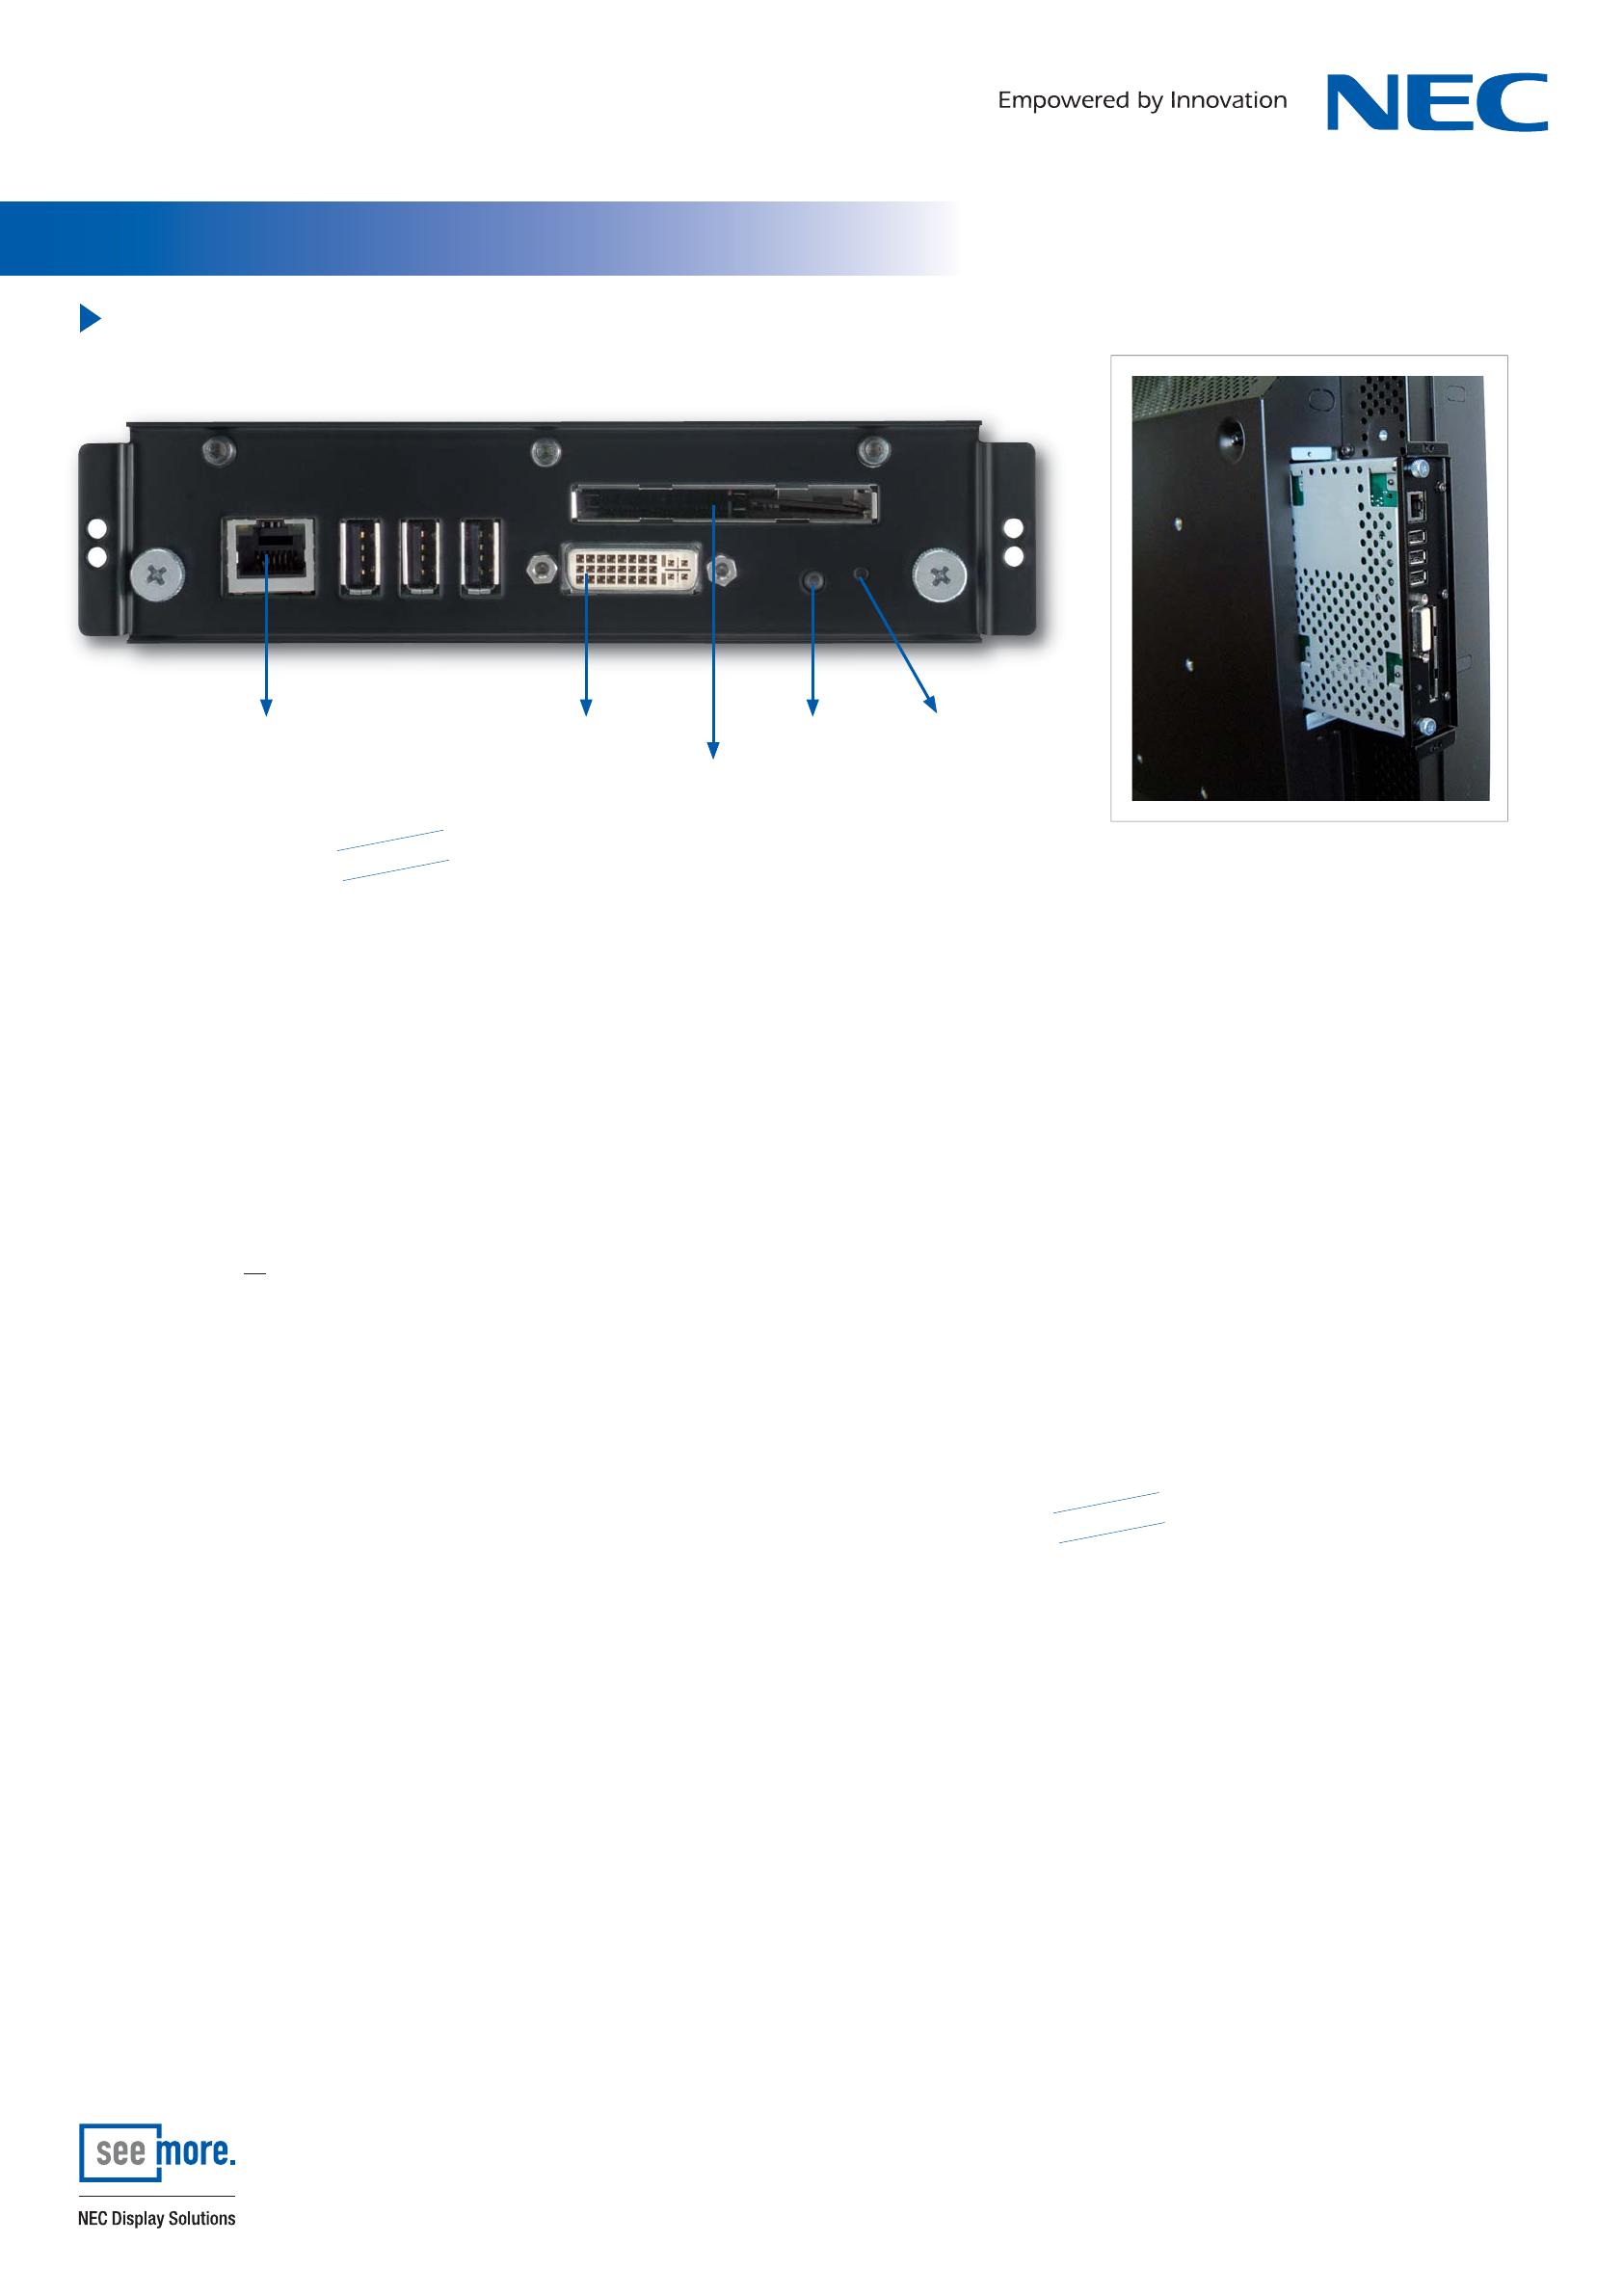
5) Ensure that the computer is inserted with the right orientation. This is correct when the USB ports
and the LAN port are on top and the computer’s heat sink is facing the front of the display.
Slide the computer carefully into the plug-in slot, until you feel it lock into place. Do not force it in!
6) Now use the screws that were previously holding the cover panel in place to secure the computer.
7) Re-attach the carrying handle. Ensure that the screws are properly tightened (1.39 – 1.89 Nm torque).
Risk of an accident!
8) In the Display menu, go to „Display protection“ / „Fan control“ and switch fans to „on“.
This is important specifi cally to prevent the hard disk from overheating.
9) The computer is supplied as standard with a resolution of 1360 x 768. If using the computer in
a NEC MULTEOS or NEC MultiSync
®
LCD6520, please set the resolution accordingly (1920 x 1080).
10) The computer must not be operated at the same time as the internal amplifi er. The display may be
damaged (in newer displays the audio function is automatically deactivated).
11) NEC Display Solutions GmbH assumes no liability for loss of data and resulting losses/damage.
OPERATING AND MAINTENANCE INSTRUCTIONS
1) Please note that the combination of computer and display is approved up to a maximum ambient
temperature of 35°. Higher temperatures may cause damage to the display and computer or reduce
their usable life.
2) Should you wish to remove the computer from the plug-in slot, ensure that the computer has cooled
down suffi ciently. Parts of the computer can reach temperatures of above 100° Celsius. Risk of burns!
3) The computer must not be opened either for maintenance or to expand or replace the memory.
Opening the computer will invalidate the guarantee.
4) All dust should be removed from the computer (and, where applicable, the display) regularly
(e.g. every 6 or 12 months). How often cleaning is required depends largely on the operating hours,
the ambient temperature and the amount of dust in the surroundings. A brush, for example, can be
used for cleaning, to remove dust from the fan and the cooling fi ns. Never open the computer housing!
5) Do not change the BIOS settings, which reduce the clock frequency of the CPU in the event of
overheating.
TROUBLESHOOTING
1) The computer does not start.
a. Is the computer correctly positioned in the plug in slot and have the screws been tightened?
b. It is possible that the BIOS settings have been changed so that the computer only starts when
the on/off switch is pressed. Press the on/off switch or reset the original BIOS confi guration.
2) The computer starts but there is no picture on the display.
a. Have you selected “Computer“ as the input?
b. If you have connected an external display, the internal display may have been deactivated.
Re-connect the external display and confi gure the monitor controls under “Display” so that the
internal display is the primary one.
c. If you have changed the BIOS settings, this may also cause the effect described in 2) b. Reset
the original BIOS confi guration.
3) The picture is out of focus.
a. Has the correct resolution been set?
i. NEC MultiSync
®
LCD4020, LCD4620: 1360 x 768
ii. NEC MULTEOS
®
M40, M46 and MultiSync
®
LCD6520: 1920 x 1080
b. The display has possibly been set up for a different size. Press the “Size” button on the remote
control until “standard” is displayed in green in the top right hand side of the screen.
4) The system is slow and even unstable after software has been installed / uninstalled.
a. The operating system is restricted by the software and/or residual software in terms of
operation and performance. Reinstall the operating system using the enclosed “Recovery” DVD.
Note 1: All stored data will be lost!
Note 2: The initial boot process after reinstallation can take up to 15 minutes.
5) A device that has been connected using USB or an ExpressCard, does not operate correctly.
a. Ensure that all the drivers have been installed.
b. Contact the manufacturer of the USB / ExpressCard device.
c. Reinstall the operating system using the enclosed Recovery DVD.
Note 1: All stored data will be lost!
Note 2: The initial boot process after reinstallation can take up to 15 minutes.
6) The display’s speakers are silent even though I am outputting audio.
a. This is normal. The internal speaker does not work in combination with the computer. The audio
signal can only be picked up from the display’s 3.5mm jack socket.
7) RS232 communication with the display is not working.
a. You have a display with old fi rmware. Please contact NEC Display Solutions GmbH to obtain a
fi rmware upgrade.
INSTALLATIONSHINWEISE:
1) Schalten Sie das Display über den Kippschalter vollständig aus oder trennen Sie das Gerät
vollständig vom Netz.
2) Der Rechner muss in den dafür vorgesehen Einschubschacht eingesetzt werden. Dieser befi ndet
sich auf der linken Seite des Displays in der Nähe des Tragegriffs.
3) Entfernen Sie den Tragegriff, in dem Sie die beiden Kreuzschrauben lösen.
4) Entfernen Sie die Abdeckplatte, die den Einschubschacht verschließt, in dem Sie die beiden
Kreuzschrauben lösen.
5) Stellen Sie sicher, dass die Option in der richtigen Orientierung eingeführt wird. Diese ist richtig, wenn
sich die USB-Anschlüsse und der LAN-Anschluss oben befi nden und der Kühlkörper des Rechners in
Richtung Vorderseite des Displays zeigt. Führen Sie die Option vorsichtig in den Einschubschacht ein,
bis ein Einrasten zu spüren ist. Wenden Sie keine Gewalt an!
6) Benutzen Sie nun die Schrauben, mit denen zuvor die Abdeckplatte befestigt war, um den Rechner zu
fi xieren.
7) Befestigen Sie wieder den Haltegriff. Stellen Sie sicher, dass die Schrauben korrekt angezogen sind
(1,39 – 1,89 Nm Drehmoment)! Unfallgefahr!
8) Stellen Sie im Menü des Displays unter „Monitorschutz“/ „Ventilatorensteuerung“ die Display-
Lüfter auf „ein“. Dies ist notwendig, um speziell eine Überhitzung der Festplatte zu vermeiden.
9) Der Rechner wird standardmäßig mit einer Aufl ösung von 1360 x 768 geliefert. Wenn Sie den
Rechner in einem NEC MULTEOS oder NEC MultiSync
®
LCD6520 betreiben, passen Sie bitte die
Aufl ösung an (1920 x 1080).
10) Der Rechner darf nicht gleichzeitig mit dem internen Verstärker betrieben werden. Das Display kann
beschädigt werden (bei neueren Displays ist die Audiofunktion automatisch deaktiviert).
11) Für Datenverluste und daraus resultierende Schäden übernimmt NEC Display Solutions GmbH keine
Haftung.
deutsch
Ethernet
}
USB DVI-I out
ExpressCard
ResetPowerLED / Button