Ginnys Double Decker Toaster Oven Owner's manual
- Category
- Small kitchen appliances
- Type
- Owner's manual
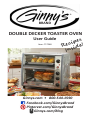
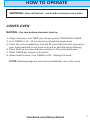
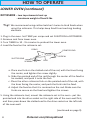
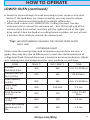
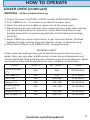
Ginnys Double Decker Toaster Oven allows you to use the device in various ways, including cooking a pizza in the upper oven while roasting a chicken on the rotisserie in the lower oven or heating appetizers in the upper oven while baking dessert in the lower one. The upper oven has a fixed temperature of 400°F, which is perfect for baking pizza or heating side dishes, and is controlled only by the timer. The lower oven allows for precise temperature adjustment up to 450°F and offers four different functions: BAKE, ROTISSERIE, TOAST, and BROIL.
Ginnys Double Decker Toaster Oven allows you to use the device in various ways, including cooking a pizza in the upper oven while roasting a chicken on the rotisserie in the lower oven or heating appetizers in the upper oven while baking dessert in the lower one. The upper oven has a fixed temperature of 400°F, which is perfect for baking pizza or heating side dishes, and is controlled only by the timer. The lower oven allows for precise temperature adjustment up to 450°F and offers four different functions: BAKE, ROTISSERIE, TOAST, and BROIL.


-
 1
1
-
 2
2
-
 3
3
-
 4
4
-
 5
5
-
 6
6
-
 7
7
-
 8
8
-
 9
9
-
 10
10
-
 11
11
-
 12
12
-
 13
13
-
 14
14
-
 15
15
-
 16
16
-
 17
17
-
 18
18
-
 19
19
-
 20
20


Ginnys Double Decker Toaster Oven Owner's manual
- Category
- Small kitchen appliances
- Type
- Owner's manual
Ginnys Double Decker Toaster Oven allows you to use the device in various ways, including cooking a pizza in the upper oven while roasting a chicken on the rotisserie in the lower oven or heating appetizers in the upper oven while baking dessert in the lower one. The upper oven has a fixed temperature of 400°F, which is perfect for baking pizza or heating side dishes, and is controlled only by the timer. The lower oven allows for precise temperature adjustment up to 450°F and offers four different functions: BAKE, ROTISSERIE, TOAST, and BROIL.
Ask a question and I''ll find the answer in the document
Finding information in a document is now easier with AI
Related papers
-
 Ginnys Long 4-Slice Toaster Owner's manual
-
 Ginnys 60677 User manual
-
 GINNY’S Copper Electric Skillet User manual
-
 Ginnys 10-In-1 Everything Oven Owner's manual
-
 GINNY’S 740782 User manual
-
 Ginnys Bacon Maker Owner's manual
-
 Ginnys Breakfast Station Owner's manual
-
 Ginnys .9 Cubic Foot Microwave Owner's manual
-
 Ginnys Window Toaster Owner's manual
-
 Ginnys 4-In-1 Multicooker Owner's manual


Other documents
-
Rival Oven CO602 User manual
-
Salton TO1827 Owner's manual
-
Elite ERO-2008S User guide
-
 GINNY’S 119EG-3727 User manual
-
-
Master Chef 43-2747-0 User manual
-
George Foreman GR80 Big George User manual
-
-
-
Sunbeam BT7000 User manual
