Black & Decker MTC220 User manual

Category
Garden tools
Type
User manual

This manual is also suitable for

LIGNES DIRECTRICES EN MATIÈRE DE SÉCURITÉ - DÉFINITIONS
Il est important que vous lisiez et compreniez ce mode d’emploi. Les informations qu’il contient concernent VOTRE SÉCURITÉ et visent à ÉVITER TOUT PROBLÈME. Les
symboles ci-dessous servent à vous aider à reconnaître cette information.
DANGER : Indique une situation dangereuse imminente qui, si elle n’est pas évitée, causera la mort ou des graves blessures.
AVERTISSEMENT : Indique une situation potentiellement dangereuse qui, si elle n’est pas évitée, pourrait causer la mort ou de graves blessures.
MISE EN GARDE : Indique une situation potentiellement dangereuse qui, si elle n’est pas évitée, pourrait causer des blessures mineures ou modérées.
AVIS : Utilisé sans le symbole d’alerte à la sécurité, indique une situation potentiellement dangereuse qui, si elle n’est pas évitée, peut résulter en des dommages à la propriété.
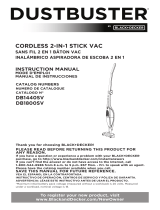
DESCRIPTION FONCTIONNELLE (FIGURE A)
1. Châssis de tondeuse 2. Poche du taille-bordure
3. Levier de dégagement 4. Roues réglables
Le châssis de tondeuse compact 3 en 1 fonctionne avec les taille-bordures à fil rotatif Black
and Decker suivants :
GH912, LST220, LST300, LST400, LST420, NST2118
AVERTISSEMENT : Lire et comprendre le manuel du taille-bordures, ainsi que ce
manuel de châssis de tondeuse, avant d’utiliser ce châssis de tondeuse. Négliger de le faire
risque de causer des blessures à des personnes ou d’endommager des biens matériels.
AVERTISSEMENT : L’utilisation de tout accessoire non recommandé par Black &
Decker, avec cet outil, pourrait s’avérer dangereuse.
AVERTISSEMENT : Le châssis de tondeuse et le taille-bordures ne sont pas des
jouets. L’utilisation en tant que jouets peut avoir comme conséquence des blessures ou des
dommages matériels.
MISE EN GARDE : Inspectez la zone à rogner et enlever toutes les pierres, bâtons,
fils métalliques, cordons ou des objets filiformes qui pourrait s’emmêler dans le fil en rotation
ou bobine. Relâcher l’interrupteur et laissez la tondeuse à arrêter avant de traverser à pied,
les routes, le patio et les lecteurs de gravier.
MONTAGE
AVERTISSEMENT : avant de procéder aux étapes d’assemblage ou de
démontage décrites ci-dessous, assurez-vous que le taille-bordure à fil rotatif est éteint et
débranché du bloc d’alimentation.
MISE EN GARDE : Reportez-vous à votre manuel de taille-bordures à fil rotatif
avant d’utiliser le taille-bordures en conjonction avec le châssis de tondeuse.
Pour fixer un taille-bordures à fil rotatif au châssis de tondeuse (1) :
• Faire glisser la partie inférieure de la tête du taille-bordure à fil rotatif (5) dans la partie
avant de la poche du taille-bordures (2) et faire tourner le pare-main du taille-bordure (6)
vers le bas dans la poche jusqu’à ce qu’il s’enclenche entièrement en place comme illustré
FUNCTIONAL DESCRIPTION (FIGURE A)
1. Mower Deck 2. Trimmer Pocket 3. Release lever 4. Adjustable Wheels
The 3-in-1 compact mower deck works with the following Black and Decker string trimmers:
GH912, LST220, LST300, LST400, LST420, NST2118
WARNING: Read and understand the string trimmer manual, as well as this mower
deck manual, before using this mower deck. Failure to do so may result in personal injury or
property damage.
WARNING: The use of any tool not recommended by Black & Decker for use with this
accessory could be hazardous.
WARNING: Mower deck and string trimmer are not toys. Use as such may result in
personal injury or property damage.
CAUTION: Inspect area to be trimmed and remove any stones, sticks, wire, cord, or
string-like objects which could become entangled in the rotating line or spool. Release
switch and allow the trimmer to stop before crossing walk, roads, patio and gravel drives.
ASSEMBLY
WARNING: Before attempting any of the assembly or disassembly steps below, ensure
your string trimmer is switched off and disconnected from the power supply.
CAUTION: Refer to your string trimmer manual prior to using trimmer in conjunction
with the mower deck.
To attach a string trimmer to the mower deck (1):
• Slide the bottom of the string trimmer head (5) into the front of the trimmer pocket (2) and
rotate the trimmer guard (6) down into the pocket until it snaps fully into place as shown in
figure B and C. If string trimmer has a wire edge guide, the guide should be below the deck.
If string trimmer has a wheeled edge guide, the guide should be above the deck as shown in
the Figure B insert.
NOTE: Ensure the cutting line is underneath the deck and not protruding out the top.
• Using the string trimmer auxiliary and back handles, lift up the string trimmer and ensure the
mower deck is securely attached.
• The trimmer should be in the position shown in figure C.
• To remove the string trimmer from the mower deck, step on the release lever (3) and lift the
trimmer out as shown in figure D.
CAUTION: Depending on the string trimmer and/or battery pack used with the mower
deck, the assembly may become unbalanced and tip. Care should be exercised when using
on uneven ground or a slope. String trimmer should be removed from mower deck when
storing or when user leaves its vicinity.
OPERATING INSTRUCTIONS
• Once a string trimmer is attached to the mower deck, switch trimmer on as directed by your
trimmer’s instruction manual.
• Grip the handle of the string trimmer and move the mower deck forward slowly in a straight
line to ensure even cutting and coverage of the lawn as shown in figure E. Do not lift up or
pivot mower deck. Keep all four wheels in contact with the ground.
NOTE: The deck can either be moved in long lines in a traditional mowing fashion or moved
back and forth in a vacuuming-like motion.
NOTE: Several passes may be required with long grass.
WHEEL ADJUSTMENT
WARNING: Before adjusting the height of the mower deck, ensure your string trimmer
is switched off and disconnected from the power supply.
The 3-in-1 compact mower deck offers two cutting lengths; 1.5” (40mm) and 2.3” (60mm).
To adjust the height of the mower deck:
• Grasp the wheel (4) of the mower deck and push it toward the front of the deck as shown in
figure F.
• Then, slide the wheel up or down within the U-shaped groove (figure F insert) under the
deck to set the height. Move the wheel up for shorter-cut grass or down for a longer-cut.
Repeat for each wheel until all four wheels are adjusted to the same height and are fully in
the upper or lower slots.
NOTE: If wheels are not located at the same height, it will result in an uneven cut.
NOTE: It may be simpler to adjust the height of your mower deck if the string trimmer is not attached.
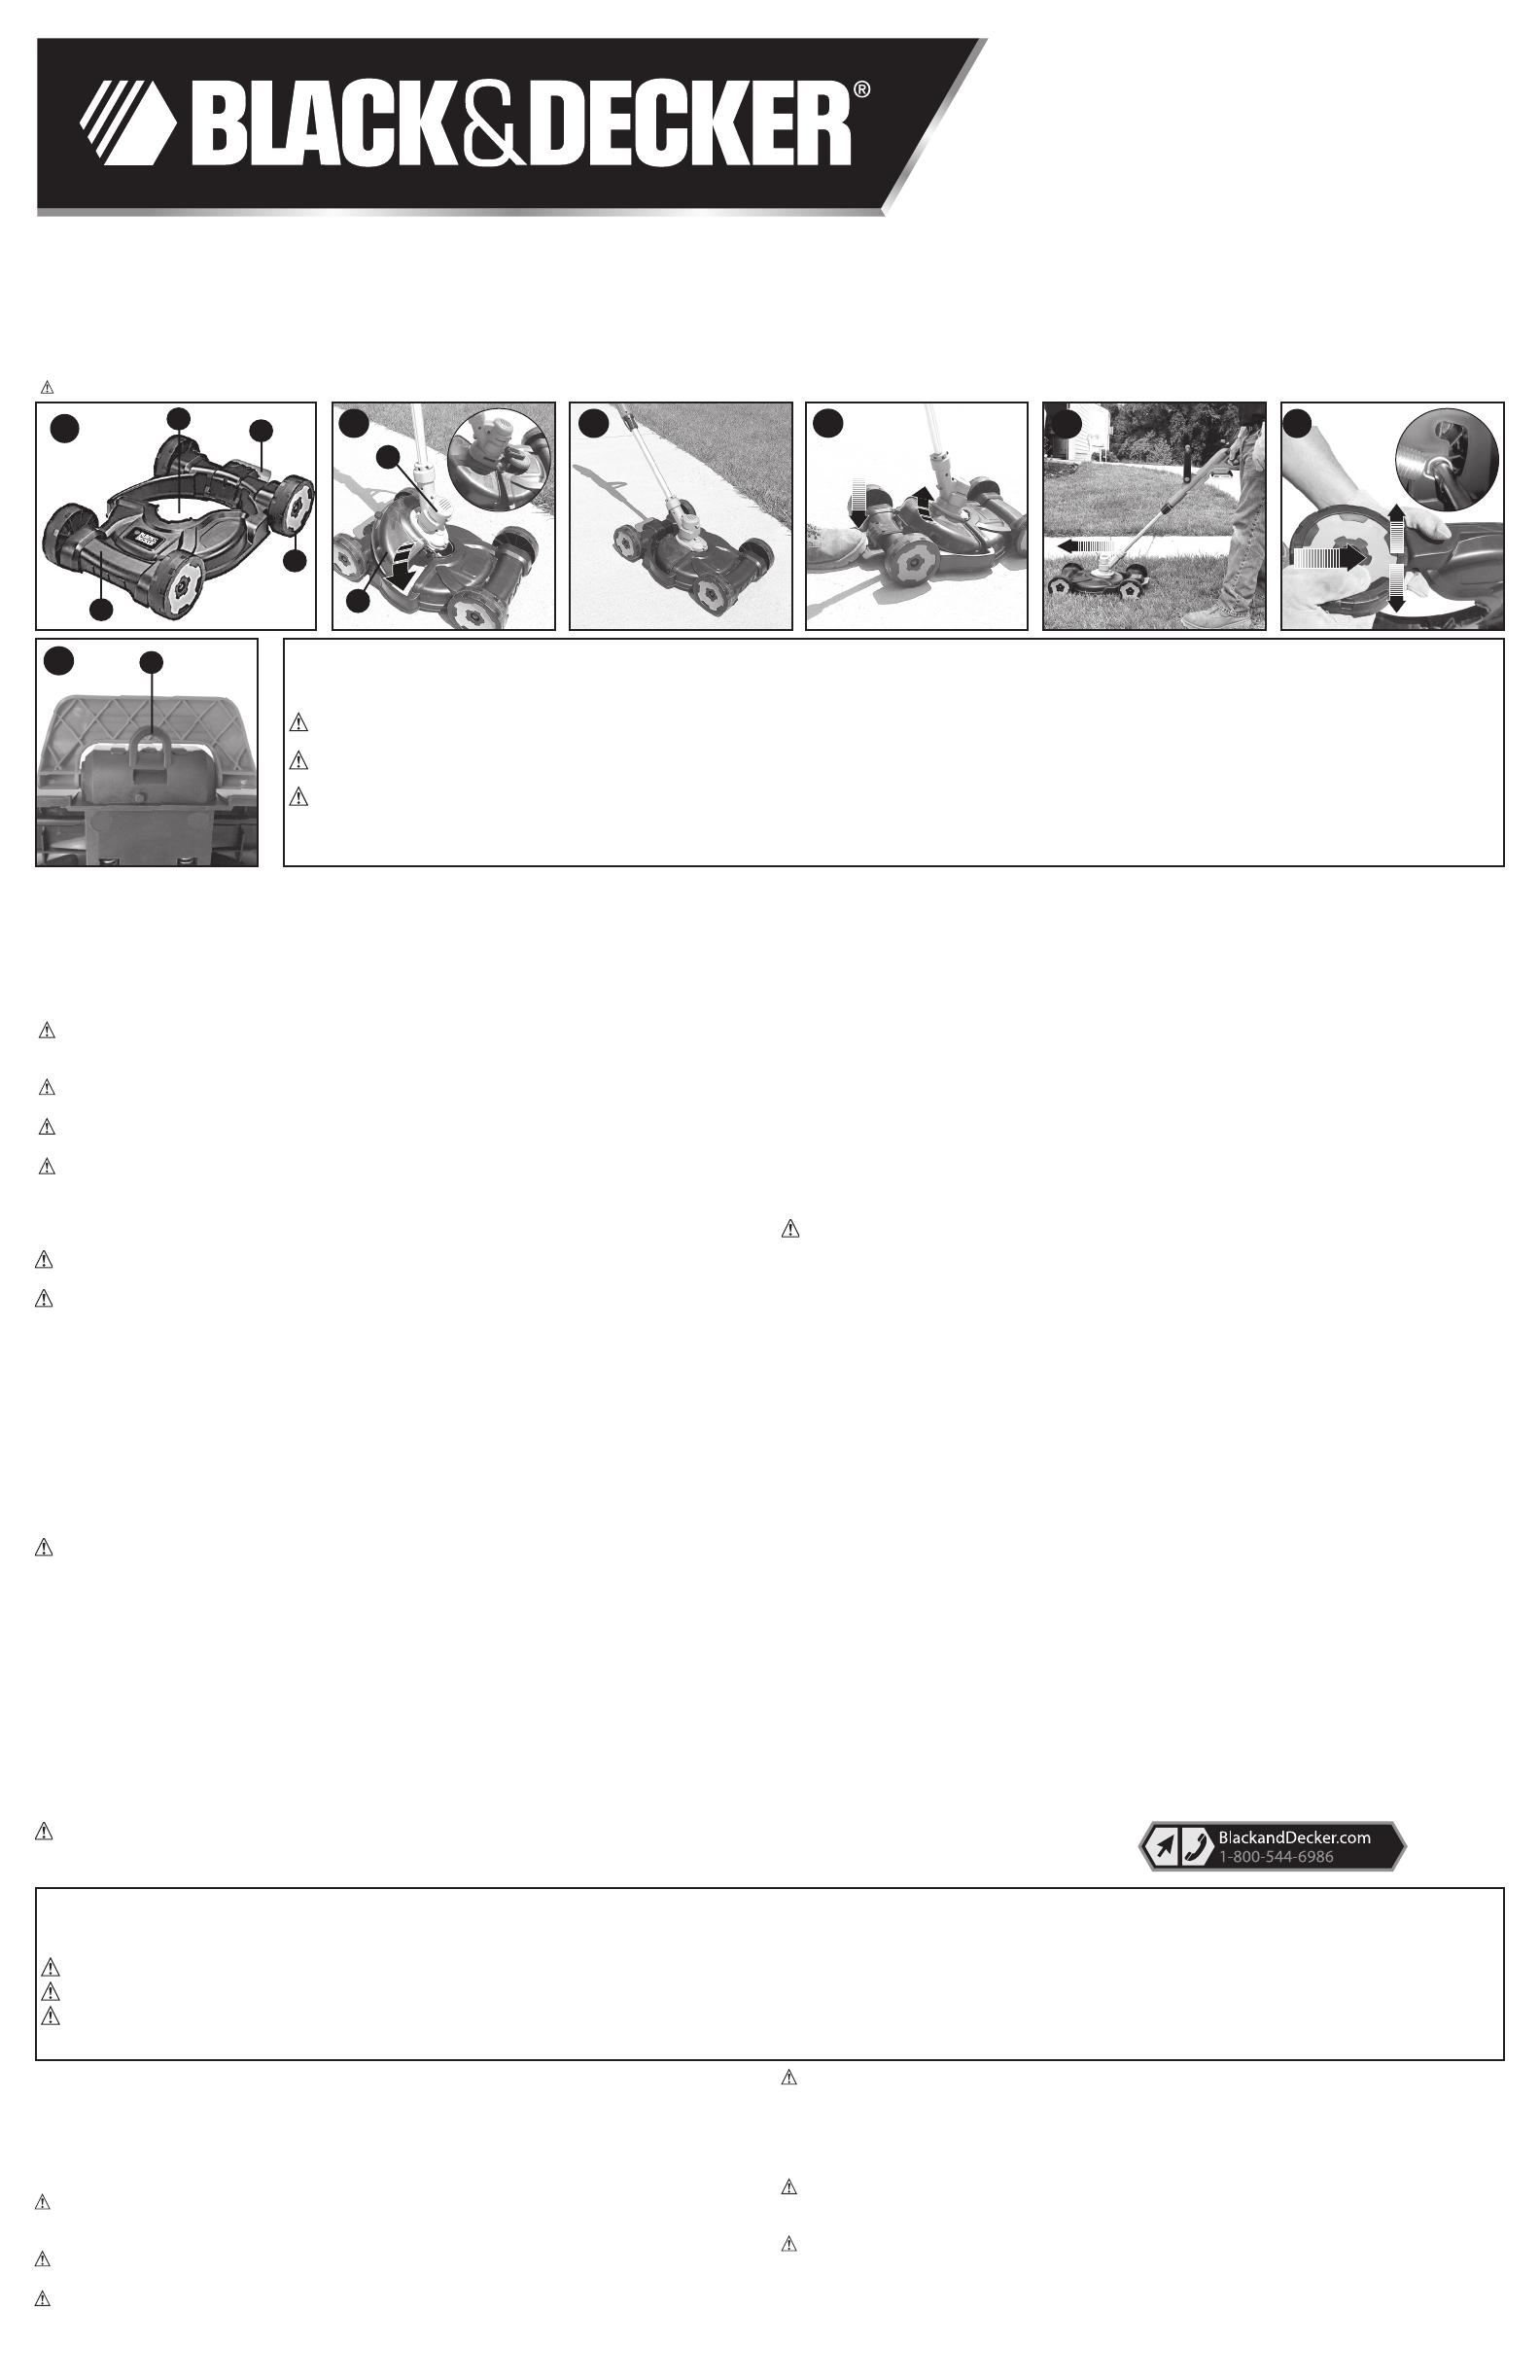
STORAGE
Your mower deck can be hung on a wall for easy storage (figure G).
Secure a nail or screw in a wall at your desired location.
Hang the mower deck on the nail or screw by the hook (7) located under the release lever (3).
MAINTENANCE
WARNING: Remove line trimmer from mower deck before performing any maintenance.
Plastic parts may be cleaned by using a mild soap and a damp rag. Do not pour or spray
water on the mower deck or trimmer in an attempt to clean them.
Do not lubricate the wheels.
Clean away built-up dirt and grass in trimmer pocket (2) and under release lever (3) to
allow trimmer to attach correctly.
SERVICE INFORMATION
All Black & Decker Service Centers are staffed with trained personnel to provide customers with efficient
and reliable service. Whether you need technical advice, repair, or genuine factory replacement parts,
contact the Black & Decker location nearest you. To find your local service location, call: 1-800-544-6986
or visit www.blackanddecker.com
FULL TWO-YEAR HOME USE WARRANTY
Black & Decker (U.S.) Inc. warrants this product for two years against any defects in mate-
rial or workmanship. The defective product will be replaced or repaired at no charge in
either of two ways. The first, which will result in exchanges only, is to return the product to
the retailer from whom it was purchased (provided that the store is a participating retailer).
Returns should be made within the time period of the retailer’s policy for exchanges (usu-
ally 30 to 90 days after the sale). Proof of purchase may be required. Please check with
the retailer for their specific return policy regarding returns that are beyond the time set for
exchanges. The second option is to take or send the product (prepaid) to a Black & Decker
owned or authorized Service Center for repair or replacement at our option. Proof of pur-
chase may be required. This warranty does not apply to accessories. This warranty gives
you specific legal rights and you may have other rights which vary from state to state or
province to province. Should you have any questions, contact the manager of your nearest
Black & Decker Service Center. This product is not intended for commercial use.
FREE WARNING LABEL REPLACEMENT: If your warning labels become illegible or are
missing, call 1-800-544-6986 for a free replacement.
LATIN AMERICA: This warranty does not apply to products sold in Latin America. For
products sold in Latin America, check country specific warranty information contained in the
packaging, call the local company or see the website for warranty information.
-SAVE THESE INSTRUCTIONS-
READ ALL INSTRUCTIONS
Instruction manual
Manuel d’instructions
Manual de’instrucciones
3-in-1 Compact Mower Deck
Châssis de tondeuse compact 3 en 1
Plataforma cortadora compacta 3 en 1
SAFETY GUIDELINES - DEFINITIONS
It is important for you to read and understand this manual. The information it contains relates to protecting YOUR SAFETY and PREVENTING
PROBLEMS. The symbols below are used to help you recognize this information.
DANGER: Indicates an imminently hazardous situation which, if not avoided, will result in death or serious injury.
WARNING: Indicates a potentially hazardous situation which, if not avoided, could result in death or serious injury.
CAUTION: Indicates a potentially haz ard ous situation which, if not avoided, may result in minor or mod er ate injury.
NOTICE: Used without the safety alert symbol indicates potentially hazardous situation which, if not avoided, may result in property damage.
Thank you for choosing Black & Decker! To register your new product, go to www.BlackandDecker.com/NewOwner.
PLEASE READ BEFORE RETURNING THIS PRODUCT FOR ANY REASON.
If you have a question or experience a problem with your Black & Decker purchase, go to http://www.blackanddecker.com/instantanswers. If you can’t find the answer or do
not have access to the Internet, call 1-800-544-6986 from 8 a.m. to 5 p.m. EST Mon. - Fri. to speak with an agent. Please have the catalog number available when you call.
SAVE THIS MANUAL FOR FUTURE REFERENCE.
VEA EL ESPANOL EN LA CONTRAPORTADA.
INSTRUCTIVO DE OPERACIÓN, CENTROS DE SERVICIO Y PÓLIZA DE GARANA.
ADVERTENCIA: LÉASE ESTE INSTRUCTIVO ANTES DE USAR EL PRODUCTO.
2
3
1
4
A
D
C
E
Imported by
Black & Decker (U.S.) Inc.,
701 E. Joppa Rd.
Towson, MD 21286 U.S.A.
B
5
6
F
G
7
MTD100
1
20V MAX* LITHIUM TRIMMER / EDGER
INSTRUCTION MANUAL
KEY INFORMATION YOU SHOULD KNOW:
 

 


 





Model # LST220
SAVE THIS MANUAL FOR FUTURE REFERENCE.
VEA EL ESPAÑOL EN LA CONTRAPORTADA.
POUR LE FRANÇAIS, VOIR LA COUVERTURE ARRIÈRE.



Thank you for choosing Black & Decker! Go
to www.BlackandDecker.com/NewOwner
to register your new product.
Model Number LST220
PLEASE READ BEFORE RETURNING
THIS PRODUCT FOR ANY REASON:


WWW.BLACKANDDECKER.COM/INSTANTANSWERS





SAFETY GUIDELINES - DEFINITIONS




DANGER: 

WARNING: 

CAUTION: 

NOTICE: 


2
TABLE OF CONTENTS












WARNING: 


Read All Instructions
ALWAYS WEAR EYE PROTECTION

GUARD
DRESS PROPERLY





NYLON LINE

THE ROTATING LINE PERFORMS A CUTTING FUNCTION

KEEP ALL BYSTANDERS AWAY

IMPORTANT WARNING




MAKE SURE

TO REDUCE THE RISK



AVOID ACCIDENTALLY STARTING

IMPORTANT SAFETY WARNINGS
AND INSTRUCTIONS
3
DO NOT FORCE THE TOOL

USE THE RIGHT TOOL

DON’T OVERREACH
DAMAGE TO UNIT



DISCONNECT TOOL

AVOID DANGEROUS ENVIRONMENTAL CONDITIONS



DO NOT OPERATE


STORE IDLE TOOLS INDOORS


STAY ALERT

MAINTAIN APPLIANCES WITH CARE


CHECK DAMAGED PARTS














SAVE THESE INSTRUCTIONS


  
 









WARNING: Some dust created by this product contains
chemicals known to the State of California to cause cancer,
birth defects or other reproductive harm. Some examples of
these chemicals are:






4
SAVE THESE INSTRUCTIONS: 



WARNING: Shock hazard.

CAUTION: Burn hazard. 
Black & Decker 

CAUTION: 






DO NOT attempt to charge the battery pack with any chargers
other than the ones in this manual.The charger and battery
pack are specifically designed to work together.
These chargers are not intended for any uses other than
charging designated Black & Decker rechargeable batteries.
Any other uses may result in risk of fire, electric shock or
electrocution.
Do not expose charger to rain or snow.
Pull by plug rather than cord when disconnecting charger.
This will reduce risk of damage to electric plug and cord.
Make sure that cord is located so that it will not be stepped
on, tripped over, or otherwise subjected to damage or stress.
Do not use an extension cord unless it is absolutely
necessary.Use of improper extension cord could result in risk of
fire, electric shock, or electrocution.
1. Switch
2. Battery
3. Auxillary Handle
4. Collar (to adjust
height and edge)
5. Motor Housing
6. Edge Guide
7. Guard
8. Spool
6
2
4
7
5
COMPONENTS
3
1
IMPORTANT SAFETY INSTRUCTIONS
FOR BATTERY CHARGERS
8
An extension cord must have adequate wire size (AWG or
American Wire Gauge) for safety.The smaller the gauge number
of the wire, the greater the capacity of the cable, that is 16 gauge
has more capacity than 18 gauge. When using more than one
extension to make up the total length, be sure each individual
extension contains at least the minimum wire size.
Recommended Minimum Wire Size for Extension Cords
Do not place any object on top of charger or place the charger
on a soft surface that might block the ventilation slots and
result in excessive internal heat. Place the charger in a
position away from any heat source.The charger is ventilated
through slots in the top and the bottom of the housing.
Do not mount charger on wall or permanently affix charger
to any surface.The charger is intended to use on a flat, stable
surface (i.e., table top, bench top).
Do not operate charger with damaged cord or plug —have
them replaced immediately.
Do not operate charger if it has received a sharp blow, been
dropped, or otherwise damaged in any way. Take it to an
authorized service center.
Do not disassemble charger; take it to an authorized service
center when service or repair is required. Incorrect reassembly
may result in a risk of electric shock, electrocution or fire.
Disconnect the charger from the outlet before attempting any
5
cleaning. This will reduce the risk of electric shock. Removing the
battery pack will not reduce this risk.
NEVER attempt to connect 2 chargers together.
The charger is designed to operate on standard household
electrical power (120 Volts). Do not attempt to use it on any
other voltage.
SAVE THESE INSTRUCTIONS
WARNING: For safe operation, read this manual and manuals
originally supplied with tool before using the charger.



READ ALL INSTRUCTIONS
Do not incinerate the battery pack even if it is severely
damaged or is completely worn out.The battery pack can
explode in a fire. Toxic fumes and materials are created when
battery packs are burned.
Do not charge or use battery in explosive atmospheres,
such as in the presence of flammable liquids, gases or dust.
Inserting or removing the battery from the charger may ignite the dust
or fumes.
If battery contents come into contact with the skin,
immediately wash area with mild soap and water. If battery
liquid gets into the eye, rinse water over the open eye for 15
minutes or until irritation ceases. If medical attention is needed, the
battery electrolyte for Li-ion batteries is composed of a mixture of
liquid organic carbonates and lithium salts.
Contents of opened battery cells may cause respiratory
irritation. Provide fresh air. If symptoms persist, seek medical
attention.
Minimum Gauge for Cord Sets
Volts Total Length of Cord in Feet
    
    
Ampere Rating
 

      
      
      
     
IMPORTANT SAFETY INSTRUCTIONS
FOR BATTERY PACKS
6
WARNING: Burn hazard. Battery liquid may be flammable if
exposed to spark or flame.
Charge the battery packs only in Black & Decker chargers.
DO NOT splash or immerse in water or other liquids. This may
cause premature cell failure.
Do not store or use the tool and battery pack in locations where
the temperature may reach or exceed 105°F (40˚C) (such as
outside sheds or metal buildings in summer).
WARNING: Never attempt to open the battery pack for any
reason. If battery pack case is cracked or damaged, do not insert into
charger. Do not crush, drop or damage battery pack. Do not use a
battery pack or charger that has received a sharp blow, been
dropped, run over or damaged in any way (i.e., pierced with a nail,
hit with a hammer, stepped on). Damaged battery packs should be
returned to service center for recycling.
WARNING: Fire hazard. Do not store or carry battery so
that metal objects can contact exposed battery terminals. For
example, do not place battery in aprons, pockets, tool boxes, product
kit boxes, drawers, etc., with loose nails, screws, keys, etc.
Transporting batteries can possibly cause fires if the battery
terminals inadvertently come in contact with conductive
materials such as keys, coins, hand tools and the like. The US
Department of Transportation Hazardous Material Regulations (HMR)
actually prohibit transporting batteries in commerce or on airplanes
(i.e., packed in suitcases and carry-on luggage) UNLESS they are
properly protected from short circuits. So when transporting individual
batteries, make sure that the battery terminals are protected and well
insulated from materials that could contact them and cause a short
circuit. NOTE: LI-ION batteries should not be put in checked
baggage.
STORAGE RECOMMENDATIONS



CHARGING PROCEDURE
 






figure 1






Recharge discharged batteries as soon as possible after use or
battery life may be greatly diminished.
LEAVING THE BATTERY IN THE CHARGER



IMPORTANT CHARGING NOTES











1
7





















WARNING: Shock hazard
 Never attempt to open the battery pack for any
reason. If the plastic housing of the battery pack breaks or cracks,
return to a service center for recycling.
INSTALLING AND REMOVING THE BATTERY PACK
WARNING: Make certain the lock-off button is engaged to
prevent switch actuation before removing or installing battery.
TO INSTALL BATTERY PACK:


figure 2
TO REMOVE BATTERY
PACK: D
 

2
8
ASSEMBLY TOOLS REQUIRED (NOT SUPPLIED):

INSTALLING THE GUARD
WARNING: REMOVE THE BATTERY BEFORE
ATTEMPTING TO ATTACH THE GUARD, EDGE GUIDE OR
HANDLE. NEVER OPERATE TOOL WITHOUT GUARD FIRMLY
IN PLACE. THE GUARD MUST ALWAYS BE ON THE TOOL TO
PROTECT THE USER.














figure
4 





ATTACHING THE AUXILIARY HANDLE



figure 5

figure 6





a
e
d
c
b
3
4
5
f
6
ASSEMBLY & ADJUSTMENT
9



figure 7)









HEIGHT ADJUSTMENT




figure 8






figure 8
OPERATING INSTRUCTIONS
WARNING: 

CAUTION: 




SWITCHING ON AND OFF

figure 9



figure 9
7
g
8
h
9
10
CONVERT TO EDGING MODE


figure 10





figure
11
figure
11









CAUTION: 





CUTTING LINE / LINE FEEDING
.065 inch (1.65 mm) diameter, ROUND
nylon line

DO NOT BUMP




REPLACEMENT ACCESSORIES
CAUTION: 










1-800-544-6986 or visit www.blackanddecker.com.
WARNING: 

i
10
11
j


figure 14



CAUTION: 



REWINDING SPOOL FROM BULK LINE
(USE ONLY .065 IN. ROUND DIAMETER LINE) (FIGURES 15, 16, 17)

NOTE:






REPLACING THE SPOOL







figure 15
11
REPLACING THE SPOOL (FIGURES 12,13,14)




figure 12






figure 13 








figure 14


figure 13





12




k
l
k
m
13
n
p
14
o
q
15
s
r
12




figure 16.



figure 17

figure 16

REPLACING THE SPOOL
THE RBRC™ SEAL




Black & Decker
Black & Decker



Black & Decker



Rechargeable Battery Recycling
Corporation.
WARNING: 

  
 


 



IMPORTANT: 



TOOL RUNS SLOWLY






TROUBLESHOOTING
MAINTENANCE
16
u
t
17
13
AUTOMATIC LINE FEED DOES NOT WORK






figure 17

















1-800-544-6986 or
visit www.blackanddecker.com



SERVICE INFORMATION
FULL TWO-YEAR HOME USE WARRANTY
See ‘Tools-Electric’
– Yellow Pages –
for Service & Sales























LATIN AMERICA:




FREE WARNING LABEL REPLACEMENT:
1-800-544-6986 

43
· GARANTÍA BLACK & DECKER · BLACK & DECKER WARRANTY
. SOLAMENTE PARA PROPOSITOS DE MEXICO
Sello firma del distribuidor

Fecha de compra Invoice No. · No. de factura
IDENTIFICACIÓN DEL PRODUCTO

Catalogo ó Modelo Serial Number · No. de serie

Nombre Last Name · Apellido

Dirección
Ciudad State · Estado

Código Postal Country · País

No. Teléfono
  • Page 1 1
  • Page 2 2
  • Page 3 3
  • Page 4 4
  • Page 5 5
  • Page 6 6
  • Page 7 7
  • Page 8 8
  • Page 9 9
  • Page 10 10
  • Page 11 11
  • Page 12 12
  • Page 13 13
  • Page 14 14
  • Page 15 15
  • Page 16 16
  • Page 17 17
  • Page 18 18
  • Page 19 19
  • Page 20 20
  • Page 21 21
  • Page 22 22
  • Page 23 23
  • Page 24 24
  • Page 25 25
  • Page 26 26
  • Page 27 27
  • Page 28 28
  • Page 29 29
  • Page 30 30
  • Page 31 31
  • Page 32 32
  • Page 33 33
  • Page 34 34
  • Page 35 35
  • Page 36 36
  • Page 37 37
  • Page 38 38
  • Page 39 39
  • Page 40 40
  • Page 41 41
  • Page 42 42
  • Page 43 43
  • Page 44 44
  • Page 45 45
  • Page 46 46

Black & Decker MTC220 User manual

Category
Garden tools
Type
User manual
This manual is also suitable for

Ask a question and I''ll find the answer in the document

Finding information in a document is now easier with AI