Page is loading ...

AB
Printed in Malaysia ZK27080
© 2014 Yamaha Corporation
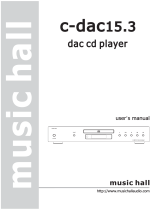
OWNER’S MANUAL
Compact Disc Player

2 En
A Living Tradition in Sound
A piano comes into this world through the perfect synergy of advanced technical
skill and artistry. Such a piano can create sound that truly reflects the player’s
feelings.
The final stage in piano production is called “voicing”. It is here that the
instrument is given its soul.
A highly skilled expert concentrates his mind and sensitivity on the sound of each
key, finely adjusting the dynamic feel of the hammers, bringing the tone and
vibrancy of all 88 keys together perfectly; a truly stunning achievement.
It is a quality of sound that can only be determined by an astute, sensitive ear. We
apply this very same concept to the manufacture of our audio products. The
technician performs exhaustive listening tests and every component is considered,
in order to finally achieve the ideal sound.
Yamaha’s tradition of audio quality stretches back over 125 years, and continues to
live on in all Yamaha products today.

3 En
NP-S2000
Soavo-1
NS-10M
A-S3000
CD-S3000
NS-20
CA-1000
NS-690
B-1
PX-2
C-2
NS-1000M
A-1
B-6
B-2x
MX-10000
CX-10000
Excellence in Audio Achievement
First HiFi System introduced in 1920
We introduced numerous HiFi components
(turntables, FM/AM tuners, integrated
amplifiers, preamplifiers, power amplifiers
and speakers) in 1955 - 1965.
Natural Sound Speaker Series introduced
in 1967
NS-20 Monitor Speaker
CA-1000 Integrated Amplifier
Featuring A-Class operation, the CA-1000 set
the standard for integrated amplifiers.
NS-690 Natural Sound Speaker
NS-1000M Monitor Speaker
A truly legendary speaker still revered by HiFi
enthusiasts.
B-1 Power Amplifier
An innovative power amp that used vertical FETs in all
stages.
C-2 Control Amplifier
Received top prize at the Milan International Music
and HiFi Show.
NS-10M Studio Monitor Speaker
Became of the most popular studio monitors
in the world.
A-1 Integrated Amplifier
PX-2 Turntable
Yamaha’s first straight arm turntable.
B-6 Power Amplifier
Pyramid-shaped power amplifier.
GT-2000/L Turntab le
First CD Player (CD-1) introduced in 1983
B-2x Power Amplifier
MX-10000 Power Amplifier and
CX-10000 Control Amplifier
Redefined the capabilities of separate components.
AX-1 Integrated Amplifier
GT-CD1 CD Player
MX-1 Power Amplifier and
CX-1 Preamplifier
Soavo-1 and Soavo-2 Natural Sound
Speaker Systems
A-S2000 Integrated Amplifier and
CD-S2000 CD Player
NP-S2000 Network Player
A-S3000 Integrated Amplifier and
CD-S3000 CD Player
English

4 En
◆ Full-stage balanced signal transmission beginning with the DAC
achieves the ultimate in CD reproduction
◆ Independent power supplies with digital and analog completely
separated
◆ Exclusive Yamaha loading mechanism and high precision CD drive
◆ Left-right symmetrical design with rigid, stable construction
◆ Pure Direct
◆ Super sound from Super Audio CDs
◆ Heavy feet with newly-developed antivibration spikes
◆ DSD playback via 192 kHz, 24-bit USB DAC
■ Supplied accessories
Please check that you have received all of the following parts.
• Power cable
• Remote control
• Batteries (AAA, R03, UM-4) (×2)
• Stereo pin cable
• SAFETY BROCHURE
■ About this manual
• y indicates a tip for your operation.
• Photographs and illustrations are for explanatory purposes, and may differ from the actual unit.
• Read the “SAFETY BROCHURE” before using this unit.
Contents
Controls and functions.......................................................................................................................................... 6
Connections.......................................................................................................................................................... 18
Playback of music files stored on a PC.............................................................................................................. 22
Specifications ....................................................................................................................................................... 26
Playable disc format............................................................................................................................................ 27
Troubleshooting................................................................................................................................................... 29
CONTROLS AND FUNCTIONS
5 En
Controls and
functions
In this chapter, you will learn the controls and functions of CD-S2100.
6 En
Controls and functions
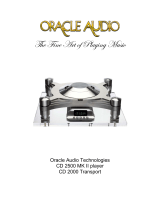
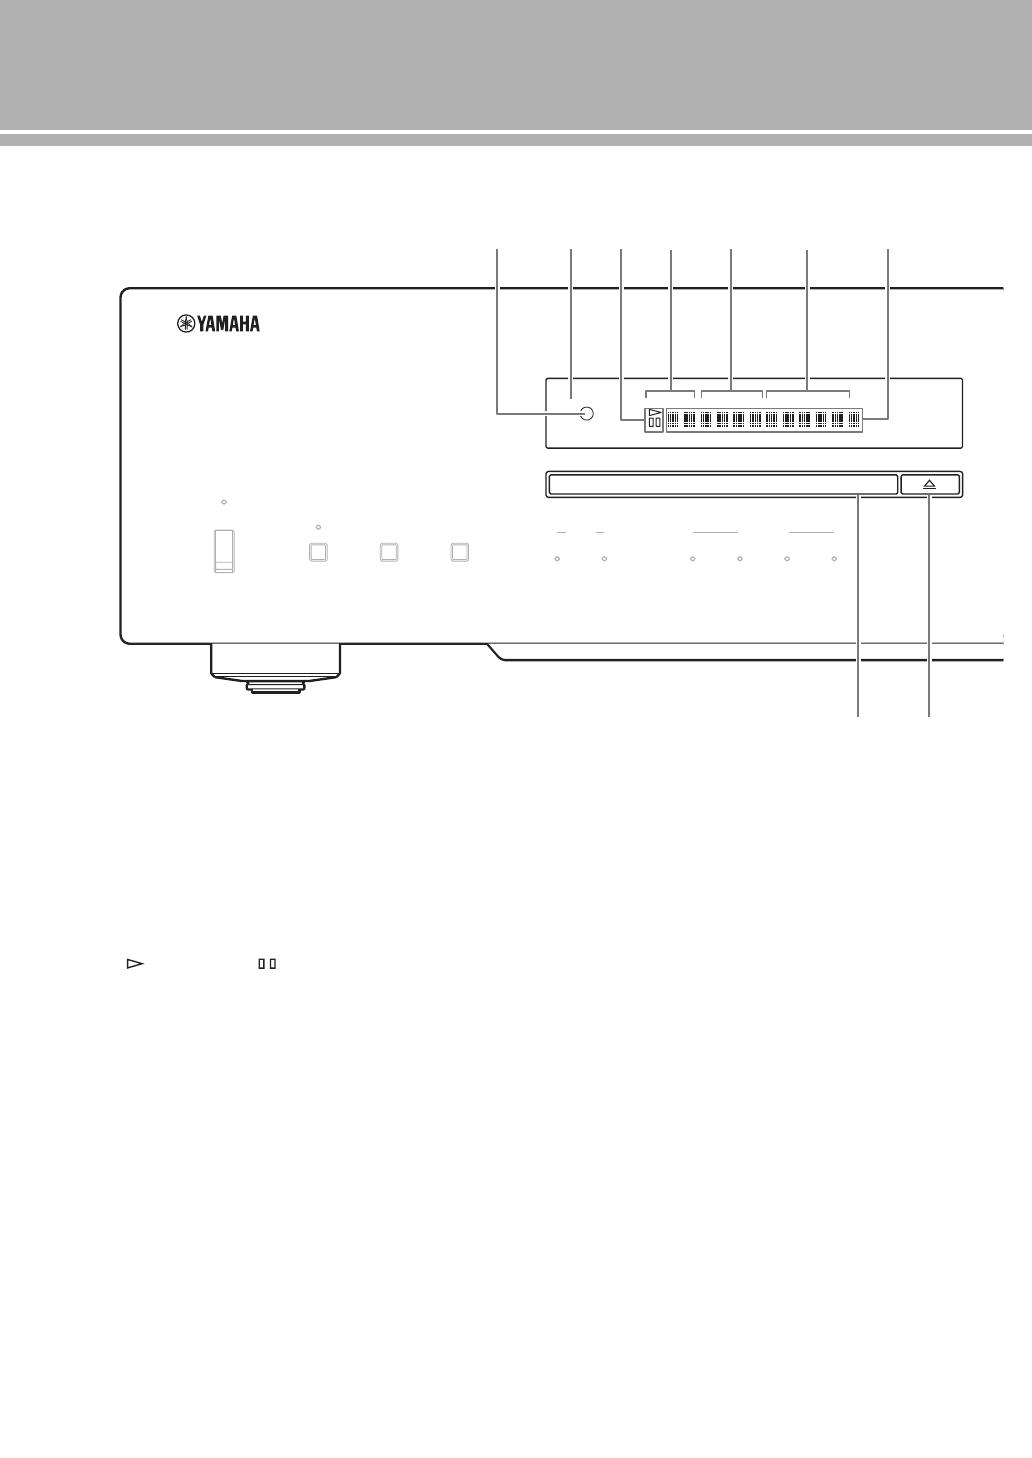
■ Front panel (pages 6 to 9)
1 STANDBY/ON, OFF switch
Turns on or off this unit.
STANDBY/ON (upper position): In this position,
you can select STANDBY or ON, using the p CD
key on the remote control.
OFF (lower position): The power of this unit is
turned off.
• When you turn on this unit, it will take a few seconds
before this unit can reproduce sound.
• If this unit is not operated for 30 minutes with no audio
signal detected, it goes to STANDBY mode (page 14).
• If you disconnect the power cable from the AC outlet and
connect it again when this unit is in STANDBY mode, the
power of the unit is turned on (page 20). If the unit is not to
be operated for a long time, set the STANDBY/ON, OFF
switch to OFF.
2 STANDBY/ON indicator
Lit brightly: Shows that the power of the unit is ON.
In this condition, you can switch the unit to
STANDBY mode by pressing the p CD key on
the remote control.
Lit dimly: Shows that the unit is in STANDBY mode.
In this condition, you can switch the unit on by
pressing the p CD key on the remote control.
Off: Shows that the power of the unit is OFF. In this
condition, you can turn the power on only by
pressing the STANDBY/ON, OFF switch on the
front panel.
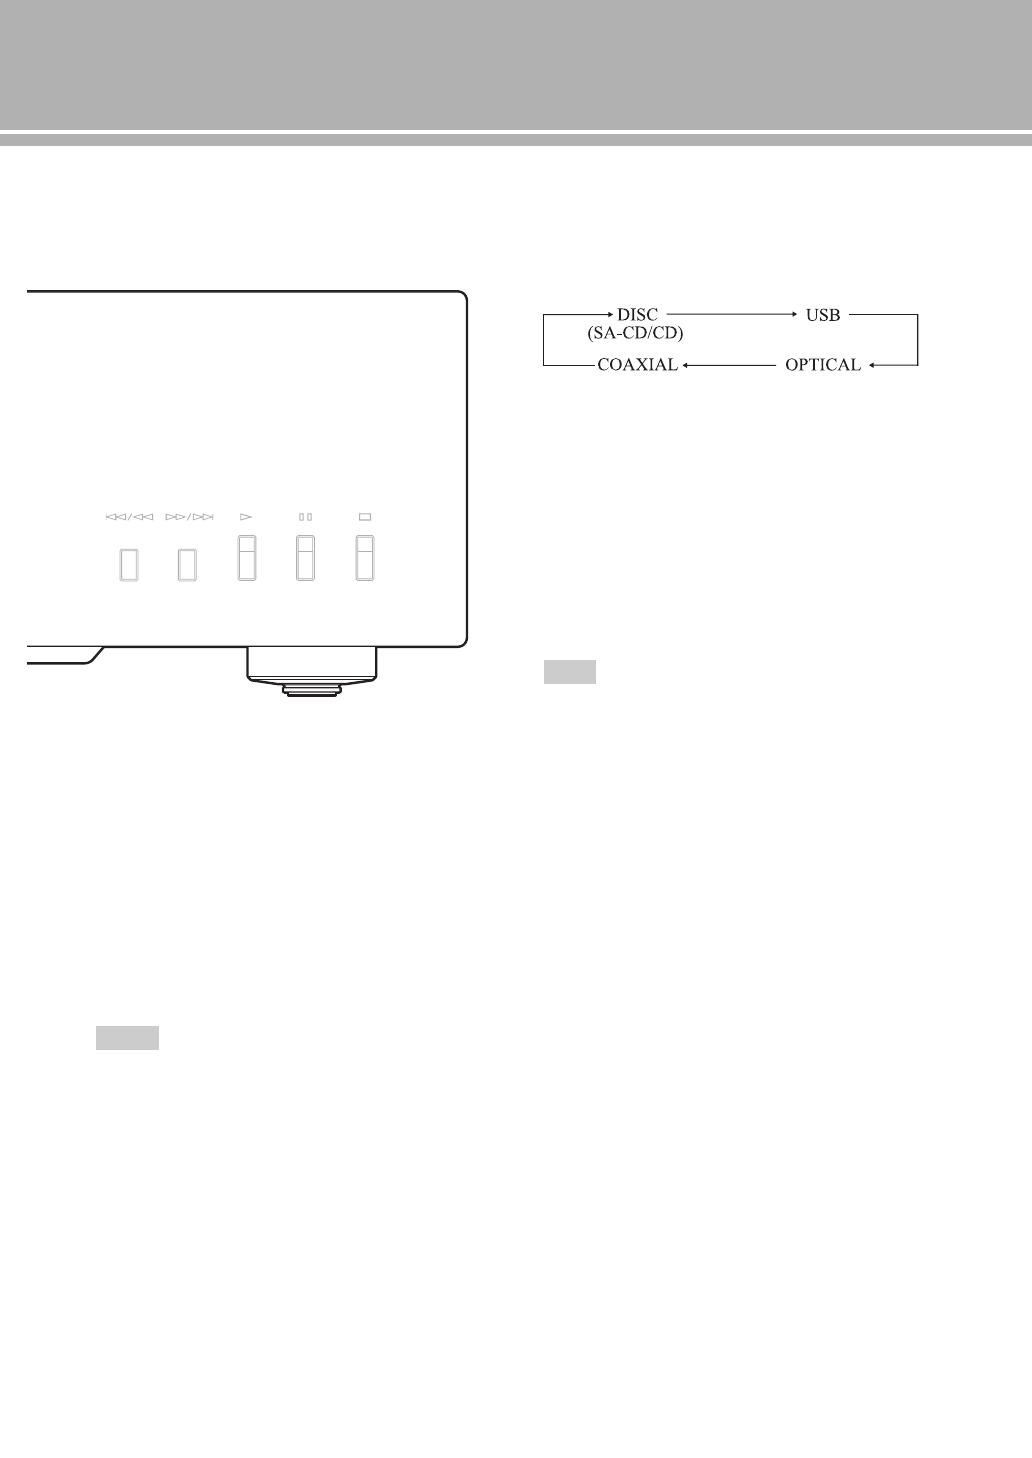
DISC USB
SOURCE
OPTICAL
STANDBY/ON
OFF
PURE DIRECT
SOURCE
LAYER
LAYER
SA-CD CD
COAXIAL
SA-CD HYBRID
TRACK TOTAL REMAIN PROG SHUFFLE REP OFF S ALL
2 41 3 5 6 7 8
Notes
7 En
3 PURE DIRECT key
Allows you to enjoy high audio quality.
y
• Press this key again to turn off the PURE DIRECT mode.
• This setting is retained even if you turn off this unit.
When PURE DIRECT is on:
• The audio signals are output only from the BALANCED
OUT jacks and the ANALOG OUT jacks.
• The front panel display will show only the minimum
indicators and messages.
4 PURE DIRECT indicator
Lights when the PURE DIRECT mode is turned on.
5 SOURCE key
Selects the audio source to be played back. Each time
you press this key, the audio source is switched.
y
The audio source setting is retained even if you turn off this
unit.
6 LAYER key
Switches the playback layer of a hybrid Super Audio
CD between SA-CD and CD while playback is
stopped (page 27).
y
This setting is retained even if you turn off this unit.
When SA-CD layer is selected, audio signals are output only
from the BALANCED OUT and ANALOG OUT jacks.
7 LAYER indicators
The indicator of the layer selected with the LAYER
key lights.
8 SOURCE indicators
The indicator of the audio source selected with the
SOURCE key lights.
Notes
Note
(coaxial digital input) (optical digital input)
English
8 En
Controls and functions
■ Front panel (pages 6 to 9)
9 Remote control sensor
Receives signals from the remote control.
0 Display
The brightness can be adjusted with the DIMMER key
on the remote control (page 12).
A (playback) / (pause) indicator
Lights in the playback/pause mode.
B Disc type indicator
Indicates the type (SA-CD/CD/HYBRID) of the disc
in the disc tray.
C Time display mode indicator
Indicates the time display mode of the display. Change
the mode by pressing the DISPLAY key on the remote
control (page 13).
TRACK: Elapsed time of the current track
TRACK REMAIN: Remaining time of the current
track
TOTAL REMAIN: Total remaining time of the disc
D Playback mode indicator
Indicates the current playback mode.
PROG: Program playback (page 14)
SHUFFLE: Shuffle playback (page 13)
REP OFF: Repeat playback off (page 12)
REP S : Single repeat playback (page 12)
REP ALL: All repeat playback (page 12)
E Information display
DISC
USB
SOURCE
OPTICAL
STANDBY/ON
OFF
PURE DIRECT
SOURCE
LAYER
LAYER
SA-CD CD
COAXIAL
A0
F G
B
C9
E
D
SA-CD HYBRID
TRACK TOTAL REMAIN PROG SHUFFLE REP OFF S ALL

9 En
F Disc tray
Loads a disc.
G (Open/Close) key
Opens or closes the disc tray.
y
The disc tray also closes automatically when you press:
• the (Play) key on the front panel or on the remote
control.
• the front edge of the disc tray gently.
• a numeric button on the remote control.
H (Skip/Search backward) key
Press the key once to skip back to the beginning of the
current track.
Press it twice to skip to the beginning of the previous
track.
Press and hold it to search backward.
(Skip/Search forward) key
Press the key once to skip to the next track.
Press and hold it to search forward.
I (Play) key
Starts playback.
J (Pause) key
Pauses playback. Press the or key to resume
playback.
K (Stop) key
Stops playback.
H
I J
K
See page 28 for more information on MP3/WMA
playback.
English
10 En
Controls and functions
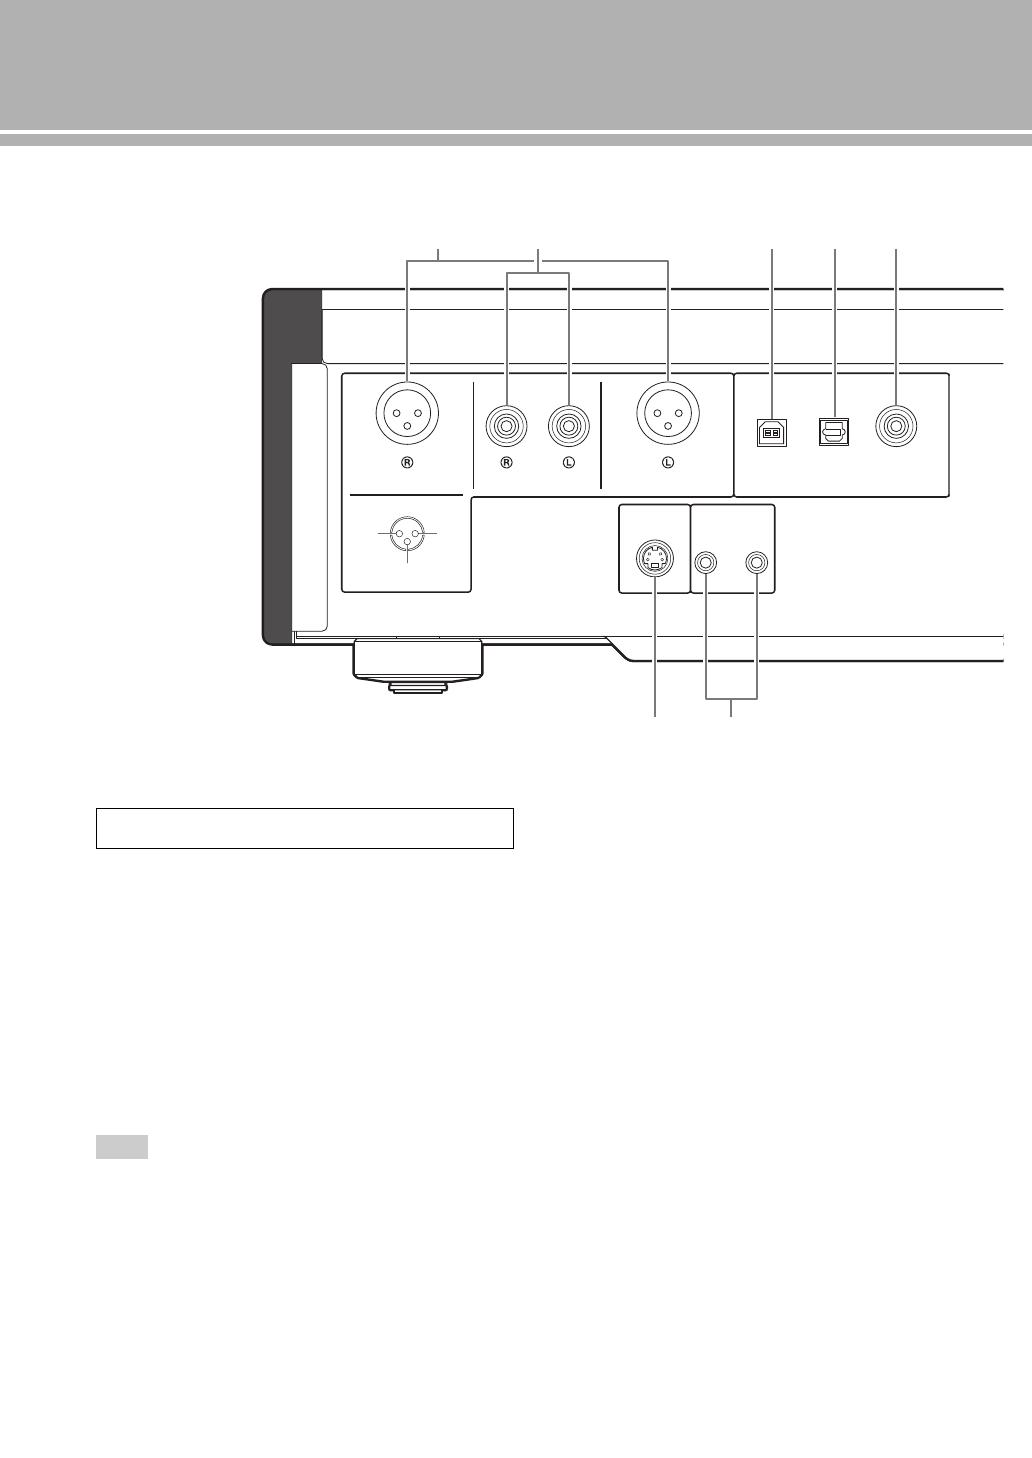
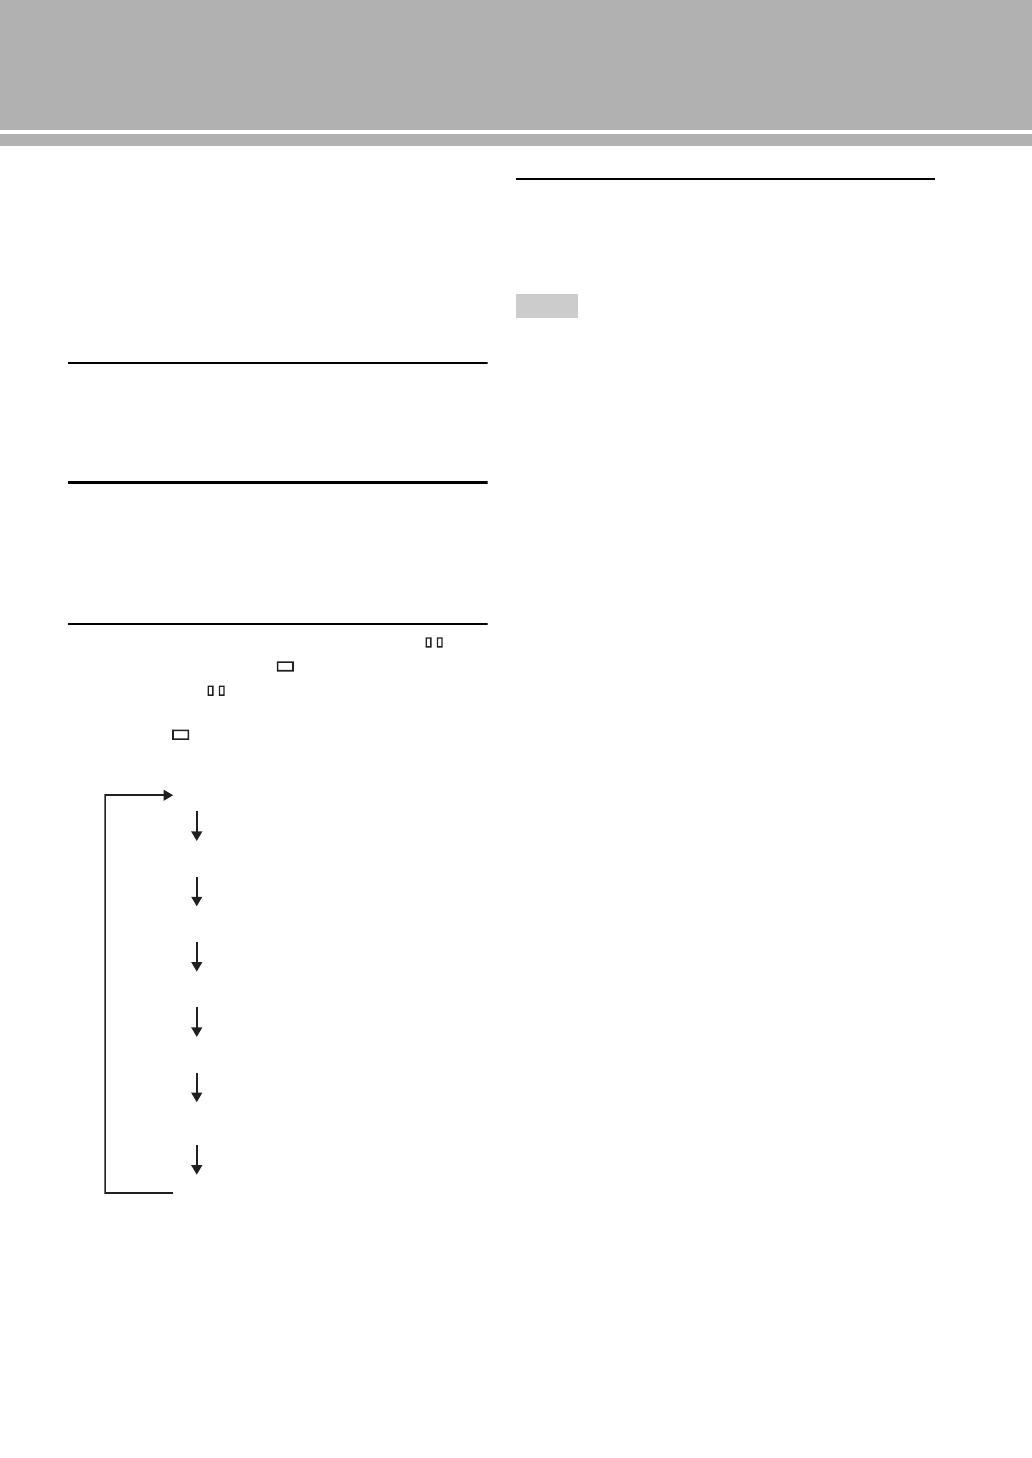
■ Rear panel
1 BALANCED OUT jacks (male)
2 ANALOG OUT jacks
3 DIGITAL IN USB jack (Type B)
4 DIGITAL IN OPTICAL jack
5 DIGITAL IN COAXIAL jack
6 DIGITAL OUT OPTICAL jack
7 DIGITAL OUT COAXIAL jack
While playing the SA-CD layer, the audio signals are output only
from the BALANCED OUT and ANALOG OUT jacks.
8 SYSTEM CONNECTOR
Use this connector to connect a product testing device
for servicing.
9 REMOTE IN/OUT jacks
Use these jacks to connect an external component for
remote operation.
For details on the connection, see page 21.
See page 18 for connection information.
SYSTEM CONNECTOR
REMOTE
IN OUT
BALANCED OUT DIGITAL IN
COAXIAL
DI
OPTICOPTICALUSB
ANALOG OUT BALANCED OUT
GND +HOT
- COLD
2
3
1
8
3 4 5
9
1 2
Note

11 En
0 AC IN inlet
Use this inlet to plug in the supplied power cable.
See page 20 for connection information.
A Foot
The feet of this unit include built-in spikes. Using the
spikes can reduce the effect of vibrations on the set.
When using the spikes, remove the transport tape, then
remove the magnet foot by pulling it.
• Take care that the magnet foot is not accidentally
swallowed by small children.
• When using the feet’s built-in spikes, the spikes may
scratch the shelf or floor on which this unit is installed. Use
the magnet feet or appropriate supports when placing this
unit on expensive furniture, etc.
y
If this unit is unstable, you can adjust the foot height by
rotating it.
COAXIAL
DIGITAL OUT
OPTICAL
A
6 7
AC IN
0
Spike
Transport
tape Magnet
foot
Caution
English
12 En
Controls and functions
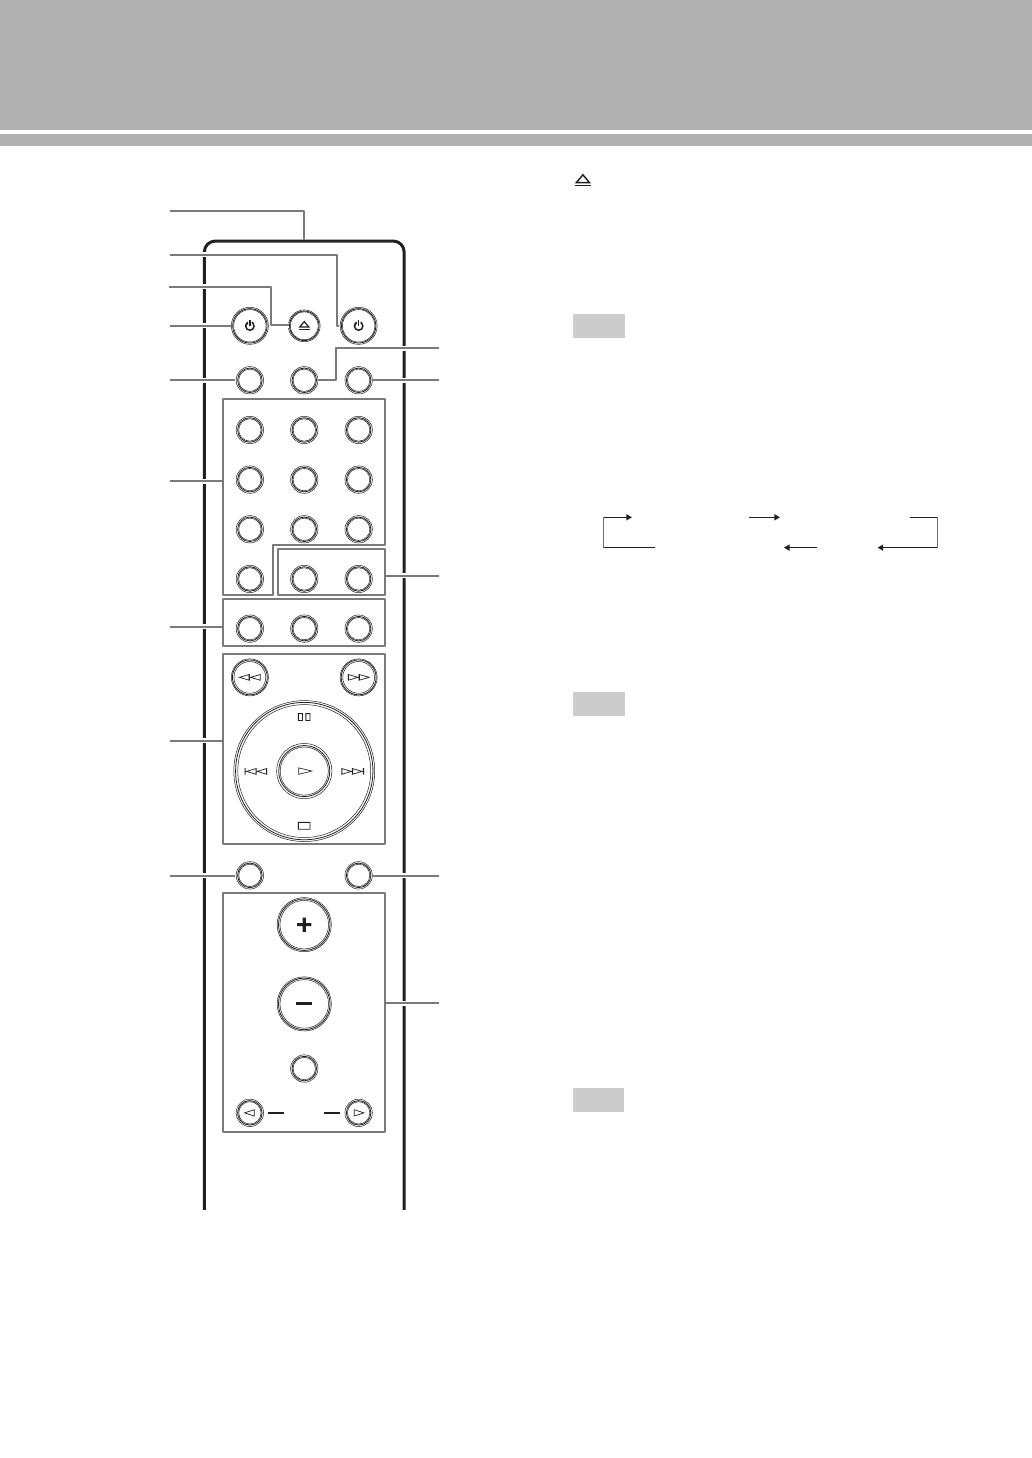
■ Remote control
1 Infrared signal transmitter
Sends infrared signals to this unit.
2 p CD key
Turns this unit ON or switches it to STANDBY mode.
For details on STANDBY, see “Front panel” (page 6).
3 OPEN/CLOSE key
Opens or closes the disc tray.
4 p AMP key
Turns the Yamaha amplifier ON or switches it to
STANDBY mode.
Some Yamaha amplifiers cannot be controlled with the
p AMP key of this remote control.
5 DIMMER key
Selects the brightness level for the front panel display.
Each time you press the DIMMER key, the brightness
level changes in the following order:
y
This setting is retained even if you turn off this unit.
6 Numeric buttons
Use to select a track directly.
This operation is ineffective for MP3 or WMA discs.
7 REPEAT key
Repeats playback of a single track or all tracks. Each
time you press the REPEAT key during playback, the
repeat playback mode changes as follows:
REP OFF (repeat playback off):
Repeat playback is cancelled.
REP S (single repeat playback):
On reaching the end of the current track, playback
repeats from the beginning of the current track.
REP ALL (all repeat playback):
On reaching the end of the last track, playback
repeats from the beginning of the first track.
This operation is ineffective for MP3 or WMA discs.
PROGRAM key
Turns on or off the program playback mode. See
“Program playback” (page 14).
1
2
B
A
@
5
3
7
4
6
C
D
8
9
AMP CD
OPEN/CLOSE
DIMMER PURE DIRECT
2
5
8
DISPLAY
13
INPUT
4
6
79
ENTER0 CLEAR
PROGRAMREPEAT SHUFFLE
MUTE
SOURCE LAYER
VOLUME
Note
Note
Note
Max (brightest) Level 1 (default)
Level 2 Level 3 (darkest)

13 En
SHUFFLE key
Performs shuffle playback.
• This operation is ineffective for MP3 or WMA discs.
• The shuffle playback mode is cancelled when playback is
stopped or the disc is ejected.
8 (Search backward) key
(Search forward) key
Searches tracks backward/forward.
(Pause) key
Pauses playback. Press the or key to
resume playback.
(Play) key
Starts playback.
(Skip backward) key
Press the key once to skip back to the beginning of
the current track.
Press it twice to skip to the beginning of the
previous track.
(Skip forward) key
Press the key once to skip to the next track.
(Stop) key
Stops playback.
9 SOURCE key
Selects the audio source to be played back. Each time
you press this key, the audio source is switched as
shown below.
y
The audio source setting is retained even if you turn off this
unit.
0 PURE DIRECT key
Allows you to enjoy high audio quality.
y
• Press this key again to turn off the PURE DIRECT mode.
• This setting is retained even if you turn off this unit.
When PURE DIRECT is on:
• The audio signals are output only from the BALANCED
OUT jacks and the ANALOG OUT jacks.
• The front panel display will show only the minimum
indicators and messages.
A DISPLAY key
Switches the time display. Each time you press the
DISPLAY key during playback, the time display
changes as follows:
TRACK: Elapsed time of the current track
TRACK REMAIN:
Remaining time of the current track
TOTAL REMAIN: Total remaining time of the disc
B ENTER key
Confirms a track number entered when you are
programming tracks.
CLEAR key
Erases the last programmed track when this unit is in
the program editing mode. See “Program playback”
(page 14).
y
To erase all programmed tracks, press the CLEAR key while
programmed playback is stopped.
C LAYER key
Switches the playback layer of a hybrid Super Audio
CD between SA-CD and CD while playback is
stopped (page 27).
y
This setting is retained even if you turn off this unit.
When SA-CD layer is selected, audio signals are output only
from the BALANCED OUT and ANALOG OUT jacks.
D Yamaha amplifier operation keys
Operates the Yamaha amplifier.
Refer to the owner’s manual of your amplifier for
details.
Some Yamaha amplifiers cannot be controlled with the keys
of this remote control.
Notes
Notes
(coaxial digital input) (optical digital input)
Note
Note
See page 28 for more information on MP3/WMA
playback.
English

14 En
Controls and functions
■ Program playback
In the program playback mode, you can play back tracks
in a programmed sequence.
1 Press PROGRAM while playback is stopped.
This unit is set to the program editing mode.
2 Select a track by using the numeric buttons
and press ENTER.
3 Repeat step 2 to program the next track.
You can program up to 24 tracks.
4 Press the p (Play) key.
Playback starts from the beginning of the
programmed sequence.
• This operation is ineffective for MP3 or WMA discs.
• The programmed tracks are erased in the following cases:
– when the disc is ejected
– when this unit is turned off or goes to STANDBY mode
– when an audio source other than the disc is selected
– when the playback layer of a hybrid Super Audio CD is
switched between SA-CD and CD
■ Setting the AUTO POWER STANDBY
function
The AUTO POWER STANDBY function can be set to
ON or OFF. When set to ON, if the unit is not operated for
30 minutes with no audio signal detected, it automatically
goes to STANDBY mode. When set to OFF, the unit does
not go to STANDBY mode automatically.
1 Open the disc tray and remove any currently-
loaded disc from the unit.
Skip step 1 to 3 if “NO DISC” appears on the
information display.
2 Close the disc tray.
3 Press SOURCE to select “DISC” as the audio
source.
“NO DISC” appears on the information display.
4 Press and hold the (Stop) key or (Play)
key on the front panel for about 2 seconds to
switch the setting.
(Stop) key: The AUTO POWER STANDBY
function switches to ON, and
“AutoSTBY ON” appears on the
information display.
(Play) key: The AUTO POWER STANDBY
function switches to OFF, and
“AutoSTBY OFF” appears on the
information display.
• The default setting for the AUTO POWER STANDBY function
is ON.
• This setting is retained even if you turn off this unit.
Notes
Notes
15 En
■ Setting the DPLL (Digital Phased Lock
Loop) bandwidth
The audio DAC (ES9016) of this unit employs DPLL to
generate accurate clock signals synchronized with the
clock of the input digital audio signal. The 7-step DPLL
bandwidth setting gives the unit tolerance for fluctuation
of the clock of the input digital signal and adjustment of
the accuracy of the operating clock in the DAC.
1 Press SOURCE to select the audio source to
be played back.
The DPLL bandwidth can be set for each audio
source, respectively.
2 Within 5 seconds after selecting the audio
source, press ENTER.
The unit enters the setting mode, and the DPLL
bandwidth currently set appears on the information
display.
3 Select the DPLL bandwidth using the
(pause) key and the (stop) key.
Each time the (pause) key is pressed, the
bandwidth changes in the following order. If you
press the (stop) key, it changes in reverse order.
4 Press ENTER.
The setting value flashes for 3 seconds, then the unit
resumes to normal mode.
To cancel the setting, press CLEAR.
• As the DPLL bandwidth setting value approaches “Lowest,” the
accuracy of the operating clock in the DAC improves, but the
unit may be susceptible to a change in the clock of the external
component. The sound from such a component may more easily
skips.
• As the DPLL bandwidth setting value approaches “Highest,”
the accuracy of the operating clock in the DAC deteriorates, but
the unit is far less susceptible to a change in the clock of the
external component, and the sound from such a component
hardly skips.
Lowest
Low
Med-Low
Medium
Med-Hi
High
Highest
(default)
Notes
English

16 En
Controls and functions
■ Installing batteries in the remote control
1 Remove the battery compartment cover.
2 Insert the two batteries (AAA, R03, UM-4)
according to the polarity markings (+ and -)
on the inside of the battery compartment.
3 Reinstall the battery compartment cover.
■ Operating range of the remote control
y
The remote control transmits a directional infrared beam.
Be sure to aim the remote control directly at the remote
control sensor on the front panel of this unit during operation.
2
1
3
30 30
Approximately
6 m (20 ft)
Connections
In this section, you will make connections between CD-S2100 and your amplifier.

18 En
CONNECTIONS
Connections
SYSTEM CONNECTOR
REMOTE
IN OUT
BALANCED OUT ANALOG OUT BALANCED OUT
GND +HOT
- COLD
If your amplifier is equipped with XLR balanced input jacks,
we recommend balanced connection for optimum audio performance.
When the SA-CD layer is played, the audio signals are output only from the BALANCED OUT and
ANALOG OUT jacks.
XLR balanced cable Stereo pin cable
Amplifier
19 En
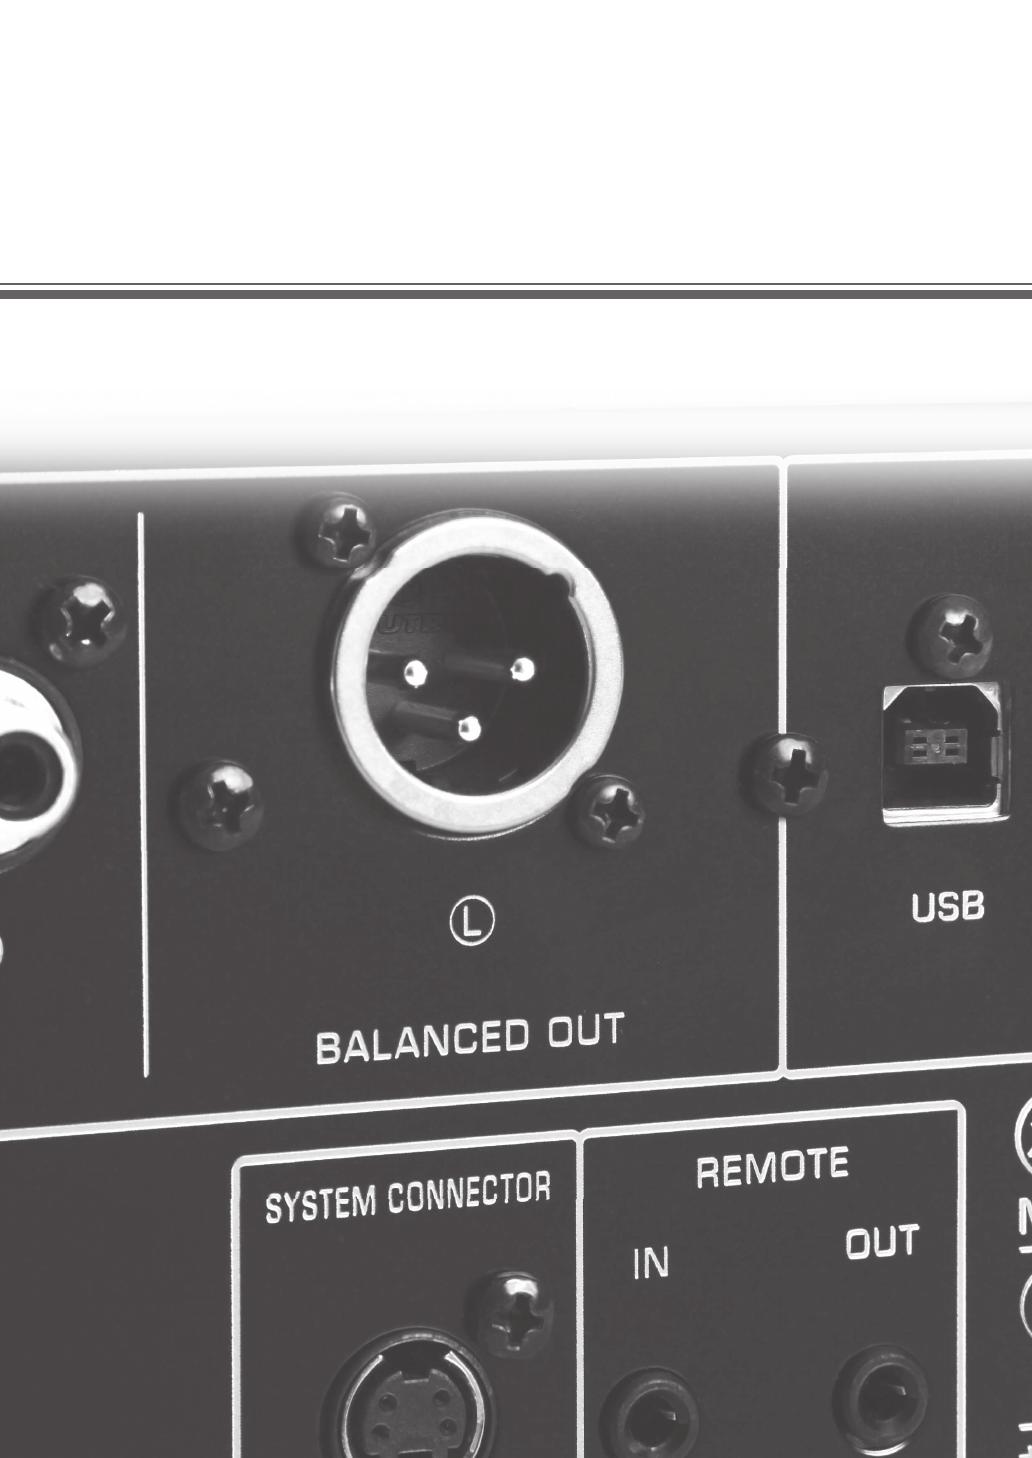
CONNECTIONS
AC IN
DIGITAL IN
COAXIAL COAXIAL
DIGITAL OUT
OPTICALOPTICALUSB
Coaxial digital
cable
Optical
digital cable
USB cable
(Type B)
PC
Component equipped with a
digital output (PCM) jack
Only PCM signals can be input to the DIGITAL IN (OPTICAL/COAXIAL) jacks of this unit. For details on the supported
PCM signals, see page 26.
Note
Coaxial digital
cable
Optical
digital cable
AV receiver equipped with a
digital input jack
English

20 En
CONNECTIONS
Connections
■ Connecting to the BALANCED OUT
jacks
Connect your amplifier with the XLR balanced input
jacks. The pin assignments for these jacks are shown
below. Refer to the owner’s manual supplied with your
amplifier and verify that its XLR balanced input jacks are
compatible with the pin assignments.
When connecting, be sure to match the pins and insert the
connector of the “female” XLR balanced cable. When
disconnecting, pull out the “female” XLR balanced cable
while pressing down the latch lock on the plug.
■ Connecting the power cable
Plug the power cable into the AC IN inlet when all
connections are complete, and then plug in the power
cable to the AC outlet.
1: ground 2: hot
3: cold
“Female” XLR connector
“Male” XLR connector
Latch lock
AC IN
Supplied power cable
to an AC outlet
Rear panel of CD-S2100
/