Page is loading ...

USER MANUAL
READ CAREFULLY BEFORE OPERATION
ULTRA HD Blu-ray Disc Player
UDP-205


i
Table of Contents
IMPORTANT INFORMATION ..................................................... 1
Important Safety Instructions .................................................................................... 1
Precautions.................................................................................................................. 2
FCC Statement ............................................................................................................ 2
Trademarks.................................................................................................................. 3
Compatible Disc Types ............................................................................................... 3
Discs that cannot be played .......................................................................................................... 4
Notes about BD-ROM compatibility .............................................................................................. 4
Disc care and handling ................................................................................................................. 4
Cinavia Notice ............................................................................................................. 4
Region management information ............................................................................... 4
Accessories ................................................................................................................. 5
INTRODUCTION ........................................................................ 6
Front Panel Controls ................................................................................................... 6
Front Panel Display Window ....................................................................................... 6
Rear Panel Connectors ............................................................................................... 7
Remote Control ........................................................................................................... 8
Remote Control Buttons ............................................................................................................... 8
Back Side ..................................................................................................................................... 9
Battery Installation ........................................................................................................................ 9
Using the Remote Control ............................................................................................................ 9
Changing the Remote Code ....................................................................................................... 10
Motion Sensitive Backlight .......................................................................................................... 10
Common Connection Methods ............................................... 12
Connecting to an A/V Receiver via HDMI ................................................................. 12
Connecting to a TV via HDMI .................................................................................... 13
Connecting to a TV and A/V Receiver via Dual HDMI .............................................. 14
Connecting to a Stereo Audio System through RCA-style Cable ............................ 15
Connecting to a Stereo Audio System through XLR Balanced Cable ..................... 16
Connecting to an A/V Receiver or Amplifier via Analog Outputs ............................ 17
Connecting to an A/V Receiver or Amplifier via S/PDIF (Coaxial / Optical) ............ 18
HDMI INPUT to UDP-205 ........................................................................................... 19
Digital Audio Input (Optical, Coaxial, USB) to UDP-205 .......................................... 20
Connecting to the Internet ....................................................................................... 21
Internet Connection via Ethernet Cable ...................................................................................... 21
Internet Connection via Wi-Fi ..................................................................................................... 22
RS232 Control ............................................................................................................ 23

ii
BASIC OPERATIONS ............................................................... 24
Disc Playback ............................................................................................................ 24
OPTION Menu ............................................................................................................ 24
Fast Forward and Reverse ........................................................................................ 25
Pause and Frame-by-Frame ...................................................................................... 26
Slow Playback ........................................................................................................... 26
Blu-ray Disc Menu Navigation ................................................................................... 26
DVD Menu Navigation................................................................................................ 27
On-Screen Display ..................................................................................................... 27
Volume Control .......................................................................................................... 28
Mute ........................................................................................................................... 28
Audio Language/Track Selection .............................................................................. 28
Subtitle Selection ...................................................................................................... 29
HDMI INPUT Selection .............................................................................................. 29
Digital Audio Input Selection .................................................................................... 29
Audio Return Channel (ARC) Selection .................................................................... 29
BD-Live ....................................................................................................................... 30
ADVANCED OPERATIONS ....................................................... 31
Zooming and Aspect Ratio Control .......................................................................... 31
Zoom Levels for HDMI Output .................................................................................................... 31
Subtitle Shift .............................................................................................................. 33
Repeat Playback ....................................................................................................... 33
Repeat a Selected Section ....................................................................................... 34
Shuffle and Random Playback .................................................................................. 34
Playback by Chapter or Track Number .................................................................... 34
Playback from a Specific Location ........................................................................... 35
DVD and Blu-ray Discs ............................................................................................................... 35
CD and SACD discs ................................................................................................................... 36
Memory and Automatic Resume ............................................................................... 37
Viewing Pictures on DVD-Audio Discs ...................................................................... 37
Pure Audio Mode ....................................................................................................... 38
MEDIA FILE PLAYBACK .......................................................... 39
Playback from a USB Flash Drive ............................................................................. 39
Playback from a Home Network ............................................................................... 40
HOME Menu ............................................................................................................... 41
Playing Music Files .................................................................................................... 41
Playing Movie Files .................................................................................................... 43
Viewing Photo Files ................................................................................................... 44
Adding Background Music ........................................................................................ 45
SETUP MENU OPTIONS .......................................................... 46

iii
Using the Setup Menu System .................................................................................. 46
Playback Setup .......................................................................................................... 49
Video Output Setup ................................................................................................... 52
Picture Adjustment ..................................................................................................................... 56
Select the Best Output Resolution .............................................................................................. 57
Determine the Display Aspect Ratio ........................................................................................... 58
Audio Output Setup ................................................................................................... 59
Audio Signal Reference Chart .................................................................................................... 62
Recommended Audio Format Options ........................................................................................ 63
Audio Processing Setup ............................................................................................ 65
Speaker Configuration ................................................................................................................ 68
Device Setup ............................................................................................................. 72
Network Setup ........................................................................................................... 76
Useful Notes ........................................................................... 80
Troubleshooting ..................................................................... 80
Specifications......................................................................... 82
User Manual Updates Online .................................................. 83
Language Code List ................................................................ 84
RS-232 Control Protocol ......................................................... 85
LIMITED WARRANTY .............................................................. 95
OPPO Digital, Inc. Limited Two Years Warranty ...................................................... 95

1
IMPORTANT INFORMATION
CAUTION: TO REDUCE THE RISK OF ELECTRIC
SHOCK, DO NOT REMOVE COVER (OR BACK).
NO USER-SERVICEABLE PARTS INSIDE. REFER
SERVICING TO QUALIFIED SERVICE
PERSONNEL.
The lightning flash with arrowhead symbol, within an
equilateral triangle, is intended to alert the user to the
presence of uninsulated “dangerous voltage” within
the product's enclosure that may be of sufficient magnitude to
constitute a risk of electric shock to persons.
The exclamation point within an equilateral
triangle is intended to alert the user to the
presence of important operation and maintenance
(servicing) instruction in the literature
accompanying the appliance.
WARNING:
TO REDUCE THE RISK OF FIRE OR ELECTRIC SHOCK,
DO NOT EXPOSE THIS APPLIANCE TO RAIN OR
MOISTURE. DANGEROUS HIGH VOLTAGES ARE
PRESENT INSIDE THE ENCLOSURE. DO NOT OPEN
THE CABINET. REFER SERVICING TO QUALIFIED
PERSONNEL ONLY.
THE APPARATUS SHALL NOT BE EXPOSED TO
DRIPPING OR SPLASHING AND THAT NO OBJECTS
FILLED WITH LIQUIDS, SUCH AS VASES SHALL BE
PLACED ON THE APPARATUS.
CAUTION:
DANGER OF EXPLOSION IF BATTERY IS INCORRECTLY
REPLACED. REPLACE ONLY WITH THE SAME OR
EQUIVALENT TYPE.
THIS PRODUCT UTILIZES A LASER. USE OF CONTROLS
OR ADJUSTMENTS OR PERFORMANCE OF
PROCEDURES OTHER THAN THOSE SPECIFIED HEREIN
MAY RESULT IN HAZARDOUS RADIATION EXPOSURE.
DO NOT OPEN COVERS AND DO NOT REPAIR
YOURSELF. REFER SERVICING TO QUALIFIED
PERSONNEL.
CLASS I LASER
PRODUCT
This label is located on the laser protective housing inside the
product.
Important Safety Instructions
1) Read these instructions.
2) Keep these instructions.
3) Heed all warnings.
4) Follow all instructions.
5) Do not use this apparatus near water.
6) Clean only with dry cloth.
7) Do not block any ventilation openings. Install in
accordance with the manufacturer’s instructions.
8) Do not install near any heat sources such as radiators,
heat registers, stoves, or other apparatus (including
amplifiers) that produce heat.
9) Do not defeat the safety purpose of the polarized or
grounding-type plug. A polarized plug has two blades
with one wider than the other. A grounding type plug
has two blades and a third grounding prong. The wide
blade or the third prong is provided for your safety. If
the provided plug does not fit into your outlet, consult
an electrician for replacement of the obsolete outlet.
10) Protect the power cord from being walked on or
pinched, particularly at plug, receptacle, and the point
where it exits from the apparatus.
11) Only use attachments/accessories specified by the
manufacturer.
12) Use only with the cart, stand, tripod,
bracket, or table specified by the
manufacturer, or sold with the
apparatus. When a cart is used, use
caution when moving the
cart/apparatus combination to avoid
injury from tip-over.
13) Unplug this apparatus during lightning storms or when
unused for long periods of time.
14) Refer all servicing to qualified service personnel.
Servicing is required when the apparatus has been
damaged in any way, such as power-supply cord or plug
is damaged, liquid has been spilled or objects have fallen
into the apparatus, the apparatus has been exposed to
rain or moisture, does not operate normally, or has been
dropped.
15) Batteries (battery pack or batteries installed) shall not be
exposed to excessive heat such as sunshine, fire or the
like.

IMPORTANT INFORMATION
2
Precautions
• Before connecting the AC power cord to the appliance,
make sure the voltage designation of the appliance
corresponds to the local electrical supply. If you are
unsure of your power supply, contact your local power
company. The acceptable power input range is AC
110V–120V~ / 220V–240V~, 50/60Hz.
• The apparatus with CLASS I construction shall be
connected to a MAINS socket outlet with a protective
earthing connection.
• The player is still receiving power from the AC power
source as long as it is connected to the wall outlet,
even if the player itself has been turned off.
• Unplug the power cord if you are not going to use the
product for an extended period of time. Hold the power
plug when unplugging. Do not pull on the cord.
• The main plug is used as the mechanism for cutting off
power, therefore make sure it is easy to unplug.
• To ensure proper ventilation around this product, do not
place this product on a sofa, bed or rug. When installing
this product on a wall or bookshelf, you need to provide
appropriate space: we recommend leaving 4 inches (10
cm) of free space at the top, the sides and the rear.
• High temperature will lead to abnormal operation of this
unit. Do not expose this unit or batteries to direct sunlight
or near other heating objects.
• When moving the player from a cold location to a warm
one, or vice versa, moisture may condense on the laser
pickup unit inside the player. Should this occur, the
player may not operate properly. In such a case please
turn the unit on for 1-2 hours (without a disc) to facilitate
moisture evaporation.
FCC Statement
This equipment has been tested and found to comply with the
limits for a Class B digital device, pursuant to Part 15 of the FCC
Rules. These limits are designed to provide reasonable
protection against harmful interference in a residential
installation. This equipment generates, uses, and can radiate
radio frequency energy and, if not installed and used in
accordance with the instructions, may cause harmful
interference to radio communications. However, there is no
guarantee that interference will not occur in a particular
installation. If this equipment does cause harmful interference to
radio or television reception, which can be determined by turning
the equipment off and on, the user is encouraged to try to
correct the interference by one or more of the following
measures:
• Reorient or relocate the receiving antenna.
• Increase the separation between the equipment and
receiver.
• Connect the equipment into an outlet on a circuit
different from that to which the receiver is connected.
• Consult the dealer or an experienced radio/TV
technician for help.
Any unauthorized changes or modifications to this equipment would
void the user’s authority to operate this device.
This device complies with Part 15 of the FCC Rules. Operation is
subject to th
e following two conditions: (1) This device may not cause
harmful interference, and (2) this device must accept any interference
received, including interference that may cause undesired operation.

IMPORTANT INFORMATION
3
Trademarks
• “ULTRA HD Blu-ray”, “Blu-ray Disc”, “Blu-ray 3D”,
“BONUSVIEW” and “BD-Live” are trademarks of Blu-ray
Disc Association.
• Java and all Java-based trademarks and logos are
trademarks or registered trademarks of Sun
Microsystems, Inc. in the United States and other
countries.
• DVD Logo is a trademark of DVD Format/Logo Licensing
Corp., registered in the U.S., Japan and other countries.
• Super Audio CD, SACD and the SACD logo are joint
trademarks of Sony Corporation and Philips Electronics
N.V. Direct Stream Digital (DSD) is a trademark of Sony
Corporation.
• “AVCHD” and the “AVCHD” logo are trademarks of
Panasonic Corporation and Sony Corporation.
• “480i/480p/720p/1080i/1080p” up-converting arrow logo,
“Source Direct” and “True 24p” logos are trademarks of
OPPO Digital, Inc.
• For DTS patents, see http://patents.dts.com.
Manufactured under license from DTS Licensing
Limited. DTS, the Symbol, DTS in combination with the
Symbol, the DTS-HD logo, and DTS-HD Master Audio
are registered trademarks or trademarks of DTS, Inc.
in the United States and/or other countries. © DTS,
Inc. All Rights Reserved.
• Manufactured under license from Dolby Laboratories.
Dolby, Dolby Audio and the double-D symbol are
trademarks of Dolby Laboratories.
• HDMI, the HDMI logo and High-Definition Multimedia
Interface are trademarks or registered trademarks of
HDMI Licensing LLC.
• “Cinavia” is trademark of Verance Corporation.
• All other trademarks are the properties of their
respective owners.
Compatible Disc Types
Logo Features Manual Icon
BD: Supports 4K Ultra HD Blu-ray and Blu-ray with Bonus View and BD-Live
content, including Blu-ray 3D discs. A 3D-capable display with compatible
glasses is required for 3D playback. BD-R/RE, both single- and dual-layer are
also supported.
DVD: Plays commercially-released DVDs, as well as finalized DVD±R/RW.
DVD-A: High-resolution stereo or multi-channel audio. Some DVD-Audio discs
also contain a DVD-Video portion.
SACD: High-resolution stereo or multi-channel audio. Note: some SACDs use
a hybrid format with both a CD and a high resolution DSD layer.
CD: Supports standard Red Book CDs, as well as CD-R/RW.
AVCHD: High-definition digital video camera format, often in the form of a
DVD±R or flash memory.

IMPORTANT INFORMATION
4
Discs that cannot be played
• BDs with cartridge
• DVD-RAMs
• HD-DVDs
• Data portion of CD-Extras
• DVDs / Blu-Rays with a region code not matching the
player’s region code
• Some Dual-Discs: A Dual-Disc is a two-sided disc with
DVD-video on one side and digital audio on the other
side. The digital audio side does not meet the technical
specifications of the Red Book CD format so playback is
not guaranteed.
• Audio discs with copy-protection may not be playable.
Notes about BD-ROM compatibility
Since the Blu-ray Disc specifications are new and evolving, some discs may not play properly depending on the disc type, version
and encoding. It is possible that a Blu-ray Disc manufactured after the player uses new features of the Blu-ray Disc specifications.
To ensure the best possible viewing experience, the player may need a firmware or software update from time to time. Please visit
OPPO Digital’s web site www.oppodigital.com
to check if updates are available.
Disc care and handling
• To keep the disc clean from scratches or fingerprints,
handle the disc by its edge. Do not touch the recorded
surface.
• Blu-ray Discs record data in very high density and the
recorded layer is very close to the disc surface. For this
reason, Blu-ray Discs are more sensitive to dust and
fingerprints than DVD. Should you encounter playback
problems and see dirty spots on the disc surface, clean
the disc with a cleaning cloth. Wipe the disc from the
center out along the radial direction. Do not wipe the
disc in a circular motion.
• Do not use record cleaning sprays or solvents such as
benzene, thinner and anti-static spray.
• Do not attach labels or stickers to discs as this may
cause the disc to warp or become too thick, resulting in
playback issues and a potentially stuck disc.
• Avoid exposing the discs to direct sunlight or heat
sources.
• Do not use the following discs:
o Discs with exposed adhesive from removed stickers
or labels. The disc may get stuck inside the player.
o Warped or cracked discs.
o Irregularly shaped discs, such as heart or business
card shapes.
Cinavia Notice
This product uses Cinavia technology to limit the use of unauthorized copies of some commercially-produced film and videos and their
soundtracks. When a prohibited use of an unauthorized copy is detected, a message will be displayed and playback or copying will be
interrupted.
This product incorporates proprietary technology under license from Verance Corporation and is protected by U.S. Patent 7,369,677 and
other U.S. and worldwide patents issued and pending as well as copyright and trade secret protection for certain aspects of such
technology. Cinavia is a trademark of Verance Corporation. Copyright 2004-2013 Verance Corporation. All rights reserved by Verance.
Reverse engineering or disassembly is prohibited.
This update includes Cinavia
®
content protection technology. Information about Cinavia technology is provided at the Cinavia Online
Consumer Information Center at http://www.cinavia.com.
More information about Cinavia technology is provided at the Cinavia Online Consumer Information Center at http://www.cinavia.com
. To
request additional information about Cinavia by mail, send a postcard with your mailing address to: Cinavia Consumer Information Center,
P.O. Box 86851, San Diego, CA, 92138, USA.
Region management information
This player is designed and manufactured to respond to the region management information. If the region number of a BD-Video
or DVD disc does not correspond to the region number of this player, this player cannot play the disc.

IMPORTANT INFORMATION
5
BD-Video: Blu-Ray Discs with marks containing the region code A.
DVD-Video: DVDs with marks containing the region code 1 and ALL.
Accessories
Please check that the following parts are included in your UDP-205 package:
User Manual
Premium High Speed HDMI Cable, about 6 feet
Power Cable, about 4.5 feet
Remote Control with AA Batteries

6
INTRODUCTION
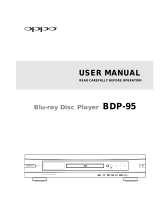
Front Panel Controls
1. POWER Status Indicator
2. POWER Button
3. Disc Tray
4. Front Panel Display Window
5. IR Sensor Window
6. OPEN/CLOSE Tray Button
7. USB 2.0 Input
8. Playback Controls and
Navigation Buttons
9. ¼-inch Stereo Headphone
Jack (6.3mm)
Front Panel Display Window
1. Main Display – Text messages and numeric display
2. HDR Icon – Indicates the current playing content is High-
Dynamic Range
3. Disc Type Indication – Indicates the currently playing disc
type
4. Audio Type Indication – Indicates the type of audio tracks
being played
5. Title – When illuminated, the displayed time applies to a title
6. Chapter – When illuminated, the displayed time applies to a
chapter
7. Track – When illuminated, the displayed time applies to a
track
8. Remaining – When illuminated, the displayed time is the
remaining play time
9. Multi-channel Indication – Indicates the audio being played
is multi-channel surround
10. Mute Icon – Indicates that the audio is muted
11. Playback Status – Indicates playback status such as Play,
Pause
12. Network Status – Indicates that the player is connected to a
wired / wireless network
13. Playback Modes – Indicates playback modes such as
Repeat, Repeat All, and Random Mode

INTRODUCTION
7
Rear Panel Connectors
1. Gigabit Ethernet LAN Port
2. HDMI Output (Main)
3. HDMI Output (Audio Only)
4. HDMI Input
5. Stereo Audio Output
6. Balanced Stereo Audio Output
7. Optical Digital Audio Output
8. Coaxial Digital Audio Output
9. USB 3.0 Input
10. USB 3.0 Input
11. Optical Digital Audio Input
12. Coaxial Digital Audio Input
13. USB (Type B) Audio Input
14. RS-232C Serial Control Port
15. Trigger Output
16. Trigger Input
17. IR (Infrared) Sensor
18. Ground
19. 7.1CH / 5.1CH / Stereo Analog
Audio Output
20. AC Power Inlet
The AC power inlet is the IEC60-320 C14 type. Only the included AC power cord or an approved power cord
with an IEC60-320 C14 type plug should be used.

INTRODUCTION
8
Remote Control
Remote Control Buttons
1. POWER: Toggle power
STANDBY and ON
2. PURE AUDIO: Turn
off/on video
3. NUMBER Buttons:
Enter numeric values
4. CLEAR: Clear numeric
input
5. TOP MENU: Show BD
top menu or DVD title
menu
6. ARROW and ENTER
Buttons: Navigate menu
selection
7. OPTION: Brings up the
context-related menu
8. COLOR Buttons:
Function varies by
content
9. PLAY: Start playback
10. STOP: Stop playback
11. REV: Fast reverse play
12. PREV: Skip to previous
13. AUDIO: Change audio
language or channel
14. SUBTITLE: Change
subtitle language
15. SETUP: Enter the
player Setup Menu
16. A-B REPLAY: Repeat
play the selected
section
17. RESOLUTION: Switch
output resolution
18. OPEN: Open/close the
disc tray
19. INPUT: Switch input
source
20. MUTE: Mute audio
21. VOLUME +/-:
Increase/Decrease
volume
22. HOME: Go to Home
Menu to select media
source
23. PAGE UP/DOWN:
Show the previous/next
page
24. INFO: Show/hide the
On-Screen Display
25. GOTO: Play from a
specified location
26. POP-UP MENU: Show
BD pop-up menu or
DVD menu
27. RETURN: Return to the
previous menu or mode
28. PAUSE: Pause
playback
29. FWD: Fast forward play
30. NEXT: Skip to the next
31. DIMMER: Dim the front
panel display
32. ZOOM: Zoom in/out and
adjust aspect ratio
33. PIC: Quick access to
the picture adjustment
menu
34. REPEAT: Repeat play
35. HDR: Choose the output
mode for High-Dynamic
Range content
NOTE
• When a button is pressed but its function is invalid or unavailable at the moment, the TV
screen displays a circle with a diagonal line:

INTRODUCTION
9
Back Side
1. Index Finger Notch 1: When your index finger is
placed at this notch while holding the remote control,
your thumb is within easy reach of the navigation
buttons (ARROW, ENTER, TOP MENU and POP-UP
MENU).
2. Index Finger Notch 2: When your index finger is
placed at this notch while holding the remote control,
your thumb is within easy reach of the playback
control buttons (STOP, PLAY, PAUSE, PREV, NEXT,
REV, FWD).
3. Battery Cover: Remove to replace batteries or set
remote code.
4. Batteries: Use 2 AA or LR6 batteries.
5. Remote Code Switch: Adjust the position of the
switch to set the remote control to use the indicated
remote code (see details on page 10).
Battery Installation
1. Remove the battery
compartment cover
2. Insert batteries
3. Replace the battery
compartment cover
Using the Remote Control
When using the remote control, the front window of the remote control should be pointed to the infrared sensor
on the front panel within an angle of ±30° and a range of about 26 ft.

INTRODUCTION
10
Changing the Remote Code
The remote control contains three OPPO remote codes. The default is Code 1. If you have other OPPO
products placed close to the UDP-205, they may inadvertently respond to the UDP-205 remote control. To
prevent this, you can select a different remote code.
To select a new remote code, open the battery compartment cover of the remote control, and then use a ball
point pen to flip the switch to one of the positions marked as 1, 2, or 3. Close the battery compartment cover.
Make sure that the UDP-205 player is turned on and that the disc tray is ejected. Aim the remote control at the
player. Press and hold the ENTER button for 5 seconds. The player will start using the new remote code.
Motion Sensitive Backlight
The remote control features a motion sensor to activate the backlight for five seconds when you pick up
the remote or press a button on the remote.
To disable or enable the backlight, press the DIMMER and 0 buttons at the same time on your remote.

INTRODUCTION
11
CAUTION
• Never drop the remote control or expose it to moisture.
• Never expose the infrared remote sensor on the front panel to direct sunlight or other
strong light sources.
• Remote may not operate consistently when batteries become low. Replace them if
operation deteriorates.
• If the remote control will not be used for a long time, please remove the batteries.
• Use the batteries correctly to avoid possible leakage and corrosion. Do not leave the
batteries exposed to direct sunlight or in a high temperature environment for a long period
of time. Do not heat or expose to flame. Do not mix old and new batteries. Do not use
batteries of different types at the same time. Do not attempt to recharge the batteries.
• If battery leakage occurs, do not touch the liquid with bare hands. Wipe out any liquid
inside the battery compartment, and insert new batteries.

12
Common Connection Methods
Connecting to an A/V Receiver via HDMI
• If you have an HDMI-capable receiver that supports 4K HDR video pass-through, you can simply
run an HDMI cable from the player’s HDMI OUT (Main) output into your receiver and enable
HDMI video pass-through on the receiver (see your receiver’s owner’s manual for more
information). The receiver usually has an HDMI output that you can connect to your TV to pass
the video signal.
• Some receivers contain a mixture of HDMI 2.0 and HDMI 1.4 ports. In order to view 4K UHD
content, ensure that you are connecting the UDP-205’s HDMI OUT (Main) output into an HDMI
2.0 and HDCP 2.2 compliant input of the receiver.
NOTE
• HDMI (High-Definition Multimedia Interface) is a single cable that can transport both audio and
video from your player to your display. Be aware, however, that HDMI is an evolving standard, and
there may be compatibility issues. A receiver that supports audio input over HDMI is required.
Some receivers offer HDMI ports solely for video switching. If your receiver does not have audio
input capability, please read the following sections regarding other connection methods.
• For Blu-ray Discs, a receiver that supports HDMI 1.4 or later with decoding capability for Dolby
TrueHD and DTS-HD Master Audio is preferred.
• For 4K UHD Blu-ray discs, a receiver that supports HDMI 2.0 and HDCP 2.2 or later is required. It
is recommended to use an 18 Gbps Premium High-Speed HDMI Cable to watch 4K UHD movies.
• The UDP-205 supports bitstreaming the latest object-based surround audio formats, such as Dolby
Atmos and DTS:X to a receiver that can decode these formats.
• Please check the specifications of your receiver to ensure that it meets these requirements.

BASIC OPERATIONS
13
Connecting to a TV via HDMI
• Use an HDMI cable to connect the player’s HDMI OUT (Main) output directly into your TV. This
connection method delivers both audio and video in a pure digital format via a single cable.
• In order to play 4K UHD content, you must connect the UDP-205’s HDMI OUT (Main) output into
an HDMI 2.0 and HDCP 2.2 compliant input of the 4K UHD TV.
NOTE
• This connection method will output sound via the TV’s speakers. For optimal sound quality, it is
recommended that audio be transferred from the UDP-205 to an A/V receiver with connected
speakers.
• You will need a UHD TV that supports HDMI 2.0 and HDCP 2.2 in order to watch UHD Blu-Ray
and other UHD content in 4K resolution.
• You will need an HDR-capable TV to watch HDR content.
• You will need an 18 Gbps High-Speed HDMI Cable to watch UHD movies at 4K@60.
• Do not connect the HDMI OUT (Audio Only) output to your TV.

BASIC OPERATIONS
14
Connecting to a TV and A/V Receiver via Dual HDMI
• The UDP-205’s Dual HDMI connection mode ensures that you can enjoy the highest possible
video quality and resolution, in addition to high bit rate audio content. Use an HDMI cable to
connect the HDMI OUT (Main) output to your TV, and another HDMI cable to connect the HDMI
OUT (Audio Only) output to your receiver.
• This configuration is recommended when you have a 3D or UHD compatible display, but your
receiver is not 3D or UHD compatible. This configuration will allow you to send the video signal
(3D or UHD in this case) directly to the TV and send the audio signal to the receiver.
NOTE
• Please refer to the notes on HDMI connections available on page 12.
• If your receiver does not have HDMI audio input capability, please try the alternate
connection methods discussed on pages 15 through 18.

BASIC OPERATIONS
15
Connecting to a Stereo Audio System through RCA-style Cables
• If your audio system offers only stereo audio inputs, or if you would like to connect a dedicated stereo
audio system in addition to the surround audio system which is already connected to the HDMI,
coaxial or optical outputs, you can connect the dedicated stereo audio system to the STEREO
AUDIO OUT terminals of the player.
• Two sets of dedicated stereo audio outputs are available on the UDP-205: the RCA-style connectors
and the XLR balanced connectors (shown in the next page). Preference should be given to the XLR
connectors since they may provide better noise rejection and signal integrity (refer to page 17 for
more information).
NOTE
• The STEREO AUDIO OUT terminals automatically down-mix the multi-channel audio
source into the stereo signals. However, STEREO AUDIO OUT will NOT be affected by the
“Down Mix” modes and other speaker settings in the Audio Processing section of the
Setup Menu (described on page 65).
/