Campomatic C64VSGRI Owner's manual
- Category
- Ovens
- Type
- Owner's manual

USER INSTRUCTIONS
60cm SINGLE CAVITY ELECTRIC COOKER
••••••••••••••••••••••••••••••••USER INSTRUCTIONS
60cm SINGLE CAVITY ELECTRIC COOKER
C64VSGRI
C64VSGRI

ELECTRICAL OVENS
with
4 HOTPLATES
USER INSTRUCTIONS
13501 4 CERAMIC HOBS CERAN ELECTRICAL OVEN with Timer &Turbo Fan
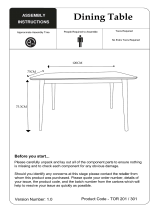
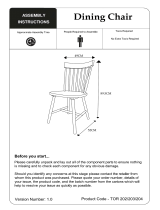
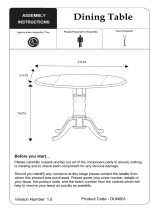
Please read these instructions carefully before
attempting to install or use this product. It is advisable
to keep these instructions in a safe place for future
reference.
SECTION 1 TECHNICAL SPECIFICATIONS & SECTIONS of OVEN
Dear Client,
Thank you about buying our product. You can trust our products. This is a
detailed User’s Manual which you can read it to use your product easier and better.
You can find safety information in page 2. Please check your product that it
has got any failure or lacking. If you find a damage sourced by transportation,
please contact with sales department that you bought product or region store that
sent product to you.
We hope you use your oven in good days.
INDEX
:
Section 1
Technical Specifications & Sections of Oven
Section 2
Important Safety Notices
Section 3
Installation of Oven
Section 4
Control Panel
Section 5
Usage of Oven
Section 6
Grilling in the Oven
Section 7
Adjustment of Timer (Optional)
Section 8
Maintenance & Cleaning
Section 9
Information About Transportation
Section 10
Troubleshooting
-1-
MODEL
COLOUR
BLACK+INOX
COVER
-
FUEL TYPE
HOB
ELECTRIC
OVEN
ELECTRIC
HOB TYPE CERAN
145 MM CERAN HEATER ( QUANTITY X WATT ) 2X1200 WATT
180 MM CERAN HEATER ( QUANTITY X WATT ) 2X1800 WATT
TOTAL HOB POWER 6000 WATT
TIMER
COOKING FUNCTION 6 FUNCTION
OVEN VOLUME
58 LITER
OVEN POWER
2550 WATT
GRILL POWER 2000 WATT
TURBO HEATER -
TURBO FAN YES
TOTAL POWER 8550 WATT
THERMOSTAT
OVEN 0-285 C
SECURITY 130 C
VOLTAGE 230 V
FREQUENCY 50-60 HZ
ENERGY CLASS A
ENERGY CONSUMPTION ( CONVENSIONAL KWH )
ENERGY CONSUMPTION ( FORCED AIR KWH )
DIMENSIONS
WIDTH ( MM ) 600
DEPTH ( MM ) 600
HEIGHT ( MM ) 900
SWITCH NO 14
2 BUTONS
DIGITAL
0,85 Kwh
0,78 Kwh
C64VSGRI

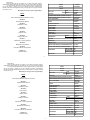
SECTION 1 TECHNICAL SPECIFICATIONS & SECTIONS of OVEN
Model 13501
Timer Digital / -
Colour White
Cooker 4 Ceramic Hobs
Lid Metal
Big Hotplate (Pcs – Watt) 2 - 1800
Medium Rapid Hotplate
(Pcs - Watt)
2 - 1200
Oven Volume (lt) 66
Total Oven Power (Watt) 2500
Grill Power (Watt) 2000
Voltage (Volt) 230
Frequence (Hz.) 50-60
Energy Efficiency Class A
Energy Consumption
(Conventional) (Kilowatt
hour)
0,76
Energy Consumption
(Forced air convection)
(Kilowatt / hour)
0,75
Width (mm) 600
Length (mm) 600 DIMENSIONS
Height (mm) 860
SECTION 2 IMPORTANT SAFETY NOTICES
This electrical oven is manufactured for using preparation of normal home
meals. Please do not use for other purposes.
Installation
- This appliance must be installed by qualified personnel, according to the
manufacturer’s instructions and to the relevant Safety Standards.
- This appliance is heavy. Take care when moving it.
- Remove all packaging, protective films and oils From the appliance before
using for the first time.
- Ensure that the electrical supply complies with The type stated on the
rating plate.
- Do not attempt to modify the appliance in any way.
- Usage voltage of your oven is 230 Volt - 50 Hz.
- Fuel Type for your oven is Electricity.
Warning:
This appliance must be earthed.
When you have finished cooking check that all controls are in the OFF
position.
• If your electrical installation fuse range is not 40 A, please make a capable
electrical technician connect 40 A fuse.
• Please be sure that plug of your oven cooker is accidentally if the pulled beyond
the extent of the power cord, the Earth wire will pull out last. İf your residence did
not contain earth system the producer company dose not responsible about the
damaged event.
• Your oven must be used with an earthed outlet, since the inlet of your oven is
an earthed inlet. Our firm will not take any responsibility in case that it is used
without grounding.
• Keep electric cable of your cooker away from hot areas and don’t let these to be
in touch with the device. Keep away from sharp edges and hot surfaces.
• When supply cable is damaged, call on your nearest service and get it replaced
with a new one.
• Connection can only be done by an expert authorised by customer relations.
• Before connecting your appliance, please check local connection conditions
(electricity) suitability to type of appliance.
• Appliance can not be connected to a hood. Connection must be done according
to valid assembly and connection instructions. Please pay a special attention to
ventilation requirement. The distance between appliance and hood must be at least
as the distance described in hoods User’s Manual.
• Oven can be installed between two furniture element. (Class 2/1). Appliance
can be placed near a furniture element which has a taller side than oven.
Horizontal distance to a high cupboard or wall must be at least 300 mm. There can
be only a semi-heighted furniture element paced at the other side of appliance.
Hanged furniture elements can only be assembled at a height that is not an
opportunity for working process. The shortest vertical distance to appliance must
be at least 650 mm.
• Operations which can only be made with a tool on appliance must be done by
an authorised service technician.
• Appliance can only be connected by a technician who authorised by technical
service. By this way, it provides to obey legal instructions and local technical
connection conditions. You can find important statements about this subject at
‘Installation of Oven’ section.
• During boiling and frying, very hot solid or liquid oil drops leaped on oven can
easily catch fire and cause fire danger. Please take frying process in your control.
• Connection cables of appliances near oven can be damaged and shortcutted if
they contacted with hot parts of oven. Thats why, cables of other appliances must
be in enough safety distance to oven.
• Please do not use appliances plates for heating inside. Please do not put any
empty pot on plates.
• Humidity and heat shall come out of your device while using it, so be sure that
your kitchen is well ventilated. Keep natural ventilation holes active, or get a
mechanical ventilation assembly installed. (Exhaust Fan)
• Utilise oven gloves to take out hot pots or pans/trays.
• External surfaces of oven can be hot while utilising oven section.
Children Safety
- This appliance is designed to be operated by adults. Do not allow children to
play near or with the appliance.
- The appliance gets hot when it is in use. Children should be kept away until it
has cooled down.
- Children can also injure themselves by pulling pans or pots off the appliance.
- Before using your product please take out packing materials on oven. Do not
forget to take out cartoons on sides of trays and wire grate and strafor that stick on
front panel. Packing material can cause a danger for children.
- Small children must be kept away. Don’t touch heating elements inside oven.
Don’t definitely touch oven glass when oven is hot. Keep children and pets away
from cooker while oven is operating.
Attention :
Burning risk is high especially for small children who are not aware of
danger. Burners surfaces, cover of oven, inner parts and steam exit are hot during
usage. They can exposed to burning or boiling. So it required to keep small
children from oven in appropriate distance. Bigger children can use oven under
watch.
Attention: Burning Danger. Heating elements, oven and accesories are very hot
during usage. So please always use kitchen cloths or heat resist gloves during
holding pots and be careful on usage of pots for remove burn risk.
Pressing on open cover of oven with heavy matters can cause damage on cover
hinges. So please do not sit or load heavy matters on open cover of oven.
SECTION 1 TECHNICAL SPECIFICATIONS & SECTIONS of OVEN
Model 13501
Timer Digital / -
Colour White
Cooker 4 Ceramic Hobs
Lid Metal
Big Hotplate (Pcs – Watt) 2 - 1800
Medium Rapid Hotplate
(Pcs - Watt)
2 - 1200
Oven Volume (lt) 66
Total Oven Power (Watt) 2500
Grill Power (Watt) 2000
Voltage (Volt) 230
Frequence (Hz.) 50-60
Energy Efficiency Class A
Energy Consumption
(Conventional) (Kilowatt
hour)
0,76
Energy Consumption
(Forced air convection)
(Kilowatt / hour)
0,75
Width (mm) 600
Length (mm) 600 DIMENSIONS
Height (mm) 860
-2-
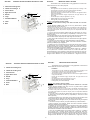
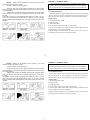
1. 180mm dia cooking zone
2. 145mm dia cooking zone
3. Control Panel
4. Upper Oven Cover
5. Handle
6. Тrays
7. Command Buttons
8. Timer
9. Raw
1
2
SECTION 1 TECHNICAL SPECIFICATIONS & SECTIONS of OVEN
SECTION 2 IMPORTANT SAFETY NOTICES
This electrical oven is manufactured for using preparation of normal home
meals. Please do not use for other purposes.
Installation
- This appliance must be installed by qualified personnel, according to the
manufacturer’s instructions and to the relevant Safety Standards.
- This appliance is heavy. Take care when moving it.
- Remove all packaging, protective films and oils From the appliance before
using for the first time.
- Ensure that the electrical supply complies with The type stated on the
rating plate.
- Do not attempt to modify the appliance in any way.
- Usage voltage of your oven is 230 Volt - 50 Hz.
- Fuel Type for your oven is Electricity.
Warning:
This appliance must be earthed.
When you have finished cooking check that all controls are in the OFF
position.
• If your electrical installation fuse range is not 40 A, please make a capable
electrical technician connect 40 A fuse.
• Please be sure that plug of your oven cooker is accidentally if the pulled beyond
the extent of the power cord, the Earth wire will pull out last. İf your residence did
not contain earth system the producer company dose not responsible about the
damaged event.
• Your oven must be used with an earthed outlet, since the inlet of your oven is
an earthed inlet. Our firm will not take any responsibility in case that it is used
without grounding.
• Keep electric cable of your cooker away from hot areas and don’t let these to be
in touch with the device. Keep away from sharp edges and hot surfaces.
• When supply cable is damaged, call on your nearest service and get it replaced
with a new one.
• Connection can only be done by an expert authorised by customer relations.
• Before connecting your appliance, please check local connection conditions
(electricity) suitability to type of appliance.
• Appliance can not be connected to a hood. Connection must be done according
to valid assembly and connection instructions. Please pay a special attention to
ventilation requirement. The distance between appliance and hood must be at least
as the distance described in hoods User’s Manual.
• Oven can be installed between two furniture element. (Class 2/1). Appliance
can be placed near a furniture element which has a taller side than oven.
Horizontal distance to a high cupboard or wall must be at least 300 mm. There can
be only a semi-heighted furniture element paced at the other side of appliance.
Hanged furniture elements can only be assembled at a height that is not an
-2-
1. 180mm dia cooking zone
2. 145mm dia cooking zone
3. Control Panel
4. Upper Oven Cover
5. Handle
6. Тrays
7. Command Buttons
8. Timer
9. Raw
1
2

SECTION 2 IMPORTANT SAFETY NOTICES
This electrical oven is manufactured for using preparation of normal home
meals. Please do not use for other purposes.
Installation
- This appliance must be installed by qualified personnel, according to the
manufacturer’s instructions and to the relevant Safety Standards.
- This appliance is heavy. Take care when moving it.
- Remove all packaging, protective films and oils From the appliance before
using for the first time.
- Ensure that the electrical supply complies with The type stated on the
rating plate.
- Do not attempt to modify the appliance in any way.
- Usage voltage of your oven is 230 Volt - 50 Hz.
- Fuel Type for your oven is Electricity.
Warning: This appliance must be earthed.
When you have finished cooking check that all controls are in the OFF
position.
• If your electrical installation fuse range is not 40 A, please make a capable
electrical technician connect 40 A fuse.
• Please be sure that plug of your oven cooker is accidentally if the pulled beyond
the extent of the power cord, the Earth wire will pull out last. İf your residence did
not contain earth system the producer company dose not responsible about the
damaged event.
• Your oven must be used with an earthed outlet, since the inlet of your oven is
an earthed inlet. Our firm will not take any responsibility in case that it is used
without grounding.
• Keep electric cable of your cooker away from hot areas and don’t let these to be
in touch with the device. Keep away from sharp edges and hot surfaces.
• When supply cable is damaged, call on your nearest service and get it replaced
with a new one.
• Connection can only be done by an expert authorised by customer relations.
• Before connecting your appliance, please check local connection conditions
(electricity) suitability to type of appliance.
• Appliance can not be connected to a hood. Connection must be done according
to valid assembly and connection instructions. Please pay a special attention to
ventilation requirement. The distance between appliance and hood must be at least
as the distance described in hoods User’s Manual.
• Oven can be installed between two furniture element. (Class 2/1). Appliance
can be placed near a furniture element which has a taller side than oven.
Horizontal distance to a high cupboard or wall must be at least 300 mm. There can
be only a semi-heighted furniture element paced at the other side of appliance.
Hanged furniture elements can only be assembled at a height that is not an
opportunity for working process. The shortest vertical distance to appliance must
be at least 650 mm.
• Operations which can only be made with a tool on appliance must be done by
an authorised service technician.
• Appliance can only be connected by a technician who authorised by technical
service. By this way, it provides to obey legal instructions and local technical
connection conditions. You can find important statements about this subject at
‘Installation of Oven’ section.
• During boiling and frying, very hot solid or liquid oil drops leaped on oven can
easily catch fire and cause fire danger. Please take frying process in your control.
• Connection cables of appliances near oven can be damaged and shortcutted if
they contacted with hot parts of oven. Thats why, cables of other appliances must
be in enough safety distance to oven.
•
• Humidity and heat shall come out of your device while using it, so be sure that
your kitchen is well ventilated. Keep natural ventilation holes active, or get a
mechanical ventilation assembly installed. (Exhaust Fan)
• Utilise oven gloves to take out hot pots or pans/trays.
• External surfaces of oven can be hot while utilising oven section.
Children Safety
- This appliance is designed to be operated by adults. Do not allow children to
play near or with the appliance.
- The appliance gets hot when it is in use. Children should be kept away until it
has cooled down.
- Children can also injure themselves by pulling pans or pots off the appliance.
- Before using your product please take out packing materials on oven. Do not
forget to take out cartoons on sides of trays and wire grate and strafor that stick on
front panel. Packing material can cause a danger for children.
- Small children must be kept away. Don’t touch heating elements inside oven.
Don’t definitely touch oven glass when oven is hot. Keep children and pets away
from cooker while oven is operating.
Attention :
Burning risk is high especially for small children who are not aware of
danger. Burners surfaces, cover of oven, inner parts and steam exit are hot during
usage. They can exposed to burning or boiling. So it required to keep small
children from oven in appropriate distance. Bigger children can use oven under
watch.
Attention:
Burning Danger. Heating elements, oven and accesories are very hot
during usage. So please always use kitchen cloths or heat resist gloves during
holding pots and be careful on usage of pots for remove burn risk.
Pressing on open cover of oven with heavy matters can cause damage on cover
hinges. So please do not sit or load heavy matters on open cover of oven.
During Use;
- Ensure the control knobs are in the ‘OFF’ position when not in use.
- When cooking heavy items, eg; turkeys, do not pull the oven shelf out with the
item is still on the shelf. There might be a risk of tipping.
- Never use the appliance for heating a room.
- Reachable parts of oven can be very hot when grate uses. Please keep small
children away. Please do not touch heating elements inside oven.
- Outer surfaces of oven can be hot during ordinary working of appliance
- Use oven gloves when removing hot food utensils from the oven. The oven and
utensils will be very hot when in use.
- Do not put any hot items into the drawer. Utensils used during cooking should
only be put into the drawer when cold.
- During boiling and frying, very hot solid or liquid oil drops leaped on oven can
easily catch fire and cause fire danger. Please take frying process in your control.
- The oven door must always close properly. Keep the door seal areas clean.
- Pressing on open cover of oven with heavy matters can cause damage on
cover hinges. So please do not sit or load heavy matters on open cover of oven.
- Do not use the oven with the door inner glass panel removed.
- Do not use the drop down door as a step to reach above cabinets
- After using oven side, please wipe vapour drops with a cloth that can be formed
on oven cover by high temperature.
- When opening the appliance door, take care to avoid skin contact with any
steam that may escape from the oven.
- Perishable food, plastic items and aerosols may be affected by heat and should
not be stored above or around the appliance.
Service :
- Connection cables of appliances near oven can be damaged and shortcutted if
they contacted with hot parts of oven. Thats why, cables of other appliances must
be in enough safety distance to oven. When power cord damaged plese contact
with closest authorised service to fix new one.
- Operations and repairs on appliance that done unmethodically causes
possibility of electric shock and shortcuts. Please keep away from this kind of
operations which can destroy your appliance and cause danger of getting injured.
- This appliance should only be repaired or serviced by an authorised Service
Engineer and only genuine approved spare parts should be used.
SECTION 3 INSTALLATION OF OVEN
• Before connecting your appliance, please check local connection conditions
(electricity) suitability to type of appliance.Your Appliance is set for electricity.
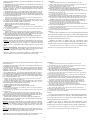
• When placing your appliance, the appliance should be at the same level as the
counter level. Position the appliance at the same level as the counter level by
adjusting the feet if required.
• The sidewalls where the appliance is located should be made from durable
materials resistance to heat. A space of 70 cm from upper hotplates upward
should be left.
• Appliance can not be connected to a hood. Connection must be done
according to valid assembly and connection instructions. Please pay a special
attention to ventilation requirement. The distance between appliance and hood
must be at least as the distance described in hoods User’s Manual.
• Oven can be installed between two furniture element. (Class 2/1). Appliance
can be placed near a furniture element which has a taller side than oven.
Horizontal distance to a high cupboard or wall must be at least 300 mm. There
can be only a semi-heighted furniture element paced at the other side of
appliance. Hanged furniture elements can only be assembled at a height that is
not an opportunity for working process.
The shortest vertical distance to appliance must be at least 650 mm.
• Operations which can only be made with a tool on appliance must be done by
an authorised service technician.
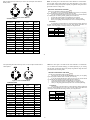
• Please look at Figure 2 for locating oven.
Figure 2
650
mm
850
mm
-3-
Please do not use appliance's cooking zone for the purpose of heating indoor area.
Please do not put any emty pot cooking zone
opportunity for working process. The shortest vertical distance to appliance must
be at least 650 mm.
• Operations which can only be made with a tool on appliance must be done by
an authorised service technician.
• Appliance can only be connected by a technician who authorised by technical
service. By this way, it provides to obey legal instructions and local technical
connection conditions. You can find important statements about this subject at
‘Installation of Oven’ section.
• During boiling and frying, very hot solid or liquid oil drops leaped on oven can
easily catch fire and cause fire danger. Please take frying process in your control.
• Connection cables of appliances near oven can be damaged and shortcutted if
they contacted with hot parts of oven. Thats why, cables of other appliances must
be in enough safety distance to oven.
•
• Humidity and heat shall come out of your device while using it, so be sure that
your kitchen is well ventilated. Keep natural ventilation holes active, or get a
mechanical ventilation assembly installed. (Exhaust Fan)
• Utilise oven gloves to take out hot pots or pans/trays.
• External surfaces of oven can be hot while utilising oven section.
Children Safety
- This appliance is designed to be operated by adults. Do not allow children to
play near or with the appliance.
- The appliance gets hot when it is in use. Children should be kept away until it
has cooled down.
- Children can also injure themselves by pulling pans or pots off the appliance.
- Before using your product please take out packing materials on oven. Do not
forget to take out cartoons on sides of trays and wire grate and strafor that stick on
front panel. Packing material can cause a danger for children.
- Small children must be kept away. Don’t touch heating elements inside oven.
Don’t definitely touch oven glass when oven is hot. Keep children and pets away
from cooker while oven is operating.
Attention :
Burning risk is high especially for small children who are not aware of
danger. Burners surfaces, cover of oven, inner parts and steam exit are hot during
usage. They can exposed to burning or boiling. So it required to keep small
children from oven in appropriate distance. Bigger children can use oven under
watch.
Attention:
Burning Danger. Heating elements, oven and accesories are very hot
during usage. So please always use kitchen cloths or heat resist gloves during
holding pots and be careful on usage of pots for remove burn risk.
Pressing on open cover of oven with heavy matters can cause damage on cover
hinges. So please do not sit or load heavy matters on open cover of oven.
During Use;
- Ensure the control knobs are in the ‘OFF’ position when not in use.
- When cooking heavy items, eg; turkeys, do not pull the oven shelf out with the
item is still on the shelf. There might be a risk of tipping.
- Never use the appliance for heating a room.
- Reachable parts of oven can be very hot when grate uses. Please keep small
children away. Please do not touch heating elements inside oven.
- Outer surfaces of oven can be hot during ordinary working of appliance
- Use oven gloves when removing hot food utensils from the oven. The oven and
utensils will be very hot when in use.
- Do not put any hot items into the drawer. Utensils used during cooking should
only be put into the drawer when cold.
- During boiling and frying, very hot solid or liquid oil drops leaped on oven can
easily catch fire and cause fire danger. Please take frying process in your control.
- The oven door must always close properly. Keep the door seal areas clean.
- Pressing on open cover of oven with heavy matters can cause damage on
cover hinges. So please do not sit or load heavy matters on open cover of oven.
- Do not use the oven with the door inner glass panel removed.
- Do not use the drop down door as a step to reach above cabinets
- After using oven side, please wipe vapour drops with a cloth that can be formed
on oven cover by high temperature.
- When opening the appliance door, take care to avoid skin contact with any
steam that may escape from the oven.
- Perishable food, plastic items and aerosols may be affected by heat and should
not be stored above or around the appliance.
Service :
- Connection cables of appliances near oven can be damaged and shortcutted if
they contacted with hot parts of oven. Thats why, cables of other appliances must
be in enough safety distance to oven. When power cord damaged plese contact
with closest authorised service to fix new one.
- Operations and repairs on appliance that done unmethodically causes
possibility of electric shock and shortcuts. Please keep away from this kind of
operations which can destroy your appliance and cause danger of getting injured.
- This appliance should only be repaired or serviced by an authorised Service
Engineer and only genuine approved spare parts should be used.
-3-
Please do not use appliance's cooking zone for the purpose of heating indoor area.
Please do not put any emty pot cooking zone

SECTION 3 INSTALLATION OF OVEN
• Before connecting your appliance, please check local connection conditions
(electricity) suitability to type of appliance.Your Appliance is set for electricity.
• When placing your appliance, the appliance should be at the same level as the
counter level. Position the appliance at the same level as the counter level by
adjusting the feet if required.
• The sidewalls where the appliance is located should be made from durable
materials resistance to heat. A space of 70 cm from upper upward
should be left.
• Appliance can not be connected to a hood. Connection must be done
according to valid assembly and connection instructions. Please pay a special
attention to ventilation requirement. The distance between appliance and hood
must be at least as the distance described in hoods User’s Manual.
• Oven can be installed between two furniture element. (Class 2/1). Appliance
can be placed near a furniture element which has a taller side than oven.
Horizontal distance to a high cupboard or wall must be at least 300 mm. There
can be only a semi-heighted furniture element paced at the other side of
appliance. Hanged furniture elements can only be assembled at a height that is
not an opportunity for working process.
The shortest vertical distance to appliance must be at least 650 mm.
• Operations which can only be made with a tool on appliance must be done by
an authorised service technician.
• Please look at Figure 2 for locating oven.
Figure 2
650
mm
850
mm
Figure 3 Control Panels
-4-
SECTION 4 INTRODUCTION of Control Panel &
USAGE of CERAMIC COOKER
You can find control buttons in Figure:5 With these control buttons
power of each heating element can be adjustable. Buttons can turn
clockwise or opposite to clockwise directions. Please bring the control
button to required cooking position and do not forget big numbers on button
print means high heat outlet. For first cooking, it recommended to use
highest cooking position.
User Instructions :
Before start cleaning cooker be sure that electrical connection is cut
off. Please do not use rough pots can scratch the surface of cooker. Before
using cooking pots, pay attention that their base is dry and clean. Base
diameter of cooking pots must be same as cooking surface of cooker. Base
of cooking pot must be a little concave in cold condition. When this concave
base heated, its contact with cooker surface increases by expantion; so
maximum heat transfer from cooker to pot provided. Best base thickness
for enamelled pots is 2-3 mm. For sandwich type stainless steel pots 4-6
mm base thickness is recommended. To test whether pot base has right
shape or not, you can do this easy test whne it is cold as follows : Let pot
base stay contacted to smooth side of desk in right, pass it on between
some paper tape. ( For enamelled pot 5-10 pieces of paper tape, for
stainless steel pot 2-5 pieces of tape are recommended.)
cooking
cooking

SECTION 5 USAGE OF OVEN
During initial operation of your oven, a smell arising from insulation
materials and heating elements will be generated. To avoid it, operate
your oven at 250 C for 45 minutes without putting any trays before use.
Control Buttons of Oven
Indicator lamp will be on together with thermostat switch. When the heat inside
the oven reaches the set value, Thermostat cuts the circuit and the lamp is off.
When the heat is below set value, thermostat is on again and indicator lamp is lit.
Usage of Oven
1. The meals that can be cooked
2. Positions of trays
3. Thermostat positions
4. Recommended cooking times are given in cooking table.
5. Turn the “oven heating control” switch clockwise to adjust cooking time for the
meal you desire to cook, refer to cooking table.
6. Before cooking, pre-heat the oven for 10 minutes. The front cover of the oven
should be open. Put the dish in the oven after pre-heating.
NOTE: The values given in the table are the values obtained in our laboratories.
You can obtain various tastes satisfying your tastes depending on your cooking
and use habits. Cooking times depend on quantity of ingredients. Using cake forms
gives better results for making cakes.
-5-
NOTICE : Please cut off electricity at the moment of any crack
formed on surface of ceramic cooker.
Ceramic cookers are cleaning easily.
Firstly all food and oil churns lightly cleaned with a glass scraper
without scratching. Soft razor mouthed type or fixed razor side can be used
as a glass scraper.
Please clean cooker with suitable liquid cleaner and paper towel
when it is still hot. Then wipe with a humidous cloth and dry it with clean,
dry cloth.
At condition of sugar or high sugarized foods spilled on cooker, you can
clean it by using same way defined above. Please do not use corroding
sponge, irritator chemical detergents as oven spray or stain remover in any
condition.
SECTION 5 USAGE OF OVEN
During initial operation of your oven, a smell arising from insulation
materials and heating elements will be generated. To avoid it, operate
your oven at 250 C for 45 minutes without putting any trays before use.
Control Buttons of Oven
Indicator lamp will be on together with thermostat switch. When the heat inside
the oven reaches the set value, Thermostat cuts the circuit and the lamp is off.
When the heat is below set value, thermostat is on again and indicator lamp is lit.
Usage of Oven
1. The meals that can be cooked
2. Positions of trays
3. Thermostat positions
4. Recommended cooking times are given in cooking table.
5. Turn the “oven heating control” switch clockwise to adjust cooking time for the
meal you desire to cook, refer to cooking table.
6. Before cooking, pre-heat the oven for 10 minutes. The front cover of the oven
should be open. Put the dish in the oven after pre-heating.
-5-
NOTICE : Please cut off electricity at the moment of any crack
formed on surface of ceramic cooker.
Ceramic cookers are cleaning easily.
Firstly all food and oil churns lightly cleaned with a glass scraper
without scratching. Soft razor mouthed type or fixed razor side can be used
as a glass scraper.
Please clean cooker with suitable liquid cleaner and paper towel
when it is still hot. Then wipe with a humidous cloth and dry it with clean,
dry cloth.
At condition of sugar or high sugarized foods spilled on cooker, you can
clean it by using same way defined above. Please do not use corroding
sponge, irritator chemical detergents as oven spray or stain remover in any
condition.

NOTE: The values given in the table are the values obtained in our laboratories.
You can obtain various tastes satisfying your tastes depending on your cooking
and use habits. Cooking times depend on quantity of ingredients. Using cake forms
gives better results for making cakes.
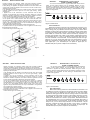
SECTION 6 GRILLING IN THE OVEN
Turn the oven temperature button to position
• We advise you to use grill wire that put into the tray when you are grilling.
By the way leaped or flowed oil can not make your oven dirty.
• If you use grill wire that placed on shelf, put a tray into one of lower shelves
for collecting oils. For cleaning it easily, please put some water in it.
• Cover at half opened position do preheating for 5-10 minutes.
• Please oil the grill to prevent your grilling food from sticking on grill.
• When you are grilling, please half open the oven cover after preheating,
ATTENTION :
For preventing command buttons on control panel from heating, please set
its sheet centered between front cover and oven body without have blank. Our
company is not responsible for damage made by not using this sheet.
GRILL
Shelf Time (min.)
Lamb Meat 4-5 15
Lamb Chops 4-5 15
Calf Chops 4-5 15-25
Sheep Chops 4-5 15-25
-6-
After pre-heating place the food that you cook in oven and adjust control button to
related position.
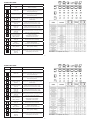
Figure 5 Oven Control Buttons
COOKING TABLE
Food Kinds
Thermostat
Position
Cooking Extension
(min.)
Shelf
Position
Cream-Cake 150-175 25-35 2-3
Grape-Cake 150-175 20-30 2-3
Apple-Cake 150-175 25-35 2-3
Fruitful-Cake 150-175 20-30 2-3
Light Cake 150-175 20-30 2-3
Cookie 150-175 30-35 2-3
Bun 190-200 30-40 3-4
Pastry 170-190 30-40 3-4
Cake 150-175 15-25 3
Biscuit 150-175 25 3-4
Lamb Meat 225 50-60 3-4
Beef 250 30-40 3-4
Mutton 240 40-50 3-4
Veal 250 30-40 3-4
Chicken 200 20-35 3-4
Fish 200 30-40 3-4
NOTE: The values given in the table are the values obtained in our laboratories.
You can obtain various tastes satisfying your tastes depending on your cooking
and use habits. Cooking times depend on quantity of ingredients. Using cake forms
gives better results for making cakes.
SECTION 6 GRILLING IN THE OVEN
Turn the oven temperature button to position
• We advise you to use grill wire that put into the tray when you are grilling.
By the way leaped or flowed oil can not make your oven dirty.
• If you use grill wire that placed on shelf, put a tray into one of lower shelves
for collecting oils. For cleaning it easily, please put some water in it.
• Cover at half opened position do preheating for 5-10 minutes.
• Please oil the grill to prevent your grilling food from sticking on grill.
• When you are grilling, please half open the oven cover after preheating,
ATTENTION :
For preventing command buttons on control panel from heating, please set
its sheet centered between front cover and oven body without have blank. Our
company is not responsible for damage made by not using this sheet.
GRILL
Shelf Time (min.)
Lamb Meat 4-5 15
Lamb Chops 4-5 15
Calf Chops 4-5 15-25
Sheep Chops 4-5 15-25
-6-
After pre-heating place the food that you cook in oven and adjust control button to
related position.
Figure 5 Oven Control Buttons
COOKING TABLE
Food Kinds
Thermostat
Position
Cooking Extension
(min.)
Shelf
Position
Cream-Cake 150-175 25-35 2-3
Grape-Cake 150-175 20-30 2-3
Apple-Cake 150-175 25-35 2-3
Fruitful-Cake 150-175 20-30 2-3
Light Cake 150-175 20-30 2-3
Cookie 150-175 30-35 2-3
Bun 190-200 30-40 3-4
Pastry 170-190 30-40 3-4
Cake 150-175 15-25 3
Biscuit 150-175 25 3-4
Lamb Meat 225 50-60 3-4
Beef 250 30-40 3-4
Mutton 240 40-50 3-4
Veal 250 30-40 3-4
Chicken 200 20-35 3-4
Fish 200 30-40 3-4

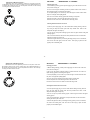
LEVEL FUNCTION DESCRIPTION
O Close Oven is not working
Oven Lamp
Double Grill
Outer Heating Element and Grill Heating
Element works together.Recommends to use
for big and powerfull grill.
Oven Lamp
Grill Heating Element
Oven Lamp and Grill heater works.
Recommend to use for frying.Thermostat must
be at maximum position.
Oven Lamp
Top&Bottom Heating
Elements
Hot air comes from up and down heats the tray
from both side. Top and bottom sides of meals
cooked equally.
Oven Lamp
Grill Heating Element
Turbo Fan
Oven Lamp, Grill heater and Turbo Fan work
together. Recommend to use for frying.
Thermostat must be at maximum position.
Oven Lamp
Double Grill
Turbo Fan
Oven Lamp, Double Grill and Turbo Fan work
together. Recommend to use for frying.
Thermostat must be at maximum position.
Oven Lamp
Turbo Heating Element
Turbo Fan
Oven Lamp, Turbo Fan and Turbo Heating
Element work.Recommend to use fast cooking.
Oven Lamp
Turbo Heating Element
Turbo Fan, Bottom
Heating Element
Oven Lamp, turbo heating element,
turbo fan and bottom
heating element work together.
Recommed to use for pizza.
Oven Lamp
Turbo Fan
Only Oven Lamp and Turbo Fan work.
Recommend to use for defrosting.
Bottom
Heating Element
Bottom heating element,
Recommed to use cake and bread.
Top
Heating Element
Top Heating Element for keeping cooked food
warm or gently reheating.
Oven Lamp
Top&Bottom Heating
Elements
Turbo Fan
Hot air comes from up and down heats the tray
from both side. Top and bottom sides of meals
cooked equally with Turbo Fan.
OVEN FUNCTIONS:
SECTION 7 ADJUSTMENT of TIMER (Optional)
A) Adjustment of Mechanical Timer :
Mechanical Timer can be adjusted by its button on front panel. T�mer must
be adjusted to start the oven cooking. Cooking time can be adjusted between 5 to
90 minutes with mechanical timer. You should position the button to ‘ON’ manually
if cooking time will exceed 90 minutes.
B) Adjustment of QT- 3000 Digital Timer :
OT- 3000 Programmable Options
BUZZER TONE ADJUSTMENT
� Press the
Raw Positions For 2 Trays : 4-6 For 1 Tray : 4
-7-
LEVEL FUNCTION DESCRIPTION
O Close Oven is not working
Oven Lamp
Double Grill
Outer Heating Element and Grill Heating
Element works together.Recommends to use
for big and powerfull grill.
Oven Lamp
Grill Heating Element
Oven Lamp and Grill heater works.
Recommend to use for frying.Thermostat must
be at maximum position.
Oven Lamp
Top&Bottom Heating
Elements
Hot air comes from up and down heats the tray
from both side. Top and bottom sides of meals
cooked equally.
Oven Lamp
Grill Heating Element
Turbo Fan
Oven Lamp, Grill heater and Turbo Fan work
together. Recommend to use for frying.
Thermostat must be at maximum position.
Oven Lamp
Double Grill
Turbo Fan
Oven Lamp, Double Grill and Turbo Fan work
together. Recommend to use for frying.
Thermostat must be at maximum position.
Oven Lamp
Turbo Heating Element
Turbo Fan
Oven Lamp, Turbo Fan and Turbo Heating
Element work.Recommend to use fast cooking.
Oven Lamp
Turbo Heating Element
Turbo Fan, Bottom
Heating Element
Oven Lamp, turbo heating element,
turbo fan and bottom
heating element work together.
Recommed to use for pizza.
Oven Lamp
Turbo Fan
Only Oven Lamp and Turbo Fan work.
Recommend to use for defrosting.
Bottom
Heating Element
Bottom heating element,
Recommed to use cake and bread.
Top
Heating Element
Top Heating Element for keeping cooked food
warm or gently reheating.
Oven Lamp
Top&Bottom Heating
Elements
Turbo Fan
Hot air comes from up and down heats the tray
from both side. Top and bottom sides of meals
cooked equally with Turbo Fan.
OVEN FUNCTIONS:
Raw Positions For 2 Trays : 4-6 For 1 Tray : 4
-7-

-8-
SECTION 8 MAINTENANCE & CLEANING
Cleaning your Oven
1. Before starting cleaning, pull the power-supply plug out of the socket. If the oven
is hot, wait for cooling off.
2. Do not use the agents scratching enamel or painted surfaces. Use creams or
liquid cleaning agents not containing hard agents.
3. The liquid spilling on the cooker may cause damage to enamel surfaces when
they burn. Promptly clean spilling liquids.
4. Do not use corrosive cleaning agents when cleaning control panel.
5. Never drip water on and touch the glass when the oven is hot.
6. Remove covers of the oven. Wash and rinse with soapy water.
Cleaning the Interior Part of Your Oven
● Pull the power-supply plug out of the socket before starting cleaning. Remove
trays and grill. Wipe the interior parts with soap soaked cloth. Clean it with
dampened cloth again and wipe dry.
● Do not use dry and powder cleaning agents. Clean the glass surfaces with glass
cleaning agents.
● Do not use hard brushes, steel wood or sharp instruments such as a knife when
cleaning the interior part of the oven.
● Remove the glass front lid by unscrewing the fixing parts by use of a screwdriver,
and remove the inside glass, clean and rinse it. After drying it place the seal
properly and re-install the glass
Adjustment of Mechanical Timer :
Mechanical Timer can be adjusted by its button on front panel. Timer must
be adjusted to start the oven cooking. Cooking time can be adjusted between 5 to
90 minutes with mechanical timer. You should position the button to ‘ON’ manually
if cooking time will exceed 90 minutes.
-8-
SECTION 8 MAINTENANCE & CLEANING
Cleaning your Oven
1. Before starting cleaning, pull the power-supply plug out of the socket. If the oven
is hot, wait for cooling off.
2. Do not use the agents scratching enamel or painted surfaces. Use creams or
liquid cleaning agents not containing hard agents.
3. The liquid spilling on the cooker may cause damage to enamel surfaces when
they burn. Promptly clean spilling liquids.
4. Do not use corrosive cleaning agents when cleaning control panel.
5. Never drip water on and touch the glass when the oven is hot.
6. Remove covers of the oven. Wash and rinse with soapy water.
Cleaning the Interior Part of Your Oven
● Pull the power-supply plug out of the socket before starting cleaning. Remove
trays and grill. Wipe the interior parts with soap soaked cloth. Clean it with
dampened cloth again and wipe dry.
● Do not use dry and powder cleaning agents. Clean the glass surfaces with glass
cleaning agents.
● Do not use hard brushes, steel wood or sharp instruments such as a knife when
cleaning the interior part of the oven.
● Remove the glass front lid by unscrewing the fixing parts by use of a screwdriver,
and remove the inside glass, clean and rinse it. After drying it place the seal
properly and re-install the glass
Adjustment of Mechanical Timer :
Mechanical Timer can be adjusted by its button on front panel. Timer must
be adjusted to start the oven cooking. Cooking time can be adjusted between 5 to
90 minutes with mechanical timer. You should position the button to ‘ON’ manually
if cooking time will exceed 90 minutes.

-9-
CHANGING OVEN LAMP
Oven Door and Gasket
Before cleaning oven door, we advise you to follow below steps to seperate oven
door from body :
1. Open the oven door to the end;
2. Find hinges that bound door to body;
3. Make free two forelegs on hinges and turn them;
4. Close the door halfly to the oven by holding it from left and right;
5. Slowly lift the door and put it into a rough place.
Clean the glass part of oven door with hot water and only a soft cloth.
After cleaning set the door to oven body by applying above steps in opposite
order.
Proper work of oven provided by a gasket surrounded on inner body of oven.
- Check this gasket in regular periods. If it requires clean it without using
abrasive materials.
- If gasket is damaged, immediately contact with closest authorised servise of
Termikel. Do not use oven till gasket fixed.
Changing Oven Lamp
1. Pull the plug out of socket.
2. Turn the lamp fixing glass counter-clockwise direction to seperate it.
3. To seperate lamp from body turn it to counter-clockwise direction.
4. Fix new lamp that you gain from authorised service in place of old lamp.
Shelling Out Inner Glass of Door
SECTION 9 INFORMATION ABOUT TRANSPORTATION
In case of transport hold your oven vertically and do not put
anything on it.
At transportation;
Please Keep your ovens original box.
Carry your oven with original box. Obey carrying signs on box.
To keep your oven door from damage that may occur during
transportation by wire grate and trays, stick 1-1,5 cm thin cardboard or
paper on oven front door inner glass with sticky tape at level of trays.
Stick oven door to side walls with sticky tape.
To place packaging materials look at figures below.
If your oven haven’t got an original box ;
Take precautions about damage possiblity of oven outer walls,
glass, painted, enamelled or stainless steel surfaces.
BSB Authorized Service Center
-9-
CHANGING OVEN LAMP
Oven Door and Gasket
Before cleaning oven door, we advise you to follow below steps to seperate oven
door from body :
1. Open the oven door to the end;
2. Find hinges that bound door to body;
3. Make free two forelegs on hinges and turn them;
4. Close the door halfly to the oven by holding it from left and right;
5. Slowly lift the door and put it into a rough place.
Clean the glass part of oven door with hot water and only a soft cloth.
After cleaning set the door to oven body by applying above steps in opposite
order.
Proper work of oven provided by a gasket surrounded on inner body of oven.
- Check this gasket in regular periods. If it requires clean it without using
abrasive materials.
- If gasket is damaged, immediately contact with closest authorised servise of
Termikel. Do not use oven till gasket fixed.
Changing Oven Lamp
1. Pull the plug out of socket.
2. Turn the lamp fixing glass counter-clockwise direction to seperate it.
3. To seperate lamp from body turn it to counter-clockwise direction.
4. Fix new lamp that you gain from authorised service in place of old lamp.
Shelling Out Inner Glass of Door
BSB Authorized Service Center

-10-
SECTION 9 INFORMATION ABOUT TRANSPORTATION
In case of transport hold your oven vertically and do not put
anything on it.
At transportation;
Please Keep your ovens original box.
Carry your oven with original box. Obey carrying signs on box.
To keep your oven door from damage that may occur during
transportation by wire grate and trays, stick 1-1,5 cm thin cardboard or
paper on oven front door inner glass with sticky tape at level of trays.
Stick oven door to side walls with sticky tape.
To place packaging materials look at figures below.
If your oven haven’t got an original box ;
Take precautions about damage possiblity of oven outer walls,
glass, painted, enamelled or stainless steel surfaces.
SECTION 10 Troubleshooting
-10-
SECTION 10 Troubleshooting

Micromark
Devonshire House, 550 White Hart Lane, London N17 7RQ
www.micromark.co.uk
Micromark continuously tries to improve its products for the benefit of its customers.
For this reason we reserve the right to make changes to any product at any time, without notice.
MICROMARK INSTRUCTIONS MM25985/050106 © Micromark 2006
The appliance is guaranteed for a period of 1 year from the date of purchase.
Keep your purchase and installation receipts with these instructions.
If the appliance fails to work properly during the 1 year period contact the Faults
and Assistance
Helpline on 0870 241 3029.
The appliance will be repaired (at the manufacturer’s discretion) at no cost to
you. If the guarantee has elapsed, you will be given a quotation for any repairs or
parts required.
This appliance/fitting is marked according to the European directive 2002/96/EC on Waste
Electrical and Electronic Equipment (WEEE). By ensuring this product is disposed of
correctly, you will help prevent potential negative consequences for the environment
and human health, which could otherwise be caused by inappropriate waste handling
of this product.
The symbol on the product, or on the documents accompanying the product, the
Crossed Out Wheelie Bin symbol, indicates that this appliance/fitting may not be
treated as household waste. Instead it shall be handed over to the applicable
collection point for the recycling of electrical and electronic equipment. Disposal must
be carried out in accordance with local environmental regulations for waste disposal. For
more detailed information about treatment, recovery and recycling of this product, please
contact your local authority, your household waste disposal service or the retailer where you
purchased the product.
25985-050106.qxp 14/03/2006 10:27 Page 16
This appliance/fitting is marked according to the European directive 2002/96/EC on Waste
Electrical and Electronic Equipment (WEEE). By ensuring this product is disposed of
correctly, you will help prevent potential negative consequences for the environment
and human health, which could otherwise be caused by inappropriate waste handling
of this product.
The symbol on the product, or on the documents accompanying the product, the
Crossed Out Wheelie Bin symbol, indicates that this appliance/fitting may not be
treated as household waste. Instead it shall be handed over to the applicable
collection point for the recycling of electrical and electronic equipment. Disposal must
be carried out in accordance with local environmental regulations for waste disposal. For
more detailed information about treatment, recovery and recycling of this product, please
contact your local authority, your household waste disposal service or the retailer where you
purchased the product.
-
 1
1
-
 2
2
-
 3
3
-
 4
4
-
 5
5
-
 6
6
-
 7
7
-
 8
8
-
 9
9
-
 10
10
-
 11
11
-
 12
12


Campomatic C64VSGRI Owner's manual
- Category
- Ovens
- Type
- Owner's manual
Ask a question and I''ll find the answer in the document
Finding information in a document is now easier with AI
Other documents
-
 Julian Bowen TOR201 Assembly Instructions
-
 Julian Bowen TOR203 Assembly Instructions
-
 Julian Bowen DUN001 Assembly Instructions
-
 Yosemite Home Decor DF-EFP1313 User guide
-
VESTEL MF 41 SB User manual
-
Defy 600 Series Electric Stove – DSS517 Owner's manual
-
Hoover FVC66.01 S User manual
-
La Germania TU6 4C 61 C X User manual
-
Bush DHBDFDBL60B DF BLK INS User manual
-


