Denon PMA-50 Quick start guide

Type
Quick start guide

Denon PMA-50 integrated amplifier offers versatile connectivity options for enjoying music from various sources. It features Bluetooth for wireless music streaming from smartphones, tablets, and other compatible devices. Experience high-resolution audio playback from your PC or Mac via the USB-DAC input and revel in the pristine sound quality of your digital music collection. Additionally, the PMA-50 boasts optical and coaxial digital inputs for connecting CD players or other digital audio sources, ensuring a wide range of connectivity options for your audio setup.

Denon PMA-50 integrated amplifier offers versatile connectivity options for enjoying music from various sources. It features Bluetooth for wireless music streaming from smartphones, tablets, and other compatible devices. Experience high-resolution audio playback from your PC or Mac via the USB-DAC input and revel in the pristine sound quality of your digital music collection. Additionally, the PMA-50 boasts optical and coaxial digital inputs for connecting CD players or other digital audio sources, ensuring a wide range of connectivity options for your audio setup.

ENGLISH
FRANÇAIS
ESPAÑOL
Lisez-moi en premier.... / Lea esto primero....
PMA-50
INTEGRATED AMPLIFIER
Quick Start Guide
Read Me First....
Guide de démarrage rapide / Guía de inicio rápido
Please do not return this unit to the store – call for assistance.
If you need help… :
If you need additional help in solving problems, contact Denon customer service in your area.
1-855-MY.Denon
1-855-693-3666
Call for Assistance: Monday – Friday 10:00AM to 10:00PM E.S.T, Saturday 12:00PM to 8:00PM E.S.T
For frequently asked questions please visit www.usa.denon.com/FAQ
For US and Canada only
1
Thank you for choosing a Denon amplifier. This guide provides
step-by-step instructions for setting up your amplifier.
Welcome Before You Begin
What’s In the Box
Quick Start Guide
Integrated
Amplifier
Owner’s Manual Power cord
Safety Instructions Remote control
unit
Notes on radio Caps (silver)
Warranty
(for North America
model only)
USB cable
2
Required for Basic connections
Speaker systems Speaker cables
Optional
Computer Bluetooth device
These drawings are for illustrative purposes only and may
not represent the actual product(s).
3
There are seven steps to the setup process.
1
Before using the remote control unit
2
Placing this unit
3
Installing the driver software onto your PC (Windows OS only)
4
Connecting the speakers to the amplifier
5
Plug the power cord into a power outlet
6
Enjoying music using PC or Mac
7
Enjoying music using Bluetooth
Setup
4
1
Before using the remote
control unit
n Horizontal placement
The feet are initially attached to the unit for horizontal
installation.
2
Placing this unit
5
n Vertical placement
Remove the feet.
Rotate each of the 4 feet
counter-clockwise to remove.
Insert the supplied caps
(silver) into the holes
from which the feet were
removed.
1
2
Remove the cap (black).
NOTE
Be careful not to damage your nails when removing
the caps. If necessary, use a thin-tipped tool to
remove the caps. However, be careful not to damage
the unit when using tools.
Rotate the removed feet
clockwise to attach them.
3
4
6
3
Installing the driver software onto your PC
(Windows OS only)
Download the dedicated driver from the
“Download” section of the PMA-50 page of
the Denon website
(http://www.denon.com/pages/home.aspx)
onto your PC.
Unzip the downloaded le.
Select the 32 bit or 64 bit exe le that matches
your Windows operating system, and double-
click the le.
1
2
3
Install the driver.
q Select the language to use for the installation.
w Click “OK”.
q
w
e The wizard menu is displayed. Click “Next”.
e
4
7
r Read the Software Licensing Agreement,
and click “I accept the terms in the license
agreement”.
t Click “Next”.
SOFTWARE LICENSING AGREEMENT
r t
y Click “Install” on the installation start dialog.
The installation starts. Do not perform any
operation on the PC until the installation is
completed.
y
8
u In the Windows security dialog, select “Always
trust software from DandM Holdings Inc.”.
i Click “Install”.
u i
o When the installation is completed, click
“Finish”.
o
9
AUDIOPRE OUT
IN
R L
OPTICAL
2
OPTICAL
1
USB-DAC COAXIAL
AUDIODIGITAL
IN
AC
IN
SUBWOOFER
SPEAKERS
IMPEDANCE : 416Ω
w q w q
(R) (L)
Connecting the speaker cables
q Peel o about 3/8 inch (10 mm)
of sheathing from the tip of the
speaker cable, then either twist
the core wire tightly or apply
solder to it.
w Turn the speaker terminal
counterclockwise to loosen it.
e Insert the speaker cable’s core
wire to all the way into the
speaker terminal.
r Turn the speaker terminal
clockwise to tighten it.
4
Connecting the speakers to the amplifier
10
AUDIOPRE OUT
IN
R L
OPTICAL
2
OPTICAL
1
USB-DAC COAXIAL
AUDIODIGITAL
IN
SPEAKERS
IMPEDANCE : 416Ω
SUBWOOFER
AC
IN
Power cord
(supplied)
Connect to household
power outlet
(AC 120 V, 60 Hz)
5
Plug the power cord into a power outlet
11
6
Enjoying music using PC or Mac
n Connect to PC or Mac
Connect to PC or Mac.
AUDIOPRE OUT
IN
R L
OPTICAL
2
OPTICAL
1
USB-DAC COAXIAL
AUDIODIGITAL
IN
SPEAKERS
IMPEDANCE : 416Ω
AC
IN
SUBWOOFER
Computer on which
the driver software and
audio player software are
installed
USB 2.0 cable
(supplied)
Type B
Type A
Press X on this unit.
When the unit power is turned on, the computer
automatically finds and connects to the unit.
1
2
n Listen to PC or Mac Audio
Press to change the
input source to “USB-
DAC”.
Set the audio signal destination to this unit on
the computer.
[Windows OS]
q Click the “Start” button and click “Control Panel”
on the PC.
The control panel setting list is displayed.
w Click the “Sound” icon.
The sound menu window is displayed.
1
2
12
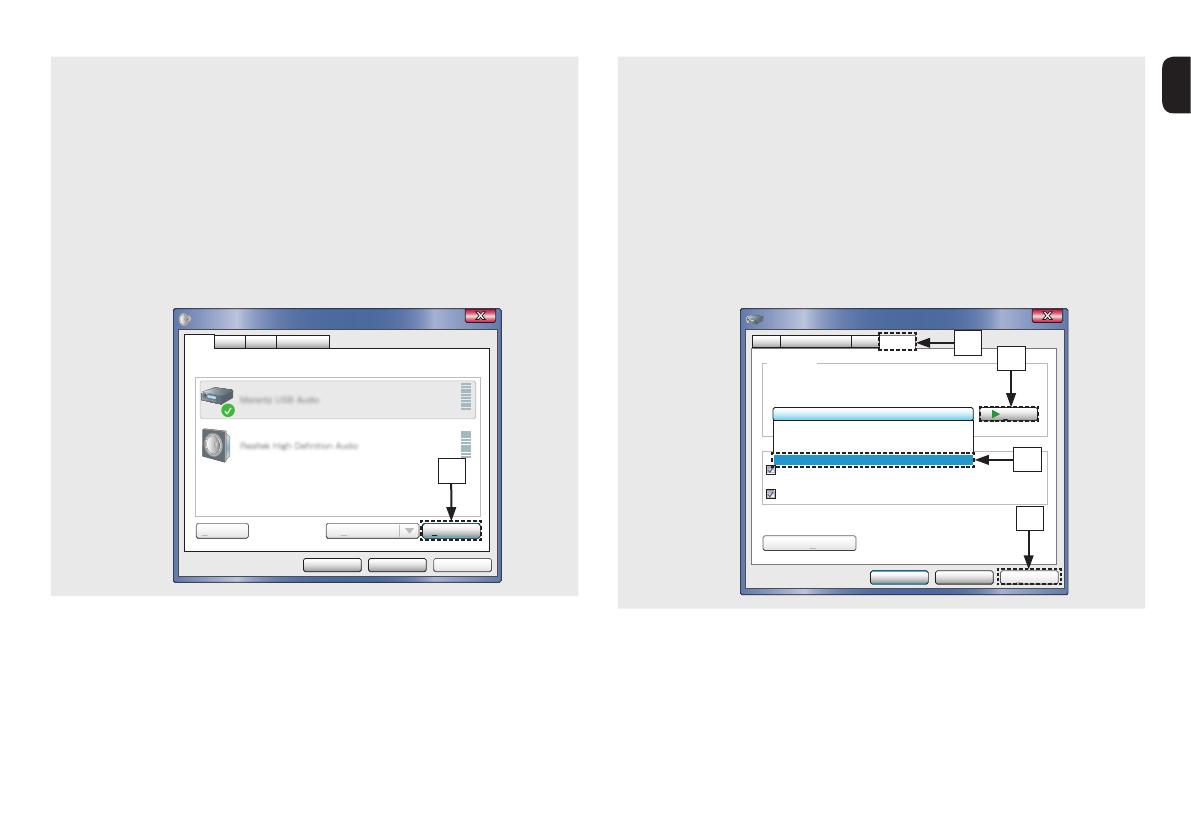
e Check that there is a checkmark next to “Default
Device” under in “Digital Audio Interface” of the
“Playback” tab.
When there is a checkmark for a dierent device,
click “Denon USB Audio” and “Set Default”.
r Select “Digital Audio Interface” and click
“Properties”.
The Digital Audio Interface Properties window
is displayed.
ApplyCancelOK
Properties
Select a playback device below to modify its settings
Digital Audio Interface
Default Device
Speakers
Ready
Sound
Configure Set Default
Playback
Recording CommunicationsSounds
r
t Click the “Advanced” tab.
y Select the sampling rate and bit rate to be applied
to the D/A converter.
It is recommended that “2 channel, 24 bit,
192000 Hz (Studio Quality)” is selected.
u Click “Apply”.
i Click “Test”.
Check that audio from this unit is output from
the PC.
ApplyCancel
Test
OK
2 channel, 24 bit, 192000 Hz ( Studio Quality)
Give exclusive mode applications priority
Default Format
Select the sample rate and bit depth to be used when running
in shared mode.
Digital Audio Interface Properties
Allow applications to take exclusive control of this device
Restore Defaults
General Supported Formats Levels Advanced
2 channel, 24 bit, 44100 Hz ( Studio Quality)
2 channel, 24 bit, 48000 Hz ( Studio Quality)
2 channel, 24 bit, 96000 Hz ( Studio Quality)
2 channel, 24 bit, 192000 Hz ( Studio Quality)
t
i
y
u
13
[Mac OS X]
q Move the cursor to “Go” on the computer
screen, and then click “Utilities”.
The utility list is displayed.
w Double-click “Audio MIDI Setup”.
The “Audio Devices” window is displayed.
e Check that “Use this device for sound output” is
checked in “PMA-50”.
If a dierent device is checked, select and
“Secondary click” on “PMA-50”, and then
select “Use this device for sound output”.
r Select the “PMA-50” format.
It is normally recommended to set the format to
“192000.0 Hz” and “2ch-24 bit Interger”.
t Quit Audio MIDI Setup.
14
Play back a music le with music playback
software such as Windows Media Player,
iTunes, foobar2000, Audirvana Plus and
JRiver Media Center.
192kHz
The type of music file and sampling frequency are
displayed.
Adjust the volume.
The volume level appears on the display.
Volume control knob
3
4
NOTE
Adjust the volume to an appropriate level on the computer.
Further settings might be required in your dedicated media
player software such as JRiver to enable high resolution
audio playback. Please refer to the owner’s manual of the
software.
Please refer to the owner's manual about the required
specifications of suiting computer.
15
7
Enjoying music using Bluetooth
Press for 3 seconds or
longer.
“Pairing“ appears on the
display of the unit.
Activate the Bluetooth
settings and search mode
on your device.
Bluetooth ON
1
2
Select “Denon PMA-
50” from the Bluetooth
device list on your
device.
“At the end of the pairing,
the device name appears
on the display of this unit.
Denon PMA-50
Play music using any app on your device.
Pair and connect your NFC capable device by gently
touching it on the NFC logo ( ).
Enter “0000” when the password is requested on the
screen of the Bluetooth device.
3
4
16
n Printable Version
Access the print version of the owner's manual from the
included CD-ROM or select the “PDF Download” link
from the Online Version.
Insert the disc into your
PC.
Follow the screen or double click on the PDF
le.
1
2
Owner’s Manual
n Online Version
Enter the following URL into your web browser:
manuals.denon.com/PMA50/NA/EN/
Overview
Connections
Playback
Settings
Tips
Appendix
PDF Download
INTEGRATED AMPLIFIER
WEB Manual
Copyright 2014 D&M Holdings Inc. All Rights Reserved.
c
PDF
PMA-50
Contents
English
Online Manual
Please reference to the Owner's Manual for more details about the setup and operation of the amplifier and its features.
www.denon.com
D&M Holdings Inc.
Printed in China 5411 11248 00AD
  • Page 1 1
  • Page 2 2
  • Page 3 3
  • Page 4 4
  • Page 5 5
  • Page 6 6
  • Page 7 7
  • Page 8 8
  • Page 9 9
  • Page 10 10
  • Page 11 11
  • Page 12 12
  • Page 13 13
  • Page 14 14
  • Page 15 15
  • Page 16 16
  • Page 17 17
  • Page 18 18

Denon PMA-50 Quick start guide

Type
Quick start guide

Denon PMA-50 integrated amplifier offers versatile connectivity options for enjoying music from various sources. It features Bluetooth for wireless music streaming from smartphones, tablets, and other compatible devices. Experience high-resolution audio playback from your PC or Mac via the USB-DAC input and revel in the pristine sound quality of your digital music collection. Additionally, the PMA-50 boasts optical and coaxial digital inputs for connecting CD players or other digital audio sources, ensuring a wide range of connectivity options for your audio setup.

Ask a question and I''ll find the answer in the document

Finding information in a document is now easier with AI