Page is loading ...

INSTALLATION
INSTRUCTIONS
St. Tropez One-Piece Toilet
SM-1T253 / SM-1T254 / SM-1T254MB
www.swissmadison.com | 1-434-623-4766 | [email protected]
Swiss Madison
®
Share your pictures for a feature!
using
#SwissMadison

Thank you for purchasing a Swiss Madison One-Piece Toilet.
We appreciate your business and know you will enjoy your toilet for many years to come.
If you have any questions or require assistance we would be happy to help,
please contact us at 1-434-6234766 or [email protected].
Thank you for your purchase!
www.swissmadison.com
To learn more about our products, please visit:
Sincerely,
The Swiss Madison Team
If you have any questions or concerns please contact us:
1-434-623-4766
General Recommendations: Read installation and maintenance instructions thoroughly before installing the toilet.
Be sure to use proper tools and always wear proper personal safety accessories for your protection.
— 1 —
Prior to Installation:
· Inspect toilet to ensure no damages have occurred while in shipping.
· Observe all plumbing and building codes in accordance with your state and
local requirements.
· Remove old toilet.
· Make sure mounting surface is CLEAN and LEVEL.
· All dimensions are nominal! Be sure to measure your toilet prior to installation.

— 2 —
ONE-PIECE TOILET MODELS
St. Tropez
27 ³⁄16” x 15 9⁄16“ x 31 5⁄16”
SM-1T254 - White
15 9⁄16”
5 ¹¹⁄16”
18 ¹⁄2”
27 ³⁄16”
16”
31 5⁄16”
12”
Rough-in
St. Tropez
26 ¹⁄2” x 15“ x 31”
SM-1T254MB - Matte Black
15”
6”
18 ³⁄4”
26 ¹⁄2”
16 ¹⁄2”
31”
12”
Rough-in
St. Tropez
27 ³⁄16” x 15 9⁄16“ x 31 5⁄16”
SM-1T253 - White
15 9⁄16”
5 ¹¹⁄16”
18 ¹⁄2”
27 ³⁄16”
16”
31 5⁄16”
12”
Rough-in

ONE-PIECE TOILET ROUGH DIMENSIONS
— 3 —
NOTE: Specialized tools may be necessary to install a Swiss Madison One-Piece Toilet, plumbing not included.
SUGGESTED TOOLS AND MATERIALS
Safety Glasses
Wrench Level
Screwdriver
NOTE: Distance from wall to closest flange centerline must be listed as below.
Putty Knife
Tape Measure
Hacksaw
Flexible Supply Tube
PARTS LIST
W”
L”
H”
12”
Rough-in
· One-Piece Toilet
· Wax Ring/ Gasket
· Bolts · Side Cover Caps

— 4 —
The step-by-step guidelines in the installation instructions are a general reference.
Should there be any discrepancies, Swiss Madison cannot be held liable.
It is recommended to install all Swiss Madison products by hiring a licensed professional
2. Rough-In the Toilet
· Using the measurements on the previous page, find the toilet’s rough-in.
· Measure the wall from behind the toilet to the middle of the closet bolt.
NOTE: Your rough-in measurement should be around 12”.
Rough-in
1. Remove Old Toilet
· Close toilet supply valve and flush tank completely, use towel or sponge to remove excess water.
· Disconnect and remove supply line, if you are replacing the valve shut off the main water supply first.
· Remove old mounting hardware, remove toilet and plug floor waste opening to prevent escaping gas.
· Remove closet bolts from flange and clean away old wax and putty from base area.
ONE-PIECE TOILET INSTALLATION INSTRUCTIONS
1. Read the complete instruction manual before beginning installation.
2. Confirm that your model will fit in intended location and plumbing fixtures are located
where legally required before beginning installation.
3. Not all drawings on this manual are drawn to scale. Please refer to the model chart.
4. Two people are recommended to install and move this product.
5. Product is FRAGILE! To avoid breakage and possible injury handle with care.
NOTE: Drawings may not exactly define contour of china.

— 5 —
3. Install Closet Bolts
· Install closet bolts to flange channel, turn 90° and slide into place 6” (152mm) apart and parallel to wall.
Closet Flange
Closet Bolts
A
4. Install Wax Seal
· Invert toilet on floor (use cushion to prevent damage), and install wax ring evenly around waste flange
with tapered end of ring facing toilet. Apply a thin bead of sealant around toilet base.
Wax Ring
Sealant
ONE-PIECE TOILET INSTALLATION INSTRUCTIONS
NOTE: Drawings may not exactly define contour of china.

— 6 —
T
H
I
S
S
I
D
E
U
P
5. Position Toilet on Flange
· Unplug floor waste opening and install toilet on closet flange so bolts project through mounting holes.
· Loosely install retainer washers and nuts. Side of washers marked “THIS SIDE UP” must face up!
Closet Flange
Nut
Washer
Bolt
6. Install Toilet
· Position toilet square to wall and, with a rocking motion, press bowl down fully on wax ring and flange.
Alternately tighten nuts until toilet is firmly sealed to floor.
NOTE: Do NOT overtighten nuts as it might crack the ceramic.
· Adhere bolt covers to toilet.
· Smooth off the bead of sealant around the base. Remove excess sealant.
T
H
I
S
S
I
D
E
U
P
Closet Flange
Bolts
ONE-PIECE TOILET INSTALLATION INSTRUCTIONS
NOTE: Drawings may not exactly define contour of china.

ONE-PIECE TOILET INSTALLATION INSTRUCTIONS
NOTE: Drawings may not exactly define contour of china.
— 7 —
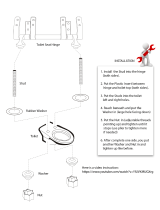
Toilet Seat Installation
1. Dissassemble
· Disassemble the cover cap and the hinge.
2. Construct Hinges
· Insert screw and nut into the hole on the hinge.
· Attach blind hole screw fixing to the bottom on the screw.
3. Attach Hinges
· Insert hinges with blind hole screw fixings attached into holes on toilet bowl.
· Lightly tighten hinges with a screwdriver too allow for later adjustment.
Pull
or

ONE-PIECE TOILET INSTALLATION INSTRUCTIONS
NOTE: Drawings may not exactly define contour of china.
— 8 —
5. Adjust and Attach Seat
· Align seat to the hinges then firmly tighten the hinges.
· Attach seat to the secure hinges.
· Adjust seat to align to the bowl.
6. Usage
· To remove, push middle button until you hear a “click”, then pull straight up.
· To re-install, align hinge posts with reference marks on seat, then push down until your hear a “click”.
*Click* *Click*
4. Adjust and Cover Hinges
· Be sure the hinge is all the way forward for proper seat fitting.
· Place the covers onto the hinges.
Incorrect: Correct:

1-434-MADISON
(623-4766)
19 Stults Road
Dayton, NJ 08810
www.swissmadison.com
ONE YEAR LIMITED WARRANTY
Swiss Madison® products are made with quality materials and excellent craftsmanship to provide our
customers with beautiful, durable, long-lasting products. Should there be any defects in materials or
craftsmanship under regular use that are discovered within the first year of installation, Swiss Madison®
will provide replacement parts at no charge, or at its discretion, replace any product or part of the product
that is deemed defective, under normal installation, use, service or maintenance. This warranty applies
only to the original purchaser. Proof of purchase will be required in the instance of a claim.
Swiss Madison® recommends all installations of Swiss Madison® products to be conducted by a
licensed, professional plumber or contractor. Swiss Madison® will not be held responsible for any
damage or product failure due to improper installation, misuse, or failure to utilize a licensed professional
for installation. Swiss Madison® is not responsible for any installation or removal costs.
This One Year Limited Warranty Will Be Voided If:
• The installation recommendations were not followed by the installer
• The product has been moved from its initial place of installation
• The product has in any way been modified from its packaged state
• The product has been subjected to improper maintenance, abuse, misuse, excessive use of
chemicals, accidents, or other damages, etc.
Swiss Madison® makes no implication that its products comply with any local building or plumbing
codes. It is the consumer’s responsibility and obligation to determine local code compliance prior to and
during installation. This warranty extends only to the original purchaser and first consumer.
Swiss Madison® is not responsible for any special, incidental or consequential damages associated with
the installation, replacement, return or use of the original purchaser’s product. This includes, but is not
limited to: freight costs, labor, travel time, lost profit, home damages and other contingent liabilities and
costs (including, without limitation, costs associated with ‘professionals’ or ‘experts’, investigations,
audits, analyses, attorneys and any other professional/hired services).
The Swiss Madison® warranty is a comprehensive and explicit limit of liability. All items not disclosed
within the warranty are not addressable within the responsibility of Swiss Madison®. Certain states have
variances regarding implied warranties; in those situations, we remain fully compliant.
If you have any questions or concerns, please contact us directly at
1-434-MADISON (623-4766)
WARNING: Contents of your order may contain sharp and possibly other harmful pieces and may cause
hazard to children and adults. Swiss Madison® is not responsible in any way for personal damages.
Swiss Madison
®
/