Page is loading ...

THANK YOU FOR CHOOSING NELLA™
Welcome to the Nella™ family. We are confident Nella’s™ superior quality, design and aesthetic will enhance your bath-
room experience for many years to come. If you have any questions regarding your Nella products please contact your
local sales representative or visit our website www.nellabath.com for customer support and service information.
Thank you again,
NELL A™
PRIOR TO INSTALLATION
Prior to installation please be sure to review all installation instructions with a licensed or qualified plumbing technician
who is familiar with all local plumbing and building codes in your jurisdiction.
TOILET INSTALLATION INSTRUCTIONS
™
USA / Canada: www.nellabath.com
PRODUCT FEATURES AND DESCRIPTION
FEATURES
•Vitreouschina
•Seamlessone-piecedesign
•2”fullyglazedtrapway
•12”(305mm)rough-In
•SiphonicJet/DualFlushTechnology
(Geberit
TM
Insideavailable)
•1.28GPF/4.8LDual-Flush/HET
INCLUDED COMPONENTS
•Seatw/lid(soft-close)
•Tankcover
•Flushactuator
•Waxring
•Floorinstallationkit
CODES AND STANDARDS
Meetsorexceeds:
•ASMEA112.19.2/CSAB45.1
•ASMEA112.19.14
DURA
NBKD-50A
IMPORTANT - PRIOR TO INSTALLATION
Beforeyoubeginpleasebesuretoreviewthestepsbelowtoensurepreferredinstallationresults.
1.UnpackyournewNELLA™productandconrmitisthecorrectmodelorderedandinspecttheproductfordamage.
Pleasekeepproductinitsoriginalpackaginguntilyouarereadyforinstallation.
2.Conrmthatallwallsareplumbandallmounting/installationsurfacesarelevel.
3.Shutofexistingwatersupply.
4.Conrmthatyourplumbingtechnicianhastheproper/recommendedtoolsforproperinstallation.

ROUGH-IN DIMENSIONS
Tape MeasurePencil Ruler SquareLevel Pipe Wrench Channel Locks
Scroll SawAdjustable Wrench Pipe Clamp Pipe Cutter Hacksaw Plumber’s Putty or
Caulking
Putty Knife
Drill Philips
Screwdriver
Flathead
Screwdriver
USA / Canada: www.nellabath.com
™
TOILET INSTALLATION INSTRUCTIONS
DURA
NBKD-50A

INSTALLATION INSTRUCTIONS
1. Remove existing toilet and prepare installa-
tion surface.
• Shutofftoiletsupplyandushtankcompletely.
• Disconnectandremovesupplyline.
• Ifreplacingatoiletremoveoldtoiletandexistingwax
ring.Cover/plugoorwasteopening.
• Cleananyoldwaxordebrisfromfrominstallationarea.
• Conrmthatcurrentsupplylocationcoincideswith
desiredtoiletlocationandrough-indimensions.
Supplyrelocationmaybenecessaryforpropertoilet
installation.
• Positiontoilettemplateonnishoormakingsureit
alignswithcurrentwastelocation;tapetemplatese-
curelytooor.
2. Using toilet installation template mark floor
screw/anchor location and drill pilot holes in
floor.
3. Insert screw through the plastic mounting
brackets and install securely to floor in proper
location.
4. Turn toilet on its side (please protect the
ground surface with soft material to prevent
damage to toilet), and press new wax seal
firmly around waste flange. apply a small bead
of silicone sealant around toilet base.
5. Position toilet squarely with wall and align
toilet with closet flange.
Slowly lower toilet down onto closet flange
making sure base mounting holes are aligned
with munting anchors on finished floor.
™
CONCEALED MOUNT INSTALLATION INSTRUCTIONS
Finished Wall
Wax Seal
Sealant
Mounting Holes
Note: Please refer
to template for
mounting hole
locations.
**NOTE:Installationsurfacemustbeclean
andlevelbeforenewtoiletisinstalled.**
**NOTE:Foroorslessthan1-1/2”(38mm)thick
usea5/32”bit.Foroorthickerthan1-1/2”(38mm)
usea3/8”bitforanchor(required)installation.**
DURA
NBKD-50A

INSTALLATION INSTRUCTIONS
6. Press toilet down firmly on wax ring and
flange until toilet is securely seated on floor.
7. Adjust the plastic mounting brackets so
they align with the mounting hole location on
the toilet.
8. Tighten the toilet bowl mounting screws to
the mounting brackets; place the finish caps
on the heads.
• Apply a small bead of silicone sealant where toilet
base meets finish floor.
• Wipe and clean any excess sealant immediately.
9. Connect water supply.
• Connect the shut-off valve to the supply pipe.
Gradually open the valve and check for leaks.
• Flush several times to test for leaks and continue to
do so periodically for the first few days of usage.
™
CONCEALED MOUNT INSTALLATION INSTRUCTIONS
Sealant
Apply Silicone Sealant
DURA
NBKD-50A

INSTALLATION INSTRUCTIONS
1. Remove existing toilet and prepare installa-
tion surface.
• Shutofftoiletsupplyandushtankcompletely.
• Disconnectandremovesupplyline.
• Ifreplacingatoiletremoveoldtoiletandexistingwax
ring.Cover/plugoorwasteopening.
• Cleananyoldwaxordebrisfromfrominstallationarea.
2. Turn toilet on its side (please protect the
ground surface with soft material to prevent
damage to toilet), and press new wax seal firm-
ly around waste flange. Apply a small bead of
silicone sealant around toilet base.
3. Install T-bolts in correct floor position and
fasten closet flange.
™
EXPOSED MOUNT INSTALLATION INSTRUCTIONS
Wax Seal
Sealant
T-Bolt
Closet Flange
**NOTE:Installationsurfacemustbeclean
andlevelbeforenewtoiletisinstalled.**
**NOTE:Donotovertightennuts.Porcelainis
fragileandcouldpossiblycrackifnutsareover-
tightened.**
4. Position toilet squarely with wall and align
toilet with closet flange.
Slowly lower toilet down onto closet flange
making sure base mounting holes are aligned
with mounting anchors on finished floor.
Press toilet down firmly on wax ring and flange
until toilet is securely seated on floor.
5. Place the bolt cap bases on the T-bolts and
proceed to secure the toilet into place by fas-
tening the washers and nuts to the bolt caps
and T-bolts.
DURA
NBKD-50A

™
EXPOSED MOUNT INSTALLATION INSTRUCTIONS
Sealant
Apply Silicone Sealant
6. Apply a small bead of silicone sealant
where toilet base meets finish floor.
Wipe and clean any excess sealant immedi-
ately.
7. Connect water supply.
• Connecttheshut-offvalvetothesupplypipe.
Graduallyopenthevalveandcheckforleaks.
• Flushseveraltimestotestforleaksandcontinue
todosoperiodicallyfortherstfewdaysofusage.
DURA
NBKD-50A

INSTALLATION INSTRUCTIONS
1. Remove existing toilet and prepare installa-
tion surface.
• Shutofftoiletsupplyandushtankcompletely.
• Disconnectandremovesupplyline.
• Ifreplacingatoiletremoveoldtoiletandexistingwax
ring.Cover/plugoorwasteopening.
• Cleananyoldwaxordebrisfromfrominstallationarea.
• Conrmthatcurrentsupplylocationcoincideswith
desiredtoiletlocationandrough-indimensions.
Supplyrelocationmaybenecessaryforpropertoilet
installation.
• Positiontoilettemplateonnishoormakingsureit
alignswithcurrentwastelocation;tapetemplatese-
curelytooor.
2. Turn toilet on its side (please protect the
ground surface with soft material to prevent
damage to toilet), and press new wax seal firm-
ly around waste flange. Apply a small bead of
silicone sealant around toilet base.
3. Install T-bolts in correct floor position and
fasten closet flange.
4. Position toilet squarely with wall and align
toilet with closet flange.
Slowly lower toilet down onto closet flange
making sure base mounting holes are aligned
with mounting anchors on finished floor.
5. Press toilet down firmly on wax ring and
flange until toilet is securely seated on floor.
™
CONCEALED MOUNT WITH SIDE ACCESS INSTALLATION INSTRUCTIONS
Wax Seal
Sealant
T-Bolt
Closet Flange
**NOTE:Installationsurfacemustbeclean
andlevelbeforenewtoiletisinstalled.**
DURA
NBKD-50A

INSTALLATION INSTRUCTIONS
6. Place the bolt cap bases on the T-bolts and
proceed to secure the toilet into place by fas-
tening the washers and nuts to the bolt caps
and T-bolts.
7. Place access cover over access opening
and fasten to the toilet.
™
CONCEALED MOUNT WITH SIDE ACCESS INSTALLATION INSTRUCTIONS
Sealant
Apply Silicone Sealant
8. Apply a small bead of silicone sealant
where toilet base meets finish floor.
Wipe and clean any excess sealant immedi-
ately.
9. Connect water supply.
• Connect the shut-off valve to the supply pipe.
Gradually open the valve and check for leaks.
• Flush several times to test for leaks and continue
to do so periodically for the first few days of usage.
**NOTE: Do not overtighten nuts. Porcelain is
fragile and could possibly crack if nuts are over-
tightened.**
DURA
NBKD-50A

PARTS AND ACCESSORIES
PIN POSITION AND HINGE ADJUSTMENT
™
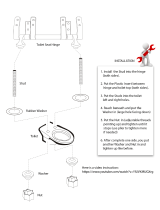
TOILET SEAT INSTALLATION INSTRUCTIONS
1
2
3
1
2
3
4
5
4
5
• Byrotatingtheanchorplatearoundthescrew,maximum
hingeadjustmentisachievable.
Pleaserefertothediagramabove(AdjustmentA).
• Additionaladjustmentandne-tuningofthepinposition
canaccomplishedbyslidingthewithintheanchorplate
(adjustmentB).
INTEGRATED ANCHOR
COVER PLATE
PIN
RUBBER WASHER
FIXING SCREW
ANCHOR PLATE
ADJUSTMENT
A
B
DURA
NBKD-50A

INSTALLATION INSTRUCTIONS
Attaching the hinge anchor
• Place integrated anchor into anchor holes provided
on the toilet pan.
• Place Anchor Plate over the integrated anchor and
Insert screws.
• Tighten the screw and fasten anchor plate to the
integrated anchor.
Installing the seat
• Align seat pins with the seat hinge sockets and apply
downward pressure until you feel and hear a “click”.
This “click” will signify the seat pin is locking into posi-
tion. With care - adjust the hinge anchors and position
the hinge anchors so the seat is aligned with the outer
edges of the toilet pan.
• When the toilet seat has been aligned and is in the
desired position, carefully unfasten the seat from the
hinge anchors. Please refer to step 3 of the process
to learn how to unfasten the seat. Be sure to unfas-
ten the seat gently so the integrated anchors and pin
positions don’t move.
• Once toilet seat has been removed, proceed to firmly
tighten screws and fasten anchor plate to the inte-
grated anchor (please see step 1) so that toilet seat
remains in its desired final position.
Removing the toilet seat with quick release
technology
To remove the seat, place the seat in its open position,
and locate the release-buttons in the center of each hinge.
Press the release-buttons and lift the seat upwards.
This should unlock the seat.
To re-install the seat. Align seat pins with the seat hinge
sockets and apply downward pressure until you feel and
hear a “click”. This “click” will signify the seat pin is locking
into position.
™
TOILET SEAT INSTALLATION INSTRUCTIONS
**NOTE: Do not overtighten - Be sure screws are
slightly loose to allow for final adjustments later in
this process.**
DURA
NBKD-50A
/