Page is loading ...

1
PMK 450 Projector Mounting Kit • Installation Notes
PRELIMINARY
Installation Notes for PMK 450 (70-618-03)
The Extron PMK 450 Projector
Mounting Kit can accommodate
multiple Extron products of one
eighth, quarter, or half rack sizes
with power supplies.
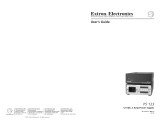
The components of the PMK 450
kit are shown in Figure 1. Also
included are:
• Set-screw hex wrench (1)
• Security screw hex wrench
(1)
• Velcro™ Pads for securing
power supply (2)
• 4-40 Screws for mounting
devices (6)
68-1397-01, Rev B
11 07
FRONT
REAR
Pipe Collar &
Set Screws
Extron PMP
Pipe Collar (1) with
Set Screws (4)
Security Screws (2)
AC Power Cord
Access Slot
Plate
Screws (4)
Bottom Plate (1)
Filler Plate (1)
Front Plate (1)
Rear Plate (1)
Top Plate (1)
Figure 1 — Contents of PMK 450 kit
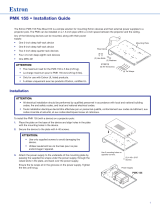
Figure 2 — Mount top plate on pole
FRONT
REAR
Cable Input from
Sources (AV control)
Cable Access
Hole
L
R
A
U
X
/M
IX
I
N
D
O
N
O
T
G
R
O
U
N
D
O
R
S
H
O
R
T
S
P
E
A
K
E
R
O
U
T
P
U
T
S
!
1
B
1
A
I
N
P
U
T
S
O
U
T
P
U
T
S
2
B
2
A
3
B
3
A
R
S
-
2
3
2
M
L
C
/
IR
D
C
V
O
L
4
/8
O
h
m
s
A
M
P
L
IF
IE
D
O
U
T
P
U
T
S
V
O
L
/M
U
T
E
T
x
A B
C
R
x
IR
1
2
V
1
0
V
P
O
W
E
R
1
2
V
3
A
M
A
X
U
S
L
I
S
T
E
D
1
7
T
T
A
U
D
I
O
/
V
I
D
E
O
A
P
P
A
R
A
T
U
S
®
R
G
B
V
I
D
E
O
R
G
B
V
I
D
E
O
Bottom Plate
Cable Output
to Projector
Figure 3 — Route cables
Installation
CAUTION
Maximum load for the PMK 450 is 15 lb (6.8 kg).
1. Unscrew the front and rear plates and the security
screws from the sides. Slide the top and bottom
plates apart. The filler plate is attached to the rear
plate and should not be removed.
2. Ensure that the mounting pipe is installed with
the cable access hole facing the rear, away from the
projector screen.
3. Loosen the four pipe collar set screws to allow the
top plate to move freely along the pole.
4. Slide the top plate up the pipe until the pipe collar is
positioned just above the cable access hole (Figure 2).
Ensure the rear of the top plate is facing to the rear, in
the same direction as the cable access hole in the pipe.
5. Level the top plate and secure it by fully tightening
the set screws. At least three screws must come in
contact with the pipe.
6. Route the cables so that they exit the pipe via the
cable access hole (Figure 3).
7. Using the supplied 4-40 screws, secure the devices
to the bottom plate. Figure 3 shows the PVS 204
screwed to the plate with a power supply attached by
the supplied Velcro pads.
8. Attach cables to the device(s) and pull excess cable
back into the ceiling. Feed the output cables to the
projector via the cable access hole and the bottom of
the pipe.

PMK 450 Installation Notes, cont’d
PMK 450 Projector Mounting Kit • Installation Notes
2
PRELIMINARY
©
© 2007 Extron Electronics. All rights reserved.
Extron Electronics, USA
1230 South Lewis Street
Anaheim, CA 92805
800.633.9876 714.491.1500
FAX 714.491.1517
Extron Electronics, Europe
Beeldschermweg 6C
3821 AH Amersfoort, The Netherlands
+800.3987.6673 +31.33.453.4040
FAX +31.33.453.4050
Extron Electronics, Japan
Kyodo Building, 16 Ichibancho
Chiyoda-ku, Tokyo 102-0082
Japan
+81.3.3511.7655 FAX +81.3.3511.7656
Extron Electronics, Asia
135 Joo Seng Rd. #04-01
PM Industrial Bldg., Singapore 368363
+800.7339.8766 +65.6383.4400
FAX +65.6383.4664
www.extron.com
9. Insert the lugs on the bottom plate into the slots
on the top plate and slide the bottom plate into
position (Figure 4).
10. Lock the top and bottom plates together with
the security screws, pass the AC power cord
through the slot at the rear of the top plate.
11. Reattach the front and rear plates (Figure 5).
Lugs (4)
Slots (4)
Figure 4 — Attach bottom plate
Specifications
Dimensions .................................... 2.25" (5.72 cm) H x 12.25"
(31.12 cm) W x 11.63" (29.53
cm) D
Mount application ......................... Mounts to standard 1.5"
(3.8 cm) NPT pipes or pipes
with external diameters of
1.85" (4.7 cm) to 1.95" (5 cm)
Material ....................................... White powder-coated
aluminum
Maximum load` ............................. 15 lb (6.8 kg)
Product weight .............................. 2.35 lbs (1.07 kg)
Shipping weight ............................ 3 lb (1.36 kg)
Listings............................................ UL, CUL as an accessory, for
use with UL listed mount and
projector
Compliances ................................... CE
Vibration ......................................... ISTA 1A in carton (International
Safe Transit Association)
Warranty ......................................... 3 years parts and labor
11.63"
(295.30 mm)
12.25" (311.15 mm)
2.32" (59.00 mm)
2.00" DIA (50.80 mm)
11.63" (295.30 mm)
Figure 6 — Dimensions
Figure 5 — Attach front and rear plates
FRONT
REAR
Rear Plate
/