Page is loading ...

42-420/GX400
4GB MP3 Player
with FM Radio and Speaker
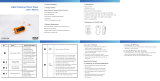
What’s Included
MP3 Player Mini USB 2.0 cable
Earphones User’s guide
Rhapsody™ Software Installation CD
System Requirements
• Windows
®
2000, Windows XP (SP2) or Windows
Vista
®
• Pentium II 200MHz
• 64MB RAM
• 500MB memory space
• CD-Rom drive
• USB 1.1 or USB 2.0
Features
• 4GB flash memory
• Built-in speaker and rechargable battery
• FM radio
• 2 color display
• Five preset equalizer settings
• Supports MP3, WMA, ID3 tag, DRM9 and
DRM10
• Can be used as a USB flash drive to transfer and
store any type of files.
Specifications
Built-in flash memory supported.................up to 4GB
Supported file formats......... MP3 (64kbps~320kbps)
.......................................WMA (64kbps~192kbps)
FM radio frequency........................ 87.5~108.0MHz
Signal to noise ratio ....................................> 85 dB
Power....................... Built-in Lithium polymer battery
Playback time .................................. up to 10 hours
Operating temperature............32 to 104ºF (0 to 40ºC)
Language support ......................English and Spanish
Dimensions (H×W×D)..................... 1.4 × 2.1 × .4 in
............................................... (36 × 53 × 11mm)
Weight .......................................... .78 oz. (22.2g)
Specifications are subject to change and improvement
without notice. Actual product may vary from the images
found herein.
Thank you for purchasing your Gigaware 4GB MP3 Player with FM
Radio and Speaker from RadioShack. Please read this user’s guide
before installing, setting up, or using your new product.
www.radioshack.com
§
Press to turn on; hold down to turn off.
Press during playback to pause a track or mute sound in radio mode.
/
During playback: Skip to another track; hold down to search within a
track.
Press
to return to the beginning of the current track (wait 5
seconds after current track begins).
For menu navigation: Toggle or confirm options; return to previous
menu or screen.
In radio mode: Tune frequencies. Hold down to start auto scan or
select a preset station when appears.
MENU
Hold down to return to the menu during music or radio playback
display. Press once or more to scroll through main function menus:
Music/Now playing/Setting/Radio.
Scroll through function menus: Music/Radio/Setting/Now playing.
Press during playback to enter Music Options or Radio Options.
Playlist: Press and hold to add a song to Playlist during track
playback, or enter Playlist view from main Music display.
+/–
Increase/
decrease the
volume.
Clip
Clip your player to
your pocket, belt,
etc. for handsfree
music on the go.
Integrated Speaker
Disconnect earphones to listen
via the speaker.
In FM radio mode, activate
the speaker mode with your
earphones connected.
©2008. RadioShack Corporation. All rights reserved. Gigaware is a trademark and RadioShack is a registered trademark used by RadioShack Corporation.
Windows and Windows Media are registered trademarks, and Windows Vista is a trademark of Microsoft Corporation in the United States and/or other countries.
Rhapsody and Rhapsody logo are trademarks or registered trademarks of RealNetworks Inc. All Rights Reserved.
STEP 2 Connect to your PC & Download Music
We’ve provided some sample tracks if you want to turn on the
music immediately (go to STEP 3). To listen to your own songs:
1. Connect to your PC as above for charging your MP3 player. The
player is automatically detected and the directory removable
disk appears on your computer.
2. Drag and drop the desired files from your computer to the
player, OR use music management software, such as Windows
Media
®
Player 11 or Rhapsody (included; see Using Rhapsody
Software).
Important Copyright Notice
Distribution of MP3 files without permission from the content
owner is against copyright laws. RadioShack will not be liable
against such actions.
CAUTION! ONLY EJECT THE PLAYER WHEN THE PC ICON HAS
STOPPED FLASHING AND ALL DOWNLOADS HAVE
COMPLETED to prevent corrupting files and accidentally
reformatting your player.
Key lock
Slide down to lock the keys to
prevent accidental button
pressing when on the go.
appears. Slide up to unlock.
Earphone jack
Connect supplied
3.5mm earphones.
USB port
Open cover to
reveal USB port.
Reset
Press if the
keys do not
respond. See
Troubleshooting.
Display
Shows information
during playback or
menu navigation.
STEP 1 Charge your MP3 Player
Before using your player for the first time, charge it for about 3
hours. Flip open the USB jack cover and connect the supplied USB
cable to the player and your PC.
The player shows the
Gigaware splash screen,
followed by the connected to PC display with
battery charging icon.
The battery full icon appears when fully charged.
Note: Use only the supplied USB cable to charge your player.
If the player is connected to the PC via a hub, the hub must
be self-powered to charge the player.
Getting Started
STEP 3 Play Music
1. Press
§
to turn on your MP3 player. The Gigaware splash screen appears, followed by Updating
(updates may take time). When updates are complete, Music displays.
2. Use the navigation buttons to start playing music, or see next page for more detailed instructions.
3. To turn off, press and hold
§
until the Power Off icon disappears.
Using Rhapsody Software (optional)
The supplied CD contains Rhapsody software, an
optional music file management program and online
service for your player.
For more information on Rhapsody,
visit www.Rhapsody.com
To install the software:
1. Load the CD into your PC’s CD-ROM drive. The
installation starts automatically. If it does not, select
Start Ö Run, and type the path for your CD drive).
2. Double-click the setup application, follow the on-
screen instructions.
3. When setup completes, click Finish.

08A08
42-420
Printed in China
RF Emissions Information
This equipment has been tested and found to comply with
the limits for a Class B digital device, pursuant to Part
15 of the FCC Rules. These limits are designed to provide
reasonable protection against harmful interference in a
residential installation. This equipment generates, uses,
and can radiate radio frequency energy and, if not installed
and used in accordance with the instructions, may cause
harmful interference to radio communications. However,
there is no guarantee that interference will not occur in a
particular installation. If this equipment does cause harmful
interference to radio or television reception, which can be
determined by turning the equipment off and on, the user
is encouraged to try to correct the interference by one or
more of the following measures:
• Reorient or relocate the receiving antenna.
• Increase the separation between the equipment and
receiver.
• Connect the equipment into an outlet on a circuit different
from that to which the receiver is connected.
Consult your local
RadioShack store or an experienced
radio/TV technician for help.
If you cannot eliminate the interference, the FCC
requires that you stop using your equipment. Changes or
modifications not expressly approved by RadioShack may
cause interference and void the user’s authority to operate
the equipment.
This device complies with Part 15 of the FCC rules.
Operation is subject to the following two conditions: (1) This
device may not cause harmful interference, and (2) This
device must accept any interference received, including
interference that may cause undesired operation.
Warranty Information
MyMusix offers 12 months warranty for 42-420/GX400
players purchased only from RadioShack company-owned
stores and authorized RadioShack franchisees and dealers.
MyMusix products qualify for warranty repair as long as the
unit has not been damaged. If the unit has damage to the
casing, OLED screen or the USB port, then it will not be
repaired under warranty and the warranty will be voided.
Accessories such as earphone, USB extension cable and
USB cap are not covered under warranty.
Please contact suppor[email protected] for help.
Menu Navigation
Press MENU and use the , , , and
MENU keys to:
• navigate and confirm your option from 4 main
menus:
Music, Radio, Setting, Now playing
and their respective submenus, and
• exit/return to the previous display.
Music Menu
Contains 6 options to view and
play your music based on ID
tag information on your tracks.
Play All – Play all songs in the
order downloaded to your player.
Artists – Play all tracks in alphabetical order by
artist or select a listed artist on your player.
Albums – Play all tracks in alphabetical order by
album or select a listed album on your player.
Songs – Play all tracks in alphabetical order by
song title.
Playlists – Play songs in your playlist in the order
you added them.
Now playing – Return to the Now playing
screen described below.
Now playing
Quickly access the last song
listened to when you switch on
the player or enter playback
display.
Music Options
Access 5 music mode options:
EQ – Five sound options
available: Normal, Pop, Rock,
Jazz, Classical.
Repeat – All/One/Off play and repeat all
tracks, repeats a single track or deactivate the
repeat options.
Shuffle – On/ Off plays tracks in random order
if activated.
Add Playlist on the go – press from this
menu while a song is playing to add it to this
playlist. Playlist added! appears. If the song is
already in the on the go playlist, Song already
saved appears.
Clear Playlist on the go – press to confirm
deleting all tracks from your Playlist. Playlist
cleared appears.
Note: You can save up to 30 tracks in Playlist
on the go.
Troubleshooting
For mor information and updates, visit
www.mymusix.com. To contact MyMusix, send an email
to [email protected] or call 1-866-862-9224 toll
free.
The player cannot play music files.
• Make sure MP3 files are stored in the proper part
of the flash memory.
• Make sure the player is in
Music Mode.
• Make sure music files are in a format supported by
the player.
• If you have DRM10 files, make sure they have not
expired.
Unresponsive buttons.
• Check if the hold switch is activated.
• Make sure music files are in a format supported by
the player.
• Connect to your PC and check if the file system is
NTFS. If yes, change format to FAT or FAT32.
• Use a paperclip or other pointed object to press the
Reset button, then switch on the player again.
No sound comes from the earphones or speaker.
• Make sure the earphones are firmly plugged in and
make sure the volume is not set to minimum.
• Make sure
Speaker option is On in radio mode.
Formatting your Player
Format your player if it malfunctions and you cannot
remedy the problem from the above hints. All file
content in the player will be deleted after formatting, so
make sure you back up your files from time to time.
1. Connect the player to your PC as described in
“STEP 2.”
2. Right-click the drive icon and click “Format.”
3. Click “OK” to confirm.
Care and Maintenance
• Never use the device in a strong magnetic field as this
may result in data being lost.
• Avoid exposing the player to strong sunlight, heat sources,
high humidity and extreme temperatures.
• Keep your MP3 player dry. If it gets wet, wipe it dry
immediately. Keep your MP3 player away from dust and
dirt, and wipe it with a damp cloth occasionally to keep it
looking new.
• Handle your MP3 player carefully; do not drop it.
• Modifying or tampering the MP3 player’s internal
components can cause malfunction and might invalidate its
warranty. If your player is not performing as it should, take
it to your local RadioShack store for assistance.
Listening Safely
To protect your hearing, follow these guidelines when you
listen to the player:
• Do not listen at extremely high volume levels. Extended
high volume listening can lead to permanent hearing loss.
• Do not wear earphones while operating a motor vehicle or
riding a bicycle. This can create a traffic hazard and could
be illegal in some areas.
• Set the volume to the lowest setting before listening. After
you begin listening, adjust the volume to a comfortable level.
• After you set the volume, do not increase it. Over time,
your ears adapt to the volume level, so a volume level that
does not cause discomfort might still damage your hearing.
Protect the environment by recycling used
electronics. Go to www.ecyclingcentral.com
to find a recycling location near you.
Setting Menu
Contains 7 configuration
submenus:
Language – Display menus in
English or Spanish.
Display – select brightness level from dim to
bright (0-5).
FM Mode – select stereo sound for radio on/off
(earphones only).
System Info – view software version, total
memory capacity, free space, and total number
of tracks stored.
Backlight – Choose to keep the backlight on for
3, 10, 30, or 60 seconds, or choose Always On.
Auto Power Off – Choose to power the player
off automatically after 30, 60 or 90 seconds, or
deactivate the feature (Off).
Reset All – Restore factory settings. Press § to
confirm the reset.
Listening to the Radio
You can listen to the radio
through earphones or the
integrated speaker. Tune to
your stations automatically
using Auto Scan (see below),
or manually by pressing the / keys.
Note: The earphones serve as the antenna, so
you must use them even if you listen with
the speaker.
Radio Options
There are 5 options in Radio mode:
Auto Scan – This option scans up to 30 radio
frequencies and stores them automatically.
Select Presets – Shows your list of all stored
stations. Navigate and select your desired
station. When a valid preset is selected,
appears. Enter an invalid preset by selecting - - /
- - MHz to enter manual search mode,
disappears.
Add Preset – To store a station manually tuned
(if free preset available).
Del Preset – Select this, then navigate through
preset list, and press to delete a preset.
Speaker: Turn speaker On/Off. In regular
playback mode, speaker is off if earphones are
plugged in.
Product 4GB MP3 Player with FM
Radio and Speaker
Model 42-420/GX400
Responsible
Party
RadioShack
300 RadioShack Circle
Fort Worth, TX 76102
Phone 817-415-3200
Using Your MP3 Player
/