Frymaster CM4-S Computer User manual
- Category
- Deep fryers
- Type
- User manual
This manual is also suitable for

Frymaster, a member of the Commercial Food Equipment Service Association, recommends
using CFESA Certified Technicians.
Price: $6.00
24-Hour Service Hotline
1-800-551-8633
819-5899
DEC 2005
*8195899*
CM4-S Computer
Operation Manual

Table of Contents
1-A
Operational Overview 1-1
Computer Setup, Standard Mode 2-1
Programming for Segmented Cooking with Filtration 3-1
Programming for Non-Segmented Cooking with Filtration 3-5
Filtering 3-7
Programming for Segmented Cooking, Non-Filtering 4-1
Programming for Non-Segmented Cooking, Non-Filtering 4-4
Alarm Programming 5-1
Exit-Mode Programming 6-1
Toggle From Fahrenheit to Celsius 7-1
Operational and Diagnostic Codes and Messages 8-1
Diagnostic
Hints
Look into this gray
box throughout the
manual for
overviews and
hints on the
operation of the
CM4-S cooking
computer.
12345 6 7 8 9 10
CM4-S
12 3 45 67 8 910
Programming
button

CM4-S Cooking Computer — Overview
1-1
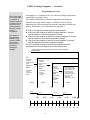
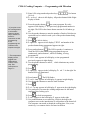
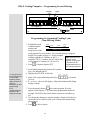
Programming Overview
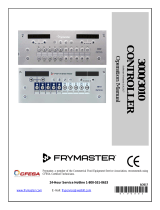
An example of a 13-minute cook cycle with four cooking temperatures
is detailed in the graphic below.
The cooktime and points at which the temperature will change are
entered in four steps in this example. Cooktimes are arrived at by
subtracting the desired segment time from the remaining cooktime and
entering that number. (See explanation in the graphic.)
♦ Step 1 sets the total cooktime and the initial setpoint.
♦ Step 2 sets the duration of the first cooking segment, 2 minutes,
and the setpoint of the first temperature change.
♦ Step 3 sets the duration of the second cooking segment, 4 minutes,
and the setpoint of the second temperature change.
♦ Step 4 sets the duration of the third cooking segment, 3 minutes,
and the setpoint of the third temperature change.
The four remaining minutes in the cooktime elapse at the final
temperature. No entry is required to use the final minutes.
The S in the CM4-
S computer stands
for segment, a
feature that allows
a cooking cycle to
be broken into a
number of parts,
each with its own
cooking
temperature.
The graphic at
right details an
example of this
process. Explicit,
step-by-step
instructions are
provided in
subsequent
chapters.
Enter 13:00, the combined time of all cook cycles, and 340°F,
initial setpoint.
1:
2 min.
2:00 4:00 6:00 8:00 10:00 12:00
4 min.
3 min.
4 min.
No entry is required
for the final 4 minutes
of the cooktime.The
computer simply
counts downs the
remaining minutes at
the final setpoint,
which was
established in step 4.
2:
3:
4:
01 42 3 5 6 7 8 9 10111213
Remaining
cooktime
Minus segment
length
Entered on
CM4-S
13
-2
11
Remaining
cooktime
Minus segment
length
Entered on
CM4-S
11
-4
7
Remaining
cooktime
Minus segment
length
Entered on
CM4-S
7
-3
4
Enter 320°F,
the first
temperature
change.
Enter 310°F,
the 2nd
temperature
change.
Enter 330°F,
the 3rd
temperature
change.
340°F
320°F
310°F
330°F

CM4-S Cooking Computer — Overview
1-2
The CM4-S can cook in segmented and non-segmented cook cycles
with or without automatic filter prompts. It is also programmable to exit
a cook cycle in one of three modes: return to setpoint, assume an idle
temperature, well below setpoint, or prompt filtering at a prescribed
cook cycle count for a specific product button
The CM4-S is also capable of monitoring cook cycles initiated by all
the product buttons and call for filtering when the cumulative amount
reaches a number set by the operator.
Programming for filtering and exit-mode options are not essential to
basic cooking programming. For that reason, filtering and exit mode
instructions are provided in separate sections of this manual.
The sequence in which programmable features are encountered after
entering the proper access code is listed below with a brief explanation
of their function.
The CM4-S has a
number of features
and it is not
essential to use all
of them in your
cooking operation.
Programming for
segmented
cooking and
staggered alarms,
which are not
essential to use
together, are
extensive
processes.
For that reason,
programming for
filtering prompts
and alarms are
presented in
separate chapters.
Product
Heads
Segment
Alarm
Exit
cooktime
Set-temp
sens
Encountered in all programming; allows computer to keep
running total of heads of chicken or equivalent. The
amount is accessible with a programming code.
Encountered in all programming; used to program
segmented and non-segmented cook cycles.
Allows up to three alarms to be set per cook cycle;
encountered by pressing special programming key.
Allows programming of the exit mode at the completion
of a cook cycle; encountered by pressing special
programming key.
Encountered in all programming; used to enter cooking
times for segmented and non-segmented cooking
cycles.
Encountered in all programming; used to enter cooking
temperatures for segmented and non-segmented
cooking cycles.
Encountered in all programming; used to enter sensitivity, which is the
degree the computer reacts to the introduction of cold product to the
heated oil. The computer shrinks or stretches the cooktime based on
the degree of cooling and the sensitivity setting. A 0 setting results in
no reaction; 9 produces the greatest reaction.
Encountered in all programming; a product
button must be pressed for programming.

CMS-4 Cooking Computer
2-1
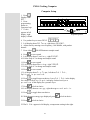
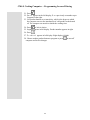
Computer Setup
1. Press .
Display reads
OFF.
2. Press
programming
button in
Frymaster logo.
3. Code
appears in left
display; right
display is blank.
4. Use product keys to enter 1656
.
5. Left display shows OK Tone; right shows 1000HZ.
6. Adjust tone by entering a new frequency, 100-2000Hz, with product
buttons.
7. Press either
ON/OFF button to sample sound.
8. Press to save sound.
9. Left display shows Caution; right 500HZ.
10. Follow steps 6-7 to change and sample sound.
11. Press to save sound.
12. Left display shows Warning; right 350HZ.
13. Follow steps 6-7 to change and sample sound.
14. Press to save sound.
15. Left display shows Fry-Type; left shows Full Pot,
Splitpot or pressure.
16. Press to toggle between choices. Leave Full Pot in the display
for a single vat fryer, splitpot in display for dual-vat fryer or
pressure in the display for a pressure fryer.
17. Press
to lock in choice.
18. Left display shows energy; right shows gas or electric.
19. Press
to toggle between choices.
20. With the proper energy type displayed, press to lock in choice.
21. Press to lock in choice.
22. Melt Ext appears in left display; a temperature setting in the right.
12345 6 7 8 9 10
CM4 -S
12 3 45 67 8 910
Programming button.

CMS-4 Cooking Computer
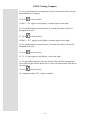
2-2
23. Use product buttons to set temperature the fryer will exit the melt cycle and
heat continuously to setpoint.
24. Press to lock in choice.
25. Melt On appears in left display; a number appears in the right.
26. Use product buttons to enter the time, in seconds, the burners will be on
during the melt cycle.
27. Press to lock in choice.
28. Melt Off appears in left display; a number appears in the right.
29. Use product buttons to enter the time, in seconds, the burners will stay off
during the melt cycle.
30. Press to lock in choice.
31. Filttime appears in left display; a time in the right.
32. Use the product buttons to enter the amount of time the filter pump should
run to fill the frypot after the drain valve is closed. An alarm sounds when the set
time elapses.
33. Press to lock in choice.
34. Computer displays OFF. Setup is complete.

CM4-S Cooking Computer — Programming with Filtration
3-1
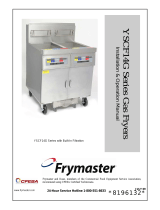
12345 6 7 8 9 10
CM4-S
12 3 45 67 8 910
ON/OFF
Temp
Product Buttons
Exit Cool
Checkmark
Programming Key Not visible
Product Buttons
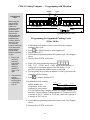
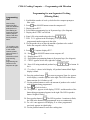
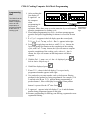
Programming for Segmented Cooking Cycles
(Filter Mode)
1. Establish the total number of cook cycles before the computer
prompts a filter cycle.
2. Press , the ON/OFF button to turn computer off.
3. Display shows OFF.
4. Press hidden programming button in Frymaster logo. (See diagram
above)
5. Display shows CODE on left side.
6. Enter 1658 using numbered product keys .
7. GBL FILT (lGBL and rGBL appear if the computer is
configured for a splitpot) appears in the left display, 0 or a
previously programmed number appears in the right.
8. Use the product keys to enter the number of cook cycles before the
computer calls for filtering.
9. Press . Computer displays OFF.
10. Establish the total cooktime
and the number and
temperatures of the cook
segments for your product.
You will find drawing a diagram helpful. See graphic on page 1-1
and above. In this example cooking segments of 2 minutes at 340°F,
4 minutes at 320°F, 3 minutes at 310°F and a final cook segment of
4 minutes at 330°F are set.
11. Press hidden programming button in Frymaster logo. (See diagram
above)
12. Display shows CODE on left side.
Programming
Hint
When using the
global filtering
feature of the
CM4-S, the
computer counts
the amount of
product cooked
and calls for
filtering when the
count reaches a
predetermined
number, which is
set by the user.
The computer
must be connected
to the drain valve
safety switch to
provide all the
features described
at right.
• Entry of the
amount of
product to
cook before
calling for
filtering is
detailed in
steps 1-8 at
right.
• The amount of
product
assigned to a
product button
is entered at
step 16.
2 min
4 min.
4 min.
Total time: 13 min
3 min.
340°F
330°F
310°F
330°F

CM4-S Cooking Computer — Programming with Filtration
3-2
13. Enter 1650 using numbered product keys. Use button
10 for 0.
14. Product shows in left display. All product buttons blink. Right
display is blank.
15. Press the product button
you want to program. Heads
appears in left display; 0 or a previously programmed number in
the right. The LED in the chosen button remains lit. All others go
off.
16. Use the product buttons to enter the number of heads of chicken (or
equivalent) to be cooked in each cycle of the product button being
programmed.
17. Press
to lock in choice.
18. Segment appears in left display, PROD and number of the
product button being programmed appears in right.
19. Press product button 1 . The LED in product 1 continues to
flash; the LED in the button being programmed stays on
continuously (unless button 1, which is flashing, is being
programmed).
20. Cooktime appears in left display; a time programmed
previously appears in right display.
21. Use the product buttons to enter 0, which eliminates any earlier
programming.
22. Press .
23. Segment appears in the left display; Prod 1 in the right. No
button LEDs are illuminated.
24. Press button 1
. The LED flashes.
25. Cooktime appears in left display; 0 appears in right display.
26. Use the product buttons to enter the total cooktime.
27. Press
.
28. Set-Temp appears in left display; 0 appears in the right display.
29. Use product keys to enter the cooking temperature for the initial
setpoint of the cooking cycle.
30. Press to lock in temperature.
31. Sens appears in the left display; 0 appears in the right.
32. Use product buttons to set sensitivity, which is the degree the
computer reacts to the introduction of cold product to the heated oil.
The computer can stretch or shrink the cooking time. Zero, or no
sensitivity, is a common choice for bone-in chicken.
* If you plan to use
the cooking alarms
or exit modes
features, please
skip to sections 5
and 6 for
instruction on their
programming.
If not,
programming can
continue in the
sequence at right.
** The temperature
display can be
toggled from
Fahrenheit to
Celsius in this
step. See
instructions on
Page 7-1.

CM4-S Cooking Computer — Programming with Filtration
3-3
33. Press to lock in choice.
34. Segment appears in left display; Prod 1 in right. The LED
in the product button 1 continues to flash. All others are dark.
35. Press product button 2 . The LED in product button 2 flashes.
The LED in the button being programmed is illuminated
continuously.
36. Determine the desired cooktime for the first cook cycle. Subtract
that number from the total cooktime entered
in the first step. Enter the result with the
product buttons. See calculation at right and
graphic in programming overview on page 1-
1.
37. Press to lock in choice.
38. Set-Temp appears in left display and 0
or a previously programmed temperature
appears in the right.
39. Use product keys to enter the cooking temperature for the first
temperature change. See graphic on page 1-1.
40. Press . Sens appears in the left display; 0 or a previously
set sensitivity setting appears in the right.
41. Use product keys to enter sensitivity.
42. Press .
43. Segment appears in left display; Prod 1 in right.
44. Press product button 3
.
45. Cooktime appears in left display; 0 appears in the
right.
46. Subtract desired time for second cook segment from
remaining cooktime. (See example at right.) Enter that
number at the cooktime prompt.
47. Press
to lock in cooktime .
48. Set-Temp appears in left display and 0 or a
previously programmed temperature appears in the right.
49. Use product keys to enter the cooking temperature for the second
temperature change.
50. Press . Sens appears in the left display; 0 or a previously
set sensitivity setting appears in the right.
51. Use product keys to enter sensitivity.
13:00
-2:00
11:00
Total cooking time
Cooktime for 1
s
t
segment
Time entered into
CM4-S.
11:00
-4:00
7:00
Remaining
cooktime
Cooktime
for 2nd
segment
Time entered into
CM4-S.

CM4-S Cooking Computer — Programming with Filtration
3-4
52. Press .
53. Segment appears in left display; Prod 1 in right
54. Press product button 4 .
55. Cooktime appears in left display; 0 appears in the
right.
56. Subtract desired time for second cook segment from
remaining cooktime. (See example at right.) Enter that
number at the cooktime prompt.
57. Press to lock in cooktime .
58. Set-Temp appears in left display and 0 or a
previously programmed temperature appears in the right.
59. Use product keys to enter the cooking temperature for the final
temperature change.
60. Press . Sens appears in the left display; 0 or a previously
set sensitivity setting appears in the right.
61. Use product keys to enter sensitivity.
62. Press .
63. Segment appears in left display; Prod 1 in right. All
programmed buttons are illuminated.
64. Nine minutes of the 13-minute cooktime have been programmed.
No additional programming is required. The computer will take the
oil to the last setpoint, which was established in step 58 and
countdown the remaining 4 minutes.
65. Press to leave programming for this product button.
66. Product appears in the left display. Right display is blank.
67. Press next product button to be programmed with segmented
cooking cycles. Follow steps outlined above to program.
68. To lock in programming and exit, press
.
7:00
-3:00
4:00
Remaining
cooktime
Cooktime
for 3rd
segment
Time entered into
CM4-S.

CM4-S Cooking Computer — Programming with Filtration
3-5
Programming for non-Segmented Cooking
(Filtering Mode)
1. Establish the number of cook cycles before the computer prompts a
filter cycle.
2. Press
, the ON/OFF button to turn the computer off.
3. Display shows OFF.
4. Press hidden programming key in Frymaster logo. (See diagram).
5. Display show CODE on left side.
6. Enter 1658 using numbered product keys .
7. GBL Filt appears in the left display; 0 or a previously
programmed number appears in the right.
8. Use the product keys to enter the amount of product to be cooked
before the computer calls for filtering.
9. Press . Computer displays OFF.
10. Press , the ON/OFF button to turn computer off.
11. Display shows OFF.
12. Press hidden programming button in Frymaster logo. (See diagram).
13. CODE appears on left side; right side is blank.
14. Enter 1650 using numbered product keys. Use button 10
for 0.
15. Product shows in left display. All product buttons blink. Right
display is blank.
16. Press the product button you want to program. Heads appears
in left display; a number appears in the right. The LED in the chosen
button remains lit. All others go off.
17. Use the product buttons to enter the amount of product to be cooked
with the button being programmed.
18. Press
to lock in choice.
19. *Segment appears in left display, PROD and the number of the
button being programmed appears in the right. The LED in product
button 1 begins to flash.*
20. Press product button 1 . The LED in product 1 continues to flash;
the LED in the button being programmed stays on continuously.
21. Cooktime appears in left display; 0 or a time programmed
previously appears in right display.
22. Use the product buttons to enter the cooking time.
Programming
Hint
Vats cooking
french fries and
other non-breaded
products do not
need filtering as
frequently as vats
used to prepare
chicken and other
heavily breaded
items.
* If you plan to use
the cooking alarms
or exit modes
features, please
skip to sections 5
and 6 for
instruction on their
programming.
If not,
programming can
continue in the
sequence at right.

CM4-S Cooking Computer — Programming with Filtration
3-6
23. Press to lock in cooktime .
24. **Set-Temp appears in left display; 0 or a previously entered
temperature appears in the right display.
25. Use product keys to enter the cooking temperature for the final
segment of the cooking cycle.
26. Press to lock in temperature.
27. Sens appears in the left display; 0 or a previously set number up to
9 appears in the right.
28. Use product buttons to set sensitivity, which is the degree to which
the computer reacts to the introduction of cold product to the heated
oil. The computer can stretch or shrink the cooking time.
29. Press to lock in choice.
30. Segment appears in left display. Product number appears in right.
31. Press .
32. Product appears in left display. Right display is blank.
33. Choose another product button to program or press to turn off
computer and lock in changes.
** The temperature
display can be
toggled from
Fahrenheit to
Celsius in this
step. See
instructions on
Page 7-1.

CM4-S Cooking Computer — Programming with Filtration
3-7
Filter Operation
The computer
must be connected
to the drain valve
safety switch in
order to function as
described at right.
To clear a
computer
programmed for
global filtering and
not connected to
the fryer’s filter
system:
• Press
to
turn computer
off.
• Press button in
Frymaster
logo.
• Display shows
CODE.
• Enter 1111
with product
keys. (On
Church’s
computers,
use 1111 to
delay filtering,
1119 to cancel
filtration. See
supplemental
Church’s
material for
instructions on
delaying and
clearing the
filter function.)
• CLR FLTR
FUNCTION
flashes in
display and
computer
displays OFF.
Filter Operation
1. When the product count entered during the programming for
global filtering is reached, the computer will display Filter.
2. Allow the cook cycle to complete.
3. Ensure the filter pan is properly prepared.
4. Open drain valve for a minimum of 30 seconds.
5. Display shows Drain Open.
6. After approximately three minutes, the computer display alternates
between Drain, Open and Fill.
7. Close drain valve. Display shows FILL.
8. Use pump on filter system to refill fry vat.
9. Press
. Fryer returns to setpoint.

CM4-S Cooking Computer —Programming for non-Filtering
4-1
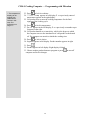
Programming for Segmented Cooking Cycles
(Non-Filtering Mode)
1. Establish the total
cooktime and the
number and
temperatures of the
cook segments for your product. You will find drawing a diagram
helpful. See graphic on page 1-1. In this example
cooking segments of 2 minutes at 340°F, 4
minutes at 320°F, 3 minutes at 310°F and a final
cook segment of 4 minutes at 330°F are set.
2. Press . Computer displays OFF.
3. Press hidden programming button in Frymaster
logo. (See diagram above)
4. Display shows CODE on left side.
5. Enter 1650 using numbered product keys.
Use button
10 for 0.
6. Product shows in left display. All product buttons blink. Right
display is blank.
7. Press the product button
you want to program. Heads
appears in left display; 0 or a previously programmed number in
the right. The LED in the chosen button remains lit. All others go
off.
8. Use the product buttons to enter the number of heads of chicken (or
equivalent) to be cooked in each cycle of the product button being
programmed.
9. Press to lock in choice.
12345 6 7 8 9 10
CM4-S
12 3 45 67 8 910
ON/OFF
Temp
Product Buttons
Exit Cool
Checkmark
Programming Key Not visible
Product Buttons
Note: Instructions are
based on a four-
segment cooking cycle.
Computers can be
programmed with up to
nine cooking segments.
* If you plan to use
the cooking alarms
or exit modes
features, please
skip to sections 5
and 6 for
instruction on their
programming.
If not,
programming can
continue in the
sequence at right.
2 min
4 min.
4 min.
Total time: 13 min
3 min.
340°F
330°F
310°F
330°F

CM4-S Cooking Computer —Programming for non-Filtering
4-2
10. Segment appears in left display, PROD and number of the
product button being programmed appears in right.
11. Press product button 1
. The LED in product 1 continues to
flash; the LED in the button being programmed stays on
continuously (unless button 1, which is flashing, is being
programmed).
12. Cooktime appears in left display; a time programmed
previously appears in right display.
13. Use the product buttons to enter 0, which eliminates any earlier
programming.
14. Press
.
15. Segment appears in the left display; Prod 1 in the right. No
button LEDs are illuminated.
16. Press button 1 . The LED flashes.
17. Cooktime appears in left display; 0 appears in right display.
18. Use the product buttons to enter the total cooktime.
19. Press .
20. Set-Temp appears in left display; 0 appears in the right display.
21. Use product keys to enter the cooking temperature for the initial
setpoint of the cooking cycle.
22. Press to lock in temperature.
23. Sens appears in the left display; 0 appears in the right.
24. Use product buttons to set sensitivity, which is the degree the
computer reacts to the introduction of cold product to the heated oil.
The computer can stretch or shrink the cooking time. Zero, or no
sensitivity, is a common choice for bone-in chicken.
25. Press
to lock in choice.
26. Segment appears in left display; Prod 1 in right.
27. Press product button 2 . The LED in product button 2 flashes.
The LED in the button being programmed is illuminated
continuously.
28. Determine the desired cooktime for the first cook cycle. Subtract
that number from the total cooktime entered in the first step. Enter
the result with the product buttons. See calculation at right and
graphic in programming overview on page 1-1.
29. Press to lock in choice.

CM4-S Cooking Computer —Programming for non-Filtering
4-3
30. Set-Temp appears in left display and 0 or a previously
programmed temperature appears in the right.
31. Use product keys to enter the cooking temperature for the first
temperature change. See graphic on page 1-1.
32. Press . Sens appears in the left
display; 0 or a previously set sensitivity
setting appears in the right.
33. Use product keys to enter sensitivity.
34. Press .
35. Segment appears in left display; Prod
1 in right.
36. Press product button 3 .
37. Cooktime appears in left display; 0 appears in the
right.
38. Subtract desired time for second cook segment from
remaining cooktime. (See example at right.) Enter that
number at the cooktime prompt.
39. Press to lock in cooktime .
40. Set-Temp appears in left display and 0 or a
previously programmed temperature appears in the right.
41. Use product keys to enter the cooking temperature for the second
temperature change.
42. Press . Sens appears in the left display; 0 or a previously
set sensitivity setting appears in the right.
43. Use product keys to enter sensitivity.
44. Press .
45. Segment appears in left display; Prod 1 in right
46. Press product button 4
.
47. Cooktime appears in left display; 0 appears in the
right.
48. Subtract desired time for the third cook segment from
remaining cooktime. (See example at right.) Enter that
number at the cooktime prompt.
49. Press
to lock in cooktime .
50. Set-Temp appears in left display and 0 or a
previously programmed temperature appears in the right.
51. Use product keys to enter the cooking temperature for the final
temperature change.
13:00
-2:00
11:00
Total cooking time
Cooktime for 1
s
t
segment
Time entered into
CM4-S.
11:00
-4:00
7:00
Remaining
cooktime
Cooktime
for 2nd
segment
Time entered into
CM4-S.
7:00
-3:00
4:00
Remaining
cooktime
Cooktime
for 3rd
segment
Time entered into
CM4-S.

CM4-S Cooking Computer —Programming for non-Filtering
4-4
52. Press . Sens appears in the left display; 0 or a previously
set sensitivity setting appears in the right.
53. Use product keys to enter sensitivity.
54. Press .
55. Segment appears in left display; Prod 1 in right. All
programmed buttons are illuminated.
56. Nine minutes of the 13-minute cooktime have been programmed.
No additional programming is required. The computer will take the
oil to the last setpoint, which was established in step 48 and
countdown the remaining 4 minutes.
57. Press to leave programming for this product button.
58. Product appears in the left display. Right display is blank.
59. Press next product button to be programmed with segmented
cooking cycles. Follow steps outlined above to program.
60. To lock in programming and exit, press .

CM4-S Cooking Computer —Programming for non-Filtering
4-5
Programming for non-Segmented Cooking
(Non-Filtering Mode)
1. Press , the ON/OFF button to turn computer off.
2. Display shows OFF.
3. Press hidden programming button in Frymaster logo. (See diagram).
4. CODE appears on left side; right side is blank.
5. Enter 1650 using numbered product keys. Use button 10
for 0.
6. Product shows in left display. All product buttons blink. Right
display is blank.
7. Press the product button you want to program. Heads appears
in left display; A number appears in the right. The LED in the chosen
button remains lit. All others go off.
8. Use the product buttons to enter the number of heads of chicken or an
equivalent to be assigned to this product button.
9. Press to lock in choice.
10. *Segment appears in left display, PROD and the number of the
button being programmed appears in the right. The LED in product
button 1 begins to flash.
11. Press product button 1 . The LED in product 1 continues to flash;
the LED in the button being programmed stays on continuously.
12. Cooktime appears in left display; 0 or a time programmed
previously appears in right display.
13. Use the product buttons to enter 0, which eliminates earlier
programming.
14. Press
.
15. Segment appears in left display, PROD and the number of the
button being programmed appears in the right. No button LEDs are
illuminated.
16. Press a product button .
17. Cooktime appears in left display; 0 appears in the right display.
18. Use product keys to enter the cooktime.
19. Press
to lock in cooktime.
61. Set-Temp appears in left display and 0 or a previously
programmed temperature appears in the right.
20. Use product keys to enter the cooking temperature for the product.
Programming
Hint
French fries and
other products do
not require
segmented
cooking cycles.
Simply exit the
programming
sequence at the
second Segment
display. The time
entered into the
first segment will
establish the
complete cooking
time.
* If you plan to use
the cooking alarms
or exit modes
features, please
skip to sections 5
and 6 for
instruction on their
programming.
If not,
programming can
continue in the
sequence at right.
** The temperature
display can be
toggled from
Fahrenheit to
Celsius in this
step. See
instructions on
Page 7-1.

CM4-S Cooking Computer —Programming for non-Filtering
4-6
21. Press .
22. Sens appears in the left display; 0 or a previously set number up to
9 appears in the right.
23. Use product buttons to set sensitivity, which is the degree to which
the computer reacts to the introduction of cold product to the heated
oil. The computer can stretch or shrink the cooking time.
24. Press
to lock in choice.
25. Segment appears in left display. Product number appears in right.
26. Press
.
27. Product appears in left display. Right display is blank.
28. Choose another product button to program or press to turn off
computer and lock in changes.

CM4-S Cooking Computer — Alarm Programming
5-1
1. B
e
g
i
n
h
e
r
e
a
f
t
e
r
r
e
a
c
h
i
n
g
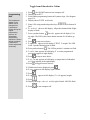
1. After reaching the first display of Segment on the computer
when programing for any mode of operation, follow these steps to
set audible alarms in the cook cycle.
2. Segment is shown in the left display; Product and its
number in the right. Press hidden program button (see diagram on
page 2-2).
3. Alarm 1 appears in left display; A or M and a time appears in
the right.
4. Determine the point in the cooktime countdown the first alarm
should occur. For example, to set an alarm two minutes into a 13-
minute cook cycle, set the alarm at 11:00, the time the computer
will display when two minutes have elapsed in the cook cycle. (See
graphic above).
5. Use
to toggle between A and M. With A displayed, alarms are
self-canceling; with M displayed, alarms must be canceled
manually. See example on next page of entering three alarm times.
6. With desired time and alarm-canceling mode displayed, press
to proceed. Skip to step 9 to program Alarm 2. To exit alarm
programming follow steps 7-8.
Programming
Hint
Alarms are set to
remind operators
to shake fry
baskets or tend to
the product in
some other way at
points during the
cook cycle. The
instructions at right
detail setting three
alarms in a 13-
minute cook cycle.
To enter a single
alarm, exit the
sequence after
setting the first
alarm.
2:00
1:
2:
3:
11:00
6:00
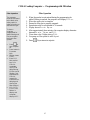
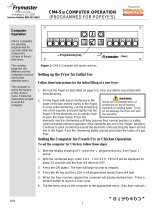
Three alarms can be programmed for a cook cycle. The CM4-S counts down cook times from
the total time to zero. Alarms are entered at the point in the countdown they are desired. The
example below is for alarms at 11:00, 6:00 and 2:00 on the countdown clock; the alarms will
occur two, seven and 11 minutes into the 13-minute cook cycle.
At the Alarm 1
prompt, enter
11:00. The alarm
will occur with 11
minutes remaining
in the cook cycle;
two minutes have
passed.
At the Alarm 2 prompt,
enter 6:00, The alarm will
occur with 6:00 remaining
in the cook cycle; seven
minutes have passed.
At the Alarm 3
prompt, enter 2:00.
The alarm will
occur with 2:00
remaining in the
cook cycle; 11
minutes have
passed.
2:00 7:00 11:00
Cook
cycle
ends
Points in the cook cycle the alarms occur
13:00
Page is loading ...
Page is loading ...
Page is loading ...
Page is loading ...
Page is loading ...
Page is loading ...
-
 1
1
-
 2
2
-
 3
3
-
 4
4
-
 5
5
-
 6
6
-
 7
7
-
 8
8
-
 9
9
-
 10
10
-
 11
11
-
 12
12
-
 13
13
-
 14
14
-
 15
15
-
 16
16
-
 17
17
-
 18
18
-
 19
19
-
 20
20
-
 21
21
-
 22
22
-
 23
23
-
 24
24
-
 25
25
-
 26
26


Frymaster CM4-S Computer User manual
- Category
- Deep fryers
- Type
- User manual
- This manual is also suitable for
Ask a question and I''ll find the answer in the document
Finding information in a document is now easier with AI
Related papers
-
 Frymaster 3000 Version 3 Controller Owner's manual
-
 Frymaster OCF30 Electric Operating instructions
-
 Frymaster 3000 Controller Training manual
-
Frymaster 1814 User manual
-
 Frymaster YUM Wingstreet Controller Owner's manual
-
 Frymaster 3000 Controller Owner's manual
-
 Frymaster 3000 Version 3 Controller Operational Manual
-
Frymaster M2000 User manual
-
 Frymaster YSCF14G User manual
-
 Frymaster CM4-S(T) User manual


Other documents
-
Metos CTX DZ 55 II Owner's manual
-
CTX G-26 User manual
-
 Alto Shaam ASF-75G Installation guide
-
Alto Shaam FryTech ASF-75E Operating instructions
-
 Alto Shaam ASF-60G Operating instructions
-
 Alto-Shaam ASF-60G User manual
-
Brandt MMK51X1E Owner's manual
-
-
-
Groupe Brandt ME250XN1 Owner's manual


