Page is loading ...

Spacemakerll’”Micwie Oven
Contents
Adapter Plugs
19 Microwaving Tips
2
Appliance Registration
2
Minute/Second Timer
7
Auto Defrost
12, 13
Model and Serial Numbers
2
Auto Roast
10,11 Precautions
3
Auto Simmer
11 Probe
5,6,9-11,17
Care &Cleaning
17 Problem Solver
18
Control Panel
6 Program Cooking
6
Conversion Guide
12
Repair Service
27
Cook ‘NWatch
8
SafetyInstructions
3,4
Cooking by Temperature
9 ToRemovefkomCabinet Mount 25
Cooking by Time
8
Under Cabinet Mounting
20-25
Cooking Complete Reminder 5
Warranty
Back Cover
Delayed Cooking
7
Double Duty Shelf
4,5, 15-17
Extension Cords
19
Features
5
Grounding Instructions
19
Hold Time
7
Light Bulb Replacement
17
GEAmwwCentw@
Manual Defrost
14
8M.62E24W
ModelJEM31H
The electric output
of this microwave oven
is 700 watts.
GEAppRmces

Help us help you...
Before using your oven,
read this book carefully.
It is intended to help you operate
and maintain your new microwave
oven properly.
Keep it handy for answers to your
questions.
If you don’tunderstand something
or need more help, write (include
your phone number):
Consumer Affairs
GE Appliances
Appliance Park
Louisville, KY40225
Write down the model
and serial numbers.
You’llfind them on a label inside
the oven.
These numbers are also on the
Consumer Product Ownership
Registration Card that came with
your microwave oven. Before
sending in this card, please write
these numbers here:
Model Number
Serial Number
Use these numbers in any
correspondence or service calls
concerning your microwaveoven.
Be sureyour microwave
ovenis registered.
It is important that we know the
location of your microwave oven
should a ned occur for adjustments.
Yoursupplier is responsible for
registering you as the owner.
Please check with your supplier to
be sure he has done so; also send in
your Consumer Product Ownership
Registration Card. If you move, or
if you are not the original purchaser
please write to us, stating model
and serial numbers. This appliance
mustberegistered.Pleasebecertain
that it is.
Write to:
GE Appliances
Range Product Service
Appliance Park
Louisville, KY40225
If you received a
damaged oven...
Immediately contact the dealer (or
builder) that sold you the oven.
Savetime and money.
Before you request service...
checktheProblem Solveron page 18.
It lists causes of minor operating
problemsthatyoucancorrectyourself.
When unpacking your
microwaveoven...
you should find an installation
package that contains a template
and installation hardware for
under-the-cabinet mounting. If
missing, contact your supplier.
Optional Accessories
available at extra cost from your
GE supplier.
JX8H Installation Kit converts
this oven to a built-in wall oven.
Microwaving Tips
● Make sure all cookware used in
your microwaveoven is suitable for
microwaving.Most glass casseroles,
cooking dishes, measuring cups,
custard cups, pottery or china
dinnerware which does not have
metallictrim or glazewith a metallic
sheen can be used. Some cookware
is labeled“suitablefor rnicrowaving~’
If you are unsure, use this dish test:
Measure 1cup water in a glass cup.
Place in oven on or beside dish.
Microwave 1-1%minutes at High. If
waterbecomeshot, dishismicrowave
safe. If dish heats, it should not be
used for microwaving.
● Paper towels, wax paper, and
plastic wrap can be used to cover
dishes in order to retain moisture
and prevent spattering.
● Some microwaved fds require
stirring, rotating, or rearranging.
Check your cookbook.
● Steam builds up pressure in foods
which are tightly covered by a skin
or membrane. Pierce potatoes, egg
yolks and chicken livers to prevent
bursting.
2


Featuresof YourOven
Cooking CompleteReminder
(Forall Am ROASTcodesexceptcode ~ AUIU
DEFROST, COOK ‘NWA~H, TIME COOK
and MANUALDEFROST cycles)
Toremind you that youhavefood in the
oven, the ovenwill beep once aminute until
you either open the ovendoor or touch the
.9 Cubic Foot
CLEAR/OFF pad.
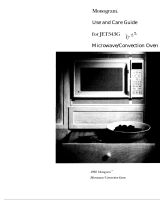
Oven Interior
Q
II 1 I
9
II I
I mm
w-i
}
t I
1. Door Latches.
5. Oven Interior Light turns on
2. Door Screen. Metal screen
when the door is opened or when
the oven is operating.
permits viewing of foods and keeps
microwaves confined inside oven.
6 MICROTHERMOMETERTM
3. Oven Vent.
Temperature Probe. Use with
AUTO ROASTor TEMP
4. Model and Serial Numbers.
COOK/HOLD fi.mctiononly.
7. DOUBLE-DUTYTMShelf. Lets
youmicrowaveseveralfoodsat once.
(See Safety Instructions and pages
15and 16for special instructions.)
When this she~fis not in use, please
remove from the oven. “
8. Touch Control Panel and
Display. See next page for
instructions.
9. Door Latch Release. Press latch
release bar at indent to open door.
Door must be securely latched for
oven to operate.
10. Auto Roast and Auto
Defrost Guides. Contain cooking
information for the Automatic
Roasting function (see page 10)
and defrosting information for the
Automatic Defrosting fi.mction(see
page 12).
When YouPlugin the Oven
The display panel lights up. After 15seconds, all lights disappear
and “RESET” appears. Touch the CLEAR/OFF pad and oven is
ready for use and the clock can be set.
If power is disrupted at any time, the above sequence reoccurs,
and you must reset Clock after touching CLEAR/OFF.
5

YourTouchControll%nel
The Touch Control I%nel
allows you to set the oven controls
electronically with the touch of
a finger. It’sdesigned to be easy
to use and understand.
1. TIME COOK I & II.
Microwave for a preset amount of
time using automatic power level 10
(High), (or change power level
after entering cooking time. See
page 8.)
2. MANUAL DEFROST. Gentle
thawing at automatic power level
3 (Low). (If desired, you may
change power level after entering
defrosting time. See page 14.)
3. POWER LEVEL. Touch this
pad before entering another power
level number if you want to change
from automatic power level 10
(High) for cooking or power level 3
(Low) for defrostfig. -
4. NUMBER PADS. Touch these
padstoentercooking/deksting time,
power level, time of day, finished
food temperature, Auto Roast
codes and Auto Defrost weights.
5. MIN. Use with number pads to
enter whole minutes. For example,
for 4 minutes touch 4 and MIN.
6 START.After all selections are
made, touch this pad to start oven.
7. AUTOROAST. Insert probe,
touch this pad, and desired number
pad for Code to slow-cook or
temperature cook meat with
automatic preset program. (See
pages 10and 11.)
& DISPLAY.Displays time of day,
time counting down during cooking
functions, power level, internal
fbod temperature, Auto Roast codes
and Auto Defrost food weights,
cooking mode and instructions.
“PROBE” Appears
On Display:
. Probe has been forgottenwhen
AUTOROASTor TEMP COOK/
HOLD function is being used.
s Probe is not securely seated
in oven wall receptacle.
9. TEMP COOK/HOLD. Use
the temperature probe to cook by
using a preset temperature. Once
oven reaches preset temperature,
it switches to HOLD setting and
maintains that temperature until
you touch the CLEAR/OFF pad.
(See page 9.)
10.MIN/SEC TIMER. This
feature uses no microwaveenergy.
It functions as a kitchen timer, as a
holding period after Manual Defrost
or as a delay timer before Time
Cook I & II, TempCook/Hold or
Auto Roast. (See page 7.)
11.COOK ‘NWA~H. Use this
pad for short-term cooking. The
oven automatically turns off after
3 minutes. (See page 8.)
12. CLOCK. Touch this pad to
enter time of day or check time of
day while microwaving.
Toset clock, first touch CLOCK
pad and then enter time of day.For
example, if time is 1:30,touch
number pads 1, 3, and Oand “1:30”
will appear in display. Touch
STARTpad. To reset or change
time, simply repeat above process.
B. CLEAR/OFF. When touched,
it shuts off the oven and erases all
settings (except time of day).
14. AUK) DEFROST. Touchthis
pad and then the number pads for
the desired food weight. The oven
automatically sets power levels
and defrosting time. (See pages 12
and 13.)
Program Cooking
Use your Touch Control Panel to
Auto Roastor Auto Defrost with the
oven automatically setting the times
and power levels for you, Manual
Defrost, Time Cook and Cook ‘N
Watchwith choice of power levels
from 1(lowest) to 10(highest),
time kitchen tasks with the Min/Sec
Timer, and set the clock.
Create your own programs to suit ~
your individual cooking style. For
example: use the Min/Sec Timer to
delay the start of Auto Roast, Temp
Cook/Hold or Time Cook I & II or
program a hold time between
Manual Defrost and Time Cook I
& II. (Seepage 7.) Set Time Cook I
&II for a two-stage program using
different times and power levels.
(See page 8.)
6

How toUse the Minute/Second Timer
The MIN/SEC TIMER has three
timing functions:
● It operates as a minute timer.
● It can be set to delay cooking.
● It can be used as a hold setting
after defrosting.
The MIN/SEC TIMER operates
without microwaveenergy.
Howto 13mea 3-Minute
Phone Call
1. Touch MIN/SEC TIMER pad.
The display shows :0 and
“ENTER TIME” flashes.
2. Touchnumber pad 3 and MIN (for
3 minutes and no seconds). Display
shows 3:00 and “TIME” flashes.
3. Touch START.Display shows
“TIME” and time counting down.
4. When time is up, oven signals,
flashes “EndJ’ and display shows
time of day.
Programming aHOLD
TIME
The Minute/Second Timer can also
be used to program “hold time”
between microwavecooking
fimctions. The time can range from
one second to 99 minutes and 99
seconds. A HOLD, or “standing”
time may be found in some of your
own recipes or cookbook.
Programming Delayed
Cooking
Todelay cooking up to 99 minutes
and 99 seconds, touch TIME COOK
I & II, TEMP COOK/HOLD or
AUTOROASTand enter cook time,
temp, or code. Touch MIN/SEC
TIMER and enternumber ofminutes
todelaycooking.TouchST~. Tmer
counts down to zero and cooking
begins. When delaying temperature
or AutoRoastcooking,be sureprobe
is in food before pressing START.
How to Manual Defrost,
Hold and Time Cook
Let’ssayyouwantto defrosta frozen
casserole for 15minutes, hold for
10minutes and then Time Cook for
25 minutes. Here’show to do it:
Step 1:Takecasserole from freezer
and place in oven.
Step2: TouchTIME DEFROSTpad.
The display shows :0 and
“POWER 3:’ “ENTER DEF
TIME” flashes.
Step 3: Touchpads 1,5 and MIN
for 15minutes defrostingtime. 15:00
appears on display. (Defrosting is
automatically set on power level 3
but can be changed by touching the
POWER LEVEL pad and the
desired power level.)
Step 4: Set standing or hold time
by touching MIN/SEC TIMER.
The display shows :0 and
“ENTER TIME” flashes.
Step 5: Touch 1,0 and MIN to hold
for ten minutes. 10:00appears on
display and “TIME” flashes.
Step 6: Touch TIME COOK I & II
pad. The display shows :0 and
“POWER 10:’“ENTER COOK
TIME” flashes.
7
Step %Touch2,5 and MIN for
twenty-fiveminutesof cooking time.
“COOK TIME” flashes and 25:00
and “POWER 10”appearon display.
Step8:TouchST~. “DEF TIME”
and 15:00 counting down show
on display. As each function is
automatically performed oven
display shows instructions entered
and the function.
Step 9: When time is up, the oven
signals and flashes “End?’
Questions and Answers
Q. What will happen if I
accidentally reversemy defrost,
hold and cook instructions?
A. The oven will automatically
rearrange your program. Defrosting
will alwayscome first, then hold,
and then the cooking function.
Q. Can I defrost and hold only?
A. Yes.Sometimes you may only
want to defrost a food, hold it, and
cook it later. All you need to do is
program in Defrost and amount of
time. Then program Hold and the
amount of time. Be sure to put the
thawed dish in the refrigerator
promptly.
NOTE: Let foods remain at room
temperature only as long as safe.
Times will vary.
Q. I programmed my oven for a
specific defrosting time but it
defrosted longer than necessary.
What happened?
A. When instructions conflict,
the oven carries out the last
instruction. Youmay have set the
oven to Defrost for 4 minutes,
Hold/Time for 2 minutes, and then
Defrost for 6 minutes. In this case,
the ovenwouldDefrostfor6 minutes
and Hold/Time for 2 minutes.

Cooking byTime
TIME COOK I &II allows you
to microwave for a preset amount
of time using automatic power
level 10(High), or change power
level automatically.
Power level 10(High) is
recommended for most cooking,
but you may change this for more
flexibility. See your cookbook.
Tobecome better acquainted with
time cooking, make a cup of coffee
by following the steps below.
Step 1:Fill a cup 2/3 fill of
water and add 1teaspoon of instant
coffee and stir to dissolve. Use a
cup that has no metal decoration
and is microwave safe (refer to
Microwaving Tips on page 2).
Place cup in oven and close door.
Step 2: Touch TIME COOK I & II
pad. Displayshows”: O“and “POWER
lot”“ENTER COOK TIME” flashes.
Step 3: Select your time. Touch
1and MIN pad for one minute.
Display shows “1:00” and “COOK
TIME” flashes.
Because automatic power level 10
is recommended for this cup of
coffee, there is no need to change
the power level. (If power level 10
is not appropriate, see “How to
Change Power Level” at right.)
Step 4: Touch START. “COOK
TIME;’ “POWER lo;”and time
counting down show on display.
Step 5: When time is up, the oven
signals and flashes “End~’Oven,
light and fan shut off.
Step 6: Open the door.
Using the me Cook II
Feature
The Time Cook II feature lets you
set two time cooking functions
within one program. This is ideal
if you want to change power levels
during your cooking operations.
Here’show to do it.
Step 1:Place food in oven in
microwave-safecontainer and close
the door.
Step 2: Touch TIME COOK I & II.
Displayshows”:
O“and “POWER107
“ENTER COOK TIME” flashes.
Step 3: Select your cooking time.
For example, touch 2, 1and 5 for
two minutes and 15seconds. Display
shows “2:15” and “POWER 10?
“COOK TIME” flashes.
Step 4: Touch TIME COOK I & II.
Step 5: Set your cooking time.
HowtoChange Ibwer Level
Afier setting cooking time,
touch POWER LEVEL pad,
then touch desired number for
new power level.
Step 6: Touch START.
Step %“POWER 10”is displayed
and “COOK TIME I“ counts down.
Step 8: At the end of “COOK
TIME I“ the second power level is
displayed and “COOK TIME II”
is shown counting down.
Step 9: When time is up, the oven
signals and flashes “EndV The
oven, light and fan shut off.
Step 10: Open the door.
Cook ‘NWatch
The Cook ‘NWatch feature is a
short-term
COOkiIlg pI’OgIIUll which
automatically turns the oven off
after 3 minutes. It’sideal for
melting cheese on food or other
quick cooking operations where
you want to stop cooking atjust
the right time.
ToUse Cook ‘NWatch
Step 1:Touch COOK ‘NWA~H.
“COOK ‘NWA~H” and
“POWER 10” are displayed and
“START” flashes.
Step 2: Touch START.“COOK ‘N
WA~H” and time counting up to
3 minutes are displayed. Power
level 10is automatically set in
oven but another power levelcan
be selected.
Step 3: Open the door or touch the
CLEAR/OFF pad to stop cooking.
The oven will automatically signal,
flash “End” and shut off at the end
of 3 minutes.
Questions and Answers
Q. I set my oven for the time
called for in the recipe, but at the
end of the time allowed, my food
wasn’tdone. What happened?
A. Since house power varies due
to time or location many time
cooking recipes give you a time
range to prevent overcooking. Set
the oven for minimum time, test the
food for doneness, and cook your
food a little longer, if necessary.
Q. I touched the number pads
andselected mypowerlevel.When
I touched START,however,my
oven didn’tcome on. Why not?
A. The TIME COOK I & II pad
must be touched before setting the
number pads or else your oven will
not begin cooking.
Q. I want to cook on a power
level other than High. What do
I need to do?
A. Tochange the power level,
touch the POWER LEVEL pad.
“ENTER POWER” flashes on the
display panel. Enter new number.
Q. Can I interrupt my Time
Cook function to check the food?
A. Yes.Toresume cooking,
simply close the door and press
the STARTpad. The timer must be
reset for cooking to resume unless
time is remaining on timer.
8

Cooking byTemperature
Internal temperature is the best
test of doneness for many foods.
Use TEMP COOK/HOLD to
cook a variety of foods to the
de&redftihed food temperature.
The TIME COOK I &II setting
is recommended for batters,
doughs, frozen foods and foods
which are diftlcult to cook
precisely with the probe.
“TEMP COOK/HOLD” takes the
guesswork out of cooking because
the oven automatically signals with
four beeps when the food reaches
the preset temperature. The Hold
featurewill maintainthis temperature
for up to twelve hours or until you
touch the CLEAR/OFF pad.
Note: Oven automatically switches
to “Hold” when preset food
temperature is reached.
The TemperatureProbe
HANDLE
CABLE
SENSOR
The temperature probe is a
food thermometer that gauges the
internal temperature of the food; it
must be used when using “TEMP
COOWHOLD” or “AUTOROAST:’
Touse the probe properly, follow
directions on page 10.
HowtoTempCook aRolled
Beef Rib Roast to Medium
Step 1:Insert temperature probe
into roast and attach probe securely
in oven wall. Close the door.
Step 2: TouchTEMP COOWHOLD.
“F” and “POWER 10”are displayed
and “ENTER TEMP” flashes.
Step 3: Touch 1,2,5 for 125*F.
“TEMP,” “pOWER 10’”and
“125F” are displayed.
Step 4: Touch POWER LEVEL
pad. “ENTER POWER” flashes.
Touch 5 for medium power.
“TEMP~’ “POWER 5“ and
“125F” show on display.
Step 5: Touch START.If internal
temperature of the roast is less than
80*F., display will show “COOI-7
and “FOOD TEMP.” If temperature
is 80”F.or above, display shows
temperature counting up.
Step 6: When 125”F.is reached,
the oven will sound and display
“HOLD7 The ovenwill then hold
the temperature.
Step Z Touchthe CLEAR/OFF
pad to stop the cycle.
Step 8: Remove probe and food
from the oven.
cookingTips
● Use a lower power level; it will
heat more evenly even though
requiring more time.
. Be sure frozen food has been
completelydefrostedbeforeinserting
probe. Probe may break off if used
in frozen foods.
● Cover foods loosely for moisture
control and quick, even heating.
Questions and Answers
Q. I inserted the temperature
probe, closed the door,touched
TEMP COOK/HOLD and entered
my desired food temperaturebut
the temperaturedidn’tappear on
the display.
A. Youmay haveentered an
incorrect temperature. Any food
temperature from 80° to 199”F.
may be entered for TEMP COOK/
HOLD. Touch CLEAR/OFF and
begin again.
Q. Are there any foods I can’t
TempCook?
A. Yes.Delicate butter icings, ice
cream, frozen whipped toppings,
etc. soften rapidly at warm
temperatures. Batters, doughs and
frozen foods are also difficult to
cook precisely with the probe. It’s
best to Time Cook these foods.
Q. Why did “PROBE” flash on
the display after I touched the
STARTpad?
A. “PROBE” will flash if you
don’tseat the cable end ofthe probe
securely into the receptacle in the
ovenwall or if you touch the TEMP
COOK/HOLD pad and forget to
use the probe.
Q. Can I leavemy probe in the
oven if it’snot inserted in food?
A. No, if it touches the ovenwall,
you may damage the oven.
Q. Can I TempCook different
portions of food at different
temperatures?
A. Yes.The temperature probe
gives you the freedom to cook
different portions of food at
different temperatures to suit
individual eating styles. Simply
place probe in food and change
temperature setting as needed.
9

. .—
AutomaticRoasting
AUTOROASTuses the
temperature probe tocook to the
desired serving temperature.
Unlike TEMP COOK/HOLD,
which uses asingle powerlevel,
AU!lXlROASTuses up to3 power
settings which automatically
switch during roasting, thus
providing even, tender cooking
results without overcooking.
Just asin conventional roasting,
only tender roasts should be Auto
Roasteduntil specified internal
temperatures are reached. Less
tender roasts should be microwaved
bytime, according tothe cookbook
which comes with your oven.
Preparing Roasts for
AutoRoasting
Pork or ham roasts need no trivet.
Add 1/2cup waterto roast dish and
cover with plastic wrap.
o
e
Place meat in ovenwith probe to
the right. Insert cable end ofprobe
firmly into receptacle on ovenwall.
Howto AutoRoast
Beef toMedium
Place tender beefroast on trivet in
microwave-safedish. Insert probe
horizontally into the center meaty
area not touching bone or fat. Make
sure the handle does not touch the
foodor top or sides ofthe oven.
Cover with waxpaper.
1. TouchAUTOROASTpad.
“AU~” and “TEMP” aredisplayed
and “ENTER CODE’ flashes.Touch
number pad 2. “TEMP~’ “CODE”
and “2” appear on display and
“START” flashes. TouchSTART.
Display shows “COOIY and “2”
until foodtemperaturereaches80”F.
10
2. At 80”F.,display switchesto
showmeat’sinternal temperature.
3. When youselect AutoRoast
Codes 1,2,3 or 4, the ovensignals
with 4 beeps and “Turn” flashing
on the display when it’stime to turn
the roast over.After youturn the
roast, close the door and touch
START.The remaining cooking
time counts down on the display.
(Note: Oven continues tocook after
the signal whether or not roast is
turned over.)
4. After apreprogrammed food
temperature isreached, ovenbeeps
4 times and “End” appears onthe
display.

Auto Roast Guide
● Use containers and coverings as directed at left. Place probe correctly in
roast before cooking.
● Recommended codes are also shown inside oven on Auto Roast guide.
Final ApproximateTime
Hold”
Food
CodeTemperature(minutesperpound)
Minutes
Beef
TenderRoast
Rare
1 115° 9-12 5
Medium 2
125° 10-14 10
Well 3
150°
14-18 10
Pork
LoinRoast
4 170°
14-17 10
PrecookedHam
1 115° 9-14 5
Poultry
WholeChicken(3lbs.) 5
175° 10-12 5-1o
TurkeyBreast 5
175° 15-18 20
(Insertprobehorizontally
intomeatiestarea.)
*Recommendedstandingtimebeforeserving,
Automatic Simmer Guide (Auto Roast Code 6)
Approx.
Food
Time/Hours Comments
Beef
Pot Roast
5-7 Addenoughliquidtojust covermeat.
If adding vegetables make sure they are ‘
completely covered by liquid.
Chili 5-8 Precook meat and drain well. Place probe
1inch from top surface. Stir after 3 hours,
if possible.
Chicken
Stewing 4-6 Add4 cups liquid. Insert probe into
meatiest area of inner thigh from below
end and parallel to leg. Turn over after
1/2of time.
Broiler/Fryer
3-4 Same procedure as above.
HamorPork
Roast 4-6 Add 4 cups liquid.
soup
Stock/Vegetable
7-1o Make sure that vegetables and meat are
covered by liquid. Stir every 3 hours.
Split Pea
5-7 Add enough liquid to cover peas at least
2 inches. Stir after 3 hours.
Automatic Simmer
(AutoRoast Code 6)
Set Auto Simmer like Auto
Roast as explained on page 10.
Display shows “COOL” until food
is 80”F., then switches to show
food temperature until 180”F.
Oven will hold at 180”F.,until you
turn off the ovenand remove the
food. If stirring is recommended,
you can reset ovenby retouching
START.Touch CLEAR/OFF after
cooking.
Totaltime includes time to bring
food to 180”F.and hold at that
temperature until done.
11

AutoDefrost
With the Auto Defrost feature,
the oven automatically sets the
defrosting times and power levels
for you.
Use the Auto Defrost guide on
page 13.Enter the Food Weightin
pounds and tenths of a pound (see
Conversion Guide at right). Then
touch STARTpad.
The oven calculates defrosting time
and changes power levels during
defrosting to give evendefrosting
results.
How to set Auto Defrost
Before you begin, check the guide
locatedatbottomofovenwhen you
open the door. It shows minimum
and maximum Food Weightsfor a
variety of foods. Youwill need to
know your Food Weightbefore
setting Auto Defrost.
1. Remove food from package,
place in oven on microwave-safe
dish and close door.
2. TouchAUTO DEFROST pad.
“LBS” and “DEF” are displayed
and “ENTER WEIGHT” flashes.
3. Enter weight. For example,touch
Number Pads 1and 2 for weight of
1.2pounds (1pound, 3 ounces. See
Conversion Guide at right.)
Display shows “1.2;’ “WEIGHT;’
“LBS” and “DEF?’After 4 seconds,
“DEF” is displayed and “1.2” is
replaced by “START” flashing.
4. Touch STARTpad. Display
showsDefrost Time counting down.
l%viceduring defrosting, the oven
beeps 4 times and “turn” flashes.
“Turn” flashes until you open the
door, attend your food (see guide
on next page), close the door and
touch START.
Stand Time
When using the Auto Defrost
feature, it is necessary to allow
meat to stand in order to finish
defi-ostingthe interior. Youmaytake
the meat out of the ovenif youwish.
Stand time recommendations are
given in the guide on the next page.
ConversionGuide
If weight of food is stated in
pounds and ounces, the ounces
must be converted to tenths (.1)
of a pound.
Ounces
Pounds
1-2 .1
3
.2
4-5 .3
6-7
.4
8 .5
9-1o
.6
11
.7
12-13 .8
14-15 .9
When defrosting time is completed,
“End” flashes and oven beeps 4
times. “End” remains on display
and ovenbeeps every minute until
door is opened or CLEAR/OFF
pad is touched.

AutoDefrost Guide
RECOMMENDED
MIN.-MAX.
FOODS
WEIGHT
xF~T SIGNAL
SECOND SIGNAL
STAND TIME
Meat
I I I I
Chops 0.1-2.0
Turn over, separate,
Separate and turn over. 5 to 10minutes
shield where necessary.
Shieldwhere necessary.
Frankfurters,
0.1-2.0
Turn over. Separate.
Separate and remove 5 to 10minutes
Sausage
defrosted
pieces.
Ground Meat
0.1-3.0
Remove defrosted Remove defrosted
I
5 to 10minutes
areas.
areas and break a~art.
Beef Patties
0.1-3.0
Separate. Turn over.
Separate and remove 5 to 10minutes
defrosted patties.
Roast 0.1-5.0 Turn over and shield if Turn over and shield if
60 to 90 minutes
necessary. necessary.
Lamb Roast
I
0.1-5.0
I
Turn over and shield if
I
Turn over. Shield
60 to 90 minutes
necessary. where necessary.
Ribs
0.1-3.0
Tbm over and Turn over and remove
5 to 10minutes
separate.
defrosted pieces.
Steak
I
0.1-2.0
I
Turn over and
I
Turn over. Shield.
I
5 to 10minutes
separate.
Stew 0.1-3.0
Turn over and
Separate and remove 5 to 10minutes
separate.
defrosted
pieces.
Poultry
I I I I
I
Whole Chicken 0.1-5.0
Turn over and shieldif Turn over and shield.
10to 15minutes;
necessary
run cold water in
cavity, if necessary.
Turkey Breast
I
0.1-5.0
I
Turn over and shieldif
I
Turn over and shield.
I
60 to 90 minutes
necessary.
Chicken Pieces 0.1-5.0 Turn over and shield if
Separate and remove
5 to 15minutes
I
I necessary.
I defrosted
pieces.
Cornish Hens 0.1-3.0
(whole)
Cornish Hens 0.1-3.0
(split)
Seafood
I
Fish Fillets
0.1-2.0
Shrimp, scallops
I
0.1-2.0
--t-
Thrn over and shield if
necessary.
Turn over and shield if
necessary.
Turn over.
Separate.
Turn over.
Turn over and shield.
10to 15minutes;
run cold water in
cavity, if necessary.
Turn over and shield.
I
5 to 10minutes
Separate and remove 5 to 10minutes
defrosted pieces.
Separate and remove
5 to 10minutes
defrosted pieces.
Turn over and shield
5 to 10
ITliIlUtf2S; hold
tail. under cold running
water, if necessary.
*Edges or thin areas of meat will defrost more rapidly than other areas. After first or second signal, shield warm areas
with small pieces of foil.
13

Manual Defrost
The Manual Defrost setting is
designed for speedy thawing of
frozen food and is one of the great
advantages of a microwaveoven.
Use the Manual Defrost setting to
quickly thaw foods such as bread,
rolls, vegetables, fruits and frozen
dinners. The Auto Defrost setting
is preferred for meat and poultry
becausethe ovensetsthe defrosting
time and power levels for you.
● Power level 3 is automatically set
for defrosting, but you may change
this for more flexibility.
● See your cookbook for
defrosting help.
Tobecome better acquainted with
the defrostfunction, defrosta 1O-OZ.
package of frozen strawberries by
following the steps below.
Step 1:Place package of frozen
strawberries in the oven and close
door. Be sure package contains
no metal.
step 2: TouchMANUAL DEFROST.
Display shows”: O“and “POWER
37 “ENTER DEF TIME” flashes.
Step 3: Select one half of the total
defrosting time recommended in
your cookbook. For example,
touch 4 and MIN pad for 4 minutes.
Displayshows “4:00” and “POWER
37 “DEF TIME” flashes.
How to Change Pbwer lkvel
After setting defrosting time,
touch POWER LEVEL pad,
then touch desired number for
new power level.
Step4: TouchSTAIW.“DEF TIME’‘
shows and time counts down on
display. When cycleis completed,
the oven signals and flashes “End~’
then automatically shuts off.
Step 5: Turn package over, close
door and repeat Steps 2 and 3 to set
remaining half of defrosting time
and touch START.
Step 6: When oven signals and
flashes “End~’open door, remove
package and separate strawberries
to finish defrosting.
Defrosting Tips
● Foods frozen in paper or plastic
can be defrosted in the package.
● For even defrosting, some foods
need to be broken up or separated
part of the waythrough the
defrosting time.
● Family-size, pre-packaged
frozen dinners can be defrosted
and microwaved. If the food is in
a foil container, transfer it to a
microwave-safedish.
● Check your cookbook for other
defrosting tips.
Questions and Answers
Q. When I press START,I hear a
dull, thumping noise. What is it?
A. This sound is normal. It is
letting you know the oven is using a
power level lower than 10(High).
Q. Can I defrost small items in
a hurry?
A. Yes,but they will need more
frequent attention than usual. Raise
the power level after entering the
time by touching the desired power
level pad. Power level 7 cuts the
total defrosting time about in 1/2;
power level 10cuts the total
defrosting time to approximately
1/3.During either, rotate or stir
food frequently.
Q. Why don’tthe defrosting
times in the cookbook seem right
for my food?
A. Cookbook times are averages.
Defrosting time can vary according
to the temperature in your freezer.
Set your oven for the time indicated
in your cookbook. If your food is
still not completely thawed at the
end of that time, reset your oven
and adjust the time accordingly.
Q. Should all foods be completely
thawed before cooking?
A. Some foods should not be
completely thawed before cooking.
For example, fish cooks so quickly
it is better to begin cooking while
it is still slightly frozen.
Q. Can I open the door during
defrosting to check on the
progress of my food?
A. Yes.Youmay open the door at
any time during microwaving. To ,
resume defrosting, close the door
and press START.The ovenbegins
operating if time is left on timer.
If not, reset timer.
14

How toUse the Double DutyTMShelf
● Do not store or c~k with
shelf on floor of oven. Product
damage mayresult.
● Use potholders when handling
metal shelf and cookware.
Theymay be hot.
● Do notstoremicrowave
browning dish on metal shelf.
The wire shelf is specifically
designed for added capacity heating
and reheating inyour microwave
oven. Nowmore than one foodmay
be heated or reheated and ready to
serve at the sametime.
When microwavingwith the oven
shelf, some techniques will differ
from thecookbook which came
with your oven. It is important to
arrange foodsproperly (shownon
the next page). Cookware sizeis
important; select from among the
suggestions below.Also, food size
should be considered; foods over
3% inches high, or 3pounds are not
recommended for shelf cooking.
Batters and dough foods and also
uncooked foods which need to be
prepared from scratch should be
cooked without the oven shelf,
following cookbook directions.
Cookware for Shelf
Heating and Reheating
Beforeplacing food in the dishes,
check to seethatthey will fittogether
on or under the shelf. Also, be sure
cookware is microwavesafe.
Cookware for heating or reheating
include 1cup measuring cup,
8x4x3-inch loaf dishes, 9x5x3-inch
loaf dishes or 9-inch pie plates.
Leftoversmaybe placed in small
individual ceramic or plastic bowls
or divided plates.
Use pot holders when handling
foods heated together with your
oven shelf, especially when heating
larger amounts of food. Extra steam
generated from multiple food
cooking may make cookware hotter
than with regular microwaving.
Use waxpaper or plastic wrap
instead oflids on casseroles. Lids
may add too much height to dish.
Positioning the Shelf
Toposition the DOUBLE DUTYTM
shelf, tip the back slightly and fit the
shelfsupportguidesonto the support
guides located on each side ofthe
oveninthe rear.
Next, lower the front until the shelf
support guides fitonto the support
guides located at each sideofthe
oveninthe front.
When properly positioned, the shelf
should fit snugly inplace, be level
and not touch theback or sidewall
ofthe oven.
If arcing occurs when using the
shelf to cook more than one food
at the same time, turn the oven
off. Make sure the shelf is
positioned right-side-up on all
four shelf supports and not
touching ovenwalls.

HOWtoUse the Double DutyTMShelf (co.tinu~)
HowtoHeat or Reheat
Similar Types of Fwd
Two plates of leftovers maybe
reheated together. Arrange thick
or dense foods to outside edges of
plate and cover with plastic wrap.
Microwaveat High (10)for 2 to 3
minutes. Reverse position of plates
(top to bottom) and rotate 1/2turn.
Continue microwaving at High (10)
for 2 to 3 minutes. Continue
heating, if necessary, until hot.
\l
Reheating two casseroles (height
should be less than 3%inches) is
possible. Cover with plastic wrap.
Use staggered arrangements of
food, placing food on right side of
shelf and left side of floor. Refer to
Heating or Reheating Guide in
cookbook for suggested microwave
time per casserole and add the times
together. Microwaveat High (10)
reversing position of foods (top to
bottom) after half of time. Several
small bowls of leftovers maybe
heated in the same way,stirring and
reversingpositions after half of time.
llvo frozen individual entrees
(5 to 7 oz. each) or two TV
dinnem (10to El oz. each) are
both ready to serve at the same
time. Remove trays of food from
their boxes and turn back one
comer of the plastic cover to vent.
If there are foil covers, remove
them and return the trays of food to
their boxes. (Batter foods should be
removed from the trays and cooked
conventionally.) Place in oven with
one TV dinner on right shelf and
the second dinner on left floor.
Microwave at High (10)for 8
minutes. Reverse positions (top to
bottom) and rotate foods 1/2turn.
Continue microwaving at High (10)
for 8 minutes. Check dinners for
heating. If one dinner seems less
done than desired, return it to the
box and continue heating on floor
1to 2 more minutes.
HowtoReheat Several
Different Types of Foods
T~ether
When heating severaldifferent
types of food together, foods which
should be served hot must be placed
on the ovenfloor, while foodswhich
areonly warmed shouldbe placed on
the shelf. This isbecause microwave
energy enters the ovenfrom the
bottom only. Also, it is important to
remember that foods absorb
microwaveenergy atdifferent rates.
Rates can be affectedbythe sizeof
the fbod, andits startingtemperature.
Because ofthe varying rates, you
mayneed to start reheating alarge
or dense food a fewminutes ahead
oftime, then add other smaller or
less dense foods. Alternately, if
one ofthe foods youare heating
seems undercooked but the others
are heated satisfactorily, letthe
underheated foodcontinue cooking.
Heat or reheat different types of
food at High (10).Todetermine
heating times, add times for all
foodstogether. (See heating guide
in cookbook.) After half oftime,
stir or rearrange foods (donot
reversepositions). Check foods
(especially those on ovenfloor)
after 3/4 oftotal time and remove
any which are done. Continue
cooking others.
I
I I
Place on floor, large or dense
foods which need the most heating,
such as leftoverfried chicken,
casseroles ofcanned or leftover
vegetables, rice or pasta. Place on
ovenshelf those foods which need
only be warmed, such asbakery
pies, rolls, muffins or breads.
I%ppopcorn on the microwave
oven floor only. Popcorn placed on
the ovenshelf will not pop properly.
Use a special microwavepopcorn
accessory or popcorn labeled for
use in microwaveovens.
16

Care and Cleaning
Yournew Microwave Oven is
a valuable appliance. Protect
it from misuse by following
these rules:
● Keep your oven clean and
sweet-smelling. Opening the oven
door a fewminutes after cooking
helps air-out the interior. An
occasional thorough wiping with a
solution of baking soda and water
keeps the interior fresh.
● Don’t use sharp-edged utensils
on your oven. The inside and
outside ovenwalls can be scratched.
The control panel can be damaged.
BE CERTAINPOWER IS OFF
BEFORE CLEANING ANY
PARTOF THIS OVEN.
Howto Cleanthe Inside
Walls and floor. Some spatters can
be removed with a paper towel,
others may require a damp cloth.
Remove greasy spatters with a
sudsy cloth, then rinse with a damp
cloth. Do not use abrasive cleaners
on oven walls. NEVER USE
A COMMERCIAL OVEN
CLEANER ON ANY PARTOF
YOUR MICROWAVEOVEN.
Door (inside). Window: Wipe up
spatters daily and wash when soiled
with a damp cloth. Rinse thoroughly
and dry.
Metal and plastic parts on door:
Wipe frequently with a damp
cloth to remove all soil. DO N~
USE ABRASIVES, SUCH AS
CLEANINGPOWDERSORSTEEL
AND PLASTIC PADS. THEY
WILL MAR THE SURFACE.
Special note when using
Brown ‘NSear Dish: If grease
is present, high heat generated on
bottom of a Brown ‘N Sear dish
may cause the grease to burn onto
the oven floor. This may be
removed with a cleanser such as
Bon Ami” brand cleanser.
After using Bon Ami@brand
cleanser, rinse and dry thoroughly,
following instructions on can. Do
not use Bon Ami” brand cleanser
on the painted surfaces such as the
walls. It may scratch the paint.
Automatic Temperature Probe.
Probe is sturdy, but care should be
taken in handling. Do not twist or
bend; avoiddropping temperature
probe.
Clean as soon afterusing aspossible.
Toclean, wipe with sudsy cloth,
then rub lightly with plastic scouring
ball if necessary. Rinse and dry. (Or
wash in dishwasher.)
DOUBLE DUTYTMshelf. Your
shelf accessory is designed for use
in a microwaveoven only; do not
use in a conventional oven. Do not
use a browning dish with the shelf.
Arcing could occur.
Clean shelf with mild soap and
water or in the dishwasher. Do not
clean shelf in a self-cleaning oven.
How to Clean the Outside
Case. Clean the outside of your
oven with soap and damp cloth,
rinse with damp cloth and then dry.
Wipe the window clean with a
damp cloth. Chrome trim is best
wiped with a damp cloth and then
with a dry towel.
Control Panel. Wipe with a damp
cloth. Dry thoroughly. Do not use
cleaning sprays, large amounts of
soap and water, abrasives, or sharp
objects on the panel—they can
damage it.
Door Surface. When cleaning
surfaces of door and oventhat
come together on closing the door,
use only mild, nonabrasive soaps
or detergents applied with a sponge
or soft cloth.
Power Cord. If the cord becomes
soiled, unplug and wash with damp
cloth. For stubborn spots, sudsy
water may be used, but be certain
to rinse with damp cloth and dry
thoroughly before plugging cord
into outlet.
Oven Lamp Replacement
First unplug the oven. Then remove
lampcompartmentcoverbyremoving
screw which holds cover in place. -
Cover is located on the side ofthe
outer case.
Replacewith 20-wattappliancebulb.
(It is availablein drug and hardware
stores.) Replace compartment
cover. Plug in the oven.

ailllb
Questions?
~ Use
This Problem Solver
I PROBLEM I POSSIBLE CAUSEAND REMEDY
I
All These Things AreNormal
with yourMicrowaveOven:
● Steam or vapor escaping from
around the door.
. Light reflection around door or
outer case.
● Dimming ovenlight andchange
in blower sound mayoccur while
operating at powerlevels other
than high.
● Dull thumping sound while oven
is operating.
If you need more help.. call, toll free:
GE Answer CenteP
8006242000
consumer information service
● some Tv.~&o interference
might benoticed while using your
microwaveoven. It’ssimilar tothe
interference caused by other small
appliances and does not indicate a
problem with your oven.
18

GROUNDING INSTRUCTIONS
This appliance must be grounded.
In the event of an electrical short
circuit, grounding reduces the risk
of electric shock by providing an
escape wire for the electric current.
This appliance is equipped with a
power cord having a grounding
wire with a grounding plug. The
plug must be plugged into an outlet
that is properly installed and
grounded. (Fig. 1)
WARNING-ImproPer
use of the grounding plug can-result
in a risk ofelectric shock.
PREFERRED
METHOD
n
Q
@lQ
‘\
%
H/
‘a
--h
f-l
INSUREPROPER
GROUNDEXISTS
Fig. 1
BEFOREUSE
Consult a qualified electrician or
service technician if the grounding
instructions are not completely
understood, or if doubt exists as to
whether the appliance is properly
grounded.
Where a standard two-prong wall
receptacle is encountered, it is
your personal responsibility and
obligation to haveit replaced with
a properly grounded three-prong
wall receptacle.
Do not under any circumstances
cut or removethe third (ground)
prong from the power cord.
Use of AdapterPlugs
Usage situations where
appliance’spowercord will
be disconnected infrequently.
Because of potential safety hazards
under certain conditions, we
strongly recommend against the
use of an adapter plug. However,
if you still elect to use an adapter,
where local codes permit, a
TEMPORARY CONNECIYON
maybe made to a properly grounded
two-prong wall receptacle by the
use of a UL listed adapter (Fig. 2)
which is available at most local
hardware stores.
TEMPORARYMETHOD
(ADAPTERPLUGSNOT
PERMITTEDINCANADA)
ALIGNLARGE
PRONGS/SLOTS
INSUREPROPER
GROUNDAND
FIRMCONNECTIO’
Fig. 2
BEFOREUSE
The larger slot in the adapter must
be aligned with the larger slot in
the wall receptacle to provide
proper polarity in the connection
of the power cord.
Caution: Attaching the adapter
ground terminal to the wall
receptacle cover screw does not
ground the appliance unless the
cover screw is metal, and not
insulated, and the wall receptacle
is grounded through the house
wiring. Youshould have the circuit
checked by a qualified electrician
to make sure the receptacle is
properly grounded.
When disconnecting the power
cord from the adapter, alwayshold
the adapter with one hand. If this
is not done, the adapter ground
terminal is very likely to break with
repeated use. Should this happen,
DO NOI’ USE the appliance until
a proper ground has again been
established.
Usage situations where
appliance’spowercord will
be disconnected frequently.
Do
not usean adapterplug inthese
situations because disconnecting of
the power cord places undue strain
on the adapter and leads to eventual
failure of the adapter ground
terminal. Youshould have the
two-prong wall receptacle replaced
with a three-prong (grounding)
receptacle by a qualified electrician
before using the appliance.
Use of ExtensionCords
1. A short power-supply cord is
provided to reduce the risks
resulting from becoming entangled
in or tripping over a longer cord.
2. Longer cord sets or extension
cords are available and may be used
if care is exercised in their use.
3. If a long cord or extension cord
is used, (1)the marked electrical
rating of the cord set or extension
cord should beat least as great as
the electrical rating of the appliance,
(2) the extension cord must be a
grounding-type 3-wire cord, and
(3) the longer cord should be
arranged so that it will not drape
over the countertop or tabletop
where it can be pulled on bychildren
or tripped over accidentally.
If you do use an extension cord
with your microwave oven, the
interior light may flicker and the
blower sound may vary when oven
is in use. Cook times maybe longer
as well.
19

MicrowaveOven Installation Instructions
for Under Cabinet Mounting
/