Epson C11C686201 User manual
- Category
- Multifunctionals
- Type
- User manual
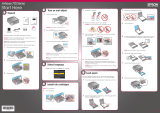
The Epson C11C686201, a versatile all-in-one printer, is designed to meet your printing, scanning, and copying needs with ease. Equipped with Epson's advanced inkjet technology, it delivers crisp and vibrant prints with remarkable clarity and detail. Its intuitive user interface and seamless wireless connectivity make it a breeze to operate and connect to your devices. From everyday documents to stunning photos, this all-in-one printer offers reliable performance for a wide range of tasks.
The Epson C11C686201, a versatile all-in-one printer, is designed to meet your printing, scanning, and copying needs with ease. Equipped with Epson's advanced inkjet technology, it delivers crisp and vibrant prints with remarkable clarity and detail. Its intuitive user interface and seamless wireless connectivity make it a breeze to operate and connect to your devices. From everyday documents to stunning photos, this all-in-one printer offers reliable performance for a wide range of tasks.


-
 1
1
-
 2
2
-
 3
3
-
 4
4
-
 5
5
-
 6
6
-
 7
7
-
 8
8


Epson C11C686201 User manual
- Category
- Multifunctionals
- Type
- User manual
The Epson C11C686201, a versatile all-in-one printer, is designed to meet your printing, scanning, and copying needs with ease. Equipped with Epson's advanced inkjet technology, it delivers crisp and vibrant prints with remarkable clarity and detail. Its intuitive user interface and seamless wireless connectivity make it a breeze to operate and connect to your devices. From everyday documents to stunning photos, this all-in-one printer offers reliable performance for a wide range of tasks.
Ask a question and I''ll find the answer in the document
Finding information in a document is now easier with AI
Related papers
-
Epson Stylus Photo RX680 Operating instructions
-
Epson Stylus WorkForce 30 User manual
-
-
Epson 50 - Artisan 50 - Printer Installation guide
-
Epson Stylus Pro 3800 Portrait Edition Operating instructions
-
Epson Stylus Pro 3880 Inkjet Printer Designer Edition Operating instructions
-
Epson Perfection Operating instructions
-
Epson V200 - Perfection Photo Operating instructions
-
-