BrickHouse Security ADC-V722W Owner's manual
- Category
- WLAN access points
- Type
- Owner's manual
This manual is also suitable for

WHEN YOU NEED TO KNOW.
MORzA Observa Hidden Camera
Setup Guide

2
MORzA Observa Hidden Camera
Thank you for purchasing the MORzA Observa Hidden Camera. You are now ready to log onto BrickHouse Security’s
intuitive online platform and stream your video, as well as experience the wealth of other customizable features unique
to MORzA Video Monitoring.
An email was sent containing your login and password information (subject: “BrickHouse Security MORzA Video
Services - Login and Password”). Locate this email, and then visit www.brickhousesecurity.com, hover over Login in
the upper right corner of the homepage and select MORzA Video from the dropdown menu; this will bring you to your
account login. Once you log in you will be able to configure your camera online and customize your settings right
from your PC.
In the Box:
• MORzA Observa Hidden Camera
• WiFi Antenna
• Camera Mounting Bracket
• Screws
• AC Power Adapter
• Network Cable
• User’s Setup Guide

3

4
Before You Begin
In this guide, you’ll learn the fundamental information required to get your MORzA Observa Hidden Camera online
and operational. In the following pages we’ll illustrate the proper use and installation of the following MORzA Observa
Hidden Camera components:
• WiFi Antenna
• Network Cable
• AC Power Adapter
• Mounting Bracket
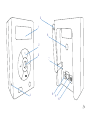
1. Speaker (inactive)
2. Speaker Buttons (inactive) & Invisible IR’s
3. Camera Lens
4. WPS Button
5. Antenna
6. Mount Bracket
7. Reset Button
8. Power
9. Ethernet
10. Alarm Inputs

5
1
2
3
4
5
6
7
8
9
10

6
Installation Requirements
• Internet Service: Broadband (Cable, DSL, or Fiber Optic).
• A Wireless Router with a WiFi Protected Setup (WPS) button or an open ethernet cable connection port.
• Personal Computer (Desktop/Laptop/Tablet) connected to the same network.
• Login/Password for MORzA Video Monitoring services.
• If your router does not have a WPS button and the camera will be connected to a wireless network, you will then
need the case-sensitive SSID (wireless network name) and the Network encryption WEP key (if encryption is
enabled at the router).
Getting Started - Installation
Step 1: Connect the camera’s AC power adapter and plug it into a non-switched outlet.
Step 2: Make sure you are on a computer that will be on the same network as the camera, log into your account
at www.brickhousesecurity.com. Hover over Login in the upper right-hand corner of the page and click on
“MORzA Video” within the drop-down menu.
Step 3: Enter your username and the temporary password provided in your confirmation email.
Step 4: Read and agree to the term and conditions.
Step 5: You will then be prompted to change your password and select a security question. Press Submit when done.
Step 6: Confirm your email address (recommended).
You are now logged in to your MORzA Video Account.

7

8
Conguring Your Camera
Step 1: In the Live Video tab, click where it says “Click here to add a camera to this account.”
Step 2: Using a paper clip, press and hold the camera’s WPS button located on the side of the device for 3
seconds and then firmly press the corresponding WPS button on your router to sync the two devices.
Note: If the router does not have a WPS button or if you have trouble connecting, use the included standard Ethernet
cable to connect the camera to the network router.
Step 3: Within the Settings tab, first select Video Device Settings. Then, highlight the New Camera field and
click Continue.
Step 4: Device Naming - Set a name for your MORzA Observa camera and click Continue. It is best to label your
camera so it corresponds to its location (ie. Living Room, Office, Cash Register).
Step 5: Wait while your camera configures to your network.
Once the camera is done configuring, you can set up your WiFi connection or remain connected via the ethernet
network cable.

9

10
Follow these steps to congure your WiFi connection
Step 1: Under the Settings tab, select the Video Device Settings option to enter the EZinstall™ Device Setup Wizard.
Select “Yes” - Setup the wireless connection now.
Step 2: Select “Scan for wireless networks”; choose your network and enter your secured password or encryption key
and then select continue.
Step 3: WiFi Settings are now saved to your Observa Camera. Unplug your camera and remove the ethernet cord.
Plug your AC power adapter cord back into the device.
Step 4: Select the Live Video tab. Your MORzA Observa Camera is now live.

11

12
Settings
Within the MORzA Video Monitoring platform you’re able to customize a number of recording settings, including:
Recording Schedules:
Customize a time & date schedule for video recording based on motion detection. You will also be able to select how
you will receive notifications on detected activity. Format Video Alert settings options to receive notifications through
email or SMS.
Video Device Settings:
Within the Video Device Settings tab, view device information, delete a camera, view live video, adjust motion
detection, create windows to monitor specific areas and much, much more.

13

14
Notications Tab
The Notification tab lets you configure who receives alerts, how they receive them, and when. Create notifications for
system events based on video detection or monthly video upload quotas.
Address Book:
The Address Book screen allows you to view, edit, and delete names and addresses in your address book.
Name:
The name of the contact, listed first name, then last name. Click on the name to edit contact information for that
person. (To edit the primary phone number and email address for the account holder (master user), click on the
Profile tab then Account Info).
Contact Information:
The phone number or e-mail address where the person can be contacted.
Notifications:
This column gives the current status for each address in your address book. To pause or activate notifications to a
specific address, click Active or Paused to toggle the status.
Click the Delete link corresponding to a contact to remove a person’s name and addresses from your address book.

15
Prole Tab
Manage Logins:
Create additional logins that can access this account through the website or mobile app. You have control to limit
access and permissions by login.
Login Information and Settings:
Change password, choose a new login name and change current email address.
Account Information:
Use this screen to manage your account information. Your mailing address may differ from your system address, which
is the location where the system is installed.
System Information:
Use this screen to manage system information, including system name, address and time zone. The system address is
the location where the system is installed.
Multi-System Access:
If you have access to more than one system (e.g., home, office, and vacation rental; or multiple store branches), you
can enable the current login (ex. GuestVideo-Demo) to have access to all of them. To add a system to your current
login, enter the login and password for that system and click Submit. You can add one login/account at a time, and
repeat the process for multiple accounts.
For more technical assistance please go to http://help.brickhousesecurity.com or call (866) 952 5276.
Video Monitoring is only one component of the wealth of services MORzA offers. Protect your property with a fully
monitored MORzA Home Security System, and take remote control of your home’s lighting, heating and appliances
with MORzA Home Automation. And, when you combine service, you’re guaranteed monthly savings.
Call 866-952-5276 for more information.

WHEN YOU NEED TO KNOW.
www.brickhousesecurity.com
-
 1
1
-
 2
2
-
 3
3
-
 4
4
-
 5
5
-
 6
6
-
 7
7
-
 8
8
-
 9
9
-
 10
10
-
 11
11
-
 12
12
-
 13
13
-
 14
14
-
 15
15
-
 16
16


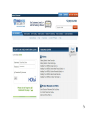
BrickHouse Security ADC-V722W Owner's manual
- Category
- WLAN access points
- Type
- Owner's manual
- This manual is also suitable for
Ask a question and I''ll find the answer in the document
Finding information in a document is now easier with AI
Related papers
-
BrickHouse Security 4G LTE Eon 4 Long Life GPS Tracker for Covert Monitoring of Teen Drivers, Kids, Elderly, Employees, Assets, Warehouse, Tracks Indoor and Outdoor User guide
-
-
-
-
-
-
-
-
-
Other documents
-
 Frontpoint PREMIUM INDOOR CAMERA Get Started
-
Alarm.Com PanelKit Installation guide
-
-
Dell Latitude 5300 2-in-1 Chromebook Enterprise Owner's manual
-
Amcrest IP2M-841 User manual
-
Amcrest 862571 User manual
-
-
Kguard QRT-301 PanTilt IP camera User manual
-
Lorex LIVE Ping User guide
-
Swann SwannEye HD User manual
