mode
reset
ente
r
lap start/stop
QUICK START GUIDE
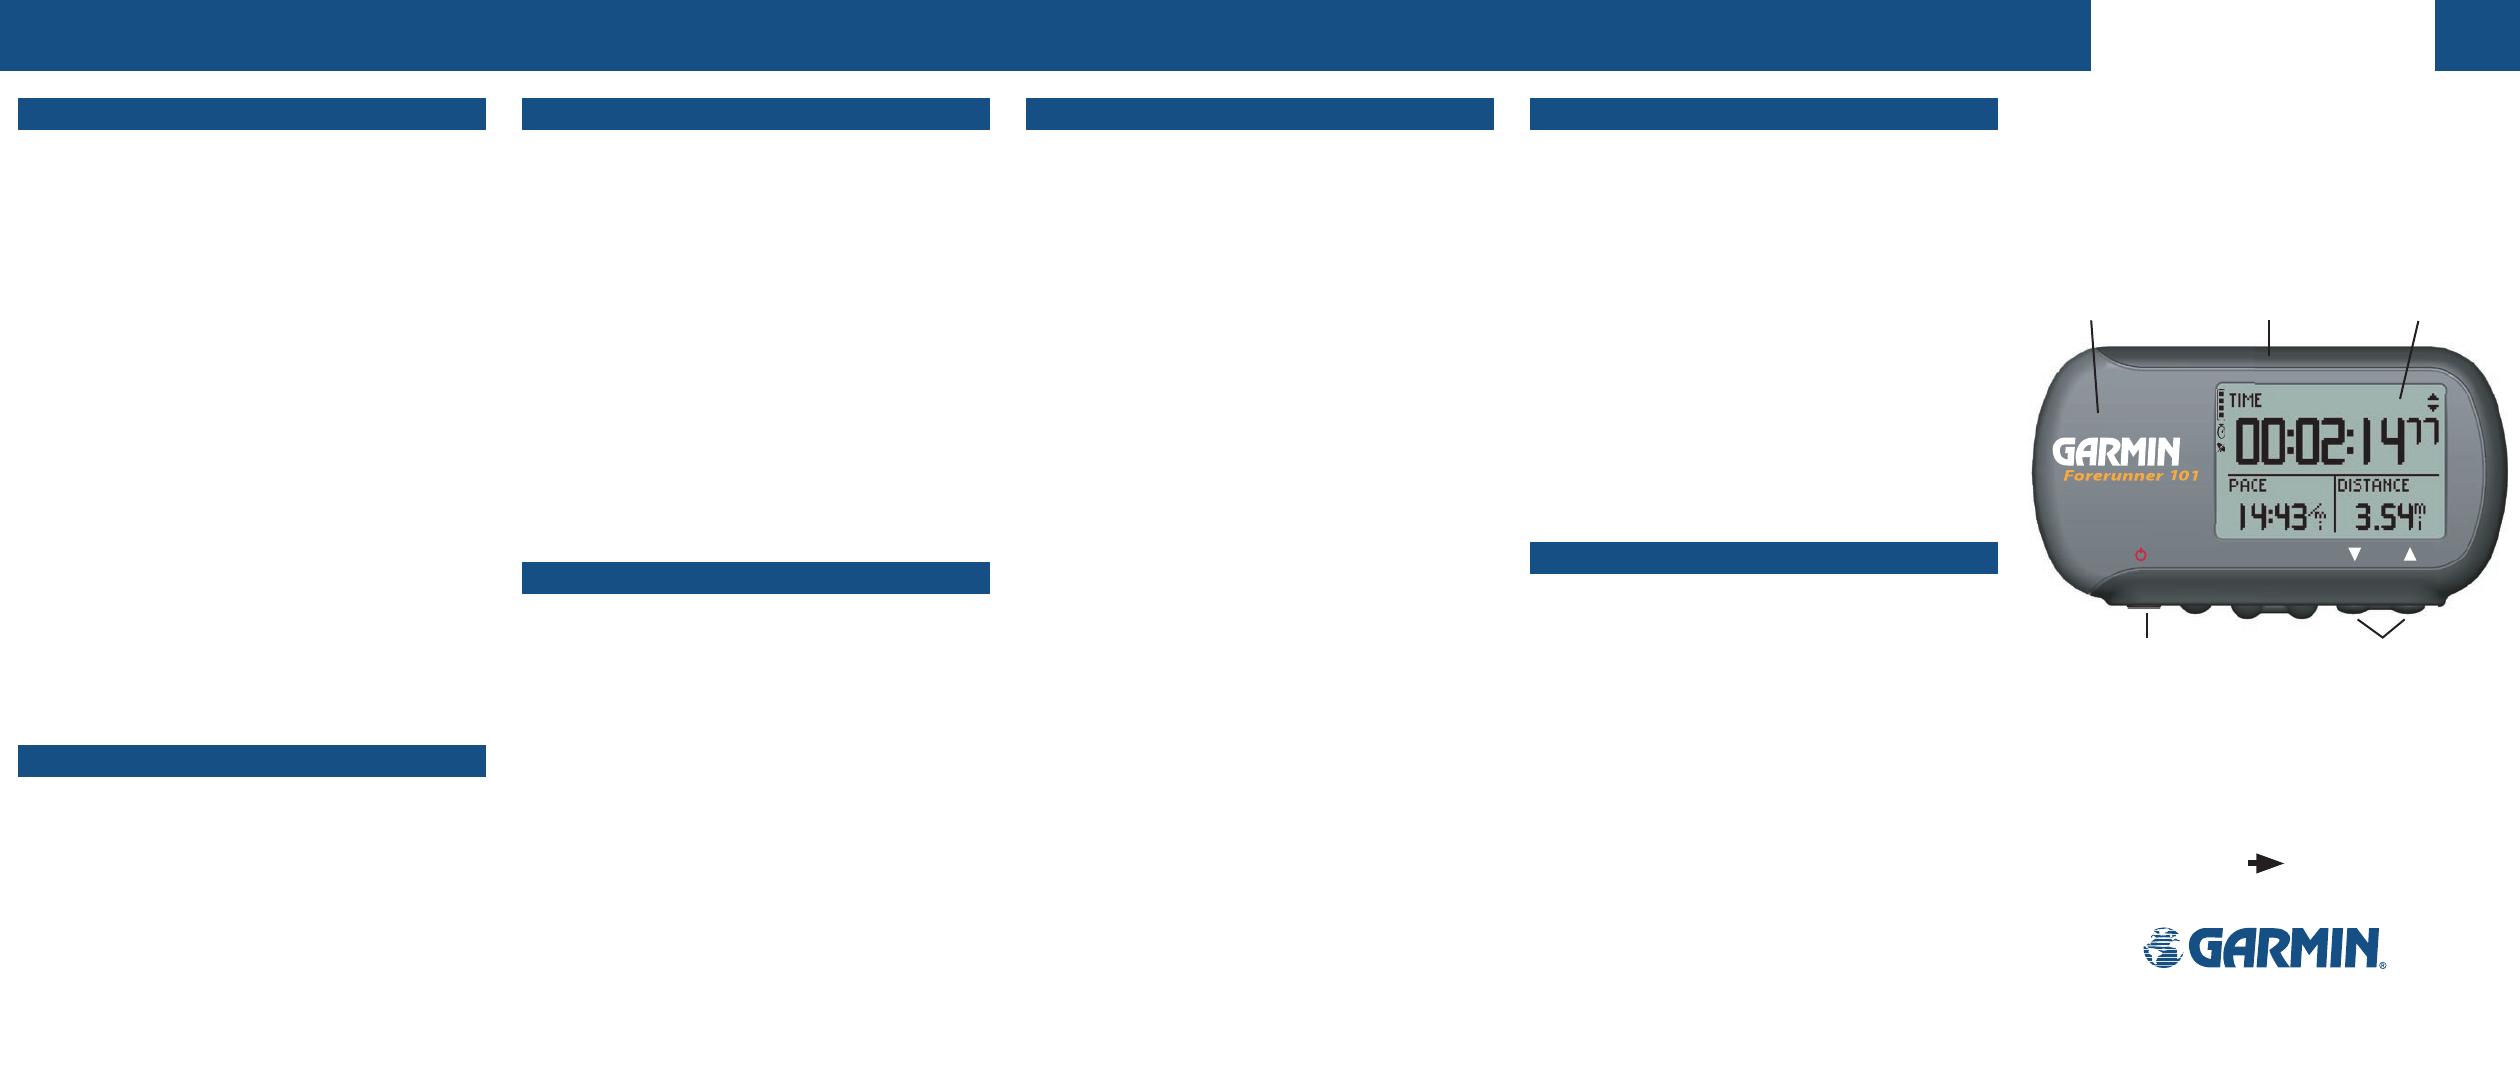
Forerunner 101 Features
Begin your Workout
After completing all of the steps on the other side of this Quick
Start Guide, you are now ready to start working out with your new
Forerunner 101. The remainder of this guide explains the basic
features and functions of the Forerunner.
To Begin your Workout:
1. Press MODE to switch to the Timer Mode, which displays three
large numeric data fields.
2. Press and hold
RESET for three seconds to reset the data fields,
then press START/STOP to start the timer and begin your work-
out of running, walking, jogging, biking, etc.
3. The
Timer Screen displays your current workout ‘TIME’, ‘PACE/
SPEED’, and ‘DISTANCE’.
4. Press
the UP/DOWN buttons to view the Lap Screen that dis-
plays your current ‘LAP TIME’, ‘LAP PACE’, and ‘LAP DISTANCE’.
Press the RESET/LAP button to complete and log a lap. You can
also set up your Forerunner to automatically log laps at speci
-
fied intervals. Refer to the Auto Lap section for more informa-
tion.
5. Press
STOP/START at any time during your workout to pause
the timer. Press
STOP/START again to resume the timer. You
can also set up your Forerunner to automatically pause and
resume at specified speeds. Refer to the Auto Pause section for
more information.
6. When you have completed your workout, press
START/STOP to
stop the timer.
Review your Performance History
To Review your Performance History:
1. Press MODE to display the Menu Mode.
2. Select ‘HISTORY’ and press
ENTER.
3. Select ‘HISTORY TOTALS’ and press
ENTER.
The Forerunner displays your total workout distance, time, and
calories burned. As you perform more workouts with the Forerun-
ner, you will be able to view more detailed performance data that
is automatically organized into day and week views. For complete
information, refer to your Owner’s Manual.
Forerunner 101 Features
Auto Pause
®
The Forerunner tracks your pace and speed while you are work-
ing out. The steps below assume that you want the timer to pause
when you stop walking then resume when you continue walking.
To Set the Timer for Auto Pause:
1. Press MODE to display the Menu Mode.
2. Select ‘TRAINING ASSISTANT’ and press
ENTER.
3. Select ‘AUTO PAUSE/LAP’ and press
ENTER.
4. Select ‘AUTO TIMER PAUSE’ and press
ENTER. Then select ‘ON’
and press ENTER.
5. Select ‘PAUSE WHEN’ and press
ENTER. Then select ‘STOPPED’
and press ENTER.
The next time you begin your workout the Forerunner will
automatically start and stop the timer. An extra data screen is added
in the Timer Mode to display your ‘REST TIME’, ‘REST DISTANCE’
if configured to pause while you walk at a low speed, and ‘TOTAL
DISTANCE’.
Auto Lap
®
The Forerunner tracks the distance you have traveled during
your workout. You can program the Forerunner to automatically
keep track of your laps. The example below assumes you want the
Forerunner to automatically lap every mile.
To Set Auto Lap:
1. Press MODE to display the Menu Mode.
2. Select ‘TRAINING ASSISTANT’ and press
ENTER.
3. Select ‘AUTO PAUSE/LAP’ and press
ENTER.
4. Select ‘AUTO LAP TRIGGER’ and press
ENTER. Then select ‘ON’
and press ENTER.
5. Select ‘LAP DISTANCE’ and press
ENTER. Then select ‘1 MILE’
and press ENTER.
The next time you begin your workout the Forerunner automati-
cally logs your laps so you do not need to press the LAP button.
Every time you complete one mile, the Forerunner notifies you with
a beep and displays the lap completion time. Lap-related perfor-
mance data is stored in the Forerunner for later review.
Forerunner 101 Features
Virtual Partner™
The Virtual Partner (Goal Oriented Training Feature) allows
you to have fun while keeping you motivated and focused on your
performance goals. The steps below assume your goal is to run five
miles in one hour.
To Setup your Virtual Partner:
1. Press MODE to display the Menu Mode.
2. Select ‘TRAINING ASSISTANT’ and press
ENTER.
3. Select ‘VIRTUAL PARTNER’ and press
ENTER.
4. Because you have distance and time goals, select ‘SET DIS
-
TANCE & TIME’ and press
ENTER.
5. Select ‘DISTANCE’ and press
ENTER. Then select ‘5 MILE’ and
press ENTER.
6. Select ‘TIME’ and press
ENTER. Then select ‘1 HOUR’ and press
ENTER.
7. The PACE/SPEED to achieve your goal is computed and dis
-
played for you. If the goals do not seem realistic to you, revise
your distance and time settings.
8. Select ‘DONE’ and press
ENTER.
After you have set up your Virtual Partner, a Virtual Partner
Mode (showing two people resting at the starting line, the bottom
person being you) is added to the Forerunner. When you are ready
to begin your workout with your Virtual Partner, press START/
STOP.
On the Virtual Partner Screen, the Forerunner uses visual and
numeric data to tell you whether you are ahead of your partner or
behind. By simply pacing yourself and keeping up with the Virtual
Partner, you will stay motivated to complete your training goals.
During the workout, you can press UP/DOWN to access other
information such as ‘DISTANCE TO GO’ and ‘TIME TO GO’. At the
end of the workout, the Forerunner displays your report card!
To stop the Virtual Partner training, select ‘END PARTNER RUN’
from the ‘TRAINING ASSISTANT’ menu and press ENTER.
Forerunner
®
101
Forerunner 101 Features
Other Features
By this time you should be familiar enough with the basic opera-
tional concepts of the Forerunner to explore other features. Below is
a summary of features found in the Menu Mode:
History Menu shows you detailed lap performance in day or
week view or history totals.
Training Assistant Menu contains training features mentioned
earlier in this sheet, as well as interval training, fast/slow pace/speed
alarm, time alarm, and distance alarm.
Navigation Menu allows you to mark and save you current
location, find a stored location, and guide you back to a stored loca-
tion or your starting point. It also allows you to add a map mode
that plots your breadcrumb trail on the screen.
Settings Menu allows you to personalize your Forerunner by
entering your body weight, pre-setting your workout pace, custom-
izing the data screen, and more.
A Note About Forerunner 101 History
The Forerunner is a completely self-contained, performance
tracking device. All lap data is automatically saved in the unit
history for future viewing. The device saves up to two years of
workout history.
Step-by-Step Instructions
to Get You Started
(Turn this page and begin with Step 1)
*Flip this Quick Start
Guide over for a
detailed explanation
of the Forerunner 101
buttons.
Waterproof
Case
LCD Display
(with Backlight)
Built-in GPS
Antenna
Power Button
(Backlight)
Up/Down
Buttons
© 2004–2006 Garmin Ltd. or its subsidiaries
Garmin International, Inc. 1200 E. 151st St., Olathe, KS 66062 USA
Part Number 190-00317-01 Rev. B

