Page is loading ...

4.1 CONSULTER LE JOURNAL
l Appuyer sur ou pour accéder au journal des appelants, le
dernier appel reçu apparaît en premier.
l Utiliser ensuite les mêmes touches ou pour passer en
revue l’ensemble du journal. Lorsque vous êtes en début ou en fin de liste
l’afficheur vous l’indique : "DEBUT/FIN".
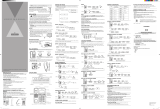
Quand vous consultez le journal, l’afficheur indique :
4.2 APPELER UN NUMERO DU JOURNAL
l Décrocher le combiné.
l Appuyer sur ou pour accéder au numéro souhaité.
l Appuyer sur pour lancer l’appel.
ou, si vous consultez le journal tandis que le combiné est raccroché :
l Appuyer sur ou pour accéder au numéro souhaité.
l Appuyer sur pour lancer l’appel. Comme indiqué sur l’afficheur, le
combiné doit être décroché dans les 10 secondes.
4.3 EFFACER UN NUMERO DU JOURNAL
Quelle que soit la façon dont vous consultez le journal, combiné décroché
ou raccroché :
l Appuyer sur ou pour accéder au numéro souhaité.
l Appuyer sur pour effacer le numéro apparaissant à l’écran.
! Attention : L’effacement est immédiat.
4.4 EFFACER TOUS LES NUMEROS DU JOURNAL
Là encore, quelle que soit la façon dont vous consultez le journal, combiné
décroché ou raccroché :
l Appuyer sur ou pour accéder au journal.
l Appuyer quelques secondes sur jusqu’à ce que l’afficheur indique :
"TOUT EFFACER ?"
l Pour confirmer l’effacement appuyer de nouveau sur .
ou
l Pour annuler l’effacement appuyer sur ou ou ou .
4.5 COPIER DANS LE REPERTOIRE UN NUMERO DU
JOURNAL
l Décrocher le combiné.
l Appuyer sur ou pour consulter le journal et accéder au
numéro souhaité.
l Appuyer sur pour rentrer en mode programmation.
l Saisir le numéro de mémoire à attribuer (de 0 à 9).
l Valider en appuyant sur .
l Raccrocher le combiné.
4.6 SORTIR DU JOURNAL DES APPELS
A tout moment, pour sortir du journal des appels, appuyer 2 fois sur .
5. PERSONNALISER VOTRE TELEPHONE
En appuyant sur la touche , l’afficheur vous invite à utiliser les touches
ou pour faire défiler les possibilités de réglages suivants :
- Mettre à jour l’heure et la date.
- Choisir la langue de l’afficheur.
- Régler le contraste lumineux de l’écran.
- Sélectionner le temps de flashing.
- Paramétrer le mode de numérotation.
Lorsque l’option qui vous intéresse s’affiche, valider votre choix en appuyant
de nouveau sur .
Si vous souhaitez sortir du menu de réglage, choisissez la dernière option :
"SORTIR REGLAGES".
5.1 METTRE A JOUR L’HEURE ET LA DATE
La mise à jour de la date et de l’heure se fera automatiquement à la
réception du premier appel si vous êtes abonné au service "Présentation du
numéro". Vous pouvez aussi effectuer le réglage manuellement :
l Appuyer sur et utiliser les touches ou jusqu’à ce que
l’écran indique : "DATE/HEURE".
l Accéder au sous-menu en appuyant de nouveau sur , l’heure clignote.
l Appuyer sur pour faire défiler les choix possibles.
l Appuyer sur pour confirmer et passer au réglage des minutes.
l Procéder de la même façon : pour sélectionner une valeur et
pour valider et passer au réglage suivant (jour et mois).
l Valider en appuyant sur , lorsque la mise à jour de la date et de l’heure
est terminée.
Si vous avez enregistré une mauvaise date (30 février par exemple),
"ERREUR" apparaît à l’écran. Vous pouvez alors recommencer le réglage du
jour et du mois.
2. TELEPHONER
2.1 RECEVOIR UN APPEL
Pendant la phase de sonnerie et si vos piles sont chargées correctement, le
voyant rouge du combiné clignote et vous signale l’arrivée d’un appel si
vous avez coupé la sonnerie.
l Pour prendre l’appel, décrocher le combiné.
2.2 REGLER LA SONNERIE
l Déplacer le curseur situé sur le côté de la base. Vous disposez de
3 niveaux sonores : haut ( ), faible ( ) et sonnerie coupée ( )
(l’indicateur lumineux signalera l’arrivée d’un appel)
.
2.3 EMETTRE UN APPEL
l Prendre la ligne en décrochant le combiné. Le chronomètre se met en
route.
l Numéroter.
l Raccrocher en fin de communication en reposant le combiné sur sa base.
2.4 REGLER LE VOLUME DE L’ECOUTEUR
En cours de conversation,
l Déplacer le curseur situé sur le côté du combiné .
Vous disposez de 3 niveaux sonores : haut, moyen, faible.
2.5 RAPPELER LE DERNIER NUMERO COMPOSE (BIS)
l Décrocher le combiné.
l Appuyer sur .
"
Le dernier numéro composé (numérotation manuelle ou répertoire) est
automatiquement appelé.
2.6 COPIER DANS LE REPERTOIRE LE DERNIER NUMERO
COMPOSE
l Décrocher le combiné.
l Appuyer sur pour rentrer en mode programmation.
l Saisir le numéro de mémoire à attribuer (de 0 à 9).
l Valider en appuyant sur .
l Appuyer sur .
l Valider en appuyant sur .
l Raccrocher le combiné.
3. LE REPERTOIRE
Temporis 08 vous permet d’accéder rapidement à l’un de vos 10 numéros
préférés. L’étiquette autocollante livrée avec votre poste vous permet de les
identifier, vous pouvez la coller sur la base sur l'emplacement prévu à cet
effet, au-dessus du compartiment à piles.
3.1 MEMORISER UN NUMERO
l Décrocher le combiné.
l Appuyer sur pour rentrer en mode programmation.
l Saisir le numéro de mémoire à attribuer (de 0 à 9).
l Valider en appuyant sur .
l Composer le numéro de téléphone à mémoriser, 16 chiffres maximum.
Pour insérer une pause, appuyer sur . En cas d’erreur, appuyer sur
pour effacer un chiffre.
l Valider en appuyant sur .
Nota : Pour copier dans le répertoire un numéro du Journal des
appelants ou le dernier numéro composé, reportez-vous aux
paragraphes 4.5 et 2.6.
3.2 EFFACER UN NUMERO DU REPERTOIRE
l Décrocher le combiné.
l Appuyer sur pour rentrer en mode programmation.
l Saisir le numéro de mémoire à supprimer (de 0 à 9).
l Effacer par un appui long (3 secondes) sur .
3.3 APPELER A PARTIR DU REPERTOIRE
l Décrocher le combiné.
l Appuyer sur pour accéder au répertoire.
l Saisir le numéro de mémoire à appeler (de 0 à 9).
ou, lorsque le combiné est raccroché :
l Appuyer sur .
l Appuyer sur ou pour faire défiler les numéros du répertoire,
lorsque le numéro désiré s’affiche.
l Appuyer sur pour lancer l’appel. Comme indiqué sur l’afficheur, le
combiné doit être décroché dans les 10 secondes.
4.
CONSULTER LE JOURNAL DES APPELANTS *
Avec un abonnement auprès de votre opérateur au service "Présentation du
Nom" ou "Présentation du Numéro", votre téléphone vous donne accès à la
liste des 75 derniers appels reçus (répondus ou non répondus). Vous savez
ainsi qui a appelé en votre absence, vous pouvez aussi décider de prendre
l’appel ou non avant de décrocher et, si vous êtes en plus abonné au service
"Signal d’appel", vous pourrez voir qui cherche à vous joindre tandis que
vous êtes déjà en ligne.
Lorsque le combiné est raccroché l’afficheur indique :
-"BIENVENUE" : aucun appel n’est resté sans réponse.
-"1 NOUV. APPEL" ou "X NOUV. APPELS": 1 ou plusieurs appels non
répondus sont enregistrés dans le journal. Le voyant lumineux situé
sur le dos du combiné clignote. Lors de la consultation du journal, le
pictogramme (pour nouveau) sera associé au numéro de votre
correspondant.
-"1 APPEL" ou "XX APPELS" : 1 ou plusieurs appels déjà consultés sont
enregistrés dans le journal.
1. PREMIERE UTILISATION
1.1 RECOMMANDATIONS
- Ne pas exposer le téléphone à la lumière du soleil ou à une température
excessive.
- Température de fonctionnement comprise entre + 5°C et + 40°C.
- Votre téléphone doit être installé à au moins 1 mètre d’un équipement
radio de type télévision, téléphone cellulaire, etc.
Attention : Ne jamais mettre l’appareil au contact de l’eau. Utilisez un
chiffon humide pour nettoyer votre téléphone. Ne jamais
employer de solvants (trichloréthylène, acétone …) susceptibles
d’endommager les surfaces plastiques, ne jamais vaporiser de
produits nettoyants.
En cas d’orage, il est recommandé de ne pas se servir du téléphone.
1.2 INSTALLATION
Votre téléphone Temporis 08 se compose :
- d'un socle et d'un combiné,
- d'un cordon spiralé et d'un cordon téléphonique,
- d'une étiquette pour les numéros mis en mémoire.
1. Connecter le cordon spiralé à l’extrémité du combiné et à la prise située
sur le devant de la base.
2. Connecter le cordon téléphonique à la prise située sous la base et passer
le fil dans la rainure prévue à cet effet. Brancher l'autre extrémité du
cordon dans la prise téléphonique murale.
1.3 INSERTION OU REMPLACEMENT DES PILES
Votre téléphone fonctionne avec 4 piles alcalines LR6-AA 1.5 V (sans
mercure ni cadmium) qui ne sont pas fournies avec l’appareil. Pour éviter
d’endommager le terminal, utilisez des piles étanches.
La durée de vie des piles est d’environ 5 mois dans des conditions
d’utilisation normale.
Lorsque les piles sont déchargées, l’icône clignote sur l’afficheur ; vous
devez les remplacer dès que possible.
Pour installer ou remplacer les piles :
Attention : Pour ne pas perdre les numéros mis en mémoire, les réglages
personnalisés de votre téléphone ou le contenu du journal des
appelants, le remplacement des piles doit se faire rapidement.
- Pour des raisons de sécurité, débrancher le cordon téléphonique de la
prise murale.
- A l’aide d’une pointe de stylo par exemple, ouvrir le compartiment des
piles situé sur le dessus de la base.
-
Retirer une par une les piles usagées en remplaçant au fur et à mesure
chaque pile usagée par une pile neuve et en respectant les polarités
indiquées ou .
- Remettre la trappe en place et rebrancher le cordon téléphonique.
- Régler la date et l’heure comme indiqué au paragraphe 5.1.
Nota : Sans piles ou avec des piles complètement déchargées,
Temporis 08 fonctionne comme un téléphone basique. Vous pouvez
recevoir et émettre des appels mais les fonctions liées à l’afficheur
(répertoire, présentation du nom et du numéro, journal des
appels …) ne sont plus actives.
1.4 FIXATION MURALE
- Retirer l’ergot (petite pièce plastique striée) situé sur la base et le replacer
dans la position inverse.
- Faire passer le cordon de ligne dans la rainure située sous la base.
- Percer 2 trous verticaux distants de 83 mm. Insérer des chevilles puis
visser des vis à bois (3 mm de diamètre, 30 mm de long) sans les bloquer.
Fixer la base sur les 2 vis en la tirant vers le bas.
Pour améliorer la lisibilité de l’afficheur, vous pouvez régler le contraste
lumineux de l’écran ; reportez-vous au paragraphe 5.3.
-
+
Les touches :
L'afficheur :
TEMPORIS 08
Guide d’utilisation
User guide
Services commerciaux et marketing /
Sales and Marketing Departments:
41, boulevard de la République - Bâtiment B6
78400 Chatou - France
Un produit / A product by
Siège social / Head office:
46, quai Alphonse Le Gallo 92100
Boulogne Billancourt - France
SAS Capital 130 037 460
€
- 390 546 059 RCS Nanterre
© ATLINKS 2003 - Reproduction interdite / All rights reserved
ALCATEL, ATLINKS et TEMPORIS sont des marques déposées / ALCATEL, ATLINKS and TEMPORIS are registered trade marks
Le constructeur se réserve le droit de modifier les caractéristiques de ses produits en vue d'y apporter des améliorations techniques ou de respecter
de nouvelles réglementations. / The manufacturer reserves the right to modify the specifications of its products in order to make technical
improvements or comply with new regulations.
Ref : XXX-XXXX-XX - 09/10/03
M1=
M1=
Heure et date
de réception
de l'appel
Signale un appel non-répondu à la
première consultation du journal
Indique le rang de la fiche
consultée (compteur du
journal)
Numéro du correspondant ou raison
de son absence (appel de l’étranger,
le correspondant a masqué son n°,
service indisponible …)
Nom du correspondant s’il est transmis
par le réseau (dans le cas d’un abon-
nement au service " Présentation du
Nom" auprès de votre opérateur) ou, si
le n° est enregistré dans le répertoire,
le n° de la mémoire correspondante.
5.2 CHOISIR LA LANGUE DE L’AFFICHEUR
Vous avez le choix entre 4 langues : anglais, français, espagnol et italien.
Pour modifier ce réglage :
l Appuyer sur et utiliser les touches ou jusqu’à ce que
l’écran indique : "CHOISIR LANGUE".
l Accéder au sous-menu en appuyant de nouveau sur .
l Appuyer sur ou pour faire défiler les choix possibles.
l Valider votre sélection en appuyant sur .
5.3 REGLER LE CONTRASTE LUMINEUX DE L’ECRAN
Pour garantir une bonne lisibilité de l’afficheur il vous faudra peut-être régler
son contraste lumineux (5 niveaux au choix). Ce réglage dépend de l’endroit
où se situe votre téléphone ainsi que de sa position (murale ou posée sur
un meuble).
l Appuyer sur et utiliser les touches ou jusqu’à ce que
l’écran indique : "REGL. CONTRASTE".
l Accéder au sous-menu en appuyant de nouveau sur .
l Appuyer sur ou pour faire défiler les choix possibles.
l Valider votre sélection en appuyant sur .
5.4 SELECTIONNER LE TEMPS DE FLASHING
l Appuyer sur et utiliser les touches ou jusqu’à ce que
l’écran indique : "TEMPS DE FLASH".
l Accéder au sous-menu en appuyant de nouveau sur .
l Appuyer sur ou pour faire défiler les choix possibles : 100,
300 ou 600 ms.
l Valider votre sélection en appuyant sur .
Nota : Le réglage, pour une utilisation classique en France, est 300 ms.
5.5 PARAMETRER LE MODE DE NUMEROTATION
Ce réglage ainsi que la sélection du temps de flashing ne concernent que
des installations spécifiques. Par exemple, lorsque vous installez votre
téléphone derrière un système téléphonique en entreprise
(autocommutateur).
l Appuyer sur et utiliser les touches ou jusqu’à ce que
l’écran indique : "MODE DE NUM.".
l Accéder au sous-menu en appuyant de nouveau sur .
l Appuyer sur ou pour faire défiler les choix possibles :
fréquences vocales ou impulsions.
l Valider votre sélection en appuyant sur .
Nota : Le réglage, pour une utilisation classique en France, est : "FREQ.
VOCALES".
6. L’ACCES AUX SERVICES DE VOTRE OPERATEUR
6.1 LA MESSAGERIE VOCALE
Si vous êtes abonné à une messagerie vocale ainsi qu'à la présentation du
numéro (renseignez-vous auprès de votre opérateur), l’écran vous signalera
la présence d’un nouveau message en affichant le pictogramme .
Pour prendre connaissance du message, appeler le service de votre
messagerie. Une fois en ligne, un guide vocal vous explique comment
procéder.
6.2 LES AUTRES SERVICES
Les touches , et permettent l’accès à des services
supplémentaires. Renseignez-vous auprès de votre opérateur ou de votre
installateur.
7. EN CAS DE PROBLEME …
Le magasin où vous avez acheté votre téléphone est également en mesure
de vous renseigner et d’assurer le service après-vente.
PROBLEMES SOLUTIONS
Vous n’avez pas de tonalité. Vérifier que le cordon de ligne est bien
branché à la fois dans la prise murale
et dans la base.
Le téléphone ne sonne pas. Vérifier que la sonnerie n’est pas
coupée, voir paragraphe 2.2.
Le correspondant n’est pas
audible.
Vérifier qu’un autre téléphone de votre
installation n’est pas décroché en
parallèle.
L’écran est trop faiblement
contrasté.
Modifier le contraste de l’afficheur, voir
paragraphe 5.3.
L’écran n’affiche plus rien. Les piles sont complètement
déchargées, il faut les remplacer, voir
paragraphe 1.3.
R
* Sous réserve de disponibilité du service.
8. GARANTIE
TEMPORIS 08 est un équipement agréé conformément à la
réglementation européenne, attesté par le marquage .
Vous bénéficiez d'une garantie légale sur ce produit et pour toute
information relative à cette garantie, veuillez vous adresser à votre
revendeur.
Indépendamment de la garantie légale dont le produit bénéficie, le
revendeur garantit la conformité des produits à leurs spécifications
techniques pendant une durée de douze (12) mois, pièces et main-
d’œuvre, à compter de la date figurant sur la preuve d'achat du produit. Il
vous appartient donc de conserver votre facture ou votre ticket de caisse
précisant la date d’achat du produit et le nom du revendeur. Néanmoins,
si la garantie légale en vigueur dans votre pays excède douze (12) mois,
la garantie légale est alors seule applicable. La pièce ou le produit non
conforme sera réparé ou remplacé sans frais, par une pièce ou un produit
identique ou au moins équivalent en termes de fonctionnalité et de
performance. Si la réparation ou le remplacement s'avéraient
impossibles, le produit vous serait remboursé.
Le produit ou la pièce de rechange, qui peuvent être neufs ou
reconditionnés, sont garantis soit pour une période de trois mois à
compter de la réparation, soit jusqu'à la fin de la période de garantie
initiale si cette dernière est supérieure à trois mois. Toute pièce ou produit
renvoyé et remplacé devient la propriété du constructeur.
Toutefois, la présente garantie est exclue dans les cas suivants :
l une installation ou une utilisation non conforme aux instructions
figurant dans ce guide ;
l un mauvais branchement ou une utilisation anormale du produit,
notamment avec des accessoires non prévus à cet effet ;
l produits ayant subi un choc ou une chute ;
l produits détériorés par la foudre, une surtension électrique, une source
de chaleur ou ses rayonnements, un dégât des eaux, l'exposition à des
conditions d'humidité excessive, ou toute autre cause extérieure au
produit ;
l une usure normale ;
l un entretien défectueux, une négligence ;
l le non-respect des normes techniques et de sécurité en vigueur dans
la zone géographique d'utilisation ;
l une intervention, une modification ou une réparation effectuée par une
personne non agréée par le constructeur ou le revendeur.
Sous réserve des dispositions légales, toutes garanties autres que celles
décrites aux présentes sont expressément exclues.
9. SECURITE / ENVIRONNEMENT
Les piles usagées du produit doivent être éliminées
conformément à la réglementation en vigueur sur la protection de
l’environnement. Vous devez rapporter vos piles à votre
revendeur ou les déposer dans un centre de récupération
réservé à cet effet.
Ne tentez pas d’ouvrir les piles qui contiennent des substances
chimiques. En cas de fuite, évitez le contact avec les muqueuses
(la peau, les yeux, la bouche). Le cas échéant, rincez la partie
atteinte plusieurs minutes à l’eau courante. Nettoyez le produit à
l’aide de papier absorbant ou d’un chiffon sec et contactez votre
revendeur pour changer vos piles.
10. CARACTERISTIQUES TECHNIQUES /
DECLARATION DE CONFORMITE
Le TEMPORIS 08 est destiné à émettre et recevoir des communications
téléphoniques et à être raccordé au réseau de télécommunications public
français.
Ce produit est conçu pour être connecté à une ligne téléphonique
analogique de classe TRT3 (tension de réseau de télécommunications)
au sens de la norme NF EN 60-950.
Par la présente, ATLINKS déclare que le TEMPORIS 08 est conforme aux
exigences essentielles et autres dispositions pertinentes de la directive
1999/5/CE.
Le certificat de conformité est également disponible sur le site internet :
"www.atlinks.com".
Clignote à l'arrivée d'un appel pour signaler un appel
non répondu ou un nouveau message sur votre
messagerie opérateur *
- Accéder au répertoire
- Lancer un appel (le combiné devra être décroché
dans les 10 secondes)
- Valider un choix dans le menu
- Consulter le journal des appelants
- Naviguer dans les menus
- Supprimer une fiche du journal des appelants
- Effacer un caractère
Accéder au Menu principal :
- régler l’heure et la date
- sélectionner la langue du menu et le contraste de
l’afficheur
R
Mémoriser un numéro dans le répertoire
Accéder au répertoire
- Rappeler le dernier numéro composé (Bis)
- Insérer une pause en numérotation
Heure / date
Position dans le journal
des appelants (compteur)
Indicateur du niveau de charge des piles
(clignotant = piles à remplacer)
Nouveau message reçu sur
la messagerie opérateur
Appel non répondu et non consulté
dans le journal des appelants
JOHN SMITH
JOHN SMITH
* Sous réserve de disponibilité du service et d’abonnement auprès de l’opérateur.

8. GUARANTEE
We would remind you that TEMPORIS 08 is approved in conformity with
European regulations, as certified by the marking.
You are covered by a legal warranty on this product and for all information
concerning this warranty, please contact your reseller.
Regardless of the legal warranty on the product, the reseller guarantees
conformity of the products with their technical specifications for a period of
twelve (12) months, parts and labour, starting from the date on the proof of
purchase of the product. You should therefore keep your invoice or till
receipt specifying the date of purchase of the product and the name of the
reseller. However, if the legal warranty in your country exceeds twelve (12)
months, the legal warranty alone then applies. The non-conforming part or
product will be repaired or replaced free of charge, by an identical part or
product, or one at least equivalent in terms of function and performance. If
repair or replacement were to prove impossible, you would receive a refund
for the product.
The spare product or part, which may be either new or reconditioned, is
guaranteed for a period either of three months from the date of repair, or up
to the end of the initial warranty period if this is longer than three months. All
parts or products returned and replaced become the property of the
manufacturer.
However, this warranty becomes null and void in the following cases:
l installation or use other than as instructed in this guide;
l incorrect connection or abnormal use of the product, in particular with
accessories not specifically recommended;
l products which have been knocked or dropped;
l products damaged by lightning, voltage surge, source of heat or radiation,
water damage, exposure to excessive humidity, or any other cause
outside the product itself;
l normal wear and tear;
l defective maintenance, negligence;
l failure to comply with local technical and safety standards;
l maintenance, modification or repair by a person not approved by the
manufacturer or reseller.
SUBJECT TO LEGAL PROVISIONS, ALL WARRANTIES OTHER THAN
THOSE DESCRIBED HEREIN ARE EXPRESSLY EXCLUDED.
9. SAFETY / ENVIRONMENT
Used handset batteries must be disposed of in compliance with
current environmental protection regulations. You should return
your batteries to your reseller or dispose of them in an approved
recycling centre.
Do not attempt to open the batteries as they contain chemical
substances. In the event of leakage, avoid contact with the skin,
eyes and mouth. If necessary, rinse the affected part for several
minutes in running water. Clean the product with absorbent paper
or a dry cloth and contact your reseller for replacement batteries.
10. TECHNICAL SPECIFICATIONS /
DECLARATION OF CONFORMITY
The TEMPORIS 08 is designed to send and receive telephone
communications and for connection to the public telecommunications
network.
Appliance designed for connection to a TRT3 class analogue telephone
line (telecommunications network voltage) as defined in standard
NF EN 60-950.
ATLINKS hereby declares that the TEMPORIS 08 appliance is compliant
with the essential requirements and other relevant provisions of directive
1999/5/CE.
The certificate of conformity is available on the following Internet site:
"www.atlinks.com", or will be sent to you upon request.
5.3 ADJUSTING THE CONTRAST
In order to be able to read the display comfortably, you may want to adjust
the contrast (you have a choice of 5 levels). The optimal setting will depend
on where your telephone is located and how it is positioned (i.e. wall-
mounted or horizontal).
l Press and use the or keys until the screen shows:
"SELECT CONTRAST".
l Press again to open the sub-menu.
l Press or to scroll through the options.
l Press to confirm your selection.
5.4 ADJUSTING THE FLASH RATE
l Press and use the or keys until the screen shows: "FLASH
TIME".
l Press again to open the sub-menu.
l Press or to scroll through the options: 100, 300 or 600 ms.
l Press to confirm your selection.
Note: The standard setting for France is 300 ms.
5.5 SETTING THE DIALLING MODE
This setting, and the previous (flash rate) setting, only concern particular
types of installation such as, for example, behind an enterprise telephony
system (PBX).
l Press and use the or keys until the screen shows: "T/P
DIAL MODE".
l Press again to open the sub-menu.
l Press or to scroll through the options: voice frequency or
pulse.
l Press to confirm your selection.
Note: The standard setting for France is "TONE DIAL".
6. ACCESSING YOUR OPERATOR'S SERVICES
6.1 VOICEMAIL
If you subscribe to a voicemail service as well as caller ID (ask your operator),
the screen will signal the presence of a new message by displaying the icon
.
To listen to the message, call your voicemail service. Once you are
connected, a voice prompt will guide you through the process.
6.2 OTHER SERVICES
The , and keys provide access to additional services. Ask
your operator or installer for details.
7. WHAT TO DO IF …
The store where you bought your telephone can also provide assistance and
after-sales service.
PROBLEM SOLUTION
There is no tone. Check that the line cord is correctly
connected to the wall jack and the
base.
The telephone doesn't ring. Check that the ringer is not
switched off (see 2.2).
You cannot hear your
correspondent.
Check that another extension on
the installation is not being used at
the same time.
The screen contrast is too
weak.
Adjust the contrast (see 5.3).
The screen is blank. The batteries are flat and need
replacing (see 1.3).
R
4.1 CONSULTING THE CALL LOG
l Press or to open the call log. Calls are listed in reverse
chronological order.
l Use the same keys or to scroll through the log. When you
are at the beginning or end of the list the display shows: "START/END".
When you consult the log, the display looks like this:
4.2 CALLING A NUMBER FROM THE LOG
l Pick up the handset.
l Press or to select the number you want.
l Press to initiate the call.
or, if consulting the log while on-hook:
l Press or to select the number you want.
l Press to initiate the call. As indicated on the display, the handset
must be picked up within 10 seconds.
4.3 DELETING A NUMBER FROM THE LOG
Whether consulting the log on-hook or off-hook:
l Press or to select the number you want.
l Press to delete the number on the display.
! Caution: The number is deleted immediately.
4.4
DELETING ALL THE NUMBERS IN THE LOG
Likewise, whether consulting the log on-hook or off-hook:
l Press or to open the log.
l Press for several seconds until the display shows: "ERASE ALL?"
l To confirm, press again.
or
l To cancel, press or or or .
4.5 COPYING A NUMBER FROM THE LOG INTO THE SPEED
DIAL LIST
l Pick up the handset.
l Press or to consult the log and select the number you want.
l Press to go into programming mode.
l Enter the memory position (from 0 to 9) that you want to assign to the
number.
l Press to confirm.
l Replace the handset.
4.6 QUITTING THE CALL LOG
You can quit the call log at any time by pressing twice.
5.
CUSTOMIZING YOUR TELEPHONE
When you press , the display prompts you to use the or keys
to scroll through the following settings options:
- Set time and date.
- Select display language.
- Adjust display contrast.
- Adjust flash rate.
- Set dialling mode.
When the desired option appears, press again to confirm.
To quit the settings menu, select the last option: "EXIT SETUP".
5.1 SETTING THE TIME AND DATE
If you subscribe to the "number announcement" service, the date and time
are adjusted automatically when you receive your first call. You can also
adjust them manually:
l Press and use the or keys until the screen shows:
"DATE/TIME".
l Press again to open the sub-menu. The time flashes.
l Press to scroll through the options.
l Press to confirm and move on to the minutes.
l Repeat the process: to select a value and to confirm and
move on to the next adjustment (day and month).
l Once you have finished adjusting the date and time, press to confirm.
If you enter an invalid date (30 February, for example), "ERROR" appears on
the screen. You can then correct the day and month settings.
5.2 SELECTING THE DISPLAY LANGUAGE
You have a choice of 4 languages: English, French, Spanish and Italian.
To select your preferred language:
l Press and use the or keys until the screen shows: "CID
LANGUAGE".
l Press again to open the sub-menu.
l Press or to scroll through the options.
l Press to confirm your selection.
2.2 ADJUSTING THE RINGING VOLUME
l The ringing volume adjustment is located on the side of the base. There
are 3 levels: loud ( ), soft ( ) and ringer off ( ) (the light will flash when
a call is received)
.
2.3 MAKING A CALL
l Pick up the line by lifting the handset. The timer starts.
l Dial.
l When you have finished, hang up by replacing the handset on the base.
2.4 ADJUSTING THE EARPIECE VOLUME
During a call,
l Slide the cursor on the side of the handset .
There are 3 levels: loud, medium and soft.
2.5 REDIALLING THE LAST NUMBER
l Pick up the handset
l Press .
"
The last number called (whether manually or via the speed dial list) is
automatically redialled.
2.6 COPYING THE LAST NUMBER DIALLED INTO THE
SPEED DIAL LIST
l Pick up the handset.
l Press to go into programming mode.
l Enter the memory position (from 0 to 9) that you want to assign to the
number.
l Press to confirm.
l Press .
l Press to confirm.
l Replace the handset.
3. THE SPEED DIAL LIST
Your Temporis 08 gives you rapid access to your 10 most useful numbers.
Use the included self-adhesive label to identify them: you can stick it in the
space provided on the base, above the battery compartment.
3.1 STORING A NUMBER
l Pick up the handset.
l Press to go into programming mode.
l Enter the memory position (from 0 to 9) that you want to assign to the
number.
l Press to confirm.
l Key in the telephone number (max. 16 digits).
To insert a pause, press . If you make a mistake, press to erase
the last digit.
l Press to confirm.
Note: To copy the last number dialled, or a number from the call log, into the
speed dial list, see sections 2.6 or 4.5 respectively.
3.2 DELETING A NUMBER FROM THE SPEED DIAL LIST
l Pick up the handset.
l Press to go into programming mode.
l Enter the memory position (from 0 to 9) to be cleared.
l Press for 3 seconds to erase the number.
3.3 USING THE SPEED DIAL LIST TO MAKE A CALL
l Pick up the handset.
l Press to open the speed dial list.
l Key in the desired memory position (from 0 to 9).
or, when on-hook:
l Press .
l Press or to scroll through the speed dial list until you reach
the desired number.
l Press to initiate the call. As indicated on the display, the handset must
be picked up within 10 seconds.
4.
THE CALL LOG*
If you subscribe to your network operator's "caller ID" or "number
announcement" service, your telephone will list the last 75 calls received
(answered or unanswered). This will tell you who called while you were
away, and you can also decide whether or not to take a particular call. If you
also subscribe to the "call waiting" service, you can see who is trying to get
through to you while you are already on the line.
When on-hook, the display shows:
-"WELCOME": no unanswered calls.
-"01 NEW CALL" or "XX NEW CALLS": there are one or more unanswered calls
in the log. The lamp on the back of the handset flashes. When you consult
the log, the icon (for "new") will be displayed alongside the caller's
number.
-"01 CALL" ou "XX CALLS": the log contains one or more calls that you have
already consulted, but no new calls.
1. FIRST USE
1.1 RECOMMENDATIONS
- Do not expose your telephone to direct sunlight or extreme temperatures.
- Operating temperature: between + 5°C and + 40°C.
- Position the telephone at least 1 meter away from potential sources of
interference such as TVs and cell phones.
Caution: Avoid contact with water. Use a damp cloth for cleaning. Never
use solvents (trichlorethylene, acetone, etc.) which might damage
the plastic surfaces, and never spray cleaning products on your
set.
Avoid using the telephone during electrical storms.
1.2 INSTALLATION
Your Temporis 08 telephone consists of:
- a base and a handset,
- a spiral cord and a telephone cord,
- a label for the numbers stored in memory.
1. Connect one end of the spiral cord to the end of the handset, and the
other to the socket at the front of the base.
2. The telephone cord plugs in under the base (there is a groove for holding
the cord). Connect the other end of the cord to the wall telephone jack.
1.3 INSERTING OR REPLACING BATTERIES
Your telephone uses 4 LR6-AA 1.5 V alkaline batteries (mercury and
cadmium-free), not supplied. To avoid damaging your set, only use
leakproof batteries.
The batteries should last about 5 months under normal conditions of use.
When the batteries are running low, the battery icon starts flashing.
Replace the batteries as soon as possible.
To install or replace the batteries:
Caution: To avoid losing your memorized numbers and customized
settings, or the contents of the call log, you need to perform the
following operation with reasonable speed.
- For safety reasons, unplug the telephone cord from the wall jack.
- Using a pointed object (the end of a pen, for example), open the battery
compartment on the top of the base.
-
Take the used batteries out one after the other, replacing each one in turn
with a new battery. Make sure you put them in the right way round, with the
or
ends as indicated
.
- Replace the battery cover and plug the telephone cord back in.
- Set the date and time as shown in 5.1.
Note: Without batteries or with empty batteries, your Temporis 08 will still
function as a basic telephone: you can make and receive calls, but all
display-dependent features (speed dial list, caller ID, call log, etc.) will
be disabled.
1.4 WALL MOUNTING
- Extract the peg (small serrated plastic part) from its housing under the
base and reinsert it upside-down.
- Run the line cord through the groove under the base.
- Drill 2 vertical holes in the wall, 83 mm apart. Insert the anchors then
screw in wood screws (diameter: 3 mm; length: 30 mm) without tightening
them. Secure the base onto the screws by pulling it downwards.
You can adjust the display contrast to make it easier to read (see 5.3).
2. USING THE TELEPHONE
2.1 RECEIVING A CALL
During the ringing phase and provided the batteries are charged correctly,
the red light on the handset flashes, signalling an incoming call if you have
cut off the ringer.
l To take the call, pick up the handset.
-
+
The keys:
The display:
Flashes to indicate incoming calls, unanswered calls,
or new messages in your voicemail *
- Open the speed dial list
- Initiate a call (the handset needs to be picked up
within 10 seconds)
- Validate a menu option
- Consult call log
- Navigate the menus
- Delete an entry from the call log
- Erase a character
Access to the main menu:
- set date and time
- select menu language and display contrast
R
Store a number in the speed dial list
Open the speed dial list
- Redial last number
- Insert pause in dialling
Time / date
Position in call log
(counter)
Battery charge indicator
(flashing = replace batteries)
New message in
voicemail
Call log contains an unanswered call
that has not yet been consulted
JOHN SMITH
JOHN SMITH
* Voicemail service provided by your network operator: subject to availability and
subscription.
* Service subject to availability.
M1=
M1=
Date and
time of call
Signals a new unanswered call
since the last consultation
Entry number
(log counter)
Caller number or reason for
absence (overseas call, caller
secrecy, service unavailable…)
Caller name, if identified by the
network (if you subscribe to your
operator's "caller ID" service) or, if
the number is in your speed dial list,
the corresponding memory position.
/