Page is loading ...

TM
Shop online at
omega.com
e-mail: [email protected]
For latest product manuals:
www.omegamanual.info
User’s Guide
CN400 Series
Controllers

The information contained in this document is believed to be correct, but OMEGA accepts no liability for any errors it
contains, and reserves the right to alter specifications without notice.
Servicing North America:
U.S.A. Omega Engineering, Inc.
Headquarters: Toll-Free: 1-800-826-6342 (USA & Canada only)
Customer Service: 1-800-622-2378 (USA & Canada only)
Engineering Service: 1-800-872-9436 (USA & Canada only)
Tel: (203) 359-1660 Fax: (203) 359-7700
e-mail: info@omega.com
For Other Locations Visit omega.com/worldwide
omega.com [email protected]

Table of contents
1 Introduction .................................................................................................................................................................. 5
2 Safety guidelines .......................................................................................................................................................... 5
2.1 Organization of safety notices .................................................................................................................. 5
2.2 Safety Precautions ....................................................................................................................................... 5
2.3 Precautions for safe use .............................................................................................................................. 6
2.4 Environmental policy / WEEE .................................................................................................................... 6
3 Model Identification .................................................................................................................................................... 7
4 Technical Data .............................................................................................................................................................. 7
4.1 General Features .......................................................................................................................................... 7
4.2 Hardware Features ...................................................................................................................................... 7
4.3 Software Features ........................................................................................................................................ 8
4.4 Programming mode .................................................................................................................................... 8
5 Dimensions and Installation ..................................................................................................................................... 8
6 Electrical wirings .......................................................................................................................................................... 8
6.1 Wiring diagram ............................................................................................................................................. 9
6.1.a Power Supply ...................................................................................................................................... 9
6.1.b Analogue Input AI1 ......................................................................................................................... 10
6.1.c Analogue Input AI2 (only CN402-111x) ....................................................................................... 11
6.1.d CT input (only on CN401-111445 and CN402-x) ....................................................................... 11
6.1.e Digital inputs .................................................................................................................................... 11
6.1.f Serial inputs (only CN401-11445-C4, CN402-1114455-C4 / -DC) ........................................... 11
6.1.g Digital outputs ................................................................................................................................. 12
6.1.h Analogue output AO1 .................................................................................................................... 12
6.1.i Analogue output AO2 (only CN402-x) ........................................................................................ 12
6.1.j Relay output Q1 ............................................................................................................................... 12
6.1.k Relay output Q2 (only CN401-11445/-C4) .................................................................................. 12
6.1.l Relays output Q2 - Q3 (only on CN401-111445 and CN402-x) ............................................... 12
7 Display and Key Functions ....................................................................................................................................... 13
7.1 Numeric Indicators (Display) ................................................................................................................... 13
7.2 Meaning of Status Lights (Led) ................................................................................................................ 13
7.3 Keys ................................................................................................................................................................ 13
8 Dual input mode ........................................................................................................................................................ 14
8.1 Selection of process value related to the command output and to the alarms .......................... 14
8.2 Remote setpoint by analogue input ...................................................................................................... 14
8.3 Remote setpoint by serial input .............................................................................................................. 14
9 Controller Functions .................................................................................................................................................. 15
9.1 Modification of main and alarm setpoint value ................................................................................ 15
9.2 Automatic Tune .......................................................................................................................................... 15
9.3 Manual Tune ................................................................................................................................................ 15
9.4 Tuning once ................................................................................................................................................. 15
9.5 Synchronized tuning ................................................................................................................................. 16
9.6 Digital input functions .............................................................................................................................. 16
9.7 Automatic / Manual regulation for % output control ....................................................................... 17
9.8 Heater Break Alarm on CT (current transformer - only on CN401-111445 and CN402-x) .......... 17
9.9 Dual Action (Heating-Cooling) ............................................................................................................... 18
9.10 LATCH ON Function ................................................................................................................................... 19
9.11 Soft-Start Function .....................................................................................................................................20
9.12 Pre-Programmed cycle .............................................................................................................................20
9.13 Retransmission function on analogue output ....................................................................................20
9.14 Timer functions ........................................................................................................................................... 21
10 Serial communication ..............................................................................................................................................22
11 Reading and configuration through NFC ............................................................................................................ 28
12 Access configuration .................................................................................................................................................29
12.1 Loading default values .............................................................................................................................29
12.2 Parameters list functioning .....................................................................................................................29

13 Table of Configuration Parameters .......................................................................................................................30
14 Alarm Intervention Modes ....................................................................................................................................... 66
14.a Absolute or threshold alarm active over (par. 123
A L.1 . F.
=
A b . u P. A .
) ...........................................................66
14.b Absolute or threshold alarm active below (par. 123
A L.1 . F.
=
A b . u P. A .
) ........................................................ 66
14.c Absolute or threshold alarm referred to command setpoint active over (par. 123
A L.1 . F.
=
Ab . c. u .A.
) 67
14.d Absolute or threshold alarm referred to command setpoint active below (par. 123
A L.1 . F.
=
Ab . c.L.A.
) 67
14.e Band alarm (par. 123
A L.1 . F.
=
band
) .................................................................................................................. 67
14.f Asymmetric band alarm (par. 123
A L.1 . F.
=
A.band
) ........................................................................................67
14.g Upper deviation alarm (par. 123
A L.1 . F.
=
up.dev.
) .......................................................................................... 68
14.h Lower deviation alarm (par. 123
A L.1 . F.
=
Lo.dev.
) ..........................................................................................68
14.1 Alarms label ................................................................................................................................................. 68
15 Table of Anomaly Signals .........................................................................................................................................69

User manual - CN40x- 5
1 Introduction
The process controller CN40x stands out for the bright display which ensures optimal visibility and
increased level of information for the operator beside a scrolling Help function.
CN40x relies on Omega programming mode by NFC/RFID technology with dedicated App Direct link
| 400S Devices for Android devices not requiring wirings and power supply, allowing quick set-up/
updates on site.
Availability include a model with dual analogue input and dual analogue output for maximum
flexibility of applications. It is possible to achieve two separate heating/cooling PID control loops in
one device or to handle mathematical operations between two process values.
The outputs can be selected as command/multiple alarm modes/analogue retransmission. Serial
communication standard is RS485 with Modbus RTU/Slave protocol. Useful power supply with
extended range 24 to 230VAC / VDC with galvanic insulation of the net for the single loop version,
while the model with double analogue input provides two versions: 115 / 230 VAC or 24 VAC / VDC.
2 Safety guidelines
Read carefully the safety guidelines and programming instructions contained in this manual before
connecting/using the device.
Disconnect power supply before proceeding to hardware settings or electrical wirings to avoid risk of
electric shock, fire, malfunction.
Do not install/operate the device in environments with flammable/explosive gases.
This device has been designed and conceived for industrial environments and applications that rely
on proper safety conditions in accordance with national and international regulations on labour
and personal safety. Any application that might lead to serious physical dama ge/ life risk or involve
medical life support devices should be avoided.
Device is not conceived for applications related to nuclear power plants, weapon systems, flight
control, mass transportation systems.
Only qualified personnel should be allowed to use device and/or service it and only in accordance to
technical data listed in this manual.
Do not dismantle/modify/repair any internal component.
Device must be installed and can operate only within the allowed environmental conditions.
Overheating may lead to risk of fire and can shorten the lifecycle of electronic components.
2.1 Organization of safety notices
Safety notices in this manual are organized as follows:
Safety notice Description
Danger! Disregarding these safety guidelines and notices can be life-threatening.
Warning!
Disregarding these safety guidelines and notices can result in severe injury or
substantial damage to property.
Information! This information is important for preventing errors.
2.2 Safety Precautions
This product is UL listed as open type process control equipment. Danger!
If the output relays are used past their life expectancy, contact fusing or burning may
occasionally occur.
Always consider the application conditions and use the output relays within their
rated load and electrical life expectancy. The life expectancy of output relays varies
considerably with the output load and switching conditions.
Danger!
Loose screws may occasionally result in fire.
For screw terminals of relays and of power supply, tighten screws to tightening torque
of 0,51 Nm. For other terminals, tightening torque is 0,19 Nm
Warning!

6 - CN40x - User manual
A malfunction in the Digital Controller may occasionally make control operations
impossible or prevent alarm outputs, resulting in property damage. To maintain safety
in the event of malfunction of the Digital Controller, take appropriate safety measures,
such as installing a monitoring device on a separate line.
Warning!
2.3 Precautions for safe use
Be sure to observe the following precautions to prevent operation failure, malfunction, or adverse
affects on the performance and functions of the product. Not doing so may occasionally result in
unexpected events. Do not handle the Digital Controller in ways that exceed the ratings.
• The product is designed for indoor use only. Do not use or store the product outdoors or in any of
the following places.
- Places directly subject to heat radiated from heating equipment.
- Places subject to splashing liquid or oil atmosphere.
- Places subject to direct sunlight.
- Places subject to dust or corrosive gas (in particular, sulfide gas and ammonia gas).
- Places subject to intense temperature change.
- Places subject to icing and condensation.
- Places subject to vibration and large shocks.
• Installing two or more controllers in close proximity might lead to increased internal temperature
and this might shorten the life cycle of electronic components. It is strongly recommended to
install cooling fans or other air-conditioning devices inside the control cabinet.
• Always check the terminal names and polarity and be sure to wire properly. Do not wire the
terminals that are not used.
• To avoid inductive noise, keep the controller wiring away from power cables that carry high voltages
or large currents. Also, do not wire power lines together with or parallel to Digital Controller
wiring. Using shielded cables and using separate conduits or ducts is recommended. Attach a
surge suppressor or noise filter to peripheral devices that generate noise (in particular motors,
transformers, solenoids, magnetic coils or other equipment that have an inductance component).
When a noise filter is used at the power supply, first check the voltage or current, and attach the
noise filter as close as possible to the Digital Controller. Allow as much space as possible between
the Digital Controller and devices that generate powerful high frequencies (high-frequency
welders, high-frequency sewing machines, etc.) or surge.
• A switch or circuit breaker must be provided close to device. The switch or circuit breaker must be
within easy reach of the operator, and must be marked as a disconnecting means for the controller.
• The device must be protected by a fuse 1A (cl. 9.6.2).
• Wipe off any dirt from the Digital Controller with a soft dry cloth. Never use thinners, benzine,
alcohol, or any cleaners that contain these or other organic solvents. Deformation or discoloration
may occur.
• The number of non-volatile memory write operations is limited. Therefore, use EEprom write mode
when frequently overwriting data, e.g.: through communications.
2.4 Environmental policy / WEEE
Do not dispose electric tools together with household waste material.
According to European Directive 2002/96EC on waste electrical and electronic equipment and its
implementation in accordance with national law, electric tools that have reached the end of their life
must be collected separately and returned to an environmentally compatible recycling facility.

User manual - CN40x- 7
3 Model Identification
The CN40x series includes 5 versions:
Models with power supply 24..230 VAC/VDC ±15% 50/60 Hz – 6 Watt/VA
CN4 01-114 45 1 analogue input + 2 relays 2 A + 2 SSR + 2 D.I. + 1 analogue output V/mA
CN4 01-114 45 - C4 1 analogue input + 2 relays 2 A + 2 SSR / D.I. + 1 analogue output V/mA + RS485
CN4 01-1114 45
1 analogue input + 3 relays 2 A + 2 SSR + 2 D.I. + 1 analogue output V/mA
(1 D.O. + 1 D.I. when using CT)
Model with power supply 24 VAC/VDC ±15% 50/60 Hz – 6 Watt/VA
CN4 02-1114 455-
C4-DC
2 analogue input + 3 relays 2 A + 2 SSR + 2/4 D.I. + 2 analogue output V/mA +
RS485 + CT (2 D.I./D.O when using CT)
Model with power supply 115..230 VAC ±15% 50/60 Hz – 6 Watt/VA
CN402-
1114 455 - C4
2 analogue input + 3 relays 2 A + 2 SSR + 2/4 D.I. + 2 analogue output V/mA +
RS485 + CT (2 D.I./D.O when using CT)
4 Technical Data
4.1 General Features
Displays 4 digits 0,52’’, 5 digits 0,30’’
Operating temperature Temperature: 0-45° C -Humidity 35..95 uR%
Sealing IP65 front panel (with gasket) - IP20 box and terminals (UL not evaluated)
Material Box and front panel: PC UL94V2 self-extinguishing
Weight Approx. 185 g
4.2 Hardware Features
Analogue inputs
AI1 – AI2:
Configurable via software.
Input: Thermocouple
type K, S, R, J,T,E,N,B.
Automatic compensation of cold
junction from -25…85° C.
Thermoresistances: PT100, PT500,
PT1000, Ni100, PTC 1K, NTC 10K (β
3435K)
Input V/mA: 0-1 V, 0-5 V, 0-10 V, 0-20 o
4-20 mA, 0-60 mV.
Pot. Input: 1...150 KΩ.
CT: 50 mA.
Tolerance (25° C)
± 0.2% ±1 digit (on F.s.) for thermocou-
ple, thermoresistance and V/mA.
Cold junction accuracy 0.1° C/°C.
Impedence:
0-10 V: Ri>110 KΩ
0-20 mA: Ri<5 Ω
0-40 mV: Ri>1 MΩ
Relay outputs Config. as command and alarm output.
Contacts:
2 A - 250 VAC Resistive load.
SSR output Config. as command and alarm output. 12/24 V, 25 mA.
Analogue
outputs
Configurable as command
and alarm output or as retrasmission of
process / setpoints.
Configurable:
0-10 V with 40000 points +/-0.2% (on
F.s.)
4-20 mA con 40000 points +/-0.2% (on
F.s.)
Power-supply
For CN4 01-11x xx and CN4 01-1114 45:
Extended power-supply 24..230 VAC/
VDC ±15% 50/60 Hz
For CN4 02-1114455- C4 - DC:
24 VAC/VDC ±15% 50/60 Hz
For CN4 02-1114455- C4:
115..230 VAC ±15% 50/60 Hz
Consumption:
CN4 01-11445: 6 Watt/VA
CN4 01-11445 - C4: 9 Watt/VA
CN4 01-111445: 8 Watt/VA
CN4 02-1114 455- C4 - DC: 7 Watt/VA
CN4 02-1114 455- C4: 12 Watt/VA

8 - CN40x - User manual
4.3 Software Features
Regulation algorithms ON-OFF with hysteresis. - P, PI, PID, PD with proportional time
Proportional band 0..9999°C o °F
Integral time 0,0..999,9 sec (0 excludes)
Derivative time 0,0..999,9 sec (0 excludes)
Controller functions
Manual or automatic Tuning, selectable alarm, protection of command
and alarm setpoints.
4.4 Programming mode
by keyboard ..see paragraph
software CN-SW-LAB-
SOFTVIEW
..on
“Download section”
of official Omega site: www.omega.com/en-us
App Direct link | 400S
Devices
..through download the App on Google Play Store®, see paragraph
When activated by a reader/interrogator supporting NFC-V protocol,
controller CN40x is to be considered a VICC (Vicinity Inductively Coupled
Card) according to ISO/IEC 15693 and it operates at a frequency of 13.56
MHz. The device does not intentionally emit radio waves.
5 Dimensions and Installation
19
20
21
22
23
24
25
26
27
28
FNC SET
CN401
C1
C2
MAN
TUN
REM
A2A1 A3
48 mm
80 mm
8
48 mm
DP-USB-CARD
(optional)
Spessore suggerito / Suggested thickness / É
paisseur suggérée
2 ÷ 6 mm
USB
Dima di foratura
46 x 46 mm
Frontal panel
cut-out
T
rou de panneau
6 Electrical wirings
This controller has been designed and manufactured in conformity to Low Voltage Directive 2006/95/
EC, 2014/35/EU (LVD) and EMC Directive 2004/108/EC, 2014/30/EU (EMC). For installation in industrial
environments please observe following safety guidelines:
• Separate control line from power wires.
• Avoid proximity of remote control switches, electromagnetic contactors, powerful engines.
• Avoid proximity of power groups, especially those with phase control.
• It is strongly recommended to install adequate mains filter on power supply of the machine where
the controller is installed, particularly if supplied 230Vac.
The controller is designed and conceived to be incorporated into other machines, therefore CE
marking on the controller does not exempt the manufacturer of machines from safety and conformity
requirements applying to the machine itself.
• Wiring of pins 1...8 on CN401-11xxx: use crimped tube terminals or flexible/rigid copper wire with
diameter 0.2 to 2.5 mm2 (min. AWG28, max. AWG12, operating temperature: min. 70°C). Cable
stripping lenght 7 to 8 mm.

User manual - CN40x- 9
• Wiring of pins 9...19 on CN401-11xxx: use crimped tube terminals or flexible/rigid copper wire with
diameter 0.2 to 1.5 mm2 (min. AWG28, max. AWG14, operating temperature: min. 70°C). Cable
stripping lenght 6 to 7 mm.
• Wiring of pins 1...8 on CN402-111x: use crimped tube terminals or flexible/rigid copper wire with
diameter 0.2 to 2.5 mm2 (min. AWG26, max. AWG12, operating temperature: min. 70°C). Cable
stripping lenght 10 to 11 mm.
• Wiring of pins 9...28 on CN402-111x: use crimped tube terminals or flexible/rigid copper wire
with diameter 0.5 to 1 mm2 (min. AWG24, max. AWG16, operating temperature: min. 70°C). Cable
stripping lenght 7 to 8 mm.
6.1 Wiring diagram
CN401-11445 CN401-11445-C4 CN401-111445
10
9
11
12
13
14
15
16
17
18
19
TC
V/mA
PTC
NTC
PT100
NI100
+
AO1
V/mA
+V
DO2
(PNP)
DO1
(PNP)
DI2
(PNP)
DI1
(PNP)
0V
(Rear view)
Q1
2A 230V
Resistive
SUPPLY
24...230V
AC/DC
Q2
2A 230V
Resistive
8
7
6
5
4
2
3
1
+
+
PTC
NTC
PT100
NI100
+
+
(Rear view)
Q1
2A 230V
Resistive
SUPPLY
24...230V
AC/DC
Q2
2A 230V
Resistive
8
7
6
5
4
2
3
1
TC
V/mA
+
+
AO1
V/mA
+V
DI/O2
(PNP)
DI/O1
(PNP)
0V
RS485
10
9
11
12
13
14
15
16
17
18
19
(Rear view)
Q1
2A 230V
Resistive
8
7
6
5
4
2
3
1
Q2
2A 230V
Resistive
Q3
2A 230V
Resistive
SUPPLY
24...230V
AC/DC
+
9
10
11
12
DO2
(PNP)
DO1
(PNP)
13
DI2
(PNP)
14
DI1
(PNP)
15
0V
16
+V
CT
AO1
V/mA
PTC
NTC
PT100
NI100
TC
V/mA
+
+
17
18
19
CN402-1114455-C4-DC CN402-1114455-C4
PTC
NTC
PT100
NI100
PTC
NTC
PT100
NI100
+
+
(Rear view)
TC
V/mA
+
+
TC
V/mA
+
+
20
19
21
22
23
24
25
26
27
28
9
10
11
12
13
14
15
16
17
18
RS485+
(B)
DI3
(PNP)
DI4
(PNP)
0V 0V
CT
+V
RS485-
(A)
AO1
V/mA
AO2
V/mA
+V
AI1 AI2
Q1
2A 230V
Resistive
8
7
6
5
4
2
3
1
SUPPLY
24 VAC/DC
Q2
2A 230V
Resistive
Q3
2A 230V
Resistive
DI/O1
(PNP)
DI/O2
(PNP)
PTC
NTC
PT100
NI100
PTC
NTC
PT100
NI100
+
+
(Rear view)
TC
V/mA
+
+
TC
V/mA
+
+
20
19
21
22
23
24
25
26
27
28
9
10
11
12
13
14
15
16
17
18
RS485+
(B)
DI3
(PNP)
DI4
(PNP)
0V 0V
CT
+V
RS485-
(A)
AO1
V/mA
AO2
V/mA
+V
AI1 AI2
Q1
2A 230V
Resistive
8
7
6
5
4
2
3
1
Q2
2A 230V
Resistive
Q3
2A 230V
Resistive
SUPPLY
115...230
VAC
DI/O1
(PNP)
DI/O2
(PNP)
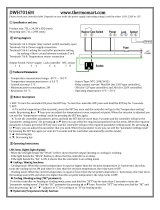
6.1.a Power Supply
SUPPLY
24...230
Vac/dc
1
2
For CN4 01-114 45, CN4 01-114 45- C4 and CN4 01-1114 45
Switching power supply 24..230 VAC/VDC ±15% 50/60 Hz - 6 Watt/VA.
Galvanic insulation (on all versions).
SUPPLY
24V
Vac/dc
1
2
For CN4 02-1114455- C4 - DC
Switching power supply 24 VAC/VDC ±15% 50/60 Hz - 6 Watt/VA.
Galvanic insulation.
SUPPLY
115...230V
Vac
1
2
For CN4 02-1114455- C4
Switching power supply 115..230 VAC ±15% 50/60 Hz - 6 Watt/VA.
Galvanic insulation.

10 - CN40x - User manual
6.1.b Analogue Input AI1
CN401-11445/-C4 and CN401-111445
For thermocouples K, S, R, J, T, E, N, B.
• Comply with polarity
• For possible extensions, use compensated cable and terminals
suitable for the thermocouples used (compensated).
• When shielded cable is used, it should be grounded at one side
only.
AI1
TC
Shield/Schermo
19
18
CN402-111x
AI1
TC
Shield/Schermo
28
27
CN401-11445/-C4 and CN401-111445
For thermoresistances PT100, Ni100.
• For the three-wire connection use wires with the same section.
• For the two-wire connection short-circuit terminals 17 and 19
(version CN401-11x and CN401-111445) or 26 and 28.
• When shielded cable is used, it should be grounded at one side
only.
RED/ROSSO
RED/ROSSO
WHITE/BIANCO
AI1
PT/NI100
Shield/Schermo
Rosso
Red
Bianco
White
Rosso
Red
19
18
17
CN402-111x
AI1
PT/NI100
Shield/Schermo
Rosso
Red
Bianco
White
Rosso
Red
28
27
26
CN401-11445/-C4 and CN401-111445
For thermoresistances NTC, PTC, PT500, PT1000 and linear
potentiometers.
When shielded cable is used, it should be grounded at one side only
to avoid ground loop currents.
AI1
Shield/Schermo
PTC/NTC
17
18
CN402-111x
AI1
Shield/Schermo
PTC/NTC
26
27
CN401-11445/-C4 and CN401-111445
For linear signals in Volt and mA
• Comply with polarity
• When shielded cable is used, it should be grounded at one side
only to avoid ground loop currents.
• It’s possible to select +V at 12Vdc or 24Vdc, by configuring
parameter 282
V.out (GROUP R - di SP. - Display and interface).
AI1
V
mA
+V
Shield/Schermo
18
16
19
CN402-111x
AI1
V
mA
+V
Shield/Schermo
27
25
28

User manual - CN40x- 11
6.1.c Analogue Input AI2 (only CN402-111x)
AI2
TC
Shield/Schermo
18
17
For thermocouples K, S, R, J, T, E, N, B.
• Comply with polarity
• For possible extensions, use compensated cable and terminals suitable for
the thermocouples used (compensated).
• When shielded cable is used, it should be grounded at one side only.
AI2
PT/NI100
Shield/Schermo
Rosso
Red
Bianco
White
Rosso
Red
18
17
16
For thermoresistances PT100, Ni100.
• For the three-wire connection use wires with the same section.
• For the two-wire connection short-circuit terminals 16 and 18.
• When shielded cable is used, it should be grounded at one side only.
RED/ROSSO
RED/ROSSO
WHITE/BIANCO
AI2
Shield/Schermo
PTC/NTC
16
17
For thermoresistances NTC, PTC, PT500, PT1000 and linear potentiometers.
When shielded cable is used, it should be grounded at one side only to avoid
ground loop currents.
AI2
V
mA
+V
Shield/Schermo
17
15
18
For linear signals in Volt and mA
• Comply with polarity
• When shielded cable is used, it should be grounded at one side only to
avoid ground loop currents.
• To power the sensor connected to AI2 through +V (terminal 15), short-circu-
it terminals 14 and 17.
6.1.d CT input (only on CN401-111445 and CN402-x)
CN401-111445 CN402-x
C.T.
11
13
C.T.
22
23
To enable CT input, modify parameter 287 ct F.
• Input for 50 mA amperometric transformer.
• Sampling time 100 ms.
• Configurable by parameters.
6.1.e Digital inputs
-11445 / -111445 -11445-C4 CN402-x
Digital inputs can be enabled by parameters.
Close pin
“DIx”
on pin
“+V”
to enable digital input.
It is possible to put in parallel the digital inputs of different devices
joining together the 0V pins (15).
13
DI2
(PNP)
14
DI1
(PNP)
0V
15
16
+V
13
DI/O2
(PNP)
14
DI/O1
(PNP)
0V
15
16
+V
20
DI3
(PNP)
DI/O2
(PNP)
DI/O1
(PNP)
DI4
(PNP)
0V
21
22
23
24
25
+V
6.1.f Serial inputs (only CN401-11445-C4, CN402-1114455-C4 / -DC)
CN401-11445-C4
Modbus RS485 communication.
RTU Slave with galvanic insulation.
It is recommended to use the twisted and shielded cable for communica-
tions.
RS485
Shield/Schermo
11
12
(B)
(A)
CN402-111x
RS485
(B)
(A)
Shield/Schermo
19
9

12 - CN40x - User manual
6.1.g Digital outputs
-11445 / -111445 -11445-C4 CN402-x
Digital output PNP (including SSR) for command or alarm.
Range 12 VDC/25 mA or 24 VDC/15mA selectable by parameter 282
v.out.
11
DO2
(PNP)
12
DO1
(PNP)
15
0V
13
DI/O2
(PNP)
14
DI/O1
(PNP)
15
0V
20
DI/O1
(PNP)
DI/O2
(PNP)
0V
21
24
6.1.h Analogue output AO1
CN401-11445/-C4 and CN401-111445
Linear output in mA or V (galvanically isolated) configurable as
command, alarm or retransmission of process-setpoint.
The selection mA or Volt for the linear output depends on the
parameters configuration.
AO1
V/mA
9
10
CN402-111x
AO1
V/mA
10
11
6.1.i Analogue output AO2 (only CN402-x)
AO2
V/mA
12
13
Linear output in mA or V (galvanically isolated) configurable as command,
alarm or retransmission of process-setpoint.
The selection mA or Volt for the linear output depends on the parameters
configuration.
6.1.j Relay output Q1
Q1
2A 230V
Resistive
3
4
5
Capacity 2 A / 250 VAC for resistive loads.
See chart below.
6.1.k Relay output Q2 (only CN401-11445/-C4)
Q2
2A 230V
Resistive
7
8
Capacity 2 A / 250 VAC for resistive loads.
See chart below.
6.1.l Relays output Q2 - Q3 (only on CN401-111445 and CN402-x)
Q2
Q3
2A 230V
Resistive
6
7
8
Capacity 2 A / 250 VAC for resistive loads.
See chart below.
Electrical endurance Q1, Q2 e Q3:
2 A, 250 VAC, resistive loads, 10
5
operations.
20/2 A, 250 VAC, cosφ = 0.3, 10
5
operations.

User manual - CN40x- 13
7 Display and Key Functions
FNC SET
CN401
C1
C2
MAN
TUN
REM
A2A1 A3
1
3
15
4
2
5
6
11 12 13 14
7
8
9
10
7.1 Numeric Indicators (Display)
1
123.4
Normally displays the process. During the configuration phase, it displays the
parameter being inserted.
2
PRo b e
Normally displays the setpoint. During the configuration phase, it displays the
parameter value being inserted.
7. 2 Meaning of Status Lights (Led)
3 C1
ON when the command output 1 is active. In versions with single analog input, it is ON
when the valve is opening. In the versions with two analog inputs, in case of command
1 on the motorized valve, it is permanently ON when the valve is opening and flashing
during the closing phase.
4 C2
ON when the command output 2 is active. In versions with single analog input, it is ON
when the valve is opening. In the versions with two analog inputs, in case of command
2 on the motorized valve, it is permanently ON when the valve is opening and flashing
during the closing phase.
5 A1 ON when alarm 1 is active.
6 A2 ON when alarm 2 is active.
7 A3 ON when alarm 3 is active.
8 TUN ON when the controller is executing an auto-tuning cycle.
9 MAN ON when "Manual" function is active.
10 REM
ON when the controller communicates through serial. Flashes when the remote setpoint
is enabled.
7. 3 Keys
11
• Increases the main setpoint.
• During configuration allows to scroll the parameters or the groups of parameters.
• Increases the setpoints.
12
• Decreases the main setpoint.
• During configuration allows to scroll the parameters or the groups of parameters.
• Decreases the setpoints.
13
SET
• Allows to visualize command and alarm setpoints.
• During configuration allows to enter the parameter to be modified and confirms the
variation.
14
FNC
• Allows to enter the Tuning launch function, automatic/manual selection.
• During configuration works as exit key (ESCAPE).
15
c
• ON during the rising phase of the pre-programmed cycle;
d
• ON during the falling phase of the pre-programmed cycle;
c
d
• Both ON during parameter modification, when this is not a default value.

14 - CN40x - User manual
8 Dual input mode
Each model is provided with two analogue inputs: it is possible to do mathematic operations between
2 measured process values, correlating obtained result to the command or alarm outputs, or to give
a process value as remote setpoint. It is also possible to use the controller for 2 independent control
loops.
8.1 Selection of process value related to the command
output and to the alarms
When second analogue input is enabled (par.18 sen.2 other than di sA b .) it is possible to choose the
process value to be related to command output, to alarms and to retransmission.
Following options are available:
•
A . i n .1 : Value read by input AI1;
•
A.i n .2: Value read by input AI2;
•
mean: Mean between inputs AI1 and AI2;
•
di f f.: Difference between inputs: AI1-AI2;
•
a b . di F: Difference between inputs as absolute value: AI1-AI2;
• Command 1 process must be selected on parameter 36
c . P r.1
• Command 2 process must be selected on parameter 55 c.Pr.2
• The process related to the alarms must be selected on par. 124 a .1 . p r. for the alarm 1, on par. 142
a .2. p r. for the alarm 2, on par. 160 a .3. p r. for the alarm 3, and on par. 178 a .4. p r. for the alarm 4, on par.
196
a .5. p r. for the alarm 5 and on par. 214 a . 6 . p r. for the alarm 6.
• The value to be retransmitted must be selected on par. 299
r t m .1 and/or on par. 308 rt m .2.
It is possible to choose what to visualize on display 2 selecting par. 278 ui . d .2.
8.2 Remote setpoint by analogue input
It is possible to enable remote setpoint function setting enab. or en . ts t. on par. 56 rem .s .
4...20mA
0...10V
Remote
Setpoint
PLC OUTPUT
Probe
AI1
Control loop
OUT
OUT
Probe
AI1
AI2
Remote
Setpoint
AI2
FNC SET
C1
C2
MAN
TUN
REM
A2A1 A3
FNC SET
C1
C2
MAN
TUN
REM
A2A1 A3
Control loop
DP1
CN3
USB1
CN1
CN2
.4
.5
.6
.7
.3
.2
.1
.0
.4
.5
.6
.7
.3
.2
.1
.0
+0
+1
1 2
3
4
5
6
7 8 9
10
12
QI.0
QI.1
QI.2
QI.3
QI.4
QI.5
QI.6
QI.7
13
14
15 16
17
18 19 20
21 22
23
24
AGND
(0V)
AI0
L+0
AI1
QI.0
QI.1
QI.2
QI.3
QI.4
QI.5
QI.6
QI.7
L+1
AQ.0
AQ.1
AGND
(0V)
CN401
CN401
The command setpoint is read on the
second analog input AI2: on par. 55
c. p r. 2
set
A.i n .2. The inputs reversal is possible
by setting
A . i n .1 on par. 55 c. p r.2.
Selecting
en . ts t. on par. 56 rem .s . it is
possible to switch from remote to local
setpoint pressing SET for 1 second.
The selection is stored even after the
subsequent device restarts.
In remote setpoint mode the led REM is
ON, it flashes when switching to local
setpoint mode.
The decimal point setting parameter for the image input (or remote setpoint) is locked and modifies
automatically when the command input decimal point is changed.
8.3 Remote setpoint by serial input
It is possible to enable remote setpoint function selecting en.ser. or en .se. t. on par. 56 rem .s. The
remote setpoint must be written on the word modbus 1249 for the command 1 and 1250 for the
command 2 (with tenth of degree if the command process is a temperature sensor).
It is possible to switch from remote to local sepoint pressing SET for 1 second. In remote setpoint mode
the led REM is ON (if there is serial communication), it flashes when switching to local setpoint mode.
At restarting the controller keeps set in remote setpoint mode (the setpoint value is initialized to 0).

User manual - CN40x- 15
9 Controller Functions
9.1 Modification of main and alarm setpoint value
Setpoint value can be modified from keyboard as follows:
Press Display Do
1
Value on display 2 changes.
Increases or decreases the main setpoint
value.
2
SET
Visualizes the other setpoints on display 1.
Display 2 shows the setpoint type.
3
Value on display 1 changes.
Increases or decreases the alarm setpoint
value.
9.2 Automatic Tune
Automatic tuning procedure allows a precise regulation without delving into the PID regulation
algorithm. Selecting Auto on par. 73
t u n .1 (for the regulation loop 1), or on par. 98 tu n.2 (for the
regulation loop 2), the controller analyzes the proces oscillations and optimizes the PID parameters.
Led TUN flashes.
If the PID parameters are not yet selected, at the device switch-on, it is automatically launched the
manual Tuning procedure described into the next paragraph.
9.3 Manual Tune
Manual procedure allows the user greater flexibility to decide when to update PID algorithm
parameters. During the manual tuning, the device generates a step to analyze the system inertia to be
regulated and, according to the collected data, modifies PID parameters.
After selecting
Manu. on par. 73 t u n .1 , or on par. 98 tu n.2, the procedure can be activated in three ways:
• Running Tuning by keyboard:
Press FNC until display 2 shows tunE with display 1 on dis. and then press SET: display 1 shows Enab.
Led TUN switches ON and the procedure starts.
• Running Tuning by digital input:
Select t
unE on par. 231 d .i .1 . F. (or on par. 239 d.i .2.F., par. 247 d .i . 3 . F. , par. 255 d .i .4 . F. ). At first activation
of digital input (commutation on front panel) led TUN led switches on and at second activation
switches off.
• Running Tuning by serial input:
Write 1 on word modbus 1216 (command 1) or 1217 (command 2): led TUN switches ON and the
procedure starts. Write 0 to stop the tuning.
To avoid an overshoot, the treshold where the controller calculates new PID parameters is determined
by this operation:
Tune threshold = Setpoint -
“Set Deviation Tune”
(par. 74 s.d.t.1 or par. 99 s.d.t.2)
Ex.: if the sepoint is 100.0∞C and the Par.32
s.d.t.1 is 20.0∞C the threshold to calculate PID parameters
is (100.0 - 20.0) = 80.0∞C.
For a greater precision on PID parameters calculation it is suggested to start the manual tuning
procedure when the process deviates from the setpoint.
9.4 Tuning once
Set once on parameter 73 t u n .1 , or on parameter 98 tu n .2.
Autotuning procedure is executed only once at next CN40x restart. If the procedure doesn’t work, will
be executed at next restart.

16 - CN40x - User manual
9.5 Synchronized tuning
Set sYNch . on parameter 73 t u n .1 or on parameter 98 tu n .2.
This procedure has been conceived to calculate correct PID values on multi-zone systems, where each
temperature is influenced by the adjacent zones.
Writing on word modbus 1216 (for regulation loop 1) or 1217 (for regulation loop 2) the controller
works as follows:
Word value Action
0 Tune off
1 Command output OFF
2 Command output ON
3 Tune active
4 Tune completed: command output OFF (read only)
5 Tune not available: softstart function enabled (only reading)
Here below the functioning for regulation loop 1: the master switches-off or turns-on all zones (value
1 or 2 on word 1216) for a time long enough to create inertia on the system.
At this point the autotuning is launched (value 3 on word 1216). The controller executes the procedure
for the calculation of the new PID values. When the procedure ends, the controller switches off the
command output and selects the value 4 on word 1216. The master, who will always read the word
1216, will control the various zones and when all will have finished, will bring to 0 the value of word
1216: the various devices will regulate the temperature independently, with the new calculated values.
N.B. The master must read the Index 0x400E at least every 10 seconds or the controller will automatically
exit the autotuning procedure.
9.6 Digital input functions
The CN40x functions related to digital inputs, can be enabled by parameters 231 d .i .1 . F. , 239 d.i.2.F., 247
d .i . 3 . F. and 255 d .i .4 . F. .
•
2t.Sw .: Two threshold setpoint modification: with digital input active the CN40x regulates on SET2,
otherwise reulates on SET1;
•
2t .Sw .i .: Modification of 2 setpoints by digital input with impulse command;
•
3 t.S w .i .: Modification of 3 setpoints by digital input with impulse command,
•
4 t.S w .i .: Modification of 4 setpoints by digital input with impulse command,
•
st. /St.: Start / Stop of the controller by digital input with impulse command,
•
ru n .: The regulation is enabled only with digital input active,
•
HoLd: With digital input active the conversion is locked (visualization maintenance function);
•
tune: Enables/disables the Tuning if par. 73 t u n .1 or par. 98 tu n .2 is selected as manu.;
•
au.ma.i.: If par. 48 a.ma.1. or par. 67 a.ma.2. is selected as enab. or en.sto. , with impulse command on
digital input, the CN40x switches the related regulation loop, from automatic to manual and vice
versa.
•
au.ma.c.: If par. 48 a.ma.1. or par. 67 a.ma.2. is selected as enab. or en.sto. the CN40x switches to manual
the related regulation loop, with digital input active, otherwise the regulation is automatic.
•
Act. ty.: On the regulation loop selected for this function (par. 234 d . i .1 . r. or 242 d .i . 2. r. or 250 d .i .3. r.
or 258
d .i .4. r.), the CN40x execute a cooling type regulation with digital input active, otherwise the
regulation is of heating type;
•
A.i . 0: Zero tare function: brings the related analogue input to 0. The analogue input is selected on
par. 233
d . i .1 . p . or 241 d .i .2. p. or 249 d .i .3. p. or 257 d .i .4 . p .
• M. reS.: Allows the reset of the output if manual reset is active for the alarms and for the command
outputs selected on par. 234
d . i .1 . r. or 242 d .i .2. r. or 250 d .i .3. r. or 258 d .i .4 . r.;
•
t.1.run: If timer 1 is enabled (par. 328 t m r .1 different from di s a b .), with digital input active, the timer is
switched to RUN, otherwise is kept in STOP;
•
t .1 . s . e . : If timer 1 is enabled (par. 328 t m r.1 different from di s a b .), acting on the digital input, the status
of the timer switches from STOP to RUN e vice versa;•
t .1 . s t a . : If il timer 1 is enabled (par. 328 t m r .1
differnet from
di s a b .), acting on the digital input, the timer is switched to RUN;
•
t .1 . e n d . : If il timer 1 is enabled (par. 328 t m r.1 differnet from di s a b .), acting on the digital input, the
timer is switched to STOP;

User manual - CN40x- 17
• t.2.run: If timer 2 is enabled (par. 331 t m r. 2 different from di s a b .), with digital input active, the timer
is switched to RUN, otherwise is kept in STOP;
•
t.2. s . e.: If timer 2 is enabled (par. 331 t m r. 2 different from di s a b .), acting on the digital input, the
status of the timer switches from STOP to RUN e vice versa;
•
t.2. s t a .: If timer 2 is enabled (par. 331 t m r. 2 different from di s a b .), acting on the digital input, the
timer is switched to RUN;
•
t.2. e n d .: If timer 2 is enabled (par. 331 t m r. 2 different from di s a b .), acting on the digital input, the
timer is switched to STOP;
•
Lo . cfG.: With digital input active, the access to setpoint configuration/modification is locked;
•
reM.s. e.: If on par. 56 rem .s . it is selected enab. or en.ser.), with digital input active the remote setpoint
is enabled, otherwise the setpoint is local. On par. 234
d . i .1 . r. or 242 d .i .2. r. or 250 d .i .3. r. or 258 d .i .4 . r.
it is necessary to select the reference regulation loop.
9.7 Automatic / Manual regulation for % output control
This function allows to switch from automatic functioning to manual command of the output
percentage.
With par. 48
A . m a .1 . (for regulation loop 1) or par. 67 A. m a .2. (for regulation loop 2) it is possible to select
two modes.
1 First selection (
enab.) allows to eneble with FNC the writing p.--- on display 1, while on display 2 is
showed
autom.
Press SET to visualize manu.; it’s now possible, during the process visualization, modify through the
keys
c
and
d
the output percentage. To back to automatic, with the same procedure, select autom.
on display 2: immediately led MAN switches off and functioning backs to automatic.
2 Second selection (
en.sto.) enables the same functioning but with two important variants:
• If there is a temporary power failure or after switch-off, the manual functioning as well as the
previous output percentage value will be maintained at restarting.
• If the sensor breaks during automatic functioning, the controller switches to manual mode while
maintaining the output percentage command unchanged as generated by the PID immediately
before breakage.
Ex: on an extruder the command in percentage of the resistance (load) is maintained also in case of
input sensor failure.
9.8 Heater Break Alarm on CT (current transformer - only
on CN401-111445 and CN402-x)
This function allows to measure load current to manage an alarm during a malfunctioning with power
in short circuit, always open or partial break of the charge. To enable this function set
50 H z or 60 H z on
par. 287
ct F. and the value of the connected transfomer, on par. 288 ct v..
• Select on par. 289
H.b.a.r. the regulation loop referred to the current measure and the Heater Break
Alarm intervention.
• Select on par. 290
H.b.a.t. the Heater Break Alarm intervention threshold in Ampere.
• Select on par. 291
ocu .t. the intervention threshold in Ampere to control the overcurrent.
• Select on par. 292
H.b.a.d. the delay time in seconds for the Heater Break Alarm intervention.
• It is possible to associate an alarm, selecting
H.b.a. on par. 123 a L .1 . F. on par. 141 a L.2.F. or par. 159 a L. 3 . F.
or par. 177
a L.4. F. or par. 195 a L. 5 . F. or par. 213 aL.6.F.
It is possible to visualize on display 2 the average current, selecting AMPEr. on par. 278 vi . d .2.
Selecting 0 on par. 290
H. b .A. t. it is possible to visualize the current consumption without generating
an Heater Break Alarm.

18 - CN40x - User manual
9.9 Dual Action (Heating-Cooling)
CN40x is suitable also for systems requiring a combined heating-cooling action.
The command output has to be configured as PID for Heating (Par. 38
a c . t .1 or Par. 57 ac. t.2 = Heat and
P. b . 1 or P. b . 2 greater than 0), and one of the alarms (A L.1 . F. , AL. 2. f. , AL.3. f. , A L.4. f . , AL.5. f. or A L. 5 . F.) has to be
configured as
co o L.
The command output must be connected to the actuator responsible for heating, while the alarm will
control cooling action.
Parameters to be configured for the heating PID are:
a c . t .1 or a c. t.2 = Heat Command output action type (Heating);
P. b . 1 or p. b . 2: Heating proportional band;
i . t. 1 or i . t. 2: Integral time of heating and cooling;
d . t. 1 or d . t. 2: Derivative time of heating and cooling;
c. t. 1 or c. t. 2: Heating time cycle.
Parameters to be configured for the cooling PID related to regulation loop 1 and alarm 1 are:
A L .1 . F. = c o o L. Alarm 1 selection (Cooling);
p.b.m.1: Proportional band multiplier;
o.d.b.1: Overlapping / Dead band;
c. c. t.1: Cooling time cycle.
Par.
p.b.m.1 (that renges from 1.00 to 5.00) determines the proportional band of
cooling action basing on the formula:
Proportional band for cooling action =
p. b. 1 x p.b.m.1.
This gives a proportional band for cooling which will be the same as heating band if p.b.m.1 = 1.00, or 5
times greater if
p.b.m.1 = 5.00.
Integral and derivative time are the same for both actions.
Par.
o.d.b.1 determines the percentage overlapping between the two actions. For systems in which
the heating output and cooling output must never be simultaneously active a Dead Band (
o.d.b.1 ≤ 0),
must be configured, vice versa you can configure an overlapping (
o.d.b.1 > 0).
The following figure shows an example of dual action PID (heating-cooling) with
i . t. 1 = 0 e d . t. 1 = 0.
1
ACTIVE
ACTIVE
SPV
PV
x = COOL
x = COOL
x = COOL
< 0
= 0
> 0
(HEAT)
(HEAT)
(HEAT)
COMMAND OUTPUT (HEAT)
ALARM OUTPUT (COOL)
COMMAND OUTPUT (HEAT)
ALARM OUTPUT (COOL)
COMMAND OUTPUT (HEAT)
ALARM OUTPUT (COOL)
SPV
PV
ACTIVE
ACTIVE
SPV
PV
ACTIVE
ACTIVE
2
ACTIVE
ACTIVE
SPV
PV
x = COOL
x = COOL
x = COOL
< 0
= 0
> 0
(HEAT)
(HEAT)
(HEAT)
COMMAND OUTPUT (HEAT)
ALARM OUTPUT (COOL)
COMMAND OUTPUT (HEAT)
ALARM OUTPUT (COOL)
COMMAND OUTPUT (HEAT)
ALARM OUTPUT (COOL)
SPV
PV
ACTIVE
ACTIVE
SPV
PV
ACTIVE
ACTIVE

User manual - CN40x- 19
3
ACTIVE
ACTIVE
SPV
PV
x = COOL
x = COOL
x = COOL
< 0
= 0
> 0
(HEAT)
(HEAT)
(HEAT)
COMMAND OUTPUT (HEAT)
ALARM OUTPUT (COOL)
COMMAND OUTPUT (HEAT)
ALARM OUTPUT (COOL)
COMMAND OUTPUT (HEAT)
ALARM OUTPUT (COOL)
SPV
PV
ACTIVE
ACTIVE
SPV
PV
ACTIVE
ACTIVE
Parameter c. c.T.1 has the same meaning of cycle time for heating action c. t. 1.
Parameter c o . f .1 (Cooling Fluid) pre-selects the proportional band multiplier p.b.m.1 and the cooling PID
cycle time
c. c.T.1 according to cooling fl uid type:
c o . f .1
Cooling fl uid type
p.b.m.1 c. c. t.1
Ai r
Air 1.00 10
oi L
Oil 1.25 4
H2o
Water 2.50 2
Once parameter
c o . f .1 has been selected, the parameters p.b.m.1, o.d.b.1 and c. c.T.1 can be however
modifi ed.
9.10 LATCH ON Function
For use with input po t. and with linear input (0..10 V, 0..40 mV, 0/4..20 mA) t is possible to associate start
value of the scale (par. 4
L.L.i .1 or par. 21 L.L.i .2) to the minimum position of the sensor and value of the
scale end (par. 5
u.L.i.1 or par. 22 u.L.i .2) to the maximum position of the sensor (par. 10 L t c .1 or par. 27
Lt c.2 confi gured as stndr).
It is also possible to fi x the point in which the controller will display 0 (however keeping the scale
range between
L.L.i .1 / L. L.i .2 and u.L.i. 1 / u.L.i.2) using the
“virtual zero”
option by selectin u.0.sto. or
u.0.t.on. on par. 10 L t c .1 or 27 Lt c.2. Selecting u.0.t.on. the virtual zero must be reset at each switching
on; selecting
u.0.sto. the virtual zero will remain fi xed once calibrated. To use the LATCH ON function,
confi gure the par.
L t c .1 or27 Lt c.2.
1
Then refer to the following table for the calibration procedure:
Press Display Do
1
FNC
Exit parameters confi guration. Display 2
visualizes writing
La t c.
Place the sensor on minimum operating
value (corresponding to
L.L.i .1 / L. L.i .2)
2
Store value on minimum.
Display shows
Lo w .
Place sensor on maximum operating value
(corresponding to
u.L.i.1 / u.L.i.2).
3
Store value on max.
Display shows
Hi G h .
To exit standard proceeding press SET.
For
“virtual zero”
setting, place the sensor to
zero point.
4
FNC
Set virtual zero. Display shows
zero .
If
“Virtual zero at start”
is selected, point 4
must be repeated at each starting.
To exit procedure press SET.
1 The tuning procedure starts by exiting the confi guration after changing the parameter.

20 - CN40x - User manual
9.11 Soft-Start Function
CN40x is provided with two types of softstart selectable on parameter 264 SS. tY. (
“Softstart Type”
).
1 First selection (
GrA d .) enables gradient softstart. At starting the controller reaches setpoint basing
on the rising gradient set on parameter 266
SS. G r. (
“Softstart Gradient”
) in Unit/hour (ex. °C/h). If
parameter 269
SS . ti . (
“Softstart Time”
) is diff erent to 0, at starting when the time selected on par.
269 is elapsed, the controller stops to follow the gradient and reaches setpoint with the maximum
power.
2 Second selection (
PErc.) enables output percentual softstart. On par. 268 SS. tH. it is possible to set
the threshold under which starts the softstart (
“Softstart Threshold”
). On par. 267 SS.PE. (
“Softstart
Percentage”
) an output percentage is selectable (from 0 to 100), which controller keeps until the
process exceeds the threshold set on par. 268 or until the time in minutes set on par. 269
SS . ti .
(
“Softstart Time”
word 2084).
If the Sof-Start function is active the automatic/manual Tuning function cannot be activated.
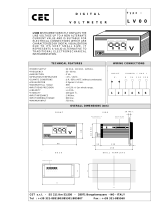
9.12 Pre-Programmed cycle
Pre-programmed cycle function activates by setting
Ena b.
on parameter 263 p r. cY. .
Controller reaches setpoint 1 basing on the gradient set on parameter 266
SS. G r. , then it reaches max.
power up to setpoint 2. When the process reaches max. power, this setpoint is maintained for the time
set on parameter 270
m a . t .i . .
At expiry, process will reach ambient temperature according to gradient entered on parameter 271
f a . G r. , then command output will be disabled and display will visualize Stop.
Setpoint
Time
Setpoint 1
Setpoint 2
Maintenance time
Mantenimento
Cooling
RareddamentoMax Power
Max Potenza
Rising gradient
Gradiente di salita
Cycle starts at each activation of the controller, or via digital input if it is enabled for this type of
functioning (parameters 231, 239, 247, 255 set as
st./st.
or
rUn
).
9.13 Retransmission function on analogue output
If not used as command, the analogue output can be used to retransmit process/ setpoint/ current
read by the C.T. input/ output percentage.
Select on parameter 298
r t M .1 (“Retransmission 1”) or on parameter 308 rtM.2 (“Retransmission 2”) the
value to be retransmitted and on parameter 299
r.1 . t Y . (“Retransmission 1 Type”) or on parameter 309
r.2. tY. (“Retransmission 2 Type”) the output type.
It is possible also to select on parameters 300
r.1.L.L. and 301 r.1 . u . L . or 310 r.2.L.L. and 311 r.2. u .L. the input
value rescale limites.
/