Page is loading ...

FORM NO. Z2570
REV. A-09/18/2018
PERLICK RESIDENTIAL ICED COFFEE DISPENSING KIT
To prevent appliance or component damage and injury, read these
instrucons thoroughly prior to installaon and operaon.
RS-CDK
INSTALLATION
INSTRUCTIONS

PERLICK RESIDENTIAL RS-CDK INSTALLATION INSTRUCTIONS
2 | perlick.com/residential
CONTENTS
3 Introducon
4 Installaon

PERLICK RESIDENTIAL RS-CDK INSTALLATION INSTRUCTIONS
perlick customer service (800)558-5592 | 3
INTRODUCTION
Model Number: _____________________________________
Serial Number: _____________________________________
Purchase Date: _____________________________________
Dealer Name/Address:
__________________________________________________
__________________________________________________
__________________________________________________
Phone Number: ____________________________________
C
US
IMPORTANT!
Read and understand all information in this manual before attempting the installation. All plumbing
and electrical work must be performed by a qualified technician and conform to all applicable state
and local codes.
CONGRATULATIONS
CongratulaonsonyourpurchaseofaPerlickhighquality
residenal Beer Dispenser. Perlick has proudly manufactured
beerdispensingsystemsforover50yearsforbars,restaurants,
stadiums,arenasandlargevenuesaroundtheworld.Thatsame
technologyisusedineachandeveryresidenalbeerdispenser
weproduce,assuringyou’llpourfresh,coldbeerasthebrewery
intendedittobeenjoyed.
All Perlick products are built with commercial grade stainless
steel,providingyouwiththebeautyanddurabilityforalifeme
ofuse.Thisinstallaonguidewillshowyouhowtoproperly
installthedispensingequipmentonyourPerlickBeerDispenser.
We dedicate considerable me to ensure that our products
providethehighestlevelofcustomersasfacon. If,however,
service isrequired,callPerlickat 800.558.5592. Foryour own
protecon,neverreturnmerchandiseforcreditwithoutour
approval.
WethankyouagainforselecngahighqualityPerlickBeer
Dispenser.Cheers!
IMPORTANT!
The installation of the actual beer dispens-
er cabinet should happen prior to installing
the dispensing equipment. Refer to the
Installation Manual that accompanied the
Beer Dispenser for step-by-step installation
of the cabinet.
Keep CO2 cylinder away from heat.
Rupture disc vents at 122°F maximum.
Allow only properly trained and
experienced personnel to handle high pressure gas.
Do not drop or throw regulator or
CO2 cylinder.
Do not apply oil to the regulator!
PLEASE NOTE
The following instructions are for both the
Draft Arm (standard tower) and the Adara
Signature Beer Tower. Some photos and
drawings may only show the Draft Arm, but
the instructions will also apply to the Adara
Signature Beer Tower unless noted.
DANGER
!
DANGER
!
WARNING
WARNING

PERLICK RESIDENTIAL RS-CDK INSTALLATION INSTRUCTIONS
4 | perlick.com/residential
INSTALLATION
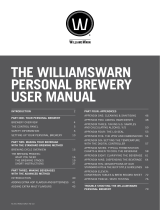
INSTALLATION OF DISPENSING EQUIPMENT
Openthetappingkitboxandbecomefamiliarwithitscompo-
nents.Theinstruconsonpages4through10willdemonstrate
howtoproperlyinstallthetappingequipmentonyourPerlick
BeerDispenser,withtheRS-CDKIcedCoeeDispensingKit.
Dispensing Head
Faucet Lead
Apply silicone to
bottom ange
Flange Sleeve
All hose connections
use worm-drive hose
clamps (view enlarged
to verify)
Quick Connect to
Nitrogen Regulator
Keg
Quick Connect to
Dispensing Head
Coee Connection
NOTE: Image does not accurately reect posions of the
dierent elements within the unit. Posions and hose lengths
shown are to clearly illustrate proper connecon methods only.
Nitrogen Tank

PERLICK RESIDENTIAL RS-CDK INSTALLATION INSTRUCTIONS
perlick customer service (800)558-5592 | 5
INSTALLATION
MOUNTING HOLE TEMPLATE FOR DRAFT ARMS
AND ADARA SIGNATURE TOWERS
NOTE: If installing accessory kit on exisng unit, skip to
page 6.

PERLICK RESIDENTIAL RS-CDK INSTALLATION INSTRUCTIONS
6 | perlick.com/residential
INSTALLATION
INSTALLATION OF DISPENSING EQUIPMENT
Openthetappingkitboxandbecomefamiliarwithits
components.Ifthedispensingheadisgoingtobemountedon
acountertopdirectlyabovetherefrigeratedcabinet,havethe
countertoppre-drilledusingthesuppliedtemplateonpage12.
Makesurethattheaccessholeintherefrigeratedcabinetisin
linewiththecountertopholes.Removeanyobstruconsfrom
theaccessholeoftherefrigerator.
Followinstruconsonpages8through11toproperlyinstallthe
tappingequipmentonyourPerlickunit,orwatchourBeer
DispenserTappingInstallaonvideo.
NOTE: Wash tapping devices thoroughly. Flush beer
and faucet lines, as well as the tapping device (keg
coupler) with fresh water.
IF YOU ARE INSTALLING A DRAFT ARM - SKIP TO PAGE 8. THE FOLLOWING INSTRUCTIONS ARE
ADDITIONAL PREPARATION STEPS FOR THE ADARA DISPENSING HEAD ONLY
1. Marktheairtubeforcorrectlengthdependentuponyourinstallaonscenario.Ifinstallingdirectlyontopoftherefrigerated
cabinet,makeamark5inchesfromtheboomofthetower(Figure1).Ifinstallingdirectlyontopofacountertop,addthe
depthofthecountertoptotheoriginal5inchesandmarkatthatnewdimension(Figure2).
Figure 1. Figure 2.

PERLICK RESIDENTIAL RS-CDK INSTALLATION INSTRUCTIONS
perlick customer service (800)558-5592 | 7
INSTALLATION
2. Removeair“T”fromendofairtubebylooseningfastenerholdingthetwohalvestogether.Removetheairtubefromthe
towerbeingcarefulnottodamagetheproducttube.
3. Cutairtubeatmarkmadeinstep1.Re-installairtubeintotowerandre-install“T”ontheendoftheairtubeso“T”facesthe
rearofthetower.
4. Cutproducttube3inchesbelowthe“T”andinstallincludedbarbedunionintoproducttubeandclampusingwormdrive
clamp.
Figure 3.
Figure 4.

PERLICK RESIDENTIAL RS-CDK INSTALLATION INSTRUCTIONS
8 | perlick.com/residential
INSTALLATION
Locate the dispensing head , black beer line(s), and hose
clamp(s).Slideoneendofeachbeerlineontothestainless
steeltubeswhichprotrudeouttheboomofthedispensing
headandclampght.
Removetransittapewithaulityknifearoundtheholeinthe
topoftheunitfrombothinsideandoutsideofthecabinet.
Gentlypunchoutfoamw/screwdriverandremove.Insertthe
beerline(s)throughtheholeinthecountertop.Movehead
asideandbeadsiliconearoundperimeterofhole,andthen
posiontheheadbackinplace.Fastenusingthe4chrome
screws included with the dispensing head. Wipe oexcess
siliconetocompletetheseal.
1.
2.
Usethe3/8”-thickfoampadincludedinthetappingkitand
rollintoacylinder.Frominsidethecabinet,insertthefoam
tubeupthroughtheholeinthecountertopunlitisrmly
againsttheinsulaoninthedispensinghead.Mark,thenput
awayanyexcessfoam.
NOTE: If using an Adara tower, foam needs to be installed so
that it is pressed up against the boom mounng ange of
the tower.
3.

PERLICK RESIDENTIAL RS-CDK INSTALLATION INSTRUCTIONS
perlick customer service (800)558-5592 | 9
INSTALLATION
Insert end of the snorkel up into the tower and screw air
scoopmounngbracketintovacatedholesabovethefan.
6.
InstalltheAirScoopKit.Startbyremovingtheuppersetof
screwslocatedabovethefanonthebackwallofthecabinet.
Assemblecomponentsfromthekitasfollows–Insertblack
snap bushing into air scoop mounng bracket, then insert
oneend oftheair snorkelthroughthesnapbushing.Azip
ecanbeinsertedbehindthemounngbrackettokeepthe
tubeinplace.
NOTE: For Adara Towers, the air snorkel consists of a 3 inch
piece of black tubing and a 3 inch piece of clear tubing that
slides over each other and then is clamped using included
worm drive clamp. The black tube is inserted per the above
instrucons and secured with the included zip e. The clear
tube is installed over the air “T” from the dispensing head and
secured with the included worm drive clamp. See Figure 4 on
page 5 for illustraon.
4.
5.

PERLICK RESIDENTIAL RS-CDK INSTALLATION INSTRUCTIONS
10 | perlick.com/residential
INSTALLATION
Slideoneendofrednitrogenhoseontothebarbngof
theregulatorandclamp.Slideotherendontoagrayquick
connect,clampandaachtocoeetankinlet.
7.
Slide black hose from dispensing head to quick connect,
clamp,andaachtocoeetankoutlet.
8.
Ontherightrearsidewallthereisadoublecolumnofscrews.
Removethelescrew.Locatethe safetychainanda#10x
1/2”sheetmetalscrewfromthepartsbag.Insertthescrew
throughtheclosed endlink ofthechainandghteninthe
vacantscrewhole.Thechaincannowbeusedtosecurethe
tankwith“S”hook,prevenngdamagetotheregulator.
9.

PERLICK RESIDENTIAL RS-CDK INSTALLATION INSTRUCTIONS
perlick customer service (800)558-5592 | 11
INSTALLATION
Locatethefaucetandinstallontothedispensingheadshanks.
Tightenwithsuppliedspannerwrench.Installblackhandle(s)
ontofaucet(s).
11.
Nitrogen tanks are shipped empty and must belled prior
to use. Turn the adjusng knob on the regulator counter-
clockwise unl the secondary gauge (top) reads zero.
Make sure that the valve at the boom of the regulator
where the red hose is connected is in the o posion as
shown. Watching the secondary pressure gauge, turn the
regulator adjusng knob clockwise unl the pressure is at
15psig.Adjustmentscanlaterbemadebasedonowrates.
IMPORTANT:AllpressureadjustmentsMUSTbemadewhen
theshut-ovalveisintheOFFposion!
10.

PERLICK RESIDENTIAL RS-CDK INSTALLATION INSTRUCTIONS
12 | perlick.com/residential
INSTALLATION
CONNECTING THE REGULATOR TO THE NITROGEN CYLINDER
1. Removetheblueplugfromtheregulatorng,butdonot
removethecarbonicwasher.
2. Screwregulatorontogascylindervalve.Tightenwithwrench
unlvercallystraight.Besurethattheshut-ovalveonthe
regulatorisintheOFF(horizontal)posion.
3. Placescrewclamp overthe end of redlineand push onto
regulatortailpiece.Tightenclampwithascrewdriver.
4. Turnregulatoradjusngscrewcounterclockwiseunlitturns
freely.
5. Turnhandvalvecounter-clockwiseonthenitrogencylinder
tothefullyopenposion.
6. Turn regulator adjusng screw clockwise unl desired
pressureisreached(approximately12-15lbs.)Tightenstop
nutonadjusngscrew.
7. Openshut-outvalveonboomofregulator.
8. Dilute a small amount of liquid dishwashing soap and rub
the soapy mixture around connecons. If bubbles appear,
ghtenconnecon.
NITROGEN
NITROGEN

FORM NO. Z2570
REV. A-09/18/2018
8300 West Good Hope Road, Milwaukee, WI 53223, USA
perlick.com/residenal • (800) 558-5592
Perlick Residential is a division of Perlick Corporation
© 2018 Perlick Corporation
/