Page is loading ...

PRX512M
PRX515
PRX535
PRX525
PRX518S
User’s Guide

2

3
Important Safety Instructions 4
Precautions 5
The PRX500 series power amplifier 7
Introduction to the PRX500 series 9
System Specifications 10-14
System Setup 16 -17
Setting Input Sensitivity 18
Setting the Gain 19
Application Examples 20-23
Reference 24
Cables and Connectors 25
Troubleshooting 26-27
Contact Information 28
Warranty Information 29
CONTENTS

4
1. Read these instructions.
2. Keep these instructions.
3. Heed all warnings.
4. Follow all instructions.
5. Do not use this apparatus near water.
6. Clean only with dry cloth.
7. Do not block any ventilation openings. Install in accordance with the manufacturer’s instructions.
8. Do not install near any heat sources such as radiators, heat registers, stoves, or other apparatus (including
amplifiers) that produce heat.
9. Do not defeat the safety purpose of the polarized or grounding-type plug. A polarized plug has two blades
with one wider than the other. A grounding-type plug has two blades and a third grounding prong. The wide
blade or the third prong are provided for your safety. If the provided plug does not fit into your outlet, consult
an electrician for replacement of the obsolete outlet.
10. Protect the power cord from being walked on or pinched, particularly at plugs, convenience receptacles, and
the point where they exit from the apparatus.
11. Only use attachments/accessories specified by the manufacturer.
12. Use only with the cart, stand, tripod, bracket, or table specified by the manufacturer, or sold with the
apparatus. When a cart is used, use caution when moving the cart/apparatus combination to avoid injury
from tip-over.
13. Unplug this apparatus during lightning storms or when unused for long periods of time.
14. Refer all servicing to qualified service personnel. Servicing is required when the apparatus has been
damaged in any way, such as power supply cord or plug is damaged, liquid has been spilled or objects have
fallen into the apparatus, the apparatus has been exposed to rain or moisture, does not operate normally, or
has been dropped.
15. WARNING: To reduce the risk of fire or electric shock, do not expose this apparatus to rain or moisture.
16. Do not expose this equipment to dripping or splashing and ensure that no objects filled with liquids, such as
vases, are placed on the equipment.
17. To completely disconnect this apparatus from the AC Mains, disconnect the power supply cord plug from the
AC receptacle.
Care and Cleaning
PRX500 series systems may be cleaned with a dry cloth. Do not get moisture into any of the openings in the
system. Ensure that the system is unplugged from the AC outlet before cleaning. In the event the DuraFlex finish
is damaged a touch up kit can be obtained from JBL Professional (part number 363972-001).
THIS APPARATUS CONTAINS POTENTIALLY LETHAL VOLTAGES. TO PREVENT ELECTRIC SHOCK OR
HAZARD, DO NOT REMOVE CHASSIS, INPUT MODULE OR AC INPUT COVERS. NO USER SERVICEABLE
PARTS INSIDE. REFER SERVICING TO QUALIFIED SERVICE PERSONNEL.
IMPORTANT SAFETY INSTRUCTIONS

5
WATCH FOR THESE SYMBOLS!
The lightning bolt triangle is used to alert
the user to the risk of electric shock.
The exclamation point triangle is used to
alert the user to important operating
or maintenance instructions.
The PRX500 series speakers covered by this manual are not intended for fixed installation and high moisture
environments. Moisture can damage the speaker cone and surround and cause corrosion of electrical contacts
and metal parts. Avoid exposing the speakers to direct moisture. Keep speakers out of extended or intense direct
sunlight. The driver suspension will prematurely dry out and finished surfaces may be degraded by long-term
exposure to intense ultra-violet (UV) light. PRX500 series speakers can generate considerable energy. When
placed on a slippery surface such as polished wood or linoleum, the speaker may move due to its acoustical
energy output. Precautions should be taken to assure that the speaker does not fall off a stage or table on
which it is placed.
Stand mounting safety precautions
Some PRX500 series models include a 36 mm receptacle cup to allow mounting on tripod stands or on a pole
over subwoofers. When using stands or poles, be sure to observe the following precautions:
• Check the stand or pole specification to be certain the device is designed to support the weight of the
speaker. Observe all safety precautions specified by the manufacturer.
• Always verify that the stand (or subwoofer /pole)is placed on a flat, level and stable surface and be
sure to fully extend the legs of tripod type stands. Position the stand so that the legs do not present a
trip hazard.
• Route cables so that performers, production crew, and audience will not trip and topple the speakers
over.
• Inspect the stand (or pole and associated hardware)before each use and do not use equipment with
worn, damaged or missing parts.
• Do not attempt to place more than one PRX500 series speaker on a stand or pole.
• Always be cautious in windy, outdoor conditions. It may be necessary to place additional weight (i.e.
sandbags)on the base of the stand to improve stability. Avoid attaching banners or similar items to any
part of a speaker system. Such attachments could act as a sail and topple the system.
• Unless you are confident that you can handle the weight of the speaker, ask another person to help
you get it onto the tripod stand or pole.
Hearing damage, prolonged exposure to excessive SPL
PRX500 series loudspeakers are easily capable of generating sound pressure levels (SPL) sufficient to cause
permanent hearing damage to performers, production crew and audience members. Caution should be taken to
avoid prolonged exposure to SPL in excess of 90 dB.
PRECAUTIONS

6

7
The PRX500 series power amplifier
AC POWER REQUIREMENTS
Standard PRX500 series speaker systems are equipped with a multi-channel Crown Class-D power amplifier
and loudspeaker specific DSP electronics and require appropriate AC power.
Before plugging a PRX500 speaker into an outlet ensure that it is able to provide the appropriate AC power as
set on the speaker.
A robust AC supply is necessary for maximum performance. If the supply is too weak the bass performance may
be affected and if it sags (drops) too much the system may self-mute to protect itself. As soon as the appropriate
AC supply is restored it will continue to operate. Plugging multiple systems into the same outlet and long
extension cord runs may affect the AC supply to the systems.
CAUTION
In compliance with safety agency criteria and proper system operation, it is critical that the system installer
observe all electrical safety practices at all times and provide proper earth grounding for all AC Power
connections.
Powering up
The main power switch is located on the input panel on the back of the enclosure. Always ensure that the
speaker system is the last thing you power up, and the first thing to turn off when operating your complete PA
system. If speaker systems are daisy chained together always turn off the last system in the chain first. Power
“on” is indicated by the illumination of the logo on the front of the enclosure.
Changing Voltage
Your PRX500 series speaker will typically be set at the factory to accommodate the power mains voltage in your
area. Before you set up your PRX500 series speaker for the first time it is a good idea to verify that the setting
of the selector is appropriate for the power in your area. In the event that you do need to change the voltage:
• Make sure that the speaker is powered off and the AC is disconnected from the speaker.
• Directly above the male IEC connector on the speaker is a voltage selector. Just slide the
switch to the appropriate setting.
• Set the voltage selector switch to the 115V or 230V setting as required for your area.
• After having reconfirmed that the correct voltage is selected, reconnect the AC (IEC connector)
and power the unit up.
DO NOT UNDER ANY CIRCUMSTANCES OPERATE THE UNIT WITH THE WRONG VOLTAGE SELECTED.
DOING SO MAY RESULT IN SERIOUS DAMAGE TO YOUR SPEAKER SYSTEM WHICH WILL NOT BE
COVERED BY WARRANTY.
Operating Temperature
The design of the Crown amplifier is such that it is very energy efficient and as a result does not get really hot.
In the rare event that it does get too hot it will automatically shut down to protect itself. When its temperature
has returned to within its operating range it will turn back on. A Condition under which this may occur is when
the system is operated in very high ambient temperatures and the heat sink on the rear of the enclosure is in
direct sunlight. Always ensure adequate cooling and appropriate shade.

8

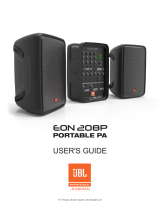
Thank you for choosing the JBL PRX500 series self-powered PA loudspeakers. There are five models in the
series, four full-range systems and one subwoofer. All are powered by integrated digital power amplifiers
developed by Crown, the most trusted name in professional sound reinforcement power amplification. In addition
to Crown power amplifiers, the systems are equipped with sophisticated DSP for EQ, crossover, system control
and protection. Engineered and manufactured by JBL Professional with precision and care, your PRX500 series
speaker will provide you with many years of flawless performance. To ensure you are always receiving optimum
performance we encourage you to review this user’s guide completely before hooking up your new system.
In addition to the high performance light weight Crown amplifier, PRX500 series utilizes the latest in JBL
transducer technology. New 400 watt neodymium Differential Drive
®
transducers not only provide high sound
pressure levels with minimum distortion and power compression, but they are also incredibly light. Combined
together in highly engineered enclosures, PRX500 series speaker systems deliver the highest performance to
weight ratio in the class – portable PA that’s actually portable.
All PRX500 systems are built road tough; covered with JBL’s DuraFlex™, one of the most durable finishes ever
created for a speaker and protected by heavy-duty foam backed steel grilles. The foam backing not only looks
excellent but it stops direct liquid intrusion and it does not affect the acoustics. The larger systems have an extra
layer of protection from the road in the form of tough polypropylene end-caps. These are independent of the
acoustic enclosure so in the event of really tough knocks the speaker’s performance will not suffer.
Single Box On a Pole Coverage
The PRX512 features a dual angle pole socket this provides flexibility in aiming the speaker. As a guide line, the
speaker should be positioned so that the audience cannot see the top or bottom panels of the speaker. The
PRX515 and PRX535 also feature a pole mount of the ‘single’ socket variety. When using stands or poles, be
sure to observe the precautions as stated in the “Precautions” section of the manual.
Introduction to the PRX500 series
PRX512M
PRX518S PRX515 PRX525 PRX535
9

10
SYSTEM SPECIFICATIONS
System Type:
Self powered 12", two-way, bass-reflex,
Frequency Range (-10 dB):
46Hz -20kHz (EQ in main position)
60Hz - 20kHz (EQ in monitor position)
Frequency Response (±3 dB):
76Hz -20kHz (EQ in main position)
90Hz - 20kHz (EQ in monitor position)
Coverage Pattern:
70º x 70º nominal
Directivity Index (DI):
10.2 dB
Directivity Factor (Q):
10.8
Crossover Modes:
DSP controlled 48dB filter slope
Crossover Frequency:
1.6KHz
System Power Rating:
500 W continuous, 1000W peak
LF Power amp:
Class-D, 400 Watt (continuous) at driver impedance
HF Power amp:
Class-D, 100 Watt (continuous) at driver impedance
Distortion:
Less than 0.1% at rated power
Maximum Peak Output:
133dB SPL
1
Signal indicators:
Overload: Red LED indicates input overload condition
Signal: Green LED indicates signal present
Input sensitivity:
Mic position: -25 dBu to 0 dBu
Line position: +28 dBu to +10 dBu
Input Impedance:
64 K Ohms (balanced), 32 K Ohms (unbalanced)
EQ:
Presets for use in Main and Monitor position
LF Driver:
1 x JBL 262F 380 mm (12 in) Differential Drive
®
woofer
HF Driver:
1 x JBL 2408H 37.5 mm (1.5 in) annular polymer diaphragm,
neodymium compression driver
Enclosure:
Trapezoidal, 18 mm, plywood
Suspension / Mounting:
Dual 36mm pole socket
Transport:
Integrated handle with backing cup
Finish:
Anthracite DuraFlex™ finish
Grille:
Powder coated, Anthracite, 18 gauge perforated steel
with acoustical transparent black foam backing.
Input Connectors:
Balanced XLR / 1/4 inch combo jack with XLR loop through,
Dimensions (H x W x D):
650 mm x 380 mm x 350 mm
(25.5 in x 15 in x 14 in)
Net Weight:
18 kg (40 lb.)
PRX512M
1
Maximum Peak output measured with IEC pink noise at 1 meter in front of speaker baffle under free space conditions. Measurement instrument
set to peak hold. Speaker muted and released at full power, recording maximum peak level.

11
System Type:
Self powered 15", two-way, bass-reflex,
Frequency Range (-10 dB):
45Hz -20kHz (EQ in flat position)
Frequency Response (±3 dB):
52Hz - 20kHz (EQ in flat position)
Coverage Pattern:
70º x 70º nominal
Directivity Index (DI):
10.3 dB
Directivity Factor (Q):
10.8
Crossover Modes:
DSP controlled 48dB filter slope
Crossover Frequency:
1.6KHz
System Power Rating:
500 W continuous, 1000W peak
LF Power amp:
Class-D, 400 Watt (continuous) at driver impedance
HF Power amp:
Class-D, 100 Watt (continuous) at driver impedance
Distortion:
Less than 0.1% at rated power
Maximum Peak Output:
133dB SPL
1
Signal indicators:
Overload: Red LED indicates input overload condition
Signal: Green LED indicates signal presents
Input sensitivity:
Mic position: -25 dBu to 0 dBu
Line position: +28 dBu to +10 dBu
Input Impedance:
64 K Ohms (balanced), 32 K Ohms (unbalanced)
EQ:
Presets for Main and Monitor position
LF Driver:
1 x JBL 265F 380 mm (15 in) Differential Drive
®
woofer
HF Driver:
1 x JBL 2408H 37.5 mm (1.5 in) annular polymer diaphragm,
neodymium compression driver
Enclosure:
Trapezoidal, 18 mm, plywood with polypropylene end caps
Suspension / Mounting:
Dual 36mm pole socket
Transport:
2 x die-cast handles with backing cup
Finish:
Anthracite DuraFlex™ finish
Grille:
Powder coated, Anthracite, 18 gauge perforated steel
with acoustical transparent black foam backing.
Input Connectors:
Balanced XLR / 1/4 inch combo jack with XLR loop through,
Dimensions (H x W x D):
815 mm x 440 mm x 465 mm
(32 in x 17.25 in x 18.25 in)
Net Weight:
26 kg (57 lb.)
PRX515
1
Maximum Peak output measured with IEC pink noise at 1 meter in front of speaker baffle under free space conditions. Measurement instrument
set to peak hold. Speaker muted and released at full power, recording maximum peak level.

12
System Type:
Self powered dual 15", two-way, bass-reflex,
Frequency Range (-10 dB):
45Hz -20kHz (EQ in flat position)
Frequency Response (±3 dB):
52Hz - 20kHz (EQ in flat position)
Coverage Pattern:
70º x 70º nominal
Directivity Index (DI):
10.3 dB
Directivity Factor (Q):
10.8
Crossover Modes:
DSP controlled 48dB filter slope
Crossover Frequency:
1.6KHz
System Power Rating
650 W continuous, 1300W peak
LF Power amp:
Class-D, 275 Watt (continuous) at driver impedance
LF2 Power amp:
Class-D, 275 Watt (continuous) at driver impedance
HF Power amp:
Class-D, 100 Watt (continuous) at driver impedance
Distortion:
Less than 0.1% at rated power
Maximum Peak Output:
135dB SPL
1
Signal indicators:
Overload: Red LED indicates input overload condition
Signal: Green LED indicates signal presents
Input sensitivity:
Mic position: -25 dBu to 0 dBu
Line position: +28 dBu to +10 dBu
Input Impedance:
64 K Ohms (balanced), 32 K Ohms (unbalanced)
EQ:
Presets for Flat or Boost
LF Driver:
2 x JBL 265F 380 mm (15 in) Differential Drive
®
woofer
HF Driver:
1 x JBL 2408H 37.5 mm (1.5 in) annular polymer diaphragm,
neodymium compression driver
Enclosure:
Trapezoidal, 18 mm, plywood with polypropylene end caps
Transport:
2 x die-cast handles with backing cup
Finish:
Anthracite DuraFlex™ finish
Grille:
Powder coated, Anthracite, 18 gauge perforated steel
with acoustical transparent black foam backing
Input Connectors:
Balanced XLR / 1/4 inch combo jack with XLR loop through,
Dimensions (H x W x D):
1300 mm x 440 mm x 465mm
(51 in x 17.25 in x 18.25 in)
Net Weight:
38 kg (84 lb.)
PRX525
1
Maximum Peak output measured with IEC pink noise at 1 meter in front of speaker baffle under free space conditions. Measurement instrument
set to peak hold. Speaker muted and released at full power, recording maximum peak level.

13
System Type:
Self powered 15", three-way, bass-reflex,
Frequency Range (-10 dB):
39Hz -20kHz (EQ in flat position)
Frequency Response (±3 dB):
46Hz - 20kHz (EQ in flat position)
Coverage Pattern:
90º x 50º nominal
Directivity Index (DI):
10.6 dB
Directivity Factor (Q):
11.4
Crossover Modes:
DSP controlled 24dB filter slope
Crossover Frequency:
430 Hz, 2.6KHz
System Power Rating:
650 W continuous, 1300W peak
LF Power amp:
Class-D, 400 Watt (continuous) at driver impedance
MF Power amp:
Class-D, 150 Watt (continuous) at driver impedance
HF Power amp:
Class-D, 100 Watt (continuous) at driver impedance
Distortion:
Less than 0.1% at rated power
Maximum Peak Output:
134dB SPL peak
1
Signal indicators:
Overload: Red LED indicates input overload condition
Signal: Green LED indicates signal presents
Input sensitivity:
Mic position: -25 dBu to 0 dBu
Line position: +28 dBu to +10 dBu
Input Impedance:
64 K Ohms (balanced), 32 K Ohms (unbalanced)
EQ:
Presets for Flat or Boost
LF Driver:
1 x JBL 265F, 380 mm (15 in) Differential Drive
®
woofer
MF Driver:
1 x JBL 195H, 165 mm (6.5 in) woofer
HF Driver:
1 x JBL 2408H, 37.5 mm (1.5 in) annular polymer diaphragm,
neodymium compression driver
Enclosure:
Trapezoidal, 18 mm, plywood with polypropylene end caps
Suspension / Mounting:
36mm pole socket
Transport:
2 x die-cast handles with backing cup
Finish:
Anthracite DuraFlex™ finish
Grille:
Powder coated, Anthracite, 18 gauge perforated steel
with acoustical transparent black foam backing.
Input Connectors:
Balanced XLR / 1/4 inch combo jack with XLR loop through,
Input Connectors:
1070 mm x 440 mm x 465 mm
(42 in x 17.25 in x 18.25 in)
Input Connectors:
33.5 kg (74 lb.)
PRX535
1
Maximum Peak output measured with IEC pink noise at 1 meter in front of speaker baffle under free space conditions. Measurement instrument
set to peak hold. Speaker muted and released at full power, recording maximum peak level.

System Type:
Self powered 18", two-way, bass-reflex,
Frequency Range (-10 dB):
37Hz -140Hz
Frequency Response (±3 dB):
52Hz – 110Hz
Crossover Modes:
DSP controlled 48dB filter slope
Crossover Frequency:
110Hz
System Power Rating:
500 W continuous, 1000W peak
LF Power amp:
Class-D, 500 Watt (continuous) at driver impedance
Distortion:
Less than 0.1% at rated power
Maximum SPL:
129dB SPL peak
1
Signal indicators:
Overload: Red LED indicates input overload condition
Signal: Green LED indicates signal presents
Input sensitivity:
-25 dBu to 0 dBu
Input Impedance:
34K Ohms (balanced), 18K Ohms (unbalanced)
Polarity:
0° or 180° phase shift
LF Driver:
1 x JBL 2044E 460 mm (18 in) woofer
Enclosure:
Rectangular, 18 mm, plywood
Suspension / Mounting:
36mm pole socket on top
Transport:
2 x die-cast handles with backing cup
Finish:
Anthracite DuraFlex™ finish
Grille:
Powder coated, Anthracite, 18 gauge perforated steel
with acoustical transparent black foam backing.
Input Connectors:
Balanced XLR 1/4 inch combo jack with XLR loop through. (stereo)
Dimensions (H x W x D):
725 mm x 535 mm x 610 mm
(28.5 in x 21 in x 24 in)
Net Weight:
36 kg (79 lb.)
14
PRX518S
1
Maximum Peak output measured with IEC pink noise at 1 meter in front of speaker baffle under free space conditions. Measurement instrument
set to peak hold. Speaker muted and released at full power, recording maximum peak level.

15
Notes

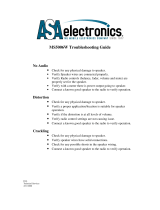
PRX500 amplifier input configuration for
PRX512M, PRX515, PRX525 and PRX535
full-range models:
Features:
1 - EQ BOOST / FLAT: When set in the
“FLAT” position, frequency response is linear
and unaltered. When “Boost” is selected,
internal equalization is applied to enhance low
frequency and high frequency response.
“FLAT” will provide greater accuracy of
reproduced music, higher speech intelligibility
and maximum overall level. “BOOST” is
particularly useful at lower levels to enhance
pre-recorded music. The feature provides
flexibility without the need to use an external
equalizer. The chart (at left) shows the effect
of the “BOOST” setting.
PRX512M, MAIN / MONITOR:
On the PRX512M: Switching between “MAIN”
and “MONITOR” optimizes the system for
use as either a main full-range system, or
a stage monitor.
2 - INPUT MIC / LINE: Allows the selection of different input sensitivities to permit the connection of many
different sources, with or without the use of a mixer or external microphone preamplifier. See “Setting
Input Sensitivity” on page 18.
3 - LEVEL: Sound level adjustment. With the input in the “MIC” position the level can be adjusted over a large
range. In the “LINE” position most typical applications will require that the level control is set at 12 o’clock.
(More details are outlined in “Setting the Input Sensitivity” and “Setting the Gain”).
6 - POWER SWITCH: Turns the power on. The illuminated logo in the front of the speaker serves also as a
power “on” indictor.
7 - LINE SELECT: Allows the user selection for different local voltage ratings.
8 - AC LINE INPUT: Standard IEC AC mains input connector.
Indicators:
4 - SIGNAL: Signal indicator. The green LED illuminates when a signal is present.
5 - LIMIT: Protection indicator. The red LED illuminates when the system overload protection is active.
Connectors:
9 - XLR / 1/4 inch phone jack balanced input connector
(see Reference section page 22 for information on balanced, unbalanced cables and connectors).
10 -XLR male balanced output connector. This connector provides a full-range signal which can be daisy
chained to another speaker.
16
SYSTEM SET UP - FULL RANGE MODELS
10
9

PRX500 amplifier input configuration for
PRX518S Subwoofer model:
Features:
1 - XOVER IN / OUT: Pressing this button
engages a high-pass filter at 110 Hz. This 4th
order active filter allows a smooth transition
between the subwoofer and a full range speaker
connected to the output connector.
2 - POLARITY INVERT: Allows you to set the
polarity of the subwoofer to either 0° (no change)
or 180° (inverse polarity). The correct polarity
setting will produce the best blend between the
subwoofer and the full-range speaker and the
strongest perceived bass response at the
listening position. This is especially useful when
the subwoofer is placed at a different distance
from the listening position than the full-range
speakers. If the bass response seems weak
try inverting the polarity.
3 - LEVEL: Sound level adjustment. The 12 o’clock position is a good starting point for most usages.
Once the full-range system has been connected the level can be varied to match and deliver the
desired balance (for details see Setting the Gain on page 19).
6 - POWER SWITCH: Turns the power on. Power “on” status is indicated with the illumination of the
logo on the grille.
7 - LINE SELECT: Allows the user selection for different local voltage ratings.
8 - AC LINE INPUT: Standard IEC AC mains input connector.
Indicators:
4 - SIGNAL: Signal indicator. The green LED illuminates when a signal is present at the input connector.
5 - OVERLOAD: The red LED illuminates when the system overload protection is active. If the input signal is too
strong or the “LEVEL” control set too high, the red LED will illuminate constantly. Illumination of the
“OVERLOAD” LED can be avoided by reducing the input level or turning down the “LEVEL” control
to the point at which the red LED occasionally flickers.
Connectors:
9 & 11 - XLR / 1/4 inch phone jack balanced input connector (see Reference section page 22 for information).
10 & 12 - XLR male balanced output connector. This connector provides a full-range or high-passed signal.
dependent on the setting of the “XOVER” switch. In addition to connecting a full-range system to the
output, it’s also possible to daisy chain subwoofers together.
Note3:
A single subwoofer can be used with a stereo source. The integral differential circuits sums the low frequency
information from the left and right channel to a mono signal, ready for reproduction by the subwoofer.
SYSTEM SET UP - SUBWOOFER
17

PRX500 series systems have been designed to allow the connection of a variety of sources. This provides a great deal
of versatility, especially with the PRX512M and PRX515, as a microphone or instrument can be connected directly to
the input. Low levels output from consumer products like MP3 and CD players, can also be accommodated.
There are two user selectable gain or input sensitivity ranges: Mic and Line. For the majority of applications, the
system will be receiving a signal from a mixer, equalizer of other professional grade product. In this case “Line” should
be selected and the “LEVEL” adjusted to the 12 o’clock position indicated by the +4 dB region. The “LEVEL”control can
then be trimmed to optimize the performance of the system (see Setting The Gain).
When a microphone, instrument or other consumer product is connected to the system, first ensure that the “LEVEL”
control is at its minimum, anti-clockwise, OFF position. Then select the “Mic” input sensitivity and slowly increase the
level. If the “overload” LED illuminates you should back the level down again. If the “overload” LED illuminates and the
“LEVEL” control is barely cracked open then you should try selecting the “LINE” input sensitivity range.
WARNING: SELECTING THE “MIC” POSITION WITH THE LEVEL CONTROL IN ANY POSITION OTHER
THAN THE “OFF” POSITION MAY RESULT IN EXTREMELY HIGH SPLs.
SETTING THE INPUT SENSITIVITY
LINE
MIC
18

The following levels should be used as a reference if you know the maximum output in dBu of the source
connected to the system’s input. For each position stated below there is an input signal level in dBu that is
required to deliver absolute maximum output of the system.
LINE
Level position Input level required to deliver maximum output
Full “on” +10 dBu
3 o’clock +12 dBu
12 o’clock +17 dBu
9 o’clock +28 dBu
MIC
Level position Input level required to deliver maximum output
Full “on” -25 dBu
3 o’clock -23 dBu
12 o’clock -18 dBu
9 o’clock -7 dBu
Only a properly setup system will guarantee maximum performance with a minimum of distortion and feedback.
(This is as true for self powered systems as it is for passive systems). An easy to rule to follow is:” Everything
should clip at once.”
Following these simple steps will ensure you are getting the optimum performance out of your complete system.
1. Once the source has been connected to the input of your mixer, adjust the input sensitivity (or trim) so
that the highest input levels are set to just before clip (or when the input LED just starts to flicker).
2. Position the channel fader for that input to 0 dB.
3. Position the Master output fader to 0 dB.
4. With the “Mic/Line” button set to “Line” (because the system is receiving a line level signal, or
commonly called a +4 dB signal), set the “Level” control to the 12 o’clock position, and adjust until the
“overload” LED just begins to flicker.
For in depth articles related to gain structure please refer the website where you can find the JBL Sound System
Design Reference Manual; http://www.jblpro.com/pub/technote/ssdm_99.pdf
+17
+12
+10
+28
0
-18
-23
-25
-7
0
SETTING THE GAIN
19

Basic sound reinforcement system
This is a very basic sound system. PRX500 series speakers allow the direct connection of sound sources,
without the need for extra mixer or pre-amplifier. The XLR or 1/4 inch input jack provides versatility and cabling
options and the mic/line input sensitivity selector switch optimizes the speaker gain for the input source.
Additional speakers may be connected (daisy chained together) in mono mode.
APPLICATION EXAMPLES
MP3
MP3
PRX515M
20
/