Galaxy Equipment 177SMG8 User manual
- Category
- Mincers
- Type
- User manual

- 1 -
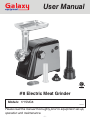
User Manual
#8 Electric Meat Grinder
Models: 177SMG8
05/2019
Please read the manual thoroughly prior to equipment set-up,
operation and maintenance.

- 2 -
User Manual
IMPORTANT SAFETY INFORMATION
Please operate according to Operation Method and read the proper operation procedures before
using. Please assemble and operate carefully, taking care not to scratch skin. To avoid any
possible injuries, please do not put hands around the paddles.
• Keep all loose clothing away from moving parts when the grinder is in use.
• Keep fingers and hair away from moving parts when the grinder is in use.
• DO NOT run the grinder without meat in the grinder head. Severe damage to the head and auger
may be a result.
• Turn the grinder off before unplugging it from the outlet.
• Always unplug the grinder when changing a part (head, plates, blades stuffing tubes, etc.) on the
grinder.
• Remove all tendons, bone, and skin from meat before grinding.
• Unplug the grinder when assembling or disassembling the unit.
• Supervision is necessary when the appliance is used near children.
• When carrying the unit, be sure to hold the motor housing with both hands.
• Never remove or attach the hopper plate, head, or cap while the motor is running.
• Do not disassemble the grinder during operation.
• Do not use the grinder if the power cord is broken.
• To protect against risk of electrical shock do not put any electrical parts (motor, cord, etc.) in water
or other liquid.
• Unplug from the outlet when not in use before putting on or taking off parts and before cleaning.
• Avoid contact with moving parts. Never feed food by hand. Always use a food pusher. Do not use
fingers to scrape food away from the grinder plate while the appliance is operating. Otherwise a cut
type injury may result.
• Do not operate any appliance with a damaged cord or plug or after the appliance malfunctions, or is
dropped and damaged in any manner.
• The use of attachments not recommended or sold by the manufacturer may cause fire, electric
shock, or injury.
• Do not use outdoors. Light-duty, occasional use only. Do not use for industrial purpose.
• Do not let the cord hang over edge of the table or counter.
• SAVE THESE INSTRUCTIONS.
WARNING
The warnings, cautions, and instructions discussed in this instruction manual
cannot cover all possible conditions or situations that could occur. It must be
understood by the operator that common sense and caution are factors that
cannot be built into this product, but must be supplied by the operator.

- 3 -
User Manual
Technical Details
ITEM # CAPACITY POWER SUPPLY MOTOR POWER DIMENSION WEIGHT
177SMG8 198lb./hr 120V/60Hz 2/3HP (500W) 500x445x410mm 40 lb.
Before Use
• Before plugging in, ensure the “ON/OFF/ Reverse” switch is turned to "OFF" posion.
• Disassemble the grinder head and wash each part thoroughly in warm soapy water.
• Remove all packing grease and oil from the surfaces.
• Dry all parts before re-assembly.
• Keep packing material for any future storage of the grinder and grinder parts.
Assembly Instructions
• Insert the grinder head into the gear housing; be sure that the hopper tray throat is facing
upward. (See Fig 1)
• Holding the grinder head with one hand, place the locking knob into the hole on the side of the
motor housing and ghten it clockwise. (See Fig 2)
• Insert the auger into the grinder head. You may need to turn the auger to align it with the drive
sha of the motor. (See Fig 3)
• Place the cung knife blade onto the feed screw sha of the auger with the at edge of the
blade facing the front (See Fig 4). If blade is not seated properly, meat will not be ground.
• Place your desired grinding plate next to the cung blade. The notch in the plate should align
with the protrusion on the grinder head. (See Fig 5)
• Firmly screw the ring nut onto the grinder head. Do not over-ghten it. (See Fig 6)
• Insert the Hopper meat tray onto the throat of the head. (See Fig 7)
Fig 1 Fig 2 Fig 3
Fig 4 Fig 5 Fig 6 Fig 7

- 4 -
User Manual
If Jamming Occurs or Performance Slows
In case of jamming switch the appliance o by turning the “R / ON” switch to "R" posion and the
“ON/OFF/ Reverse” switch to "R" posion. The feed screw will be rotang in the opposite direcon
and the head will get empty. If it doesn't work, switch the unit o and clean it.
• Shut the grinder o immediately.
• Remove the power cord from the outlet.
• Carefully remove the grinder head ring nut, grinder plate, and cung blade.
• Carefully clean the grinder plate holes thoroughly and remove any tendons from around the
cung blade.
• Replace the cung blade and grinder plate then screw the ring nut back onto the grinder head.
• Connue grinding.
• Repeat these steps as necessary to enhance the grinder performance.
Sausage Stuffing Assembly
• Be sure the grinder is unplugged.
• Aach the grinder head to the motor and install the auger as previously described in the General
Assembly instrucons.
• Slide the stung plate onto the auger. The grinding blade is not used when stung.
• Slide one of the stung tubes through the funnel ange and place on the grinder ring cap
(stung tube faces out). The stung tube size depends on the type of casing you have chosen to
use. (See Fig 8)
• Firmly screw the grinder ring onto the grinder head.
Grinding Instructions
• Plug in and turn the “R / ON” switch to "ON" posion, then turn the “ON/OFF/ Reverse”
switch to "ON" posion.
• For best results, trim all excess tendons, carlage, cords, and blood clots and remove meat
from bones.
• Opmal results occur when meat is chilled to 32-34˚F before grinding it.
• Cut meat into pieces that will easily t in the throat of the grinder head.
(Approximately 1 inch squares.)
• Place cubed meat into the tray. Be sure not to overll the tray. Make sure the throat opening
of the tray remains clear and open.
• Place a dish, bowl, or tray under grinder head to catch ground meat.
• Switch the grinder to “Grind” posion. Carefully begin to feed the meat down the throat. Use the
plunger to push meat. DO NOT use ngers or utensils other than the plunger provided; otherwise
bodily injury may occur and you could damage your grinder.

- 5 -
User Manual
Sausage Stuffing Directions
• Properly prepare casings as directed on the casing packaging. Place arcial or natural intesnes
onto the sausage funnel.
• Load the hopper with prepared meat and feed meat into the grinder head opening before
operang the unit. Reminder: Do not operate the grinder without meat in the grinder head.
Damage to the auger and/or motor can occur.
• Plug in and turn the switch on when ready to start.
• Begin to feed the sausage mixture into the hopper opening. (See Fig 9)
• Hold the casing on the sausage tube in one hand and slowly let the meat output pull the casing
from the tube. Fill casing as desired by holding casing back on tube.
• Twist or e the sausage into links as desired. Tie the end of the casing into a knot.
• It is recommended that 2 people perform sausage stung.
• Add small amounts of water to your ground meat when stung sausage to improve the output
of meat through the sausage stung tube.
Fig 8 Fig 9
After Use
Disassembling
• Make sure that the motor has stopped completely.
• Disconnect the plug from the power outlet.
• Disassemble by reversing the steps from 6-1 pictures.
• If the xing ring is not easily removed by hands,
please use tools. (Fig.10)
• To remove the cung plate easily, place a screwdriver
• between the cung plate and the head, as illustrated,
and li it up. (Fig.11)
Fig 10
Fig 11

- 6 -
User Manual
Cleaning
• Before you clean the appliance, switch the appliance o and remove the plug from the socket.
• Never clean the accessories by a dishwasher with strong alkaline cleaner; a bleaching soluon
containing chlorine will discolor aluminum surfaces.
• Remove meat, etc. and wash each part in warm soapy water.
• Do not immerse the motor housing in water, but only wipe it with a damp cloth.
• Thinners and petrol will crack or change the color of the unit.
• Wash all the metal parts in water below 122ºF and dry.
• Wipe all the cung parts with vegetable oil on a cloth.
• In case the unit is le unused for a long period of me, wipe all the metal parts
with vegetable oil on a cloth.
WARNING
Always be as thorough as possible when cleaning and sanizing components. Any parts
exposed to raw meat may harbor or develop bacteria that can cause illness or death.
WARNING
When cleaning with sanizers, always follow the manufacturer’s recommendaons. Never
use products that cause exposed surfaces to render meat unsafe for consumpon. Failure to
follow this warning may lead to sickness or death!
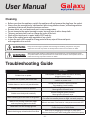
PROBLEMS SOLUTIONS
Grinders has no power
Check power to outlet. Make sure unit is securely
plugged into an outlet.
Grinder has no power, but outlet does
First, check and reset circuit breaker. Problem may be with
a switch or power cord.
Grinder hums or runs in only one direcon
Grinder has a switch or internal problem.
Tray reseng circuit breaker.
Grinder hums or labors to operate
Possible cold gear grease problem.
Move grinder to warmer area.
Grinder runs slowly and erracally
Possible cold gear grease problem.
Move grinder to warmer area.
Meat is backing up at the back of the grinder
Auger is not able to handle large porons of meat.
Cut meat into smaller pieces so auger can work properly.
Meat is only turning around the auger
and compressing against the head
Meat is too warm. Cool meat to a temperature around 40˚F.
Meat does not ow through grinder
Make sure grinder head is properly assembled.
Check sharpness of knife blade.
Meat is backing up at head and will not ow
Meat may be snagging on the auger or other parts.
Lubricate internal parts with food-grade safe silicone spray.
Troubleshooting Guide

- 7 -
User Manual
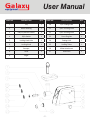
PART NO. DESCRIPTION QT Y.
1 Tray 1
2 Motor Housing 1
3 ON/OFF/Reverse Switch 1
4 R/On Switch 1
5 Locking Knob Hole 1
6 Locking Knob 1
7 Stomper 1
8 Head 1
9 Auger 1
PART NO. DESCRIPTION QT Y.
10 1/8" Griding Plate 1
11 3/16" Grinding Plate 1
12 5/16" Grinding Plate 1
13 Front Ring Nut 1
14 Cung Knife 1
15 Stung Tubes 1
16 Kibbe Aachment 1
17 Head Inlet 1

- 8 -
User Manual
Equipment Limited Warranty
To Make a Warranty Claim:
For Warranty Inquiries contact the locaon where you purchased the product:
• WebstaurantStore.com: Contact help@webstaurantstore.com. Please have your order number ready.
• The Restaurant Store: If you purchased this unit from your local store, please contact your store directly.
• TheRestaurantStore.com: Online purchases, call 717-392-7261. Please have your order number ready.
Failure to contact the designated locaon prior to obtaining equipment service may void your warranty.
Galaxy makes no other warranes, express or implied, statutory or otherwise, and HEREBY DISCLAIMS ALL IMPLIED
WARRANTIES, INCLUDING THE IMPLIED WARRANTIES OF MERCHANTABILITY AND OF FITNESS FOR A PARTICULAR PURPOSE.
This Limited Warranty does not cover:
• Equipment sold or used outside the Connental United States
• Use of unltered water (if applicable)
• Galaxy has the sole discreon on wearable parts not covered under warranty
• Equipment not purchased directly from an authorized dealer
• Equipment that has been altered, modied, or repaired by anyone other than an authorized service agency
• Equipment where the serial number plate has been removed or altered.
• Damage or failure due to improper installaon, improper ulity connecon or supply, and issues resulng from improper
venlaon or airow.
• Defects and damage due to improper maintenance, wear and tear, misuse, abuse, vandalism, or Act of God.
Any acon for breach of this warranty must be commenced within 90 days of the date on which the breach occurred.
No modicaon of this warranty, or waiver of its terms, shall be eecve unless approved in a wring signed by the pares.
The laws of the Commonwealth of Pennsylvania shall govern this warranty and the pares’ rights and dues under it.
Galaxy shall not under any circumstances be liable for incidental or consequenal damages of any kind, including but no
limited to loss of prots.
Galaxy warrants its equipment to be free from defects in material and workmanship for a period of 90 days. This is the sole and
exclusive warranty made by Galaxy covering your Galaxy brand equipment. A claim under this warranty must be made within 90 days
from the date of purchase of the equipment. Only the equipment’s original purchaser may make a claim under this warranty. Galaxy
reserves the right to approve or deny the repair or replacement of any part or repair request. The warranty is not transferable. Galaxy
Equipment installed in/on a food truck or trailer will be limited to a period of 30 days from the original date of purchase.
-
 1
1
-
 2
2
-
 3
3
-
 4
4
-
 5
5
-
 6
6
-
 7
7
-
 8
8


Galaxy Equipment 177SMG8 User manual
- Category
- Mincers
- Type
- User manual
Ask a question and I''ll find the answer in the document
Finding information in a document is now easier with AI
