VIA K-23141T-CPBW

Kohler VIA K-23141T-CPBW Installation Instructions Manual

  • Hello! I am an AI chatbot trained to assist you with the Kohler VIA K-23141T-CPBW Installation Instructions Manual. I’ve already reviewed the document and can help you find the information you need or explain it in simple terms. Just ask your questions, and providing more details will help me assist you more effectively!
ORDERING INFORMATION
VIA WH Toilet (HT100 TL IWT).........................K-20629T-BW
Includes Bowl.................................................K-19720T-W
Includes HYDRO-TOWER 100
Touchless In-Wall Tank..............K-6281T-VABW
Includes Quiet-Close Toilet Seat ....................K-4141T-2P
VIA WH Toilet (HT200 PNE IWT) .....................K-20630T-BW
Includes Bowl.................................................K-19720T-W
Includes HYDRO-TOWER 200 PNE
In-Wall Tank .............................K-20007T-VABW
Includes Quiet-Close Toilet Seat ....................K-4141T-2P
VIA WH Toilet ( HT300 PNE IWT) ....................K-20645T-BW
Includes Bowl.................................................K-19720T-W
Includes HYDRO-TOWER 300 PNE
In-Wall Tank .............................K-20010T-VABW
Includes Quiet-Close Toilet Seat ....................K-4141T-2P
VIA WH Toilet (HT300 MEC IWT).....................K-20648T-BW
Includes Bowl.................................................K-19720T-W
Includes HYDRO-TOWER 300
In-Wall Tank W/ Frame ..............K-4179T-VABW
Includes Quiet-Close Toilet Seat ....................K-4141T-2P
VIA WH Toilet (HT100 MEC IWT).....................K-20649T-BW
Includes Bowl.................................................K-19720T-W
Includes HYDRO-TOWER 100
In-Wall Tank W/ Frame ..............K-6284T-VABW
Includes Quiet-Close Toilet Seat ....................K-4141T-2P
VIA WH Toilet (HT100 TL IWT).........................K-25254T-BW
Includes Bowl.................................................K-19720T-W
Includes HYDRO-TOWER 100
Touchless IWT W/ Bevel FP ....K-21298T-VABW
Includes Quiet-Close Toilet Seat ....................K-4141T-2P
( 100 ) .....K-20629T-BW
............................................................K-19720T-W
100
......................K-6281T-VABW
.........................K-4141T-2P
( 200 ) ............K-20630T-BW
............................................................K-19720T-W
200
...........................K-20007T-VABW
.........................K-4141T-2P
( 300 ) ............K-20645T-BW
............................................................K-19720T-W
300
...........................K-20010T-VABW
.........................K-4141T-2P
( 300 ) ............K-20648T-BW
............................................................K-19720T-W
300
....................................K-4179T-VABW
.........................K-4141T-2P
( 100 ) ............K-20649T-BW
............................................................K-19720T-W
100
....................................K-6284T-VABW
.........................K-4141T-2P
( 100 ) .....K-25254T-BW
............................................................K-19720T-W
100
....................K-21298T-VABW
.........................K-4141T-2P
BEFORE YOU BEGIN
·
·
·
Please read these instructions carefully to familiarize
yourself with the required tools, materials, and installation
sequences. Follow the sections that pertain to your
particular installation. This will help you avoid costly
mistakes. In addition to proper installation, read all
operating and safety instructions.
All information in these instructions is based upon the
latest product information available at the time of
publication. Kohler China reserves the right to make
changes in product characteristics, packaging, or
availability at any time without notice.
These instructions contain important care, cleaning, and
warranty information-please leave instructions for the
consumer.
VIA
INSTALLATION INSTRUCTIONS
VITREOUS CHINA WALL-HUNG P-TRAP TOILET
K-20629T-BW/K-20630T-BW/K-20645T-BW/K-20648T-BW
K-20649T-BW/K-25254T-BW/K-25255T-BW/K-25256T-GBW
K-23140T-CPBW/K-23140T-BNBW/K-23141T-CPBW/K-23141T-BNBW
·
·
·
-
-1-
©
©
Copyright Kohler China Investment Co., Ltd. 2018
2018
No.2 KOHLER ROAD, SANSHUI CENTRAL INDUSTRIAL PARK, LEPING TOWN, SANSHUI DIST., FOSHAN, GUANGDONG, PRC POST CODE 528137
2 528137
8# MENGSHAN RD, ECONOMIC DEVELOPMENT ZONE OF HUANTAI, ZIBO, SHANDONG, CHINA POST CODE: 256410
8 256410
:
1132463-T01-E
VIA WH Toilet (HT100 PNE IWT) .....................K-25255T-BW
Includes Bowl.................................................K-19720T-W
Includes HYDRO-TOWER 100 PNE
In-Wall Tank With Frame .........K-22524T-VABW
Includes Quiet-Close Toilet Seat ....................K-4141T-2P
VIA WH Toilet (BEAM M FV)..........................K-25256T-GBW
Includes Bowl............................................K-80176T-GBW
Includes BEAM Manual Toilet/Squat
Flush Valve ......................................K-77681K-G
Includes Quiet-Close Toilet Seat ....................K-4141T-2P
VIA WH Toilet (BEAM SR D/CP) .................K-23140T-CPBW
Includes Bowl .........................................K-23142T-DPBW
Includes BEAM Toilet Sensor (DC)..............K-30947T-CP
Includes Quiet-Close Toilet Seat ....................K-4141T-2P
VIA WH Toilet
(BEAM SR D/BN) .........................................K-23140T-BNBW
Includes Bowl .........................................K-23142T-DNBW
Includes BEAM Toilet Sensor (DC)..............K-30947T-BN
Includes Quiet-Close Toilet Seat ....................K-4141T-2P
VIA WH Toilet
(BEAM SR A/CP) .........................................K-23141T-CPBW
Includes Bowl..........................................K-23142T-APBW
Includes BEAM Toilet Sensor (AC) ..............K-30948T-CP
Includes Quiet-Close Toilet Seat ....................K-4141T-2P
VIA WH Toilet
(BEAM SR A/BN) .........................................K-23141T-BNBW
Includes Bowl .........................................K-23142T-ANBW
Includes BEAM Toilet Sensor (AC) ..............K-30948T-BN
Includes Quiet-Close Toilet Seat ....................K-4141T-2P
( 100 ) ............K-25255T-BW
............................................................K-19720T-W
100
...........................K-22524T-VABW
.........................K-4141T-2P
( )................K-25256T-GBW
......................................................K-80176T-GBW
........................................................K-77681K-G
.........................K-4141T-2P
( , ) ............K-23140T-CPBW
....................................................K-23142T-DPBW
........................................K-30947T-CP
.........................K-4141T-2P
( , / ) .............................K-23140T-BNBW
....................................................K-23142T-DNBW
........................................K-30947T-BN
.........................K-4141T-2P
( , ) .........................................K-23141T-CPBW
....................................................K-23142T-APBW
........................................K-30948T-CP
.........................K-4141T-2P
( , / ) .............................K-23141T-BNBW
....................................................K-23142T-ANBW
........................................K-30948T-BN
.........................K-4141T-2P
NOTES
·
·
·
·
·
·
·
·
Observe all local plumbing and building codes.
Shut off the water supply.
Seat post holes are on 140mm centers.
Passageways is longer than 50mm.
Ensure have the correct roughing-in dimensions.
.
Be very careful while working with vitreous china products.
Vitreous china can break or chip if the bolts or nuts are
overtightened, or if carelessly handled.
Carefully inspect the new bowl for any sign of damage.
See
Fig.#1
Fixture dimensions are nominal and conform to tolerances
established by ASME Standards (A112.19.2-2018).
This product complies with Q/KCI-006-2018 and GB
25502-2017.
Water Efficiency Grade 1 for K-20629T-BW/K-20630T-
BW/K-20645T-BW/K-20648T-BW/K-20649T-BW/K-
25254T-BW/K-25255T-BW/K-23140T-CPBW/K-23140T-
BNBW/K-23141T-CPBW/K-23141T-BNBW.
Water Efficiency Grade 2 for K-25256T-GBW.
·
·
·
·
·
·
·
·
140mm
50mm
1
·
·
ASME (A112.19.2-
2018)
Q/KCI-006-2018 GB 25502-2017
K-20629T-BW/K-20630T-BW/K-20645T-BW/K-20648T-
BW/K-20649T-BW/K-25254T-BW/K-25255T-BW/K-
23140T-CPBW/K-23140T-BNBW/K-23141T-CPBW/K-
23141T-BNBW 1
K-25256T-GBW 2
TOOLS AND MATERIALS REQUIRED
(Not supplied)
· 254mm adjustable wrench
Metal file (file cut)
Tape measure
Tubing cutter
Level
Hacksaw
Putty knife
Screwdriver
Straight pipe coupling
Connection packing
·
·
·
·
·
·
·
·
·
·
·
·
·
·
·
·
·
·
·
254mm
-2-
1132463-T01-E
ROUGHING-IN
Unit: mm
:
Reference Value
Fig.#1
1
Kohler reserves the right to change marked dimensions without prior notice.
140
295
590
475
360
400
375
360
292
353
322
218
90
55
102
-3-
1. Install Flushing Mechanism
1-1. Install The Tank
Turn the water supply off before installing the new toilet.
Install the concealed tank system in wall before
decorating the wall.
Install the tank system per tank's installation instructions.
!
!
!
Note: Refer to installation instructions of in-wall tank for SKU
of faceplate.
INSTALLATION
Fig.#2
2
1.
1-1.
!
!
!
1-2. Install Manual Valve Or Sensor
Refer to installation instructions of manual valve or sensor
for the installation of flushing mechanism.
1-2.
!
!
1132463-T01-E
-4-
2. Set The Spacing Of The Bowl
After you install the tank, be careful to set the spacing of set
aside the length for carrier studs and tighten nut. The bowl on
wall according to the dimensions as shown. See Fig. #3.
2.
3
Fig.#3
3
355
320
Unit: mm
:
178
215
35
Nut
10
Carrier Stud
NOTE: Please reserve 10mm space for
the nut strictly according to the
picture. Otherwise, it will greatly
affect the loading capacity of the
toilet.
10mm
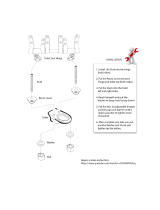
3. Attach Connection Pipe
1) Attach inlet pipe which set aside the length to the
concealed tank.
2) Attach outlet pipe to the toilet.
3) You may apply some lubricant to help connect smoothly.
4) Please tilt the outlet pipe a little after it is installed to
prevent water storage.
See Fig. #4.
See Fig.#5.
3.
1)
2)
3) 4
4) 5
Fig.#4
4
Fig.#5
5
Inlet
Outlet
1
1132463-T01-E
-5-
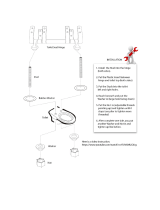
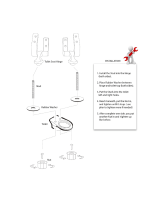
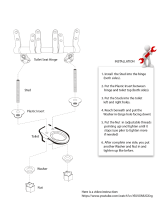
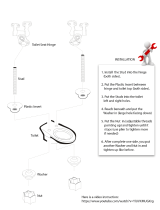
4. Install The New Toilet
1) Install the accessory kit into the installing hole.
2) Place the new toilet on the wall through the carrier.
3) Use wrench to tighten accessories and level the toilet.
Then finish fixation.
4) Insert the cap into installing hole. See Fig. #6.
4.
1)
2)
3)
4) 6
10
Fig.#6
6
5. Apply sealant to make sure the bowl
,
s edge seals to the
wall. See Fig. #7.
5. 7
Fig.#7
7
6. Install the toilet seat according to its installation instructions. 6.
1132463-T01-E
-6-
0C
o
CONSUMER RESPONSIBILITIES
If you live in a hard water area, make certain that the holes in
the toilet rim are kept clean to ensure proper bowl flushing.
Toilet bowl cleaners should be used at least once a week.
Use a long-handled brush to clean the rim holes, and to clean
as far into the trap as possible to prevent mineral deposits
from forming.
Most toilet bowl cleaners are not harmful to the vitreous china
surface of the toilet bowl. Please follow the bowl cleaner
manufacturers instructions carefully.
Do not use abrasive cleaners or solvents.
Do not use in-tank cleaners. Products containing
chlorine (calcium hypochlorite) can seriously damage
fittings in the tank. This damage can cause leakage
and property damage.
Kohler Company shall not be responsible or liable for any
damage to these tank fittings caused by the use of cleaners
containing chlorine (calcium hypochlorite).
WARNING: Risk of property or product damage.
'
Please do not use hard materials (like
scouring pad) to clean product surface, especially the
product logo.
CAUTION:
CAUTION: Don t use any cement while installing
the toilet.
WARNING: Risk of product damage.
Heat expansion of the toilet may damage
the feet of the toilet. Kohler will not be responsible for
any damage because of using cement.
Do not throw into the toilet what is easy to block it,
such as newspaper, paper pilch, sanitary towel.
Do not bump the vitreous china with great force to
prevent it from damaging and leaking.
Do not use the product in the water below 0 C.
o
1132463-T01-E
-1-
BEAM
INSTALLATION INSTRUCTIONS
TOILET/SQUAT FLUSH VALVE
/
K-77681K-G/K-77682K-G/K-77683K-G
BEFORE YOU BEGINBEFORE YOU BEGIN
TOOLS AND ACCESSORIESTOOLS AND ACCESSORIES
·
·
Congratulation on your purchase of this high quality
Bathroom Accessory. Before proceeding with the
installation, please carefully read this installation
instruction in order to ensure proper care and assembly of
this accessory.
Please keep this installation instruction for future
reference.
Prior to drilling into walls, check there are no hidden
electrical wires, cables or water supply pipes with the
aid of ar, electronic detector. If you use power tools do
not forget:
1. Wear eye protection.
2. Unplug equipment after use.
·
·
1.
2.
KOHLER CHINA INVESTMENT CO., LTD NO.158, JIANG CHANG SAN ROAD,
JING'AN DISTRICT, SHANGHAI, PRC POST CODE: 200436
( ) 158 200436
Drill Leveling Instrument
Screw Driver
Wrench
Screw X9
9
Saw
Tape Hammer
1.5mmHex Wrench
1.5mm
G1 Screw Die Machine
G1
ROUGHING-IN
UNIT : mm
Reference Value
144
Fig.1
1
Kohler reserves the right to change marked dimensions without prior notice.
180
245
55
129
250
30
166
200
228
G1"
©
©
Copyright Kohler China Investment Co., Ltd. 2017
2017
1299535-T01-C
SPECIFICATIONS
-2-
SKU K-77681K-G/K-77682K-G/K-77683K-G
Flush Volume
4.5L, 6L, 3.5L
Minimum Water Pressure
0.05mpa(Dynamic Pressure )
Maximum Water Pressure
0.75mpa(Static Pressure )
Water Temperature
Note: Only K-77682K-G(6L)can match Bardon squat(K-20441T/K-20441T/K-20441T)
K-77682K-G(6L) 6L (K-20441T/K-20441T/K-20441T)
1 ~50
INSTALLATION
1. Drill wall
Draw lines and drill the wall according to Fig.2. The horizontal
distance between the bottom of plate and the surface of squat
pan is advised to be 1200mm, and the horizontal distance
between the bottom of plate and toilet cover is advised to be
600mm. Depth can be adjusted as desired.
1.
2
1200mm
600mm
Fig.2
2
290
260
129
2.
3
(G1)
4·
·
2. Fix box
Note:
Insert the box as shown in Fig.3. Adjust and fix the box
with 4 screws.
Cut the inlet and outlet pipes as shown (G1 female thread
for inlet pipe)
The inlet and outlet pipes shall be cut level and clean
and ensure its proper vertical and horizontal level.
·
·
Fig.3
3
Inlet Pipe
( G1)
Outlet Pipe
( 32mm)
1299535-T01-C
3.
3. Cut box
Cut the excessive part of the box as shown.
-3-
Fig.4
4
Fig.5
5
4.
5
·
·
·
·
·
4. Install valve assembly
Fix onto inlet pipe
Fix onto outlet pipe
Note:
Fix valve assembly onto inlet and outlet pipes with wrench as
shown in Fig.5.
Process inlet pipe thread and fix inlet pipe connector.
Put seal onto the nut.
Tighten valve assembly and inlet connector with wrench.
Put nut and seal onto outlet pipe.
Tighten valve assembly and outlet connector with wrench.
Clean waste in the supply pipe before fixing inlet pipe.
·
·
·
·
·
Valve
Nut
Seal
Outlet Pipe(Not Supplied)
()
Inlet Pipe(Not Supplied)
()
G1 Inlet Nut
G1
Seal
1299535-T01-C
5.
6
5. Cut and fix tile
Cut tiles as shown in Fig.6.
-4-
Fig.6
6
155mm-161mm
124mm-130mm
6.
;
(17.8 );
6
+1
0
·
·
·
·
·
·
·
6. Fix bottom board
Note:
Tighten the 6 screws on the bottom board.
Cut the rod connector according to the depth into the tile
.
Fix the rod connector to the valve rod.
Do not overtighten the nut to avoid deforming or
damaging the bottom board.
Test run and check the valve after installation.
Water continues running at flush valve: Check whether
the rod is still too long. Continue press the rod with the
button to make the valve continue working.
No water or too little water running from the valve: Check
whether the rod is too short.
Connect the manufacturer for any other problems.
(17.8 )
+1
0
·
·
·
·
·
·
·
Fig.7
7
Fig.8
8
Screw
Rod
Bottom Board
Bottom Board
17.8
+1
0
1299535-T01-C
7.
;
;
L
3mm
3.5mm
·
·
·
7. Fix faceplate
Note:
Put the faceplate onto the bottom board.
Pull the faceplate downwards.
Tighten the rod with L wrench.
When removing the faceplate, unscrew the screw 3mm
out and push the faceplate 3.5mm upwards to remove it.
·
·
·
-5-
Faceplate Assembly
Button Assembly
Top Screw
Wrench
Fig.9
9
Lock
Pull
Snap
8.
7
·
·
·
8. Maintenance
Test run and check the valve after installation. Leakage at
inlet connector:
Refer to Fig.7 to check whether the seal is properly
installed, nut is tightened and whether the inlet pipe is at
proper vertical and horizontal level.
Leakage at outlet connector: Check whether the surface is
smooth, the seal is twisted and the nut is tightened.
Water cannot be stopped: Press the rod to check whether
it can be restored, there is wastes inside and valve
assembly is blocked.
·
·
·
1299535-T01-C
/