
QSG-m3-WMS12-EN-13040318
Multifunction Station Hubs
for
Windows® MultiPoint™ Server
Quick Setup Guide
40-T4100000-03
Thank you for purchasing Atrust m300 / m302 / m320 zero clients
(multifunction station hubs) for Windows® MultiPoint™ Server 2012.
Windows® MultiPoint™ Server 2012 is a new shared resource technology,
enabling you to create a multiuser computing environment simply with a
single host computer. Designed as station hubs, Atrust m300 / m302 / m320
zero clients are used to deploy USB / LAN based MultiPoint™ Server stations.
This Quick Setup Guide provides brief instructions on how to set up your
MultiPoint™ Server stations and get them ready for use quickly.
Internal draft 0.01
© 2013 Atrust Computer Corp. All rights reserved.
Initial Setup for Atrust m320
Initial Setup
The bonding between the host server and your m320-based
LAN station is created through the Ethernet interface. Except for this
physical connection, to create the bonding between both, you need to
assign your m320 to its host server. Once the bonding is established,
your m320-based LAN station is ready for use. Follow the steps below
to complete this initial setup:
1. On the host server, log in with an administrative account.
2. The Start screen appears.
3. Right-click on the Start screen. A blue bar appears on the
bottom of the screen.
4. Click All apps in the right-bottom corner to enter the
screen with a list of all applications on your host server.
5. Click MultiPoint Manager on the Apps list.
6. The MultiPoint Manager window appears.
7. Ensure that your system is in the Station rather than
Console mode ( click Switch to station mode on the MultiPoint
Manager window to switch to the Station mode if needed).
8. On LAN Stations tab, click Scan sub-tab, and then click
Start scan.
9. All discovered m320-based LAN stations will be listed on
the sub-tab.
10. Right-click on the desired LAN station to launch the popup
menu, click Assign to this server, and then click Yes to conrm.
11. After completion, the LAN station is assigned to the host server
and is moved from Scan to Assigned Stations sub-tab.
12. The Logon screen appears on the station.
13. The bonding between your LAN station and its host server is
established, and the station is ready for use.
NOTE
• The default administrative password for LAN stations is admin.
• For more details on management features available for your m320,
please refer to the User’s Manual for Atrust m320.
3

Installing Drivers and Utility
Atrust m300 / m302
To install the video driver for your m300 / m302 in a MultiPoint™ Server
system, please do the following:
get the driver.
2. Copy the le to a temporary folder on your host server where
Windows® MultiPoint™ Server 2012 is installed.
3. Switch your MultiPoint™ Server system to the Console mode.
4. Disconnect all station hubs if any.
5. Locate the SetupSgfxWmsFbr.exe le in the temporary folder,
and then double click to execute.
6. Follow the on-screen instructions to complete the installation.
7. Switch your MultiPoint™ Server system to the Station mode.
8. Attach a keyboard, mouse, and monitor to your m300 / m302,
and then connect the station hub to the host server with the
USB cable to deploy the station (see next section).
9. The Logon screen appears on the station.
Atrust m320
To install the video driver, LAN station driver, and MultiPoint Manager
Add-in for your Atrust m320, please do the following:
get the drivers and MultiPoint Manager Add-in.
2. Copy the les to a temporary folder on your host server where
the Windows® MultiPoint™ Server 2012 is installed.
3. Switch your MultiPoint™ Server system to the Console mode.
4. Disconnect all station hubs if any.
5. Locate the SetupSgfxWmsFbr.exe and Atrust_LAN_Station_
Driver_and_Utility_Setup_13_0221-515_S0105_G1085_
Cert.exe les in the temporary folder, and then install both les
in sequence. If you’ve installed the former for your m300 / m302
based stations, you don’t need to install it again.
6. Switch your MultiPoint™ Server system to the Station mode.
7. Attach a keyboard, mouse, and monitor to your m320, and then
keep following instructions on next sections.
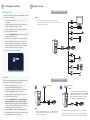
Getting Connected
Atrust m300 / m302 based USB StationAtrust m300 / m302 based USB Station
Esc F1 F2 F3 F4 F5 F6 F7 F8 F9 F10 F11 F12
Print
Screen
Insert
Backspace
Enter
Enter
Alt
Ctrl
Caps Lock
Tab
Alt
Ctrl
Page
Up
Page
Down
+
=
_
-
)(
*
*
& ^%$#
@
1
~
`
_
/
+
Delete
Scroll
Lock
Num
Lock
Home
Home
7 98
!1
02 3 4 5 6 7 8 9
Q
P
{
[
{
[
-
\
/
W E R T Y U I O
A
:
;
"
'
S D F G H J K L
Z X C V B N M
<
,
.
>
?
Ins
0
Del
.
4
PgUp
3
PgDn
End
65
2
Shift
Shift
Pause
Break
Num
Lock
Caps
Lock
Scroll
Lock
!
Atrust m320 based LAN StationAtrust m320 based LAN Station
Gigabit Switch
Local Area Network
Gigabit Switch
Local Area Network
1 2
2
1
(m302 only)
(m302 only)
NOTE
• Please connect keyboards and mice to their dedicated USB ports.
• Don’t use a keyboard and mouse that in total require more than 200 mA
of rated current during operation.
NOTE
• Please connect keyboards and mice to their dedicated USB ports. Don’t
use a keyboard and mouse that in total require more than 200 mA of
rated current during operation.
• It’s recommended to use a Gigabit switch to connect your host server and clients.
• Refer to the gure above for m300 / m302 to connect the power and peripherals.
• You still need to complete the initial setup before you can use m320 based stations.
NOTE
• If your host computer is equipped with more than one
LAN port, you could make connections using method
2
.
No matter which method you choose, your m320 will
perform network environment detection and choose
appropriate network conguration automatically.
-
 1
1
-
 2
2


Atrust M300 Setup Manual
- Type
- Setup Manual
- This manual is also suitable for
Ask a question and I''ll find the answer in the document
Finding information in a document is now easier with AI
Related papers
Other documents
-
LG N195WU User manual
-
AnyWhere Monitors Quick setup guide
-
 MCT MWS8840 User manual
-
Arctic MOACO-M3611-BLA01 Datasheet
-
Juniper JUNOS OS 10.4 Release note
-
Juniper JUNOS OS 10.4 Release note
-
-
Duplo DP - M320 User manual
-
-
