Page is loading ...

®
6A SMART BATTERY CHARGER
USER MANUAL
1714477
This TRAVELLER product has been carefully manufactured to give you dependable
operation. Please read this manual thoroughly before operating your new product, as it
contains the information you will need to become familiar with its features and obtain
optimal performance. Please keep this manual on file for future reference.

1714477
TABLE OF CONTENTS
Safety 2
5
6
8
9
10
11
12
Connecting Battery
Features
Operating Instructions
Multi - Stage Charging Process
Product Maintenance
Error Codes
Specifications

IMPORTANT SAFETY INFORMATION
SAVE THESE INSTRUCTIONS
1714477
2
WARNING: Risk of Explosive Gases, Electric Shock or Fire.
• Keep out of reach of children.
• To reduce the risk of personal or property damage, read and understand all
directions and warnings prior to use of this battery charger.
• Do not use in wet conditions or near combustible materials. Keep away from flames,
smoke or sparks while charging. Never smoke in the area of the battery or engine.
• To reduce the risk of electric shock, connect to only properly grounded outlets. Use
of an extension cord is not recommended and could result in fire.
• Use only in a well-ventilated area.
• Do not operate if cords or wires are frayed or defective, or if charger base is
defective in any way. Do not attempt to open the charger as this could result in
electric shock.
• This unit is comprised of switches which could produce sparks. Make sure you have
adequate space to use this charger.
• Use only on lead-acid batteries. Do not use this charger for charging dry cell
batteries, as this could result in personal injury or property damage due to battery
explosion.
• Do not charge a frozen battery.
• Use of an attachment not recommended or sold by the battery charger manufacturer
may result in a risk of fire, electric shock, or injury to persons.
• Do not operate charger with damaged cord/plug - replace the cord/plug immediately.
• Do not operate charger if it has received a sharp blow, been dropped, or otherwise
damaged in any way; take it to a qualified serviceman.
• Do not disassemble charger; take it to a qualified serviceman when service or repair
is required. Incorrect reassembly may result in a risk of electric shock or fire.
• To reduce risk of electric shock, unplug charger from outlet before attempting any
repairs or cleaning. Turning off controls will not reduce this risk.

IMPORTANT SAFETY INFORMATION
-+
SHIELD EYES:
Explosive gases can cause eye
injury or blindness.
CONTAINS SULFURIC ACID:
May cause severe burns and blindness.
3
1714477
PERSONAL PRECAUTIONS
• Remove metal items such as rings, bracelets and necklaces while working with this
charger. Lead acid batteries can produce a short circuit high enough to cause burns.
• Always wear protective eyewear and gloves when working with batteries. If battery
acid comes in contact with your skin or clothing, immediately wash the area with
soap and water and get medical attention right away.
WARNING – RISK OF EXPLOSIVE GASES.
a) Working in vicinity of a lead-acid battery is dangerous. Batteries generate explosive
gases during normal battery operation. For this reason, it is of utmost importance
that you follow these instructions each time you use the charger.
b) To reduce risk of battery explosion, follow these instructions and those published by
battery manufacturer and manufacturer of any equipment you intend to use in
vicinity of battery. Review cautionary markings on these products and on engine.
• If it is necessary to remove the battery prior to charging, always remove the
grounded terminal first. Ensure all electrical accessories are off prior to charging.
• It is best to clean the battery terminals prior to charging. Using a battery terminal
brush is a good way to remove corrosion.
• When charging a lead-acid battery that is not sealed, it may be necessary to add
distilled water into battery so the battery acid solution reaches the level as specified
by manufacturer. Careful do not overfill the battery.
• Read individual precautions and warnings outlined by the battery manufacturer relative
to charging and maintaining. Ensure that charger clamp make a tight connection.
• NEVER smoke or allow a spark or flame in the vicinity of the battery or engine.
• Use charger for charging LEAD-ACID batteries only.
• NEVER charge or maintain a frozen battery.

BATTERY TYPES
4
CHARGER LOCATION
1714477
• Make sure you have adequate space to use this charger. Position the charger as far
away from the battery as permitted by DC Cable.
• Never place the charger directly above the battery that is being charged; as this may
cause the charger to be damaged by gases expelled from the battery.
• Never set a battery or any other object on the charger.
• Use only in a well-ventilated area.
• Never allow battery acid to drip on the charger when reading electrolyte specific
gravity or filling battery.
• Do not operate charger in a closed-in area or restrict ventilation in any way.
Three basic types of batteries can be given a charge with this charger:
Conventional and Low Maintenance Batteries
These are lead-acid batteries. Conventional/ Low Maintenance batteries require
periodic addition of distilled water to the acid solution (electrolyte). Additional water
may be added by removing the filler caps located on the top of the battery.
Note: When lead is known to be one of the materials used in the battery’s construc-
tion, that battery is a Low Maintenance/ Conventional type.
Maintenance Free Batteries/ AGM batteries
These are lead-calcium batteries and normally do not require water additions.
Therefore, filler caps have been removed from the battery surface. These batteries will
have a smooth or sealed appearance.
Deep Cycle Batteries
These heavy duty batteries are used in boats, construction equipment, sump pumps,
etc. They are normally marked DEEP CYCLE on the outside of the case.
Other Batteries
Only 14.4V (+/- 0.5V) Lithium Iron Phosphate (LiFePO4) Batteries can be charged with
this unit. Do not select a charging rate above 2 amps so as to extend the life of your
battery. If Lithium Iron Phosphate (LiFePO4) Battery voltage is under 10 volts, it is not
recommended that you use this charger as the battery may be damaged.

5
CONNECTING BATTERY
1714477
Note: It is important to determine the battery type (maintenance free or conventional)
before use.
BATTERY INSTALLED IN VEHICLE
1. Stay clear of moving engine parts.
2. Position the AC/DC cables to reduce the risk of damage by the moving engine parts.
Never allow the clamp to touch each other.
3. If it is necessary to close the engine hood, please ensure the hood will not damage
the cable insulation or touch the battery clamp to the hood.
4. Check the polarity of the battery posts.
Note: The positive (+) post is usually larger in diameter than the negative (-) post.
5. Determine which battery post is grounded.
Note: In most vehicles, the negative battery post is grounded to the chassis.
• For negative grounded vehicles, connect the red positive (+) clamp from the
battery charger to positive (+) battery post. Connect the black negative (-) clamp
to the vehicle chassis or engine block. NEVER connect the clamp to areas
such as the carburetor, fuel lines or other metal body parts.
• For positive grounded vehicles, connect the black negative (-) clamp from the
battery charger to the negative (-) battery post. Connect the red positive (+) clamp
to the vehicle chassis or engine block. NEVER connect the clamp to areas
such as the carburetor, fuel lines or other metal body parts.
6. Plug the AC power cord/plug into a properly grounded outlet.
7. When disconnecting the charger, first unplug the AC power cord from the outlet,
remove the clamp from the vehicle chassis or engine block and then remove the
clamp from the battery terminal.
BATTERY OUTSIDE OF VEHICLE
Note: If using this battery charger for a marine battery, the battery must be removed
and charged on shore unless you have purchased special equipment designed for
marine use to allow for onboard charging.
1. Check the polarity of the battery posts.
Note: The positive (+) post is usually larger in diameter than the negative (-) post.
2. Attach at least a 24 inch 6-gauge insulated battery cable to the negative (-) battery post.

AC POWER CORD/PLUG CONNECTIONS AND PROPER GROUNDING
6
1714477
3. Connect the red positive (+) charger clamp to the positive (+) battery post.
4. Place the free end of the battery cable as far away from the battery to be charged as
the cables permit and then connect the black negative (-) charger clamp to the free
end of the cable. NEVER face the battery when making the connection.
5. Plug the AC power cord/plug into a properly grounded outlet.
6. When disconnecting the charger, always use the reverse order from the connection
process, staying as far away as possible from the battery.
• This battery charger is designed for use on a 120V circuit. Always plug the AC power
cord/plug into a properly grounded outlet that follows all local ordinances. The plug
pins must properly fit the grounded outlet. An improper connection can result in
electric shock.
• NEVER change or alter the AC power cord or plug pins.
• If an extension be used, it should follow the listed recommendations:
• 100 ft (30.5m) or less – 16 gauge
• 100 ft (30.5m) or more – 14 gauge
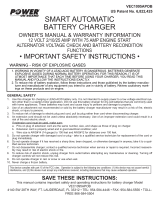
FEATURES
1. Multi-functional switch 3. AC Power LED 5. Reverse polarity/Error LED
2. 6ft. DC cables 4. Charging status LED
1
3
5 4
2

7
PROTECTION FEATURES
1714477
CHARGER STATUS / FAULT INDICATOR
This charger has 3 easy-to-follow indicators. The charger will continuously monitor
charging progress and collect feedback from the battery during charging.
LED Indicator Status Explanation
AC Power
Charging/Charged Charging
Green (solid)
Green (flash)
Red (flash)
AC power on
Charging/Charged
Reverse polarity
/Error
Reverse polarity
/Error
Reverse polarity.
Fault/error. Charging aborted due to some abnormalities detected such
as a defective battery or short circuit. (See error codes)
Green (solid)
Red (solid)
Charged/Maintaining
AUTOMATIC SHUT OFF
The battery charger is designed to automatically shut off once battery charging is
complete to prevent overcharging. When charging is complete, the Charging/Charged
LED will illuminate and the charger has switched to Maintenance mode.
MAINTENANCE MODE
Once charging is complete, the charger will automatically switch into Maintenance
mode (also known as float mode monitoring). In this mode, the charger keeps the
battery fully charged by delivering a small amount of current to keep the battery at
peak charge.
REVERSE POLARITY PROTECTION
If the cables are incorrectly connected to the battery, the Reverse Polarity indicator will
illuminate. Note, the charger will not charge if the Reverse Polarity indicator is lit.
COOLING FAN OPERATION
The charger is designed to automatically control its high speed cooling fan for efficient
operation. Therefore, it is normal for the fan to start and stop during charging.
OVERHEAT PROTECTION
The charger is designed to shut itself off if overheating is detected. Once the charger
cools down, it will resume charging automatically.

8
OPERATING INSTRUCTIONS
1714477
SELECT CHARGING RATE
Move the manual switch to select desired charge rate as follows:
• 4A or 6A Charge Rate - Use for charging of small-to-large capacity automotive
batteries.
• 2A Charge Rate - Use for charging motorcycle,ATV,snowmobile,personal watercraft,
garden tractor and golf car batteries.
UNDERSTANDING FACTORS THAT AFFECT CHARGING TIME
The time it takes to fully recharge a battery depends on several factors including:
1. Battery Depth of Discharge
The greater the depth of discharge, the longer it will take to fully charge a battery. For
example, a battery discharged to a level of 50% will take about twice as long to fully
charge than a battery discharged only 25%.
2. Battery Size
If charged at the same current, a larger (higher capacity) battery will require more time
to fully charge than a smaller (lower capacity) battery. This difference can be
overcome by charging larger batteries at a higher current.
3. Battery Age and Condition
As a battery ages, its internal resistance willl increase, impacting its ability to accept
current. This effect is particularly noticeable in batteries that have not been
well-maintained over their life.
4. Battery Type
Some battery chemistries, such as AGM and gel, have lower internal resistance which
means they can accept charge better without generating damaging heat. Such
batteries can charge up to 2 times faster than traditional wet battery types.

9
1714477
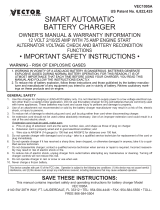
MULTI - STAGE CHARGING PROCESS
STAGE 1 DESULPHATION*
Pulses of voltage and current help recover sulphated or deeply discharged batteries.
STAGE 2 SOFT START*
Gently introduces current to condition deeply discharged batteries and prevent
overheating that could damage the battery.
* *
5. Charge Rate
The charge rate is measured in amperes (A). A battery charged at a lower rate will
take longer to fully charge than a battery charged at a higher rate. This does not mean
that one should always charge a battery at the highest ampere available as this can
cause overheating and premature battery failure. A battery should be charged at a rate
appropriate for its size—a good, safe rule of thumb is about 1/10 its Amp-hour
capacity (e.g., 100 Ah battery x1/10=10 A).
6. Cold Temperature
Cold temperatures slow down the chemical reaction that takes place inside a battery
when it is charging. Charging a battery at a cold temperature can greatly increase the
amount of time required to charge the battery. Ideal charging temperature is between
10 to 25ºC (50 to 77ºF).

10
• Wipe clean cords and clamps after each use.
• Store the power and output cables neatly to prevent damage.
• The charger housing may be cleaned using a damp cloth and mild cleaning agent.
• Always unplug the charger when not in use.
• Keep the charger stored in a cool, dry place.
PRODUCT MAINTENANCE
1714477
STAGE 3 BULK
Charging with maximum current to bring the battery to about 80% capacity.
STAGE 4 ABSORPTION
Charging with constant voltage while reducing current to safely bring the battery to
100% capacity. This stage is key to maximizing battery performance and battery life.
STAGE 5 ANALYZE
Tests if battery is holding charge.
STAGE 6 MAINTAIN
Monitors battery voltage and provides top-up charging when necessary to keep
battery fully charged.
* If necessary

11
1714477
ERROR CODES
No LEDs illuminate
when plugged into AC
outlet
Red (solid) error LED is
illuminated
Clamps are inversely
connected to battery Reverse clamp connections.
Loose connection at AC outlet
Poor clamp connection to
battery posts
Ensure power is present at AC outlet by plugging in
a different appliance.
Check connection.
Check clamp connection. Ensure battery posts are
clean and rock clamps back and forth to ensure a
good connection.
Battery voltage is too low (<1.5
V) to activate the charger
Check battery voltage with a volt meter. If less
than 1.5 V, test or replace battery. (A battery
discharged below 1.5 V is likely beyond salvage
due to extreme sulphation or some other
internal failure).
No AC power at outlet
Condition Cause Solution
Red (flashing) error
LED is illuminated
Battery voltage is still less than
10 V after some time charging
The battery is defective. Test or replace the battery.
Battery has not reached
full charge after 24
hours of charging
Remove any loads on the battery while
charging and try charging again.
The battery is defective. Test or replace the battery.
Charger current may be too low for the size
(capacity) of the battery. Change to a charger with a
higher charging rate.
Remove any loads on the battery while charging
and try charging again.
Overheat shutdown
Battery voltage is too high
Ensure ventilation to charger is not obstructed.
Move charger to a cooler location. Charging
will resume once charger cools down.
Ensure the battery is 12 V, not 24 V.

Input
Compatible Battery Types
Compatible Battery Voltage
Dimensions (L x W x H)
Weight
All lead-acid (Standard/AGM and Gel)
Charger Type 6-Stage
12 V (nominal)
7.28" x 2.43" x 5.04" (18.50 x 6.15 x 12.80 cm)
1.83 lb (0.83 kg)
120V AC, 60Hz, 2.4A
Output 12V DC, 2A /4A/6A
SPECIFICATIONS
1714477

Distributed by: TRACTOR SUPPLY COMPANY
5401 VIRGINIA WAY, BRENTWOOD, TN 37027
For customer support, call: 1-888-376-9601
www.TractorSupply.com
MADE IN CHINA
Note: This equipment has been tested and found to comply with the
limits for a Class B digital device, pursuant to part 15 of the FCC Rules.
These limits are designed to provide reasonable protection against
harmful interference in a residential installation.
This equipment generates, uses and can radiate radio frequency energy
and, if not installed and used in accordance with the instructions, may
cause harmful interference to radio communications. However, there is
no guarantee that interference will not occur in a particular installation.
If this equipment does cause harmful interference to radio or television
reception, which can be determined by turning the equipment off and
on, the user is encouraged to try to correct the interference by one or
more of the following measures:
• Reorient or relocate the receiving antenna.
• Increase the separation between the equipment and receiver.
• Connect the equipment into an outlet on a circuit different from that
to which the receiver is connected.
• Consult the dealer or an experienced radio/TV technician for help.
Warning: Any changes or modifications to this unit not expressly
approved by the party responsible for compliance could void the user's
authority to operate the equipment.
FCC STATEMENT
/