75.5940.03 PUSH PLATE FAMILY 20230417 Page 1 of 4
PUSH PLATE FAMILY
75.5940.03 PUSH PLATE FAMILY 20230417 Page 1 of 4
Stainless steel push plates
(US version)
ENGLISH
DESCRIPTION
ACCESSORIES
BOLLARDS BOXES BRACKETS
TRANSMITTERS & RECEIVERS TRANSMITTER, RECEIVER, LOGIC LOGIC MODULE
Br3-X900 MHz Br2-900
JAMB
(with and without microswitch)
4.75” SQUARE
Images shown below are “Text & Logo” versions.
See table “Push Plate Models” on the following page for all available varieties.
4.5” SQUARE
6” SQUARE VESTIBULE
4.5” ROUND
Visit website for
available languages
of this document.
6” ROUND
SINGLE GANG
Page 2 of 4 75.5940.03 PUSH PLATE FAMILY 20230417Page 2 of 4 75.5940.03 PUSH PLATE FAMILY 20230417
PUSH PLATE MODELS
4.5”
ROUND
4.5”
SQUARE
4.75”
SQUARE
6”
ROUND
6”
SQUARE
SINGLE
GANG VESTIBULE JAMB JAMB (NARROW)
W/MICROSWITCH
JAMB (WIDE)
W/MICROSWITCH
dimensions:
W: 4 12
H: 4 12
D: 58
W: 4 12
H: 4 12
D: 58
W: 4 34
H: 4 34
D: 58
W: 6”
H: 6”
D: 58
W: 6”
H: 6”
D: 58
W: 2 34
H: 4 12
D: 38
W: 4 34
H: 4 34
D: 58
W: 1 12
H: 4 34
D: 58
W: 1 12
H: 4 34
D: 58
W: 1 34
H: 4 12
D: 12
switch rating: SPDT (15A @ 125 or 250 VAC) SPST (1A @ 120 VAC / 28 VDC)
“PUSH TO OPEN” 10PBR45 10PBS45 10PBS 10PBR 10PBS6 10PBJ
“PRESS TO OPERATE
DOOR” 10PBS45POD
“PUSH TO SLOW” W/
BRAILLE (WHITE TEXT
ON BLUE PLATE)
10PBJSREV
TEXT & LOGO 10PBR451 10PBS451 10PBS1 10PBR1 10PBS61 10PBO241 10PBDGP1 10PBJ1 10PBJM1 10PBJMS1
(hard-wired)
TEXT & ALTERNATE
LOGO 10PBS451AL 10PBS1AL 10PBR1AL
LOGO ONLY 10PBR45LL 10PBS45LL 10PBSLL 10PBRLL 10PBS6LL 10PBO24L 10PBJLL 10PBJML 10PBJMSLL
(hard-wired)
PLAIN FACE 10PBR4510 10PBS4510 10PBS10 10PBR10 10PBS610 10PBO2410 10PBJ10
WHITE TEXT ON BLUE
PLATE 10PBS45B
BLUE TEXT ON SATIN
BRASS PLATE 10PBS1SB
WHITE TEXT & LOGO
ON BLUE PLATE 10PBS451B 10PBS1B 10PBJ1B
WHITE LOGO ON BLUE
PLATE 10PBJLB
BLUE TEXT & LOGO ON
BRIGHT BRASS PLATE 10PBS1BB
“PUSH TO EXIT” 10PBSE 10PBO24E 10PBJE
75.5940.03 PUSH PLATE FAMILY 20230417 Page 3 of 4
!
CAUTION
75.5940.03 PUSH PLATE FAMILY 20230417 Page 3 of 4
READ BEFORE BEGINNING INSTALLATION/PROGRAMMING/SET-UP
Only trained and qualified
personnel are recommended
to install and set up the
sensor.
The warranty is invalid if
unauthorized repairs are
made or attempted by
unauthorized personnel.
Always test the
proper operation of
the installation before
leaving the premises.
The door control system
and the header cover
profile must be correctly
grounded.
MOUNTING & WIRING
COM
NO
NC
SIDE VIEW SIDE VIEW
1. Mark and drill the appropriate holes for mounting.
10PBJMS (4-stud) plate: jigsaw required for the hole
10PBS45: face plate must be removed before wiring (using Phillips screwdriver)
2. Wire the push plate to the door controller or radio-controlled transmitter using the NO and COM
contacts.
If installing the Jamb with Microswitch (10PBJM1, 10PBJMS1, 10PBJML, or 10PBJMLL), wire-nut
the microswitch to the door controller using the NO and COM contacts.
Jamb with Microswitch
(10PBJM series)
standard
Shut off all power going to header before attempting any wiring procedures.
Maintain a clean and safe environment when working in public areas.
Constantly be aware of pedestrian traffic around the door area.
Always stop pedestrian traffic through the doorway when performing tests that may result in unexpected
reactions by the door.
ESD (electrostatic discharge): Circuit boards are vulnerable to damage by electrostatic discharge. Before handling
any board, ensure you dissipate your body’s ESD charge.
Always check placement of all wiring before powering up to ensure that moving door parts will not catch any
wires and cause damage to equipment.
Ensure compliance with all applicable safety standards (i.e. ANSI A156.10) upon completion of installation.
DO NOT attempt any internal repair of the components. All repairs and/or component replacements must be
performed by BEA, Inc. Unauthorized disassembly or repair:
1. May jeopardize personal safety and may expose one to the risk of electrical shock.
2. May adversely affect the safe and reliable performance of the product resulting in a voided warranty.
PRECAUTIONS
Page 4 of 4 75.5940.03 PUSH PLATE FAMILY 20230417
A
A
A
A
B
B
1
1
2
2
3
3
4
4
A A
B B
C C
D D
100 ENTERPRISE DRIVE
PITTSBURGH, PA 15275
(800) 523-2462
TITLE:
PART NUMBER:
DRAWN BY:
CHECKED BY:
RELEASED:
DRAWING NUMBER :
BEA, INC.
4.5" Square Text Only Pushplate
10PBS45
kjgierl
4/4/2003
10PBS45
34.43[ mm]
1.36"
114.30
[mm]
4.5"
114.30[ mm]
4.5"
©BEA | Original Instructions | PLEASE KEEP FOR FURTHER USE - DESIGNED FOR COLOR PRINTING
Page 4 of 4 75.5940.03 PUSH PLATE FAMILY 20230417
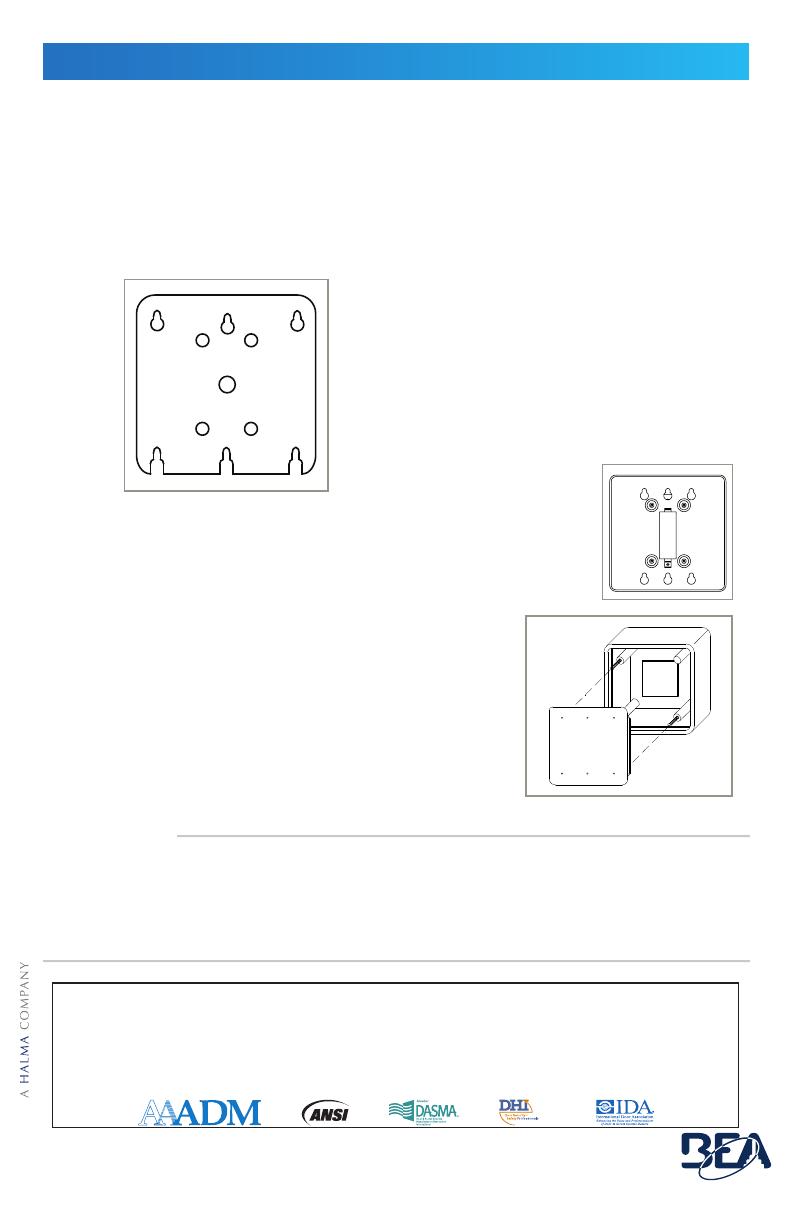
NOTE: The following accessories must be installed before securing push plate to the box:
adapter plate (10BRINGC for double-gang boxes and 50.5016 for vestibule plates)
bracket (10PBRACKET or 10PBRACKETCA for surface-mounting)
weather ring (10WRSQ475, 10WRRND45, 10WRRND6)
3. For all push plates except the 4.5” square, thread each hex-head screw 34 of the way into
the electrical enclosure. Leave about 12” of the screw unthreaded. See note below for type of
screw to use.
The 4.5” plate (see image, right) requires #6 Phillips screws for both
single- and double-gang installations. Once the back plate is secured, the
face plate must be reattached.
4. Install the push plate onto the box (see image, right), aligning
the applicable keyholes with the hex screws. Slide the push
plate down, and then secure the push plate to the box by
tightening the screws using the provided hex key.
5. Test for proper push-plate activation.
The 6” and 4.75” push plates contain 2 sizes of screws:
larger screws = corners of 4×4 electrical type boxes (A, left)
smaller screws = single/double-gang electrical boxes (B, left)
4.75” square shown here
Tech Support & Customer Service: 1-800-523-2462
General Tech Questions: [email protected] | Tech Docs: www.BEAsensors.com
MAINTENANCE
Clean the push plates using only a damp, non-abrasive cloth.
Regular cleaning with harsh solvents or abrasive materials may cause deterioration of the paint or
coating.
BEA, Inc., the sensor manufacturer, cannot be held responsible for incorrect installations or incorrect adjustments of the sensor/device; therefore, BEA, Inc. does not guarantee any use of the sensor/
device outside of its intended purpose.
BEA, Inc. strongly recommends that installation and service technicians be AAADM-certifi ed for pedestrian doors, IDA-certifi ed for doors/gates, and factory-trained for the type of door/gate system.
Installers and service personnel are responsible for executing a risk assessment following each installation/service performed, ensuring that the sensor/device system performance is compliant with local,
national, and international regulations, codes, and standards.
Once installation or service work is complete, a safety inspection of the door/gate shall be performed per the door/gate manufacturer’s recommendations and/or per AAADM/ANSI/DASMA guidelines
(where applicable) for best industry practices. Safety inspections must be performed during each service call – examples of these safety inspections can be found on an AAADM safety information label
(e.g. ANSI/DASMA 102, ANSI/DASMA 107, UL294, UL325, and International Building Code).
Verify that all appropriate industry signage, warning labels, and placards are in place.
BEA, INC. INSTALLATION/SERVICE COMPLIANCE EXPECTATIONS
MOUNTING & WIRING (cont.)
  • Page 1 1
  • Page 2 2
  • Page 3 3
  • Page 4 4

Ask a question and I''ll find the answer in the document

Finding information in a document is now easier with AI