Page is loading ...

ELECTRIC ACTUATORS FOR INDUSTRIAL PROCESS CONTROL
80-1400-02
Rev. 07.9A
INSTRUCTION MANUAL
14-10_
14-20_
MODELS
R
For actuators manufactured
after 11/01/16.

2
80-1400-02, Rev. 7.9A
This manual contains the information
needed to install, operate, and maintain the
Beck 14-100 & 14-200 linear electric actuators,
manufactured by Harold Beck & Sons, Inc. of
Newtown, Pennsylvania.
Group 11 quarter-turn
actuators ...
are designed specifically
for use with ball, plug, and
butterfly valves. Direct-
coupled, factory-mounted
assemblies are available
from Beck for easy
installation.
Group 31 rotary
actuators ...
are particularly suited for
coupling to ball, plug, and
butterfly valves up to 4”
(102 mm) diameter, and
small dampers.
The Group 14 actuator is a powerful control
package designed to provide precise position
control of globe valves and other devices
requiring up to 4,000 lbs (17 800 N) of thrust.
Group 11 rotary actuators ...
provide precise position control of dampers,
quarter-turn valves, fluid couplings, and
other devices requiring up to 1,800 lb-ft
(2 440 N•m) actuator torque.
NOTICE: This manual includes information that will
make installation simple, efficient, and trouble-free.
Please read and understand the appropriate sections in
this manual before attempting to install or operate the
Group 14 actuator.
INTRODUCTION

3
80-1400-02, Rev. 7.9A
Product Description ....................................................................................................... 4
General Specications ................................................................................................. 5
Outline Dimension Drawings ........................................................................................ 6
Control Options ............................................................................................................ 8
Installation ....................................................................................................................... 9
Wiring ......................................................................................................................... 11
Wiring Options............................................................................................................ 15
Start-up ...................................................................................................................... 17
Operation ....................................................................................................................... 18
Calibration ..................................................................................................................... 21
Switches ..................................................................................................................... 21
Stroke Change ........................................................................................................... 23
Changing Direction of Travel ...................................................................................... 24
Feedback Signal ........................................................................................................ 25
Demand Signal........................................................................................................... 29
Maintenance .................................................................................................................. 31
Routine ....................................................................................................................... 31
Component Replacement .......................................................................................... 32
Troubleshooting ............................................................................................................ 35
Appendices ................................................................................................................... 38
Spare Parts & Components ....................................................................................... 38
Control Assembly ....................................................................................................... 39
CPS-5 Data ................................................................................................................ 43
CPS-5 Functional Block Diagram............................................................................... 44
Schematics................................................................................................................. 45
Index ............................................................................................................................. 46
Services ........................................................................................................................ 47
TABLE OF CONTENTS

4
80-1400-02, Rev. 7.9A
Beck Group 14 linear actuators are engineered
for precise, reliable operation of globe valves
requiring up to 4,000 lbs (17 800 N) of thrust. The
cool, stable operation of Beck’s control motors
coupled with the powerful gear train provide the
tight, responsive control required by modern
control loops to keep operating costs low. The
motor can withstand occasional accidental stalls
of up to four days without failure, and will resume
instant response to control signals immediately
upon removal of the condition. Mechanical stops
on the output shaft prevent over-travel.
An easy-to-turn, spoke-free Handwheel is
incorporated into the Group 14 design to allow
manual operation during installation or power
outages. The Handwheel can be used to open
and close valves smoothly and easily under full
load conditions.
The Beck Tight-Seater™ coupling is a part
of the Group 14 actuator. This preloaded disk
coupling is mounted on the actuator output shaft
and provides positive seating of the valve plug
up to the rated thrust of the drive. It eliminates
high-pressure leakage, which can cause erosion
of the valve seat. A patented self-locking
mechanism holds the actuator output shaft in
position when the motor is de energized.
A Calibar index allows simple, single-point
adjustment of the length of the stroke to match
valve requirements. When this adjustment is
made, the position feedback signal, end-of-travel
limit switches, and any auxiliary switches are all
automatically adapted to the new stroke setting.
TABLE 1:
GROUP 14 MECHANICAL AND ELECTRICAL SPECIFICATIONS
Valves may also be operated at their individual
locations with a built-in electric Handswitch.
Beck’s ESR-5 Electronic Signal Receiver
pro vides precise actuator control from either
conventional analog or computer-based control
systems.
Beck’s CPS-5 Contactless Position
Sensor provides accurate position feedback
in demanding environmental conditions, with
no contacting or wiping surfaces to wear or
intermittently lose contact.
Beck Group 14 electric actuators are
designed with individual weatherproof enclosures
to protect the main components.
Although the Group 14 actuator is normally
installed in the upright position, the actuators may
be installed in any orientation. For installations
where the piping will not support the weight of
the actuator, holes are provided for mounting
hardware.
TYPICAL APPLICATIONS
Beck Group 14 electric actuators are suitable
for steam ow control, combustion gas control,
and any other application that requires precise
valve position control. An actuator may be
applied to any globe, cage, or diaphragm valve
with a rising stem that has a stroke within the
capability of the actuator. An integral mounting
yoke is part of each actuator.
Beck Group 14 actuators are available in
stroke ranges from 5/16” (7.9 mm) to 4 1/2”
(114.3 mm), and in a variety of thrust and timing
combinations. See Table 1 for thrust and timing
options.
Basic
Model
Thrust
(lbs. / N)
Timing -- sec./in. (sec./cm.) Dimensional
Data
@ 60 Hz @ 50 Hz
14-100
340 / 1 513 4 (1.6) 5 (2)
Pages 6 & 7
425 / 1 891 11 (4.3) 13 (5.1)
600 / 2 670 16 (6.3) 19 (7.5)
650 / 2 893 8 (3.1) 10 (3.9)
800 / 3 560 11 (4.3) 13 (5.1)
1,000 / 4 450 27 (10.6) 32 (12.6)
1,100 / 4 895 16 (6.3) 19 (7.5)
1,620 / 7 209 48 (18.9) 57 (22.4)
1,800 / 8 010 27 (10.6) 32 (12.6)
14-200 2,700 / 12 015 16 (6.3) 20 (7.9)
4,000 / 17 800 24 (9.4) 29 (11.4)
PRODUCT DESCRIPTION

5
80-1400-02, Rev. 7.9A
Model 120 V ac 240 V ac
Max. Current 14-100 .56 A 72 W .33 A 80 W
and Power 14-200 1.5 A 180 W .86 A 210 W
Operating Temperature -40 to 85°C. (-40 to 185°F.)
0 to 99% relative humidity
Demand Signal
Electronic Signal Receiver 0–5 mA
(ESR-5) 1–5 mA
4–20 mA
10–50 mA
1–5 V dc
-10 to 10 V dc
Demand Signal Span Adj. 2 to 18 V dc
Demand Signal Zero Adj. -100 to 275% of span
(except -10 to 10 V dc)
Split Signal Range 4–12 mA
12–20 mA
Deadband 0.6% of span
Sensitivity 25% of deadband
Direct AC Control 120 V ac for 2-position, multi-
position or modulating V ac
control.
Feedback
Contactless Position Sensor (CPS-5)
Feedback Signal 1–5 mA
4–20 mA
10–50 mA
1–5 V dc
0–16 V dc
-10 to 10 V dc
Output Stability for 0.25% of span from 102 to 132 V ac
V ac Input Power
Output Stability for ±0.03%/°C. of span for 0 to 50° C.
Temperature Change ±0.05%/°C. of span for -40 to 85° C.
Linearity ±1% of span *
Hysteresis 0.25% of span at any point
Isolation Max. leakage of 10µA at 60 V rms,
60 Hz from output to ground
Film Potentiometer 1,000 ohms
Max. Voltage 40 V
Wattage 2 watts max.
Linearity ±0.5% *
Max. Wiper Current 1 mA
Input Power 120 V ac single phase 50 or 60 Hz; 48, 72 or 180 watts Allowable Tolerance
240 V ac single phase 50 or 60 Hz +10%, -15%
Action on Loss of Power Stays in place.
Action on Loss of Input Stays in place or moves to full travel or zero position. actuators to any preset position with
Signal (Power On) optional switch assembly on Models 14-_07 and 14-_08. Field adjustable.
Stall Protection and If the motor tries to run in one direction for more than 300 seconds, the Stall Protection
Annunciation (14-200 standard, Module shuts o power to the motor and a solid state relay will change state. The relay
14-100 optional) is rated for 120 V ac or dc, 10 VA.
Limit Switches Two SPDT, one for fully retracted and one for fully extended limit of travel.
Auxiliary Switches Two 6 A, 120 V ac switches are provided (S1 & S2) and two additional switches (S3 &
S4) are available. All switches are cam-operated and eld-adjustable.
Handswitch Permits local electrical operation, independent of controller signal. Standard on all units.
An optional auxiliary contact can be used to indicate that the Handswitch is in AUTO
mode. Contact rated at 2.5 A, 125 V ac.
Handwheel Provides manual operation without electrical power.
Motor 120 V ac, single phase, no burnout, non-coasting motor has instant magnetic braking.
Requires no contacts or moving parts. Can remain stalled for 4 days without failure of
motor or gearing.
Gear Train High eciency, precision cut steel and ductile iron gears and bronze nut.
Interchangeable gear modules permit eld change of timing.
Mechanical Stops Prevent overtravel during automatic or manual operation.
Enclosure Precision machined aluminum alloy castings, painted with corrosion resistant polyurethane
paint, provides a rugged, dust-tight and weatherproof enclosure. Type 4; IP66.
Stroke Adjustment Calibar simultaneously adjusts the stroke length, position feedback signal, limit switches
and auxiliary switches. The new stroke displacement is produced by the full demand
signal.
Standards CSA listed; CE compliant
* Electrical linearity. Actual feedback relative to output shaft position varies with shaft position up to 15% at the center of stroke range.
Consult factory for details.
PRODUCT DESCRIPTION

6
80-1400-02, Rev. 7.9A
OUTLINE DRAWING -- 5/16 [8] to 2 1/8 [54] travel (Dimensions in inches & [mm] )
Beck Model 14-100 & -200
NOTE: Actuators may be mounted in any orientation.
Beck
Model
No.
Drive Shaft
Travel Range
(in) [mm]
"A"
Valve Boss
Dia. Range
(in) [mm]
"B"
Yoke
Height
(in) [mm]
"C"
Nominal Drive
Shaft Extension
(in) [mm]
Max. Valve Stem
Extension (Valve
Stem Retracted
(in) [mm]
Approx.
Weight
(lb) [kg]
14-100 5/16–1 3/4 [8–44] 1–2 5/8 [25–67] 8 [203] 4 3/16 [106] 5 1/2 [140] 80 [36]
3/4–2 1/8 [19–54] 1 3/8–3 3/4 [35–95] 13 1/2 [343] 6 [152] 9 1/4 [235] 92 [42]
14-200 5/16–1 3/4 [8–44] 1 3/8–3 3/4 [35–95] 13 1/2 [343] 6 11/16 [170] 9 [229] 105 [48]
3/4–2 1/8 [19–54]
MODEL 14-100MODEL 14-200
PRODUCT DESCRIPTION Outline Dimensions

7
80-1400-02, Rev. 7.9A
OUTLINE DRAWING -- 3/4 [19] to 4 1/2 [114] travel (Dimensions in inches & [mm] )
NOTE: Actuators may be mounted in any orientation.
Beck Model 14-100 & -200
Beck
Model
No.
Drive Shaft
Travel Range
(in) [mm]
"A"
Valve Boss
Dia. Range
(in) [mm]
"B"
Yoke
Height
(in) [mm]
"C"
Nominal Drive
Shaft Extension
(in) [mm]
Max. Valve Stem
Extension (Valve
Stem Retracted
(in) [mm]
Approx.
Weight
(lb) [kg]
14-100 3/4–3 1/2 [19–89] 1 3/8–3 3/4 [35–95] 19 13/16 [503] 12 5/16 [313] 9 1/4 [235] 100 [45]
1 3/4–4 1/2 [44–114] 19 13/16 [503] 12 5/16 [313] 9 1/4 [235] 100 [45]
14-200 3/4–3 1/2 [19–89] 1 3/8–3 3/4 [35–95] 19 13/16 [503] 13 [330] 9 1/4 [235] 113 [51]
1 3/4–4 1/2 [44–114]
MODEL 14-100MODEL 14-200

8
80-1400-02, Rev. 7.9A
TABLE 2:
SUMMARY OF GROUP 14 CONTROL OPTIONS
PRODUCT DESCRIPTION Control Options
MODEL
NO.
CONTROL
TYPE
INPUT
SIGNAL ESR-5 PART NO.* FEEDBACK
DEVICE
EXTERNAL
OUTPUT
SIGNAL
CPS-5 PART NO.*
AUXILIARY
SWITCH
OPTIONS
Electronic
Modulating
0–5 or
1–5 mA 13-2246-02
CPS-5
Contactless
Position
Sensor
4–20 mA 20-4400-12
None,
2,
4,
2+INTLOS
1–5 V dc 20-4400-13
16 V dc or
50 mA max. 20-4400-13
14-__8
4–20 mA 13-2246-03
10–50 mA 13-2246-04
1000 ohm
Potentiometer
20-3060-03
None,
1000 ohm
Aux. Pot.
n/a
None,
2,
4,
2+INTLOS
0–10 V dc 13-2246-07
14-__7 1–5 V dc 13-2246-05
-10–10 V dc 13-2246-08
Direct
AC Control
(Modulating)
120 V ac None
CPS-5
Contactless
Position
Sensor
4–20 mA 20-4400-02
None,
2,
4
1–5 V dc 20-4400-03
16 V dc or
50 mA max. 20-4400-03
14-__6
Low Power
120 V ac
13-2245-50
(Relay Board)
Low Power
dc
13-2245-51
(Relay Board)
120 V ac None
1000 ohm
Potentiometer
20-3060-03
1000 ohm
Pot.
n/a
None,
2,
4
14-__5 Low Power
120 V ac
13-2245-50
(Relay Board)
Low Power
dc
13-2245-51
(Relay Board)
5 Position
120 V ac n/a None None
None
14-__4 4 Position
3 Position None,
2
2 Position
Open/Close
None,
2,
4
14-__3
*ESR-5 series 13-2246-XX boards replace 13-2245-XX series boards.
CPS-5 series 20-4400-XX boards replace 20-3400-XX series boards.

9
80-1400-02, Rev. 7.9A
SAFETY PRECAUTIONS
WARNING
Installation and service instructions
only. To avoid injury and electric
shock, do not perform any
servicing other than that contained
in this manual. Please read
and understand the appropriate
sections in this manual before
attempting to install or operate your
actuator.
STORAGE INFORMATION
The actuator should be stored in its shipping
carton in a clean, dry area.
If it is necessary to store the actuator outdoors
for a long period of time, it should be removed
from its shipping carton and stored above ground.
A waterproof cover should be securely fastened
over it. Do not stack actuators on top of one
another. Stored actuators should be periodically
checked to make sure no condensation has
formed in the control compartments. Damage
due to moisture while in storage is not covered by
warranty.
UNPACKING
Group 14 actuators are packed in
standardized cardboard shipping containers.
actuators mounted on valves may be packed in
cardboard containers or strapped to a skid and
crated, depending on size. After unpacking, the
wooden platform may be used to transport the
actuator to the installation site.
INSTALLATION—MECHANICAL
Beck actuators can be furnished with valves
mounted as unitized assemblies ready for
pipeline installation.
CAUTION
Working with valves installed in a
pipeline can be dangerous. Take
appropriate precautions when
mounting to installed valves.
Figure 1
Mounting the Actuator on a Valve
Refer to Figure 1, below, to identify the
mounting parts and the steps to install the
actuator onto the valve.
1. Prepare the valve. It may be necessary to
remove parts that are no longer used or to
replace or adjust packing. Refer to the valve
maintenance manual for specic instructions.
Consult the Beck Valve Mounting Specication
sheet that was shipped with the actuator for
any instructions regarding modications to
the valve stem that may be necessary.
2. Push the valve stem (11) into the valve body
to the fully seated or stem down position.
3. Move the G-14 output shaft (5) up into the
actuator body until the upper mechanical stop
(3) is tight against the lower bearing plate (1).
4. Remove the four lower bearing plate bolts
(2) that hold the bottom plate to the actuator
body (1/2" bolt heads). Pressure from the
mechanical stop will hold the plate in place
when the bolts are removed. Bolt the yoke
(9) to the lower bearing plate using the longer
bolts supplied with the yoke. Torque bolts to
10 Ib-ft (14 N•m). Continued
INSTALLATION
4
0
1
2
3
1
2
3
5
7
8
10
4
6
9

10
80-1400-02, Rev. 7.9A
5. Place the jam nut (7) and travel index (6)
over the valve stem (11) before mounting the
actuator on the valve.
6. Remove the boss nut (8) from the valve and
place the actuator and yoke over the stem
and onto the boss (12). Secure the yoke with
the boss nut, nger-tight.
7. Using the actuator Handwheel, lower the
actuator output shaft to contact the valve
stem. Thread the valve stem into the end
of the actuator output shaft. HINT: Rotate
the whole yoke /drive assembly to get the
valve stem started into the actuator output
shaft. Continue lowering the actuator output
shaft and threading the valve stem until the
actuator output shaft is fully down on the
mechanical stop.
8. Tighten the boss nut to secure the yoke and
tighten the yoke set screw (10).
9. Follow the valve seating adjustment procedure
on page 17 to complete the mounting.
Removing the Actuator from a
Valve
1. Move the Group 14 output shaft up into the
actuator body until the mechanical stop (3) is
tight against the lower bearing plate (1).
2. Turn o all electrical power and disconnect all
electrical wiring from the drive.
3. Loosen the valve stem jam nut (7). Loosen
the boss nut (8) on the yoke and leave it
nger tight. Loosen the yoke set screw (10).
4. Unthread the valve stem from the actuator
output shaft by turning the whole yoke / actuator
assembly.
Valve Installation
The Beck actuator can be mounted in any
convenient orientation. There is no preferred
operating position.
Inspect the valve body to be sure that it is
clean. Be certain that other pipelines in the area
are free from pipe scale or welding slag that
could damage the gasket surfaces.
Tighten the flange bolts and ensure that
all bolts are evenly torqued. Refer to the
gasket manufacturer’s instructions for specic
information on tightening ange bolts.
NOTE: The valve may have experienced
temperature variations in shipment. This
could result in seepage past the stem seals.
Refer to the valve manufacturer’s maintenance
instructions for packing adjustments.
INSTALLATION—ELECTRICAL
Two conduit connections are provided in
every Beck Group 14 actuator for supplying
power and signal wiring to the unit. A sealant
must be used on threaded conduit connections
to keep moisture out. Conduit should be routed
from below the actuator so that condensation and
other contaminants entering the conduit cannot
enter the drive.
To maintain signal integrity and meet most
electrical codes, power and signal wires must
be routed to the actuator separately. The signal
wiring should be either shielded cables or be
installed in conductive conduit and/or cable trays.
A large, clearly labeled terminal block on the
side of the actuator is enclosed in a gasketed
metal enclosure. Terminals will accommodate
up to 12 AWG (3.31 mm2) wiring (see Figure 2,
page 11).
CAUTION
Always close covers immediately
after installation or service to
prevent moisture or other foreign
matter from entering the actuator.
Refer to the wiring diagram furnished with
your Beck actuator for proper AC power and
signal connections. It is advisable to provide
normal short circuit protection on the AC power
line. A copy of the wiring diagram is shipped with
each actuator and is fastened to the inside of the
terminal block cover. If there is no wiring diagram
available, you may obtain a copy from Beck by
providing the serial number of your drive.
Your Beck actuator has been supplied to
match the signal source in your control loop. If
it does not match, refer to the Demand Signal
Options section of this manual, page 15, for
information on how to change the demand signal.
For maximum safety, the Beck actuator body
should be grounded. Normally, the electrical
conduit provides adequate ground protection.
If not, a separate ground conductor should be
connected to the actuator body.
INSTALLATION

11
80-1400-02, Rev. 7.9A
The Group 14 actuator is available with
six separate control configurations which are
provided to match the control requirements
for your system. Typical functional wiring
connections for each control option are described
in the following paragraphs and diagrams. The
wiring diagram specific to each actuator is
attached to the inside of the wiring terminal cover.
Feedback connections for actuators incorpor-
ating the Contactless Position Sensor (CPS-5)
for control options 6 and 8 are described on
pages 13 and 14.
A Group 14 actuator can be ordered with
up to four optional auxiliary switches. Wiring
connections for these are described on page 22.
To enable full Handswitch operation, connect
a 120 V ac line to terminal C (jumper between
terminals A and C).
Option 8, Modulating
Analog Position Control with
Contactless Position Sensing
Customer must supply two wires to power the
drive: One 120 V ac line (terminal C), and one
neutral (terminal B). Customer must supply two
wires for the modulating analog control signal:
Connect to terminal AA (+) and to terminal BB(-).
Customer may supply two additional wires to
monitor the analog position feedback signal (see
pages 13 and 14 for connections). The actuator's
feedback circuit power supply is derived from the
120 V ac line, therefore the feedback signal must
be wired to a “4-wire” type non-powered analog
input.
Figure 2
The wiring diagram at
right is a typical example of
an Option 8 actuator with
a Stall Protection Module
installed.
INSTALLATION Wiring

12
80-1400-02, Rev. 7.9A
Option 6, Modulating
Direct AC Control with Contactless
Position Sensing
Customer must supply three wires to directly
control the actuator motor direction: One 120
V ac line for Retraction (terminal M), one 120
V ac line for Extension (terminal N), and one
neutral (terminal B). Customer may supply two
additional wires to monitor the analog position
feedback signal (see pages 13 and 14 for
connections). If position feedback monitoring is
desired, a 120 V ac line must be connected to
terminal C. The actuator's feedback circuit power
supply is derived from this 120 V ac line, so the
feedback signal must be wired to a “4-wire” type,
non-powered analog input.
Option 5, Modulating
Direct AC Control with Potentiometer
Position Sensing
Customer must supply three wires to directly
control the actuator motor direction: One 120 V
ac line for Retraction (terminal M), one 120 V ac
line for Extension (terminal N), and one neutral
(terminal B). The position feedback potentiometer
connections are available at terminals CC
(Reverse), DD (Wiper), and EE (Forward).
Option 7, Modulating
Analog Position Control with
Potentiometer Position Sensing
Customer must supply two wires to power the
drive: One 120 V ac line (terminal C), and one
neutral (terminal B). Customer must supply two
wires for the modulating analog control signal:
Connect to terminal AA (+) and to terminal BB (-).
If position feedback monitoring is required, an
optional auxiliary potentiometer can be ordered.
The optional auxiliary potentiometer connects
to terminals CC (Reverse), DD (Wiper), and
EE (Forward) and is compatible with standard
“slidewire” style inputs.
Option 8, Modulating without
External Feedback Signal
Analog Position Control with
Contactless Position Sensing
Customer must supply two wires to power the
drive: One 120 V ac line (terminal C), and one
neutral (terminal B). Customer must supply two
wires for the modulating analog control signal:
Connect to terminal AA (+) and to terminal BB(-).
INSTALLATION Wiring

13
80-1400-02, Rev. 7.9A
CPS-5 SIGNAL CONNECTIONS
Beck Group 14 actuators equipped with the
Contactless Position Sensor (CPS-5) are shipped
ready for installation. They are engineered to
match the mA or V dc feedback range in your
system.
Customer connections for feedback signal
wiring on each CPS-5 model are described in
the following diagrams and paragraphs. Refer
to Table 11, page 46, for output signal ranges,
output terminals, range changing resistance
values, and terminals to which the ranging
resistor or jumper is connected.
To verify that the feedback signal range
is correct for your drive, connect a mA / V dc
multimeter across the appropriate terminals
(check model number on CPS-5 transformer
and Table 11, page 46, for correct terminals CC,
DD, or EE). Use the Handswitch to operate the
actuator throughout its full travel.
NOTE: Ranging resistors must be con-
nected to the actuator output ter minals. If
a ranging resistor change is required, it
may be obtained locally. If resistors with
±1% tolerance are not available, they can be
ordered from Beck.
Option 3, Open / Close
Direct AC Control
Customer must supply three wires to directly
control the actuator motor direction: One 120 V
ac line for Retraction (terminal M), one 120 V ac
line for Extension (terminal N), and one neutral
(terminal B).
240 V ac Operation
All of the options described above are
available for 240 V ac operation instead of 120
V ac operation. In all cases, the power neutral is
Option 4, Multi-Position
Direct AC Control with Cam‑Operated
Switches to Stop actuator Travel
Customer must supply three wires to directly
control the actuator motor direction: One 120
V ac line for Retraction (terminal M), one 120
V ac line for Extension (terminal N), and one
neutral (terminal B). Up to ve intermediate stop
positions may be specied, each requiring an
additional 120 V ac line.
replaced with Line 2 of the 240 V ac, and the 120
V ac line is replaced with Line 1 of the 240 V ac.
CPS-5 Model 20-4400-02, -12
Terminal Connections
1. A single 4–20 mA current output is available
between terminals EE (+) and CC (-) when
driving into an external load between 250 and
800 ohms. No ranging resistor is required.
2. 4–20 mA output is also available across EE
(+) and DD (-); 500 ohms is the maximum
external load (for larger loads see Item 1
above).
4-20 mA Signal Output
CC
DD
EE
-------
-------
–
+
4–20 mA
CC
DD
EE
-------
-------
-------
–
+4–20 mA

14
80-1400-02, Rev. 7.9A
CPS-5 Model 20-4400-03, -13
Voltage Feedback
Terminal Connections
The universal model has a voltage divider
network which allows for various voltage signal
ranges. Voltage output ranges are available
across terminals EE (+) and CC (-) with the proper
ranging resistor connected across terminals CC
and DD.
Units are factory-calibrated for specified
signal ranges and are provided with proper
ranging resistors installed. Other voltage ranges
are attainable by adding a ranging resistor across
terminals CC and DD.
The ranging resistor value is given in Table
11, page 46, or can be calculated using the
equation:
Where R = Resistor connected from CC to DD
V = Output voltage span
If converting to a zero-based range (a range
that includes zero as an end point), refer to
“Adjusting the Zero Potentiometer” Section, page
28. Voltage Output
CPS-5 Model 20-4400-03, -13
Current Feedback
Terminal Connections
The universal model has current sensing
terminals, which allow for various current signal
ranges. Current output is available between
terminals DD (+) and CC (-) with the proper ranging
resistor connected across terminals DD and EE.
Units are factory-calibrated for specied signal
ranges and are provided with proper resistors
installed.
The ranging resistor value is given in Table 10,
page 46, or can be calculated using the following
equation:
Where R = Resistor (Ohms) Connected from
DD to EE
I = Output Current Span (Amp)
If converting to a zero-based range (a range
that includes zero as an end point), refer to
“Adjusting the Zero Potentiometer” section, page
28. Current Output
INSTALLATION Wiring

15
80-1400-02, Rev. 7.9A
DEMAND SIGNAL OPTIONS
Beck Group 14 actuators configured for
milliamp or dc analog modulating applications
include an Electronic Signal Receiver (ESR-5).
Several control options are available with the
ESR-5, such as operating more than one actuator
with a single signal source.
The instructions below apply to applications
that require a signal change or to situations
calling for operation of multiple actuators from a
common demand signal.
Demand Signal Range Change
If it is necessary to change the range of an
ESR-5 board to receive a dierent demand signal
current, the “R-in” resistor must be changed. See
Table 3, below, for the proper value, and Figure
11 on page 31 for its location on the board. It is
mounted on turrets to facilitate the change. After
soldering the new resistor in place, recalibrate in
accordance with the instructions on page 30. If
a proper resistor with ±1% tolerance cannot be
obtained locally, it can be ordered from Beck.
Series Operation
Beck actuators can be connected in series
from the same signal for concurrent operation.
Care must be taken to keep the polarity correct
in each actuator's input terminals. Two or three
actuators may usually be connected in series.
The number of actuators that may be connected
in series is limited only by the controller’s (signal
source) capability to feed current into the total
resistance of the circuit involved. Consult the
controller manufacturer’s recommendations.
No change is required to the actuator's cali-
bration for series operation. An interruption in the
circuit will actuate loss of demand signal (L.O.S.)
on the actuators in the circuit.
Parallel Operation
Beck actuators can be connected in parallel
to the same signal for concurrent operation. Up
to four actuators may be connected in parallel.
For parallel operation, use ESR-5 board no.
13-2246-05 in each drive, and add a shunting
resistor across input terminals AA and BB on one
of the Beck drives. The value of the resistor is:
Where N = the number of drives.
Refer to Table 3, below, for the input resistance.
For example, a 278 ohm shunting resistor should
be used for four actuators in parallel with a 4–20
mA demand signal. If the resistance calculation
is not a standard value, then select the nearest
standard value.
A minor span adjustment is required for each
actuator in a parallel circuit. An interruption in the
circuit to one actuator will not prevent the other
actuators from functioning, but there will be a
slight calibration shift.
TABLE 3:
ESR-5 BOARD MODELS
INPUT
SIGNAL
ESR-5
BOARD PART NO.
CHANGES FROM
13-2246-03
R-in VALUE
(TOLERANCE 1%)
NET CIRCUIT
INPUT RESISTANCE
0–5* or
1–5 mA dc 13-2246-02 Remove J10 1.05K ohms 1K ohms
4–20 mA dc** 13-2246-03 None 255 ohms 250 ohms
10–50 mA dc 13-2246-04 Remove J11 and
add R-in4 R-in4 = 100 ohms 100 ohms
1–5 V dc** 13-2246-05 Remove J9 20K ohms 10K ohms
0–10 V dc** 13-2246-07 Remove J1 and J9 20K ohms 10K ohms
-10 to 10 V dc 13-2246-08 Remove J1, J2,
J6, J7, J8 & J9 20K ohms 50K ohms
*Span and zero adjustment required.
**Standard ISA range (S 50.1/1975).
INSTALLATION Wiring Options

16
80-1400-02, Rev. 7.9A
Split Range Operation
Two or three Beck actuators may be
operated over their full range by a portion of
the controller’s output signal range. The most
common arrangement involves two actuators
operating on equal halves of the demand signal
range. For example, if a 4–20 mA control signal
is used, the rst actuator would move 100% of
its stroke on a signal range of 4–12 mA, while
the second operates on the 12–20 mA portion of
the signal. In this case, the ESR-5 boards are
the same as would be used for parallel operation
(13-2245-05), but calibrated to the range required
for each drive. A shunting resistor must be added
across input terminals AA and BB on one of the
Beck actuators to produce a 2.0–6.0 volt span
across each board for its active portion of the
range. For a 4–20 mA range three- way split,
the shunting resistor range would be 425–1,650
ohms.
Follow the steps for calibrating the demand
signal, page 30, for each actuator unit, using
half span values for the demand signal. Use the
proper starting point for each half-range when
setting the zero, 4 mA and 12 mA. Before setting
the zero on the second actuator (12 mA), cut one
lead of resistor R35 on the ESR-5 board. See
Figure 11, page 31, for location of R35.
In a split range configuration, connect
terminals E and F (L.O.S. wire) to prevent
undesired “stay-in-place” operation of the second
or third actuator due to fast, downward signal
changes.
When three actuators are to be operated
on equal portions of the demand signal, the
4–20 mA range would split into 4–9.33 mA,
9.33–14.67 mA, and 14.67–20 mA signals. A 487
ohm shunting resistor (Beck P/N 13-2510-03) is
adequate. Proceed as in the case of the two-way
split, first setting span, then the zero. When
setting the ESR-5 board in the rst drive, set the
zero at 4 mA. Then, on the second drive, cut
the R35 resistor on the board and set its zero
at 9.33 mA. Before setting zero in the board
of the third drive, short out the R34 resistor by
adding a jumper, adjust its zero to 14.67 mA,
cut resistors R35 and R36 from the board, then
remove the jumper from R34. Check operation
of all actuators by running the demand signal
through its complete range. If it is necessary to
recalibrate the same board later, you may jumper
resistors R35 and R36 by connecting the R35
turrets together.
INSTALLATION Wiring Options

17
80-1400-02, Rev. 7.9A
START-UP INSTRUCTIONS
After the actuator is mounted and its wiring
connections are made, it is ready to be tested for
proper operation.
Turn on the power supply. Operate the
actuator with the Handswitch and run it through
its full stroke, both directions. Observe that the
driven device travels through its desired stroke.
If satisfactory, set Handswitch at the “auto”
position.
If the actuator is to be operated with automatic
control, turn on the controller and operate the
actuator by varying the control signal. Check
that the valve strokes in the proper direction
for a change in control signal. An increasing
control signal retracts the shaft and opens the
valve. With a 100% signal, the actuator is fully
retracted. If the valve does not stroke in the
proper direction, first check for proper wiring
connections and verify the control signal at the
drive. If the wiring is correct, then reverse the
direction of travel (see page 25).
If the actuator is to be push-button actuated,
(options 3, 4, 5 or 6) operate the actuator using
the Handswitch and observe that direction of
travel is correct. When travel of the driven
device is satisfactory with reference to the control
signal or the push-buttons, the unit is ready for
operation.
Valve Seating Adjustment
The actuator has a Tight-Seater™ attached
to its output shaft. The Tight-Seater™ allows
tight seating of the valve plug. It is a pre-loaded
coupling that allows the valve plug to seat
before the actuator reaches its lower limit. The
additional amount of travel compresses the
thrust discs inside the Tight-Seater™, causing a
controlled amount of thrust to hold the valve plug
on its seat when the actuator stem reaches its
lower limit. The Tight-Seater™ is factory-set to
produce a thrust matched to the valve and should
never be disassembled. Control of the amount of
valve stem threaded into the Tight-Seater™ may
be used to adjust the valve seating.
If readjustment of valve seating is necessary,
proceed as follows:
1. With the Handswitch, run the actuator to a
position above the 0% or lower limit position.
2. Loosen the lock nut on the valve stem and
thread the valve stem into the Tight-Seater™.
3. Run the actuator to the 0% position, using the
Handswitch.
4. Thread the valve stem out of the Tight-Seater™
until the plug seats in the valve.
5. Raise the actuator shaft using the Handswitch
until the plug is clear of the seat and there is
sufficient clearance to make the following
adjustment.
6. Thread the valve stem out of the
Tight-Seater™ a fraction of a turn according
to the valve stem thread as listed (1/32"
travel):
Thread Turn
3/8-24 3/4
7/16-18 5/8
1/2-20 5/8
3/4-16 1/2
7. Tighten the lock nut and index disc on the
valve stem.
8. Run the actuator to its lower limit using the
Handswitch. The valve stem should stop
before the actuator shaft stops.
9. Reposition the travel index.
CAUTION
If the valve stem is threaded directly
into the actuator shaft without
a Tight-Seater™, the valve stem
should be at least 1/4 turn from
the seated plug position when the
actuator shaft reaches the lower
limit. This will prevent damage
to the valve stem or seat. Do not
attempt to obtain tight shut-off
without a Tight-Seater™ as serious
valve damage may result.
INSTALLATION Start-Up

18
80-1400-02, Rev. 7.9A
HOUSING
All models of the Beck Group 14 electric
actuator have individual, cast aluminum
compartments for the main components: The
control motor, wiring terminal board, actuator
train, electronic signal receiver, and feedback
section. Gasketed covers and sealed shafts
make this product ideally suited to outdoor and
high-humidity environments.
CONTROL MOTOR
The Beck control motor is a synchronous
inductor motor that operates at a constant speed
of 72 RPM in synchronism with the line frequency.
Motors are able to reach full speed within 25
milliseconds and stop within 20 milliseconds; actual
starting and stopping times will vary with load.
Beck motors have double grease-sealed
bearings and require no maintenance for the life
of the motor.
DRIVE TRAIN
The Group 14 drive train consists of a control
motor, SLM, Handwheel, reduction gears, main
gear, and power screw output shaft. The ductile
iron main gear and the bronze nut and stainless
steel power screw output shaft are common to
units of a particular range of thrust and timing.
The steel reduction gears are part of the eld
changeable gear housing assembly. Dierent
combinations of output gear, housing assemblies,
and motors determine the actuator’s output thrust
and timing.
The output shaft travel is limited by
mechanical stops. The mechanical stop for
the fully extended or lower limit of the output
shaft travel is not adjustable. The position of
the retracted or upward travel mechanical stop
is determined by the number of washers on the
output shaft between the Tight-Seater™ and the
lower bearing plate. This is factory-set for the
amount of travel specied at the time of the order
and is generally not changed in the eld.
Output shaft travel is determined by the
setting of the Calibar. Moving the Calibar block
away from the output shaft increases the radius
where the ball bearing contacts the sector gear
lever. The longer the radius the longer the vertical
stroke of the output shaft for the same amount of
rotation of the control end shaft. Therefore, the
Calibar changes the output shaft travel but makes
it unnecessary to change the switch cams, lm
potentiometer, or CPS-5. Field Calibar adjustment
is generally used to shorten the travel. Consult the
factory if a longer stroke is required.
SELF-LOCKING
MECHANISM (SLM)
An integral part of every Group 14 control
motor is the self-locking mechanism. This
mechanical device couples the motor to the
gear train and transmits full motor torque when
rotated in either direction. When the motor is
de-energized, it instantaneously locks and holds
the output shaft in position.
TIGHT-SEATER™
The Beck Tight-Seater™ assembly is a pre-
loaded coupling that is installed between the
actuator output shaft and the valve stem. It
produces a controlled positive pressure against
the valve seat, independent of actuator thrust.
The Tight-Seater™ consists of four parts: A
housing attached to the output shaft, linear thrust
discs contained in the housing, a anged coupling
attached to the valve stem, and a threaded ring
to contain the anged coupling in the housing
and to allow adjustment of the pre-load on linear
thrust discs.
The factory pre-load, by a threaded ring,
ensures that no relative motion occurs between
the anged coupling and housing during normal
valve operation until the pre-load thrust is
exceeded in the seated plug position of the
valve.
When the seated plug position of the valve is
reached, the anged coupling on the valve stem
is stationary, and the output shaft exceeds the
pre-load pressure of the Tight-Seater™. When
the pre-loaded pressure is exceeded, the housing
will compress the linear thrust discs, maintaining
a controlled pressure on the valve seat, with the
shaft stationary.
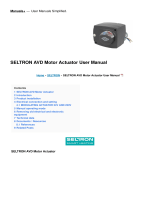
Figure 3
OPERATION
TIGHT-SEATER
COUPLING
TM
DIRECTION OF
COMPRESSION
VALVE STEM CONNECTION
(MOVEABLE COUPLING TO
COMPRESS DISKS)
ACTUATOR OUTPUT SHAFT
CONNECTION
TIGHT-SEATER HOUSING
LINEAR THRUST DISKS
(NUMBER OF DISKS
VARIES WITH RATED
THRUST OF VALVE)
THREADED RING TO
CONTAIN MOVEABLE
COUPLING

19
80-1400-02, Rev. 7.9A
CONTROL OPTIONS
Two basic types of control are available:
120 V ac contact closure (options 3, 4, 5, and 6)
and milliamp or dc analog modulating (options 7
and 8). Each option is described below.
Open / close option 3: For simple 2-position
control using manual push-buttons or an
automatic controller. Preset travel limit switches
provide open / close operation upon closure of an
automatic controller or manually operated switch.
Travel limits are adjustable over the full range of
travel and have a repeatability of 0.1°.
Multi‑position option 4: Adjustable, cam
operated switches provide up to ve discrete stop
positions upon closure of an automatic controller
or manually operated switch. Three, four, and
ve predetermined position settings are possible,
with positioning repeatability of 1° over the range
of operation.
Direct ac control option 5: Operated in forward
/ reverse from a remote location; includes a 1,000
ohm lm potentiometer for remote feedback.
Direct ac control option 6: Provides
continuous positioning capability over the full
range of actuator travel by direct ac from either
an automatic controller or manually operated
switches. Includes Contactless Position Sensor
(CPS-5) for feedback and position indication.
Modulating option 7: For automatic operation
in response to milliamp or V dc analog control;
includes a lm potentiometer for position sensing
and feedback to the Electronic Signal Receiver
(ESR-5).
Modulating option 8: For automatic operation,
as in option 7, above; includes Contactless
Position Sensor (CPS-5) for position sensing and
feedback to the ESR-5.
HANDWHEEL
Every Beck Group 14 linear actuator is
furnished with a Handwheel for operation of
the valve without electrical power. Its solid
construction design includes no spokes or
projections, and turns at a safe, slow speed. The
Handwheel is located at the bottom of the control
motor housing. The Handwheel is coupled
directly to the motor shaft and rotates when the
motor runs. Manual operation of the Handwheel
(with electric Handswitch in STOP position)
turns the motor and the rest of the actuator train
without incorporating a clutch.
HANDSWITCH
A local electric Handswitch is provided on
Beck actuators to permit operation at the valve,
independent of the controller. As a safety
feature, the Handswitch is designed so that the
controller can operate the actuator only when it
is in the AUTO position. The sequence of the
Handswitch is: AUTO, STOP, RETRACT, STOP,
EXTEND.
In the AUTO position, two contacts are closed
and the ESR-5 or external controller contact
completes the control circuit.
In the RETRACT or EXTEND positions,
contacts are closed to operate the actuator
independently of the controller.
In the STOP position, all contacts remain open.
SWITCHES
Two end-of-travel switches and two auxiliary
switches are provided on Group 14 actuators.
Two additional auxiliary switches are available
as an option. Switch cams are clamped onto the
control shaft, which rotates in relation to the output
shaft. Cam position is eld-adjustable. Switches
are enclosed in high-impact thermoplastic.
Switches are rated 6 A, 120 V ac (0.5 A, 125 V
dc). All auxiliary switch connections are made on
the terminal board.
Figure 4
Tight-Seater™

20
80-1400-02, Rev. 7.9A
INPUT: ELECTRONIC SIGNAL
RECEIVER (ESR-5)
Beck modulating actuators are equipped with
precision electronic control modules (ESR-5)
to receive conventional 4–20 mA or 1–5 V dc
control signals directly, eliminating the need for
contact protection devices, relays, switches, and
revers ing starters.
The ESR-5 provides for actuator control
with analog control systems, and is designed
to operate continuously in temperatures up to
185°F.
A feedback signal from either the CPS-5 or
a lm potentiometer is compared to the demand
signal. The dierence between these signals—
the error—is amplified and used to actuate
either of two electronic motor power switches.
These switches actuator the motor in the proper
direction to force the error to zero. The demand
signal is adjustable from 50% to 400% of the 4
volt span, with the zero adjustable from -100 to
+275% of span.
The ESR-5 permits two or more Beck
actuators to be operated by a single signal source,
for series, parallel, or split range operation. See
page 15 for details on these control options.
The ESR-5 board requires a feedback signal
source. Either the Contactless Position Sensor
(CPS-5) or a Film Potentiometer can be provided
for this purpose. The CPS-5, with a monitor /
isolator board, produces an isolated position
feedback signal for the ESR-5 board. The
Monitor function monitors the CPS-5 position
signal and compares it to established limits. If
the output exceeds normal signal conditions,
the monitor relay contact opens. This relay may
be used for either a remote signal indication or
activation of Loss of Signal operation of the drive.
POSITION FEEDBACK:
CONTACTLESS POSITION
SENSOR (CPS-5)
The CPS-5 provides a continuous feedback
signal proportional to the position of the actuator's
output shaft. It is used for remote position
indication as well as for automatic control loop
feedback to the Electronic Signal Receiver
(ESR-5). When used with the ESR-5, the CPS-5
includes a monitor / isolator board that delivers
an isolated position feedback signal to the
Electronic Signal Receiver (ESR-5). The Monitor
function monitors the CPS-5 position signal and
compares it to established limits. If the output
exceeds normal signal conditions, the monitor
relay contact opens. This relay may be used for
either a remote signal indication or activation of
Loss-of-Signal operation of the drive.
The position sensing function of the CPS-5 is
provided by a ferrite magnetic sensing element
consisting of two parts: A ferrite stator mounted
on the CPS-5 circuit board and a ferrite rotor
mounted on the control shaft, driven by the
Beck actuator's output shaft through the Calibar
assembly. The electronic circuit translates the
signal from the ferrite magnetic sensor into an
analog position feedback signal designed to
interface with electronic control systems and
indicating instruments.
POSITION FEEDBACK: FILM
POTENTIOMETER
The lm potentiometer produces a voltage
that is some fraction of the voltage applied across
its resistive element. That voltage fraction is
determined by the position of the wiper on the
resistive element. The potentiometer assembly
also includes two xed resistors, one on each
end of the resistive element. These resistors
permit suppressed ranges as well as zero-based
position feedback voltages. If position feedback
is desired on actuators equipped with an ESR-5
board, two lm potentiometers are required: One
for position feedback and the second to supply a
feedback signal to the ESR-5.
LOSS OF CONTROL SIGNAL
(L.O.S.)
Beck actuators equipped with the ESR-5 have
the ability to move to a predetermined position
upon loss of input control signal. When the
demand signal drops to 13% of span below the
zero setting, the ESR-5 provides an annunciating
signal with one of the following options:
1. STALOS = Stay in place, lock in last position
(triac output available for remote alarm 0.12
to 5A, 120V, 50 or 60 HZ).
2. REVLOS = Extend to the end-of-travel limit
switch position. Connect terminal E to F.
3. FWDLOS = Retract to the end-of-travel limit
switch position. Connect terminal E to D.
4. INTLOS = Move to predetermined intermediate
auxiliary switch position. Consult factory.
When the demand signal is lost but the power
remains on, the L.O.S. switch on the ESR-5
board is energized, a red LED on the board
lights and the directional switches are turned o.
The output of the L.O.S. switch is connected
to terminal E which is wired for one of the
predetermined operating modes listed above.
OPERATION
/