
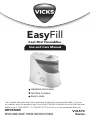
VUL570
Series
Use and Care Manual
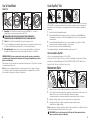
This humidifier adds water vapor to the surrounding air helping the user to breathe better. If you have
any questions about the operation of your Vicks
®
EasyFill Cool Mist Humidifier, call our toll-free Consumer
Relations line at 1-800-VAPOR-1-2 (1-800-827-6712) or e-mail us at [email protected].
Adjustable mist control
No filters to replace
Easy to clean
EasyFill
Cool Mist Humidifier
IMPORTANT!
READ AND SAVE THESE INSTRUCTIONS

2 3
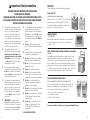
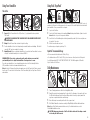
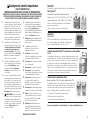
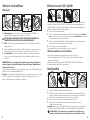
1. The humidifier should always be placed
on a firm, flat, waterproof surface at least
four feet (1.2m) away from bedside, 12
inches (30 cm) from the wall and out of
reach of patients, children and pets. Be
sure the humidifier is in a stable position
and the power cord is away from heated
surfaces and out of the way to prevent the
humidifier from being tipped over.
2. The humidifier should not be left
unattended in a closed room since air
could become saturated and leave
condensation in front of unit, on walls
and furniture. Leave room door partly
open. Do not aim Mist Outlet directly at
children, walls or furniture.
3. Before using the humidifier, extend the
cord and inspect for any signs of damage.
Do not use the unit if the cord has been
damaged. Do not operate with power cord
coiled or with twist tie in place.
4. The humidifier has a polarized plug (one
blade is wider than the other) as a safety
feature. This plug will fit into a polarized
outlet only one way. If the plug does not
fit fully into the outlet, reverse the plug.
If it still does not fit, contact a qualified
electrician. Do not attempt to defeat this
safety feature.
5. CAUTION: To avoid fire or shock
hazard, plug the humidifier directly into
a 120V AC electrical outlet. To avoid risk
of fire, shock or personal injury, do not
use an extension cord or power strip.
6. The humidifier should always be unplugged
and emptied when not in operation or
while being cleaned. Shut off and unplug
humidifier before moving. Do not move or
tilt humidifier while it is in operation. Plug
and unplug unit with dry hands. Never pull
by cord.
7. Do not operate the humidifier without
water. Turn off and unplug unit when tank
is empty.
8. Humidifier requires regular cleaning. Refer
to and follow cleaning instructions.
9. Do not operate outdoors; this humidifier is
intended for indoor residential use only.
10. Do not cover or insert objects into any
openings on the unit.
11. Do not block intake or output vents.
12. Do not attempt to repair or adjust any
electrical or mechanical functions on this
humidifier. Doing so will void your warranty.
13. Do not place in direct sunlight, high
temperature areas or near computers or
sensitive electronic equipment.
14. Do not touch the nebulizer while the unit is
plugged in as burns could result.
15. Do not touch skin with exposed VapoPad
®
or place VapoPad
®
on furniture, fabric,
bedding or plastic.
16. Do not add any medications (e.g. Kaz
Inhalant or Vicks VapoSteam
®
or oils)
into Mist Outlet, Base, Water Reservoir
or Water Tank.
SAVE THESE INSTRUCTIONS
Important Safety Instructions
READ AND SAVE THESE IMPORTANT SAFETY INSTRUCTIONS
BEFORE USING THIS HUMIDIFIER
WHEN USING ELECTRICAL APPLIANCES, BASIC PRECAUTIONS SHOULD ALWAYS
BE FOLLOWED TO REDUCE THE RISK OF FIRE, ELECTRICAL SHOCK AND INJURY
TO PEOPLE, INCLUDING THE FOLLOWING:
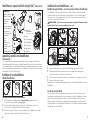
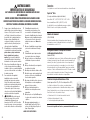
The following accessories work great with your humidifier:
Accessories
Vicks VapoPads
®
(One Menthol VapoPad Sample Included)
Menthol scent: VSP-19, VSP19FP, VSP19VPC or VSP-19-CAN
Lavender/rosemary scent: VBR-5 and VBR-5FP (US only)
Use Vicks VapoPads with your humidifier for soothing vapors.
Enjoy 8 hours of soothing comfort per pad.
Protec Antimicrobial Cleaning Products
(Protec Cleaning Ball: PC1 and PC2 or Protec Cleaning Fish: PC1F)
The Protec Cleaning Products feature an antimicrobial, Aquastat
®
, that
helps keep your humidifier cleaner, longer. Simply drop in the tank for
fresh, clean mist! Benefits of using these products include:
• Kill up to 99% of odor causing bacteria
• Keep cleaning for 30 days
• Contain no harmful chemicals
Protec
®
Demineralization Cartridge (included in some models)
(TWT500)
This humidifier works with a Demineralization Cartridge that helps remove
minerals from the water. This helps prevent the build up of minerals
(“white dust”) that can occur in hard water areas. If you live in a hard water
area, we recommend the use of this demineralization cartridge if not using
distilled water. For best results, replace your Demineralization Cartridge every
20-30 fillings, or when you begin to notice white dust forming. The effective
time will vary depending on the mineral content of the water used.
Humidity Monitor
(V70 or V70-CAN)
Displays relative humidity and room temperature so you can maintain
a comfortable humidity level in your home. The ideal humidity level
is between 40-60%.
Accessories available at retailers and at www.vickshumidifiers.com.

4 5
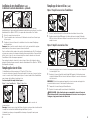
Keep this instruction manual for reference.
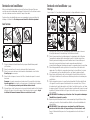
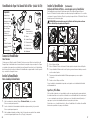
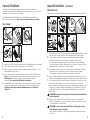
1. Remove packaging materials. Locate Float Paddle and set aside. This is required for operation.
2. Locate the Demineralization Cartridge (included in some models) and set aside. This is
optional for operation.
3. Remove twist tie and extend power cord. Place on a firm, level, water resistant surface
a minimum of 12 inches (30 cm) from walls.
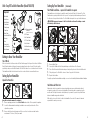
Float Paddle Installation – required for humidifier to operate
1.
Remove Water Tank.
2. Line up Float Paddle with the float paddle shape on the bottom of the Reservoir.
3. Place Float Rod over both Brackets and press firmly until you hear it click into both Brackets.
4. Pull gently up on the Float Rod to be sure it doesn’t pop out of the Brackets.
5. Replace Tank in Base.
If using the optional demineralization cartridge, see next section Installing Demineralization Cartridge.
This humidifier uses a float system to regulate the water flow from the Tank to the Reservoir. The Float
Paddle must be properly installed for the unit to operate. If not properly installed, water may not flow into
the Reservoir or it may leak from the Base. The Float Paddle is designed to be easy to install and remove.
CAUTION: Improper placement of the Float Paddle could result in leaking or water
not feeding to the Reservoir.
Step 2
Step 3
Step 1
Setting Up Your Humidifier
Unpack the Humidifier
Setting Up Your Humidifier (Continued)
Top
Le Haut
Step 2
Step 5
Step 4
$
MAX
MAX
Step 3
Top
Le Haut
$
“Click”
$
MAX
MAX
Float
Rod
Float
Paddle
Brackets
Step 1
Hard Water and White Dust
High mineral content in your water, also known as hard water, may cause a white mineral residue to
accumulate on surfaces in the room near the humidifier. This mineral residue is commonly referred to
as white dust. The higher the mineral content (hardness) of your water, the greater the potential that an
ultrasonic humidifier may produce white dust.
White dust is not a result of a defect or flaw in the humidifier. It is a result of the amount of minerals
suspended in the water you are using.
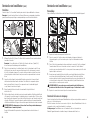
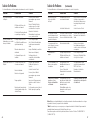
14 Demineralization
Cartridge
(included in some models)
15 Plunger
16 Tank Gasket
17 Float Paddle
18 Air Outlet
19 Water Reservoir
20 Nebulizer
1 Mist Outlet
2 Outlet Cover
3 Outlet Gasket
4 Tank Handle
5 Tank Opening
6 Tank Cover
7 Water Tank
8 Auto Shut-Off Float
9 Housing
10 Base
11 Power Knob
12 Scent Pad Door
13 Mist Chamber
Components
MAX
MAX
10
1
3
2
4
9
7
6
5
15
14
12
8
18
13
20
19
17
16
11
Vicks
®
EasyFill Cool Mist Humidifier (Model VUL570)
Getting to Know Your Humidifier
How It Works
Water is released into the Reservoir when the Float Paddle engages the Plunger at the bottom of the Water
Tank. A Nebulizer vibrates at ultrasonic frequency, breaking the water into a fine mist. The mist is quietly
propelled by a fan up a vertical Mist Chamber to the Mist Outlet where the cool, visible mist enters the room.
This humidifier will shut off when the water level is low or when the tank is removed from the base.

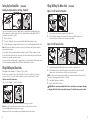
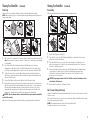
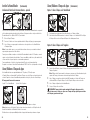
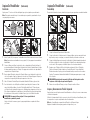
1. Pour cool water from a pitcher or jug directly into Water Tank.
2. Fill to the MAX line marked on the outside of the Tank or to the MAX indicator on the
Tank Cover. Replace the Tank Cover if it was removed for filling.
Filling/Refilling The Water Tank (Continued)
1.
Grasp Tank Handle and lift Water Tank to remove from Base. Carry Tank to sink.
2. Fill Tank with cool water to the MAX line marked on the outside of the Tank or to the MAX
indicator on the Tank Cover. Replace the Tank Cover if it was removed.
NOTE: The Tank should be carried using two hands; one hand on the Handle located on top of the
Tank and other hand supporting the bottom of the Tank.
3. Carry Water Tank back to humidifier.
4. Replace the full Tank on the Base.
CAUTION: Use care when handling Water Tank to avoid unnecessary impact. Banging
or dropping the Water Tank could result in damage to the Tank that may cause leaking.
Option 2: To Fill Tank at the Sink
Option 1: To Fill Tank at the Humidifier
This humidifier holds a maximum of 1.25 gallons (4.7 liters) of water.
The Tank Cover is removable. You can fill the Tank with the Cover in place or with the Cover removed.
Be sure to replace the Cover before using the humidifier to keep objects and debris out of the water.
The Tank can be filled in two ways:
Option 1: At the Humidifier Option 2: At the Sink
Both filling options can be performed with or without the Tank Cover in place.
Note: Ensure the Float Paddle has been placed correctly in the Reservoir before filling.
See Float Paddle Installation instructions if necessary
Manufacturer will not accept responsibility for property damage caused by water spillage.
MAX
MAX
6 7
Step 2
Step 3
$
Step 1
Step 2
Step 2
Step 3
Step 4
Step 1
Step 1
Installing the Demineralization Cartridge - (Optional)
If you live in a hard water area, the use of distilled water or a demineralization cartridge with tap water
will help minimize the production of white dust. A Protec Demineralization Cartridge (Model # TWT500)
is included in some models. To install it:
1. Remove Tank Cover.
2. Press the Cartridge into the recessed area inside the Water Tank and twist to secure.
3. Fill Tank with water according to instructions in the next section, Filling/Refilling the Water Tank.
Note:
With a new, dry cartridge, there may be a delay of a few minutes while the water begins to
pass through the cartridge.
For best results, replace your Demineralization Cartridge every 20-30 fillings, or when you begin
to notice white dust forming. For your convenience, write the month and day you installed the new
cartridge on the top with a permanent marker.
To replace, twist the Cartridge and lift to remove. Dispose of in household trash. Replace with a new
Protec Demineralization Cartridge (Model # TWT500). (Not available in Canada).
Filling/Refilling the Water Tank
Setting Up Your Humidifier
(Continued)
MAX
MAX
Option 1
MAX
Option 2
MAX
MAX
MAX
$
$
$
MAX
MAX
$
MAX
MAX

HOURS
1
2
3
4
5
6
7
11
8
9
10
12
8 9
1. Power: With the Power Knob in the OFF position ( O ), plug humidifier into a polarized
120V outlet.
CAUTION: TO AVOID ELECTRIC SHOCK DO NOT PLUG HUMIDIFIER INTO OUTLET
WITH WET HANDS.
2. Output: Turn the Power Knob clockwise to highest setting.
3. Position humidifier to direct mist output away from walls, furniture and bedding. Mist Outlet
can rotate 180° and is removable for cleaning.
4. Humidity Level: When a comfortable humidity level is reached, turn Power Knob to a lower
setting. A comfortable humidity level is between 40-60%.
CONDENSATION: If you notice condensation on the walls, windows or around unit,
your humidity level is too high. Turn humidifier off and open door to room.
To monitor your humidity level, use a humidity monitor such as the Vicks Humidity Monitor
(V70) available at retailers or at www.vickshumidifiers.com.
Note: Auto shut off feature will activate when water runs out of the Tank or the Tank is removed
from the unit. The auto shut off will not turn off the Power Knob light; it will just turn off the fan
and nebulizer.
Step 2
Step 4
Step 3
Step 1
VapoPads
®
Recommended Usage:
• Not recommended for infants under 10 lbs (4.5 kg).
• For children between 10-22 lbs (4.5-10 kg ) do not use more than 2 pads in a 24 hr period.
Scent Pad Ingredients: VSP-19, VSP19FP, VSP19VPC, VSP-19 CAN: Eucalyptus Oil, Menthol,
Glycol,Cedar Leaf Oil & Others.
Using Your Humidifier
Step 1
Your EasyFill Cool Mist Humidifier can be used with Vicks VapoPads
®
, VSP-19 or VBR-5 series, to
provide up to 8 hours of soothing vapors. One free sample of the methol VapoPad is included with
your humidifier. To use your unit with scent pads:
1. Open Scent Pad Door.
2. Open Scent Pad by tearing notch on pad bag. Do not touch pad with hands. If pad is touched
do not rub face or eyes as it may cause irritation.
3. Insert Vicks Scent Pad with angled end facing towards the product. Up to two scent pads can
be inserted. Close door.
4. After 8 hours, discard scent pad.
To continue using scent pads, repeat steps 1-4.
Using Vicks
®
VapoPads
®
Step 3 Step 2
Step 4
$
How to Use
1.
Turn off, unplug and remove Tank Cover. Empty Water Tank.
2. Empty Reservoir by slowly pouring from the low side of the Housing on the opposite side from
the Mist Outlet and away from Power Knob. Wipe outside of housing to dry any water that
may have escaped between Base and Housing.
3. Rinse Tank, wipe clean and dry with a soft cloth or paper towel.
4. Refill Water Tank with cool water according to Filling/Refilling the Water Tank instructions.
Note: Ensure Float Paddle remains installed correctly. For detailed instructions, refer to
Float Paddle Installation section.
CAUTION: Improper placement of the Float Paddle could result in leaking or water
not feeding into the Reservoir.
Daily Maintenance
Step 2
Step 4
Step 1
MAX
Step 3

10 11
Step 2
Step 3
Step 1
1.5C
Step 5
Step 6
Step 4
Cleaning Your Humidifier (Continued)
1. Pour a minimum of 2 cups (.5 liters) of undiluted distilled white vinegar in the Water Tank.
Gently swish vinegar around in the Tank to wet entire inside of Tank.
2. Place Tank on Base. Vinegar will drain into the Water Reservoir and loosen mineral buildup
(scale) in the Reservoir and bottom of the Water Tank. There should be enough vinegar to
cover the bottom of the Tank. If not using a dishwasher, the four removable components can
be soaked in the Tank. Just add enough vinegar to cover the components in the Water Tank.
3. Soak for 20 minutes, then remove Water Tank and slowly empty vinegar into sink. Remove
components placed in Tank. Rinse Tank and components with tap water until the smell of
vinegar is gone.
4. Remove Float Paddle from Reservoir by lifting up on Float Rod and set aside.
Wipe Nebulizer and Reservoir area with a soft cloth to remove loosened minerals.
5. Empty vinegar from the Reservoir by slowly pouring from the low side of the Housing on the
opposite side from the Mist Outlet and away from Power Knob. Pour 1.5 cups of water into
Reservoir, lightly swish water and pour out. Repeat until smell of vinegar is gone. Avoid
getting water into any openings in the Reservoir area by pouring from the low side of the
Housing on the opposite side from the Mist Outlet and away from Power Knob.
CAUTION: Do not submerge the Base in water. Doing so may damage the
humidifier and void the warranty.
6. Place Float Paddle back in Reservoir, ensuring Float Rod is secured in brackets.
For detailed instructions, refer to the Float Paddle Installation section.
CAUTION: Improper placement of the Float Paddle could result in leaking or
water not feeding to the Reservoir.
Wipe outside of housing to dry any water that may have escaped between Base and Housing.
V
2C
MINUTES
Top
Le Haut
$
“Click”
$
MAX
MAX
Scale Removal
Follow steps 1-5 in Before Cleaning section, then follow the additional steps below.
1. Turn off and unplug humidifier. Never clean the humidifier when it is running.
2. Remove Water Tank and Tank Cover. Empty water from Tank.
3. Remove accessories, including Demineralization Cartridge, from the Tank if being used.
Do not clean accessories.
4. Remove Mist Outlet, Outlet Cover, Mist Chamber, and Tank Cover.
Note: These four components are dishwasher safe. They may be cleaned in the Top Rack of
the dishwasher or by hand as noted in following instructions. Do not place in the bottom
rack of dishwasher.
5. Holding the Base, empty water from Reservoir by slowly pouring from the low side of the
Housing on the opposite side from the Mist Outlet and away from the Power Knob. The
Float Paddle should remain firmly attached to the brackets in the Reservoir.
Cleaning Your Humidifier
To keep your humidifier running efficiently, clean it regularly. Weekly cleaning is recommended. All
maintenance should be done in the kitchen or bathroom on a water resistant surface near a faucet.
To properly clean your humidifier we recommend the separate processes of Scale Removal
and Disinfecting. These two processes must be performed separately.
Before Cleaning
Step 2
Step 4 Step 5
Step 1
$
Step 3
Do not clean

Cleaning Your Humidifier (Continued) Cleaning Your Humidifier (Continued)
Reassembling
After descaling and disinfecting, follow these steps to reassemble the unit:
1. Replace Mist Chamber over Air Outlet.
2. Place Outlet Cover on top of Mist Chamber and lightly press down until it clicks into place
and sits fully seated on the Housing.
3. Place Mist Outlet into the recess in the Outlet Cover, lining up the opening in the Outlet
with the circle graphic on the Outlet Cover. Press down until you hear a click. This ensures
Mist Outlet is positioned properly.
4. Ensure Float Paddle is installed correctly. Line up Float Paddle with the float paddle shape
on the bottom of the Reservoir. Place Float Rod over both Brackets and press firmly
until you hear it click into both Brackets. Pull gently up on the Float Rod to be sure it
doesn’t pop out of the Brackets.
CAUTION: Improper placement of the Float Paddle could result in leaking or water
not feeding to the Reservoir.
5. Replace Tank Cover and place Tank back onto Base.
End of Season Cleaning and Storage
Follow the cleaning instructions when the humidifier will not be used for at least one week, or at the
end of the season.
At the end of the season, remove any accessories and discard. Allow the humidifier and all compo-
nents to dry completely before storing.
DO NOT store humidifier with water inside the Reservoir or Water Tank.
Pack unit safely and store in cool, dry location.
Step 2
Step 4 Step 5
Step 3
Step 1
1
“Click”
Top
Le Haut
$
$
MAX
MAX
“Click”
12 13
1. Mix 1 gallon (3.8 L) of water with 1 teaspoon of bleach. Pour the bleach solution into the Tank.
Note: Using more than 1 teaspoon of bleach to 1 gallon (3.8L) of water may result in damage
to the humidifier.
2. Place Tank on Base. Bleach solution will drain into the Water Reservoir. If not using
a dishwasher, the Mist Outlet, Outlet Cover, Mist Chamber and Tank Cover can be soaked
in the Tank. Just add additional bleach solution to cover the components in the Water Tank.
3. Soak for 20 minutes, then remove the Water Tank and slowly empty bleach solution into
sink. Remove components placed in Tank. Rinse Tank and components with tap water until
the smell of bleach is gone.
4. Remove Float Paddle from Reservoir by lifting up on Float Rod and set aside.
5. Empty bleach solution from the Reservoir by pouring from the low side of the Housing on the
opposite side from the Mist Outlet and away from Power Knob. Pour 1.5 cups of water into
Reservoir, lightly swish water and pour out. Repeat until smell of bleach is gone. Avoid
getting water into any openings in the Reservoir area by pouring from the low side of the
Housing on the opposite side from the Mist Outlet and away from Power Knob.
CAUTION: Do not submerge the Base in water. Doing so may damage the humidifier
and void the warranty.
Wipe outside of housing to dry any water that may have escaped between Base and Housing.
Step 2 Step 1
(3,8 l)
B
1 tsp
W
1 Gal.
Step 3
MINUTES
Step 4
1.5C
Step 5
$
MAX
MAX
Disinfecting
Follow steps 1-5 above in Before Cleaning section, then follow the additional steps below.
NOTE: Bleach may stain clothes. It is recommended that you wear rubber gloves during this process
to protect your hands.

Problem Possible Cause Solution
Mist is coming out from
bottom of Mist Outlet*
Mist Outlet not properly
installed
Outlet Gasket is missing
Remove and replace Mist
Outlet into the recess in the
Outlet Cover and press down
until you hear a click
Contact Consumer Relations
Outlet Cover will not sit
securely on Housing
when reassembling after
cleaning
Outlet Gasket was removed
for cleaning and not securely
replaced in Outlet Cover
Be sure Gasket fits tightly in
Outlet Cover
Mist is escaping from
the area between the
tank and housing, in
addition to the mist
outlet
Outlet Gasket is missing Replace Gasket if it was
removed for cleaning or
contact consumer relations
for a replacement
Humidifier shuts off Water Tank is empty
Float Paddle is not installed
properly
Fill the Tank with Water
Check that the Float Paddle
is secured in Brackets
White Dust accumulating
on surrounding surfaces
Using tap water in your
humidifier in hard water areas
If using, Demineralization
Cartridge has reached life
expectancy
Use distilled water or
use a Protec TWT500
Demineralization Cartridge
Replace Demineralization
Cartridge
Condensation on
windows and walls or
area around humidifier
is damp
Mist intensity is set too high
for room size or pre-existing
humidity level
Humidifier may be too close
to wall or window
Decrease mist output to a
lower setting or open door
to the room
Move humidifier away from
wall or point Mist Outlet away
from wall or window
14 15
Troubleshooting (Continued)
If your humidifier is not working properly, refer to the following:
Problem Possible Cause Solution
Water is not draining
into Reservoir
Plunger is stuck
Float Paddle not installed
correctly
Demineralization Cartridge not
allowing water to flow
Push and release Plunger to be
sure it is moving freely
Check Float Paddle and ensure
it is placed securely
in brackets
Uninstall Demineralization
Cartridge, shake a few times,
and re-install
Power light is on but little
or no mist is released
Water Tank is empty
Power Knob is set too low
Hardened minerals on
the Nebulizer
Mist Chamber is not installed
Fill Water Tank
Turn the Power Knob clockwise
(right) to increase output
Clean Nebulizer (refer to
Cleaning instructions)
Verify that all components are
installed properly
Water leaking from Base
or Reservoir
Float Paddle not placed
correctly
Plunger is damaged
Plunger is sticking
Tank is cracked
Plunger may have foreign
material stuck under the
Tank Gasket
Ensure Float Rod is secured
in Brackets
Contact Consumer Relations
Push and release Plunger to be
sure it is moving freely
Inspect Tank for damage;
contact Consumer Relations
At sink, push and release
Plunger system so water
may flow.
Troubleshooting
If your humidifier is not working properly, refer to the following:
NOTE: Keeping this unit clean from mineral deposits normally contained in water supply will improve
the efficiency and operation of this unit.
*Note: It is normal to see some mist escape around the Mist Outlet when the unit first starts and the
Mist Outlet is dry.
For additional troubleshooting help, call Consumer Relations at 1-800-VAPOR-1-2 (1-800-827-6712).

16 17
Série
VUL570
Cet humidificateur ajoute de la vapeur d’eau à l’air ambiant aidant ainsi l’utilisateur à mieux respirer.
Si vous avez des questions à propos du fonctionnement de votre humidificateur à vapeur froide
facile à remplir Vicks
MD
, appelez sans frais notre Service à la clientèle au 1 800 VAPOR-1-2
(1 800 827-6712) ou envoyez-nous un courriel à [email protected].
Contrôle réglable de la vapeur
Aucun filtre à remplacer
Facile à nettoyer
Facile à remplir
Humidificateur à vapeur froide
IMPORTANT!
LISEZ ET CONSERVEZ CES INSTRUCTIONS
2 Year Limited Warranty
You should first read all Instructions before attempting to use this product.
This 2 year limited warranty applies to repair or replacement of product found to be defective in
material or workmanship. This warranty does not apply to damage resulting from commercial,
abusive, unreasonable use or supplemental damage. Defects that are the result of normal
wear and tear will not be considered manufacturing defects under this warranty. KAZ IS NOT
LIABLE FOR INCIDENTAL OR CONSEQUENTIAL DAMAGES OF ANY NATURE, ANY
IMPLIED WARRANTY OF MERCHANTABILITY OR FITNESS FOR A PARTICULAR
PURPOSE ON THIS PRODUCT IS LIMITED IN DURATION TO THE DURATION OF
THIS WARRANTY. Some jurisdictions do not allow the exclusion or limitation of incidental
or consequential damages or limitations on how long an implied warranty lasts, so the above
limitations or exclusions may not apply to you. This warranty gives you specific legal rights,
and you also may have other rights which vary from jurisdiction to jurisdiction. This warranty
applies only to the original purchaser of this product from the original date of purchase.
At its option, Kaz will repair or replace this product if it is found to be defective in material or
workmanship.
This warranty does not cover damage resulting from any unauthorized attempts to repair or
from any use not in accordance with the instruction manual.
This warranty does not cover the filters, pre-filters, UV bulbs or other accessories (if included)
except for material or workmanship defects.
Call us toll-free at 1-800-VAPOR-1-2 (1-800-827-6712) or e-mail: [email protected]
Please be sure to specify a model number located on the box and the back and bottom of your unit.
NOTE: IF YOU EXPERIENCE A PROBLEM, PLEASE CONTACT CONSUMER RELATIONS FIRST
OR SEE YOUR WARRANTY. DO NOT RETURN THE PRODUCT TO THE ORIGINAL PLACE OF
PURCHASE. DO NOT ATTEMPT TO OPEN THE MOTOR HOUSING YOURSELF, DOING SO MAY
VOID YOUR WARRANTY AND CAUSE DAMAGE TO THE PRODUCT OR PERSONAL INJURY.
A.
B.
C.
D.
Specifications
Electrical rating: 120V, 60 Hz.
Capacity: 1.25 gallons (4.7 L)
If you experience a problem, please contact Consumer Relations. Do not return this humidifier to
the original place of purchase.
Do not attempt to open the motor housing or tamper with the Power Knob yourself. Doing so may
void your warranty and cause personal injury or damage to the product.
Manuel d’utilisation
et d’entretien
Consumer Relations
For questions, technical support or to order replacement parts, contact Consumer Relations.
Call us toll-free at: 1-800-VAPOR-1-2 (1-800-827-6712)
Hours: Mon-Fri 8:00AM-7:00PM EST
E-mail: [email protected]
Or visit our website at: www.vickshumidifiers.com
Please be sure to specify Model number VUL570.
Page is loading ...
Page is loading ...
Page is loading ...
Page is loading ...
Page is loading ...
Page is loading ...
Page is loading ...
Page is loading ...
Page is loading ...
Page is loading ...
Page is loading ...
Page is loading ...
Page is loading ...
Page is loading ...
Page is loading ...

48 49
Especificaciones
Clasificación Eléctrica: 120V~, 60 Hz.
Capacidad: 1.25 galones (4.7 L)
Si tiene algún problema, por favor contacte Servicio al Cliente. No devuelva este humidificador al
lugar original de compra.
No intente abrir la carcasa del motor o manipular la Perilla de Encendido usted mismo. Hacerlo
puede anular la garantía y causar lesiones personales o daños al producto.
Servicio al Cliente
Para preguntas, soporte técnico o para ordenar partes de reemplazo, contacte Servicio al Cliente.
Llámenos lada gratuita al: 1-800-VAPOR-1-2 (1-800-827-6712)
Horas: Lun-Vie 8:00AM-7:00PM EST
Correo Electrónico: [email protected]
O visite nuestro sitio web: www.vickshumidifiers.com
Por favor asegúrese de especificar el número de modelo VUL570.
Este dispositivo cumple con la Parte 18 de las reglas de la FCC.
Advertencia:
Cambios o modificaciones hechos a esta unidad que no hayan sido expresamente
aprobados por la parte responsable del cumplimiento pueden anular la autoridad del usuario para utilizar el
equipo. Este equipo ha sido probado y cumple con los límites correspondientes a un equipo Consumidor
ISM, según la Parte 18 de las Normas FCC (Comisión Federal de Comunicaciones de EUA). Estos límites
están diseñados para proporcionar protección razonable contra interferencias perjudiciales en una instalación
residencial. Este equipo genera, utiliza y puede emitir energía de frecuencias de radio y, si no es instalado y
usado de acuerdo a las instrucciones, puede causar interferencias perjudiciales en las comunicaciones de
radio. sin embargo, no hay garantía de que no ocurrirán las interferencias en una instalación determinada. Si
este equipo causa interferencias perjudiciales en la recepción de radio o televisión, que se pueden identificar
encendiendo y apagado el equipo, recomendamos al usuario que intente solucionar las interferencias tomando
una o más de las siguientes medidas:
• Cambiar la orientación o posición de la antena receptora.
• Aumentar la separación entre el equipo y el receptor.
• Conectar el equipo a un tomacorriente de un circuito diferente del que está conectado el receptor.
Garantía Limitada de 2 Años
Antes de usar este producto, por favor lea completamente las instrucciones.
A. La presente garantía limitada de 2 años cubre la reparación o reemplazo del producto si éste
presenta un defecto de fábrica o de mano de obra. Esta garantía excluye todo daño resultante
del uso comercial, abusivo o inadecuado del producto, o de daños asociados. Los defectos
resultantes del desgaste normal no se consideran defectos de fábrica en virtud de la presente
garantía. KAZ NO SERÁ CONSIDERADA RESPONSABLE DE DAÑOS FORTUITOS O
INDIRECTOS DE NINGÚN TIPO. TODA GARANTÍA IMPLÍCITA DE CALIDAD COMERCIAL
O DE CONVENIENCIA CON UN FIN ESPECÍFICO RELACIONADA CON ESTE PRODUCTO
TENDRÁ LA MISMA VIGENCIA QUE LA PRESENTE GARANTÍA. En ciertos lugares no
se permite la exclusión o limitación de daños fortuitos o indirectos, ni los límites de duración
aplicables a una garantía implícita. Por consiguiente, es posible que estas limitaciones o
exclusiones no se apliquen en su caso. Esta garantía le confiere ciertos derechos legales
específicos. Es posible que usted también tenga otros derechos legales, los que varían según
la jurisdicción. La presente garantía sólo es válida para el comprador inicial del producto a
partir la fecha de compra.
B. A su discreción, Kaz reparará o reemplazará el presente producto si se constata que
presenta un defecto de fábrica o de mano de obra.
C. Esta garantía no cubre los daños ocasionados por tentativas de reparación no autorizadas
o por todo uso que no esté en concordancia con el presente manual.
D. Esta garantía no cubre los filtros, prefiltros, bombillas UV u otros accesorios (si los
incluye) excepto por defectos de material o mano de obra.
Llámenos lada gratuita al: 1-800-VAPOR-1-2 (1-800-827-6712) Correo Electrónico:
[email protected] Por favor asegúrese de especificar el número de modelo.
NOTA: SI TIENE PROBLEMAS, POR FAVOR LLAME PRIMERO A SERVICIO AL CLIENTE O
CONSULTE SU GARANTÍA. NO DEVUELVA AL LUGAR ORIGINAL DE COMPRA. NO INTENTE
ABRIR LA CARCASA DEL MOTOR USTED MISMO, HACERLO PODRÍA ANULAR SU GARANTÍA Y
CAUSAR DAÑO AL PRODUCTO O DAÑOS CORPORALES.
This device complies with Part 18 of the FCC rules.
Warning:
Changes or modifications to this unit not expressly approved by the party responsible for
compliance could void the user’s authority to operate the equipment. This equipment has been tested and found
to comply within the limits for Consumer ISM equipment, pursuant to Part 18 of the FCC rules. These limits
are designed to provide reasonable protection against harmful interference in a residential installation. This
equipment generates, uses and can radiate radio frequency energy, and if not installed and used in accordance
with the instructions, may cause harmful interference with radio communications. However, there is no guarantee
that interference will not occur in a particular installation. If this equipment does cause harmful interference
to radio or television reception, which can be determined by turning the equipment off and on, the user is
encouraged to try to correct the interference by one or more of the following measures:
• Reorient or relocate the receiving antenna.
• Increase the separation between equipment and receiver.
• Connect the equipment into an outlet on a circuit different from that to which the receiver is connected.
• Consult the dealer or an experienced radio TV technician for help.
Cet appareil est conforme à la section 18 des règlements de la FCC.
Avertissement :
Toute transformation ou modification de l’appareil qui ne serait pas expressément
approuvée par la partie responsable de sa conformité pourrait annuler l’habilité de l’utilisateur à faire fonctionner
cet appareil. Cet appareil a été testé et déclaré conforme aux limitations d’un appareil numérique, conformément
à la section 18 des règlements de la Commission fédérale des communications (FCC) des États-Unis. Ces
limitations sont conçues pour procurer une protection raisonnable contre le brouillage préjudiciable dans une
installation résidentielle. Cet appareil produit, utilise et peut émettre de l’énergie de fréquence radio et, s’il n’est
pas installé et utilisé suivant les instructions, il risque de brouiller les radiocommunications. Cependant, rien ne
garantit qu’un tel brouillage ne puisse pas se produire dans une installation particulière. Si cet appareil brouille
la réception radio ou télévisuelle, ce qui peut être constaté par la mise en marche suivie de l’arrêt de l’appareil,
l’utilisateur est prié d’essayer les mesures suivantes pour remédier au problème :
• Réorienter ou placer ailleurs l’antenne réceptrice.
• Augmenter la distance entre l’appareil et le récepteur.
• Brancher l’appareil à une prise se trouvant sur un circuit électrique différent de celui auquel le
récepteur est branché.
• Consulter le revendeur ou un technicien expérimenté en radio/télévision pour obtenir de l’aide.
Page is loading ...

52
© 2016 Todos los Derechos Reservados
Kaz USA, Inc., a Helen of Troy Company
Marlborough, MA 01752
Este producto es fabricado bajo licencia de The Procter & Gamble Company.
VICKS y otras marcas registradas asociadas son propiedad de The Procter & Gamble Company.
Protec es una marca registrada propiedad de Helen of Troy Limited.
Aquastat es una marca registrada de K2 Concepts Inc., Atlanta GA.
Importado por Kaz Canada, 510 Bronte St. S., Milton, ON L9T 2X6
Contáctenos al teléfono 1-800-VAPOR-1-2 (1-800-827-6712) o al sitio web www.vickshumidifiers.com
For Responsible recycling, please visit:
www.RecycleNation.com
Para reciclar responsablemente, por favor visite:
www.RecycleNation.com
© 2016 Tous droits réservés.
Kaz USA, Inc., une société de Helen of Troy
Marlborough, MA 01752
Ce produit est fabriqué sous licence de la société Procter & Gamble.
VICKS et les marques de commerce connexes appartiennent à la société Procter & Gamble.
Protec est une marque déposée propriété de Helen of Troy Limited.
Aquastat est une marque déposée de K2 Concepts Inc., Atlanta GA.
Importé par : Kaz Canada, 510 Bronte St. S., Milton, ON L9T 2X66
Pour nous joindre : Composez le 1 800 VAPOR 1 2 (1 800 827-6712) oou visitez notre site Web à
www.vickshumidifiers.com
© 2016 All Rights Reserved.
Kaz USA, Inc., a Helen of Troy Company
Marlborough, MA 01752
This product is manufactured under license from The Procter & Gamble Company.
VICKS and other associated trademarks are owned by The Procter & Gamble Company.
Protec is a registered trademark owned by Helen of Troy Limited.
Aquastat is a registered trademark of K2 Concepts Inc., Atlanta GA.
Imported by: Kaz Canada, 510 Bronte St. S., Milton, ON L9T 2X6
To contact us call 1-800-VAPOR-1-2 (1-800-827-6712) or visit our website at www.vickshumidifiers.com
P/N: A000112R0
219APR16

Brand:
Vicks
Category: Humidifier
Model:
VUL570
Description : OWNER'S MANUAL,
KAZ Artwork,,VUL570
Subject:
Owners Manual
Artwork Part #: A000112R0
Die Line Part #: N/A
Region: US
Flat Size:
IN: W11 x H8.5
MM: W279.4 x H215.9
Folded Size:
IN: W5.5 x H8.5
MM: W139.7 x H215.9
Material:
Page count: 52 (English, French, Spanish)
50# gloss text throughout.
Revision:
4
Release Date:
Date:
21APR16
Scale: 1/1
Re-release Date:
Colors:
Special Instructions:
Black
100%
Kaz USA, Inc., a Helen of Troy Company
Creative Services
Marlborough, 01752 MA, USA
+1 508 490 7000
Quality Requirement of Artwork and Quality
Clarification Process of Artwork Printing:
Meet Eng-QS-06&02
21APR16
CREATIVE DEPARTMENT ARTWORK SPECIFICATIONS
-
 1
1
-
 2
2
-
 3
3
-
 4
4
-
 5
5
-
 6
6
-
 7
7
-
 8
8
-
 9
9
-
 10
10
-
 11
11
-
 12
12
-
 13
13
-
 14
14
-
 15
15
-
 16
16
-
 17
17
-
 18
18
-
 19
19
-
 20
20
-
 21
21
-
 22
22
-
 23
23
-
 24
24
-
 25
25
-
 26
26
-
 27
27
-
 28
28


Ask a question and I''ll find the answer in the document
Finding information in a document is now easier with AI
in other languages
- français: Vicks VUL570 Le manuel du propriétaire
- español: Vicks VUL570 El manual del propietario
Related papers
-
Vicks VUL525/545 Series Filter Free Ultrasonic Cool Mist Humidifier User manual
-
-
Vicks VUL525 User manual
-
-
-
Vicks VUL585 Series User manual
-
-
Kaz V5100N Owner's manual
-
-
Other documents
-
Honeywell HUL585 Owner's manual
-
Easy Home Humidifier User manual
-
Honeywell HUL430W User manual
-
-
Honeywell HUL900BC Owner's manual
-
-
-
-
Graco 2H001 Owner's manual
-
Kaz HUT-220 Series Owner's manual