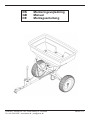
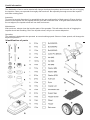
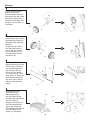
Texas 90053036 is a professional spreader designed for even distribution of seeds and granular fertilizers. It's made of high-quality materials, so it can withstand demanding working conditions. The spreader has an adjustable dosing system, so you can set the desired spreading width and amount of material. Thanks to its large container, you can spread large areas without having to refill it often. The spreader is easy to assemble and disassemble, so you can store it in a compact form when not in use.
Texas 90053036 is a professional spreader designed for even distribution of seeds and granular fertilizers. It's made of high-quality materials, so it can withstand demanding working conditions. The spreader has an adjustable dosing system, so you can set the desired spreading width and amount of material. Thanks to its large container, you can spread large areas without having to refill it often. The spreader is easy to assemble and disassemble, so you can store it in a compact form when not in use.


-
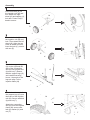
 1
1
-
 2
2
-
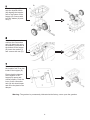
 3
3
-
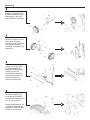 4
4
-
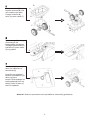 5
5
-
 6
6
-
 7
7
-
 8
8
-
 9
9
-
 10
10
-
 11
11
-
 12
12


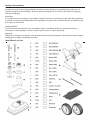
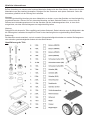
Texas 90053036 is a professional spreader designed for even distribution of seeds and granular fertilizers. It's made of high-quality materials, so it can withstand demanding working conditions. The spreader has an adjustable dosing system, so you can set the desired spreading width and amount of material. Thanks to its large container, you can spread large areas without having to refill it often. The spreader is easy to assemble and disassemble, so you can store it in a compact form when not in use.
Ask a question and I''ll find the answer in the document
Finding information in a document is now easier with AI
in other languages
- Deutsch: Texas 90053036 Bedienungsanleitung
- dansk: Texas 90053036 Brugervejledning
Related papers
-
Texas Hjulsæt 10 Owner's manual
-
-
-
Texas Centrifuge spreader CS3600 Owner's manual
-
-
-
-
-
-
Other documents
-
Anova RT60 Assembly Instruction
-
Agri-Fab 45-0502 User manual
-
-
 limex 80053 User manual
-
Toro Power Max 726 OE Snowthrower User manual
-
Simplicity SIMPLICITY DUAL STAGE SNOWTHROWER, 9.0 TP, 24 INCH User manual
-
Barbie BICYCLE 12 INCH User manual
-
Metabo SPA 1702 W Operating instructions
-
 Maximatic MX28 IFA User manual
-

