Setup Guide
Introductory Information
ENG
QT5-3269-V1 ©CANON INC. 2010 PRINTED IN JAPAN
1
Caution
MEM
O
These are the steps in printer installation.
Introduction
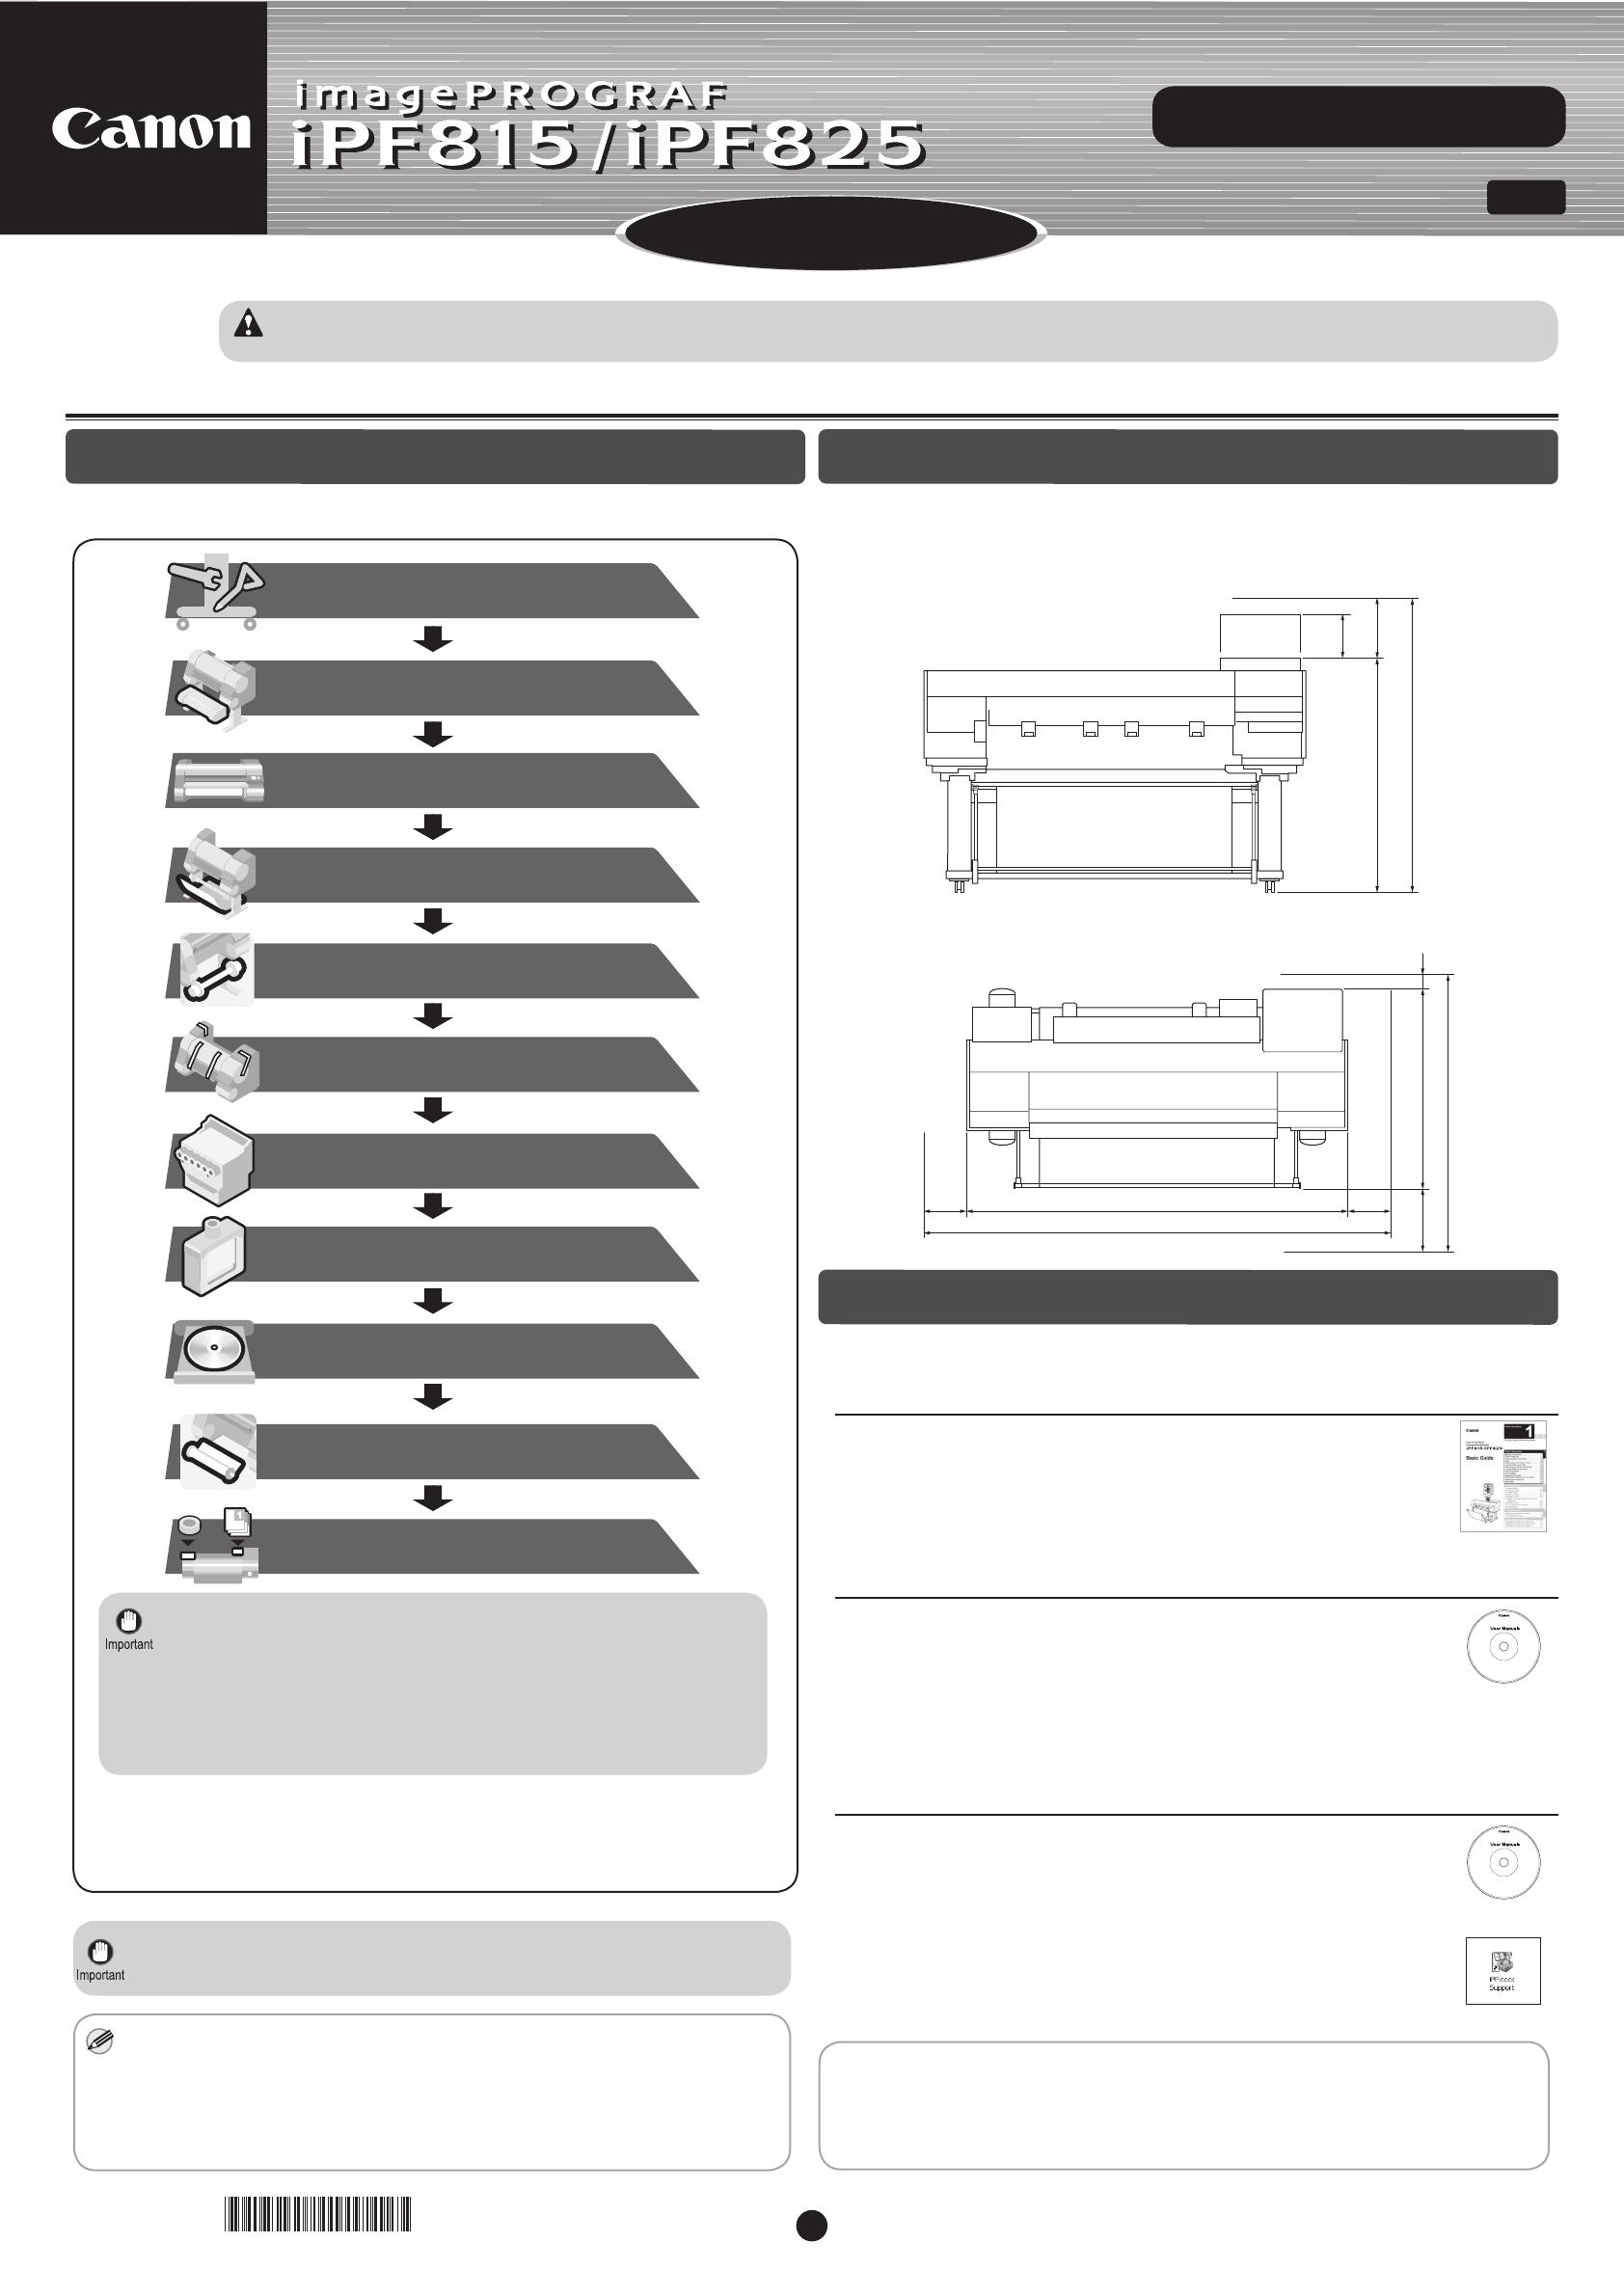
Installation Setting Up Overview Space Required for Installation
Instructions in this Setup Guide show the iPF825 printer. Note that your printer may look different from these illustrations in some cases. However,
basic operations are the same.
Ensure ample space for printer installation, a larger area than indicated
here. Values in brackets are applicable for installation of the wheeled output
stacker. Other measurements are the same for all models.
Read this manual before attempting to operate the printer.
Keep this manual in a handy location for future referencing.
Width and Depth
Height
Canon, the Canon logo, and imagePROGRAF are trademarks or registered trademarks of CANON INC.
Microsoft and Windows are trademarks of Microsoft Corporation, registered in the U.S. and other
countries.
Macintosh is trademark of Apple Inc., registered in the U.S. and other countries.
All other trademarks or registered trademarks described in this Setup Guide are the property of their
respective owners.
Some items are included with the printer but not described in this manual.
For instructions on using items not described in this manual, refer to the
User Manual.
A cable to connect the printer to a computer is not provided with the printer.
Keep these items in a safe place after setup because they are used in
various printing applications.
After installing the printer as shown in this Setup Guide , refer to the each
documentation for instructions on operation and maintenance.
Daily Operation
Detailed Instructions
The Basic Guide includes three booklets containing the following
information.
Instructions on basic operation
Troubleshooting tips and maintenance procedures
Preparations for transferring the printer, and instructions for
reinstalling the printer driver
1
2
3
Printer operating instructions
Printer driver instructions
Printing instructions
Maintenance procedures
Instructions for network printing
Troubleshooting tips
Printer menu descriptions
Printer driver function details
Specifications, details on consumables
and optional accessories, and other
information
Supported Paper
In Windows, double-click the iPFxxxx Support desktop icon.
(iPFxxxx represents the printer model.)
You can access the User Manual and Paper Reference Guide as follows.
In Mac OS X, click iPF Support , added to the Dock .
Printer Documentation
Details for each step are given in this Setup Guide . Simply follow the
instructions to install the printer.
If an error message is displayed during setup or other problems occur,
refer to "Responding to Messages. "(p.16)
To prepare the printer for relocation after it has been installed, refer to
"Printer Relocation" in the Basic Guide, booklet 3.
Even if you do not use the printer driver, be sure to install Media
Con guration Tool from the provided User Software CD-ROM.
With Media Con guration Tool, the paper types that are available
in your area can be registered to the printer. For instructions on
installation, refer to "Install the Printer Driver and the User Manual"
on page 7. (In Windows, select Install Individual Software in the
Setup Menu window to install Media Con guration Tool only.)
The User Manual (electronic manual) includes the following information.
The Paper Reference Guide (electronic manual) provides information
about paper.
(P.3)
Install the Roll Unit
Store Accessories in the Pockets
(iPF825 only)
(P.3)
(P.3)
(P.4)
(P.5)
(P.6)
(P.7)
(P.15)
(P.16)
(P.4)
(P.4)
Install the Printer
Attach the Media Take-up Unit
Set Up the Output Stacker
Remove the Packaging Material
Install the Printhead
Assemble the Stand
Install the Ink Tanks
Install the Printer Driver and
the User Manual
(optional for the iPF815)
Load Paper
to Adjust the Printhead
OO
OO
OO
OO
OO
OO=OO?
OO=OO?
OO
=OO?
OO
OO
OO OO
*QT53269V1*
2
*2 Only if the stationary output stacker is included as a standard accessory
The printer is packaged in several boxes.
Power Cord
Printera.
b.
c.
d.
e.
Ink Tanks
f.
Printhead
Ejection Support (4) *2
g. Documentation
Set of CD-ROMs
i. Sample Paper (Roll)
j.
h.
3-Inch Paper Core Attachment #1
3-Inch Paper Core Attachment #2
Wheeled Output Stacker*1 and Roll Unit
Depending on the region of purchase, boxes labeled BU-03, A, and B may
be included in the box labeled imagePROGRAF iPF815 or imagePROGRAF
iPF825.
*1: The printer includes either a stationary output stacker or a separate,
mobile wheeled output stacker.
The stationary output stacker is included as a standard accessory for the
iPF815, and the wheeled output stacker can be purchased as an optional
accessory.
Depending on the region of purchase, the wheeled output stacker may be
included as a standard accessory.
The wheeled output stacker is included as a standard accessory for the
iPF825.
Stand and Stationary Output Stacker*1
Printer
For information about the stand and stationary output stacker, refer to
the Printer Stand Setup Guide provided with the stand.
For information about the wheeled output stacker, refer to the Wheeled
Output Stacker Setup Guide provided with the wheeled output stacker.
For information about the roll unit, refer to the Printer Stand Setup
Guide provided with the stand.
Package Contents
g
h
f
j
e
d
c
a
b
i
imagePROGRAF iPF815
imagePROGRAF iPF825
This box contains the printer itself.
imagePROGRAF iPF815
imagePROGRAF iPF825
iPF815
iPF825
Printer Stand ST-44
Contains the stand and stationary output stacker.
Printer Stand ST-45
Contains the stand.
Models That Include the Wheeled Output
Stacker as a Standard Accessory
Models That Include the Stationary Output
Stacker as a Standard Accessory
BU-03
Contains the wheeled output stacker. *1
A
Contains parts used to assemble the roll unit.
B
Contains the roll unit.
RB-01
Contains the wheeled output stacker and roll unit.
iPF825
2TKPVGT5VCPF56
2TKPVGT
5VCPF56
RB-01
BU-03
A
B
A
B
3
Caution
For stand assembly instructions, refer to the Printer Stand Setup Guide provided with the stand.
For roll unit installation instructions, refer to the Printer Stand Setup Guide provided with the stand.
Mount the printer on the stand.
Remove the packaging material on top
of the printer.
Pull out the roll unit.
The printer alone weighs approximately
112 kg. Moving the printer requires at least
six people, three on either side. Be careful
to avoid back strain and other injuries.
••
Push in the roll unit.
Instructions for iPF825
Assemble the stand, in preparation for printer installation.
Install the roll unit on the stand. (iPF825 only.)
Remove the packaging material and the
plastic covering from the other side of the
printer the same way.
While two people hold the carrying handles
under the printer on one end and lift the
printer a little, have a third person remove the
packaging material and the plastic covering
from under the printer. After the packaging
material has been removed, lower the printer.
Instructions for iPF825
Align the triangles on the back of the printer and Stand when setting the printer on the
Stand. Secure the printer and Stand rmly together using four M4 hex screws on each side
by the Allen Wrench.
With three people holding the carrying handles under the printer on both ends, lift the printer.
When moving the printer, rmly grasp the
carrying handles (a) under each side. Holding
the printer at other positions is dangerous
and cause injury and damage if the printer is
dropped.
Assemble the Stand
Install the Roll Unit
Install the Printer
2 31
54
6
7
a
4
MEM
O
MEM
O
Use the Roll Unit Cable to connect the port on the back of the roll
unit to the Roll Unit Port on the back of the printer.
Keep the Belt Stopper you removed
and the Allen Wrench for future
use. You will need them in case you
move the printer to another location.
Insert the Roll Unit Cable rmly, all the way in.
For instructions on setting up the output stacker, refer to the Printer Stand Setup Guide provided with the stand.
Set up the wheeled or stationary output stacker to catch ejected documents.
(Optional for the iPF815)
For the Media Take-up Unit installation instructions, refer to the setup guide provided with the unit.
Remove the protective packaging material from the printer.
Instructions for iPF825
Open the Top Cover .
Use the Allen Wrench to loosen the screw of the Belt Stopper (a).
Rotate the Belt Stopper to the left and remove the stopper.
Remove the tape and other packaging material used to secure the
printer.
8
12
3
a
Set Up the Output Stacker
Attach the Media Take-up Unit
Remove the Packaging Material
5
Lower the Ejection Guide.
Next, install the Printhead.
Instructions for Models That Include the Stationary Output Stacker as a Standard Accessory
Lift the Ejection Guide. Attach the four Ejection Support s (a) on the back of the
Ejection Guide .
Close the Top Cover .
Plug the power cord into the Power Supply Connector on the back
of the printer.
Plug the power cord into the outlet.
Press the Power button to turn on the
printer.
When Open top cover. is displayed
on the Display Screen , open the Top
Cover .
Pull the Printhead Fixer Lever forward
all the way to open it completely.
Lift the Printhead Fixer Cover to open it
fully.
Instructions are now shown on the
Display Screen regarding Printhead
installation.
When the following screen is displayed,
press or to select the language
used on the display screen, and then
press the OK button.
Make sure your local time zone is
selected, and then press the OK button.
Instructions for Models That Include the Stationary Output Stacker as a Standard Accessory
8
6 7
Install the Printhead
1
4
5
6
4
5
a
2 3
OK
OK
Time Zone
0:London (GMT)
+1:Paris,Rome
+2:Athens,Cairo
+3:Moscow
+4:Eerevan,Baku
+5:Islamabad
Time Zone
0:London (GMT)
+1:Paris,Rome
+2:Athens,Cairo
+3:Moscow
+4:Eerevan,Baku
+5:Islamabad
OK
Language
English
ᣣᧄ⺆
Français
Italiano
Deutsch
Español
Language
English
ᣣᧄ⺆
Français
Italiano
Deutsch
Español
9
6
MEM
O
Load the ve Ink Tanks.
With the Printhead nozzles facing
down and the metal contacts toward
the back, insert it slightly at an angle
into the Carriage (a). Carefully push
the Printhead rmly into the Carriage
(a), ensuring that the nozzles and metal
contacts do not touch the carriage.
Pull the Printhead Fixer Cover down
toward the front to lock the Printhead in
place.
Push the Printhead Fixer Lever back. Close the Top Cover .
Do not reattach the protective material
after removing it. Dispose of these
materials according to local regulations.
Never touch the ink supply section (d).
This may affect printing quality.
The Printhead is lled with ink. When
removing Safety Cap 1 (a) and Safety
Cap 2 (b), be careful not to spill it.
Remove the orange Safety Cap 1 (a).
To remove Safety Cap 2 (b), push the
grip (c) as you remove the cap.
Open the Ink Tank Cover .
Lift the stopper (a) of the Ink Tank Lock
Lever of the color to load. Lift the Ink
Tank Lock Lever until
it
stops, and push
it
down to the front.
Before removing the Ink Tank from the
pouch, shake the tank gently from side
to side seven or eight times.
If you do not shake the Ink Tank, the ink
may sediment, which may affect printing
quality.
Open the pouch and remove the Ink
Tank .
Insert the Ink Tank into the holder facing
as shown, with the ink holes down.
Lift the Ink Tank Lock Lever until it
stops, and push it down until it clicks into
place.
Never touch the ink holes (a) or metal contacts
(b). Touching these parts may cause stains,
damage the Ink Tank, and affect printing quality.
Avoid dropping the Ink Tank after removing the
tank from the pouch. Otherwise, ink may leak
and cause stains.
Do not remove and shake the Ink Tank that
has already been installed in the printer. Ink
may leak out.
Ink Tank cannot be loaded in the holder if
the color or orientation is wrong.
If the Ink Tank does not t in the holder, do not
force the tank into the holder. Make sure the
color of the Ink Tank Lock Lever matches the
color of the Ink Tank , and check the orientation
of the Ink Tank before reloading the tank.
Push the Ink Tank Lock Lever down until it
locks.
Make sure the Ink Tank Lock Lever does
not return to the original position.
Hold the Printhead by the grips (a) as
you remove it from the bag.
Never touch the Printhead
nozzles (a) or metal
contacts (b). This may
damage the Printhead and
affect printing quality.
9
10 11
12
8
a
b
d
c
C
1
23
G
G
B
B
B
a
456
A
A
MB
K
BK
GY
Y
M
A
A
M
BK
BK
GY
Y
M
C
D
Install the Ink Tanks
7
a
a
a
b
7
MEM
O
After you have installed the Printheads and
all Ink Tanks, the system is automatically lled
with ink for the rst time. This process takes
about 14 minutes. In the meantime, install the
printer driver and manual.
If you will install the printer driver and manual
later, skip to "Load Paper to Adjust the
Printhead" on page 15 after ink has lled the
system.
During printer installation, ink lls the system
between the Ink Tanks and Printhead. In
addition, cleaning is performed to keep the
printer in optimal condition. This may cause
the Maintenance Cartridge capacity indicator
to drop to about 50%, but this is not a
problem with the printer.
MEM
O
MEM
O
MEM
O
If the Ink Lamp is not lit, repeat steps 2, 5
and 6.
On the Select Country or Region of
Use window, select the country or region
of use and click Next.
After reading the license agreement,
click Yes.
Make sure the Ink Lamp is lit in red. Repeat steps 2-7 to install each Ink
Tank .
Close the Ink Tank Cover .
Install the Printer Driver and the User Manual
Windows
You can print from Windows via USB or TCP/IP (network) connections.
The installation procedure varies depending on how your printer is
connected. Install the printer driver and User Manual as follows.
Installation requires administrative rights (such as those of Administrator).
Be sure to log on using an account with administrative rights before
installation.
The following screen may be displayed during installation depending
on the security settings of your computer.
Select Deactivate the block and click Next .
< Compatible Operating Systems >
Windows 7, Windows Vista, Windows Server 2008, Windows Server 2003,
Windows XP, Windows 2000
For USB connections
After making sure the printer is not
connected to the computer, turn the
computer on. Insert the provided User
Software CD-ROM for your particular
operating system in the CD-ROM drive.
Use a USB cable that conforms to the Hi-
Speed USB speci cation.
Connect the USB cable to the printer as
instructed during installation of the relevant
printer driver. If you connect the USB cable
before installing the printer driver, the
printer driver may not be installed correctly.
To choose a different language, click
Language .
In the Setup Menu window, click Install
Printer Driver .
Point at a software title to view a summary
of the software.
Con rm that the required installation
items are selected in the Installation
List window, and then click Next.
78
A
A
M
BK
BK
M
G
Y
Y
54
1 2
3
8
MEM
O
MEM
O
On the Printer Selection window, select
The printer is connected directly to a
computer and click Next.
In the Finish window, select Restart my
computer now and click Restart.
After reviewing the installation results on
the Complete Installation window, click
Next.
When the following dialog box is dis-
played, make sure the printer is on and
use the USB cable to connect the printer
to the computer.
In the Printer Installation dialog box,
select Install with USB Connection,
and click Next.
If a warning message is displayed, click
Retry to try again.
Be careful not to insert the USB cable
into the Ethernet port.
When the Install User Manual dialog
box is displayed, insert the provided
User Manuals CD-ROM in the CD-ROM
drive and click Next .
The printer driver settings take effect
after the computer restarts. The printer
driver is now installed. An iPFxxxx
Support desktop icon is created after
installation. (iPFxxxx represents the
printer model.)
Next, install the User Manual.
Click Next .
Click Install to start the installation
process.
After reading the software license
agreement, select I accept the terms of
the license agreement , and then click
Next .
After installation is complete, click
Finish.
The User Manual is now installed.
7 8
6
13
14 15
11 12
109
16
Install the User Manual
9
MEM
O
MEM
O
MEM
O
MEM
O
After reading the license agreement,
click Yes.
On the Select Country or Region of
Use window, select the country or region
of use and click Next.
On the Printer Selection window, select
The printer is connected to computers
in a network and click Next.
After reading the precautions in the
Getting Ready window, select Find
available printers in the network and
click Next.
Available printers are listed in the
Search Results window.
Select the desired printer in the Printer
List. In Method of Printer Selection,
select Use the selected printers, and
then click Next.
In the Method of Con gurating IP
Addresses window, enter the IP
address in Con gure manually, under
Method of Con guring IP Addresses.
Click Install to start the installation
process.
Also enter your preferred name for
the printer in Device Name and the
installation location in Printer Location
under Information About Printer to
Con gure, as desired.
The installation process will now begin.
If the printer you want to use is not
displayed in Printer List, refer to "When
the printer cannot be found on the network"
on page 10 to setup and con gure an IP
address for the printer.
Use the LAN cable to connect the LAN
port on the back of the printer to the hub
port.
• If the printer is on, the Link indicator is
green for 100Base-TX connections and
amber for 10Base-T connections.
To choose a different language, click
Language .
In the Setup Menu window, click Install
Printer Driver .
Make sure the printer is on. Turn the
computer on and insert the provided
User Software CD-ROM for your
particular operating system in the CD-
ROM drive.
For TCP/IP (Network) Connections
When you rst connect the printer to the network
Point at a software title to view a summary
of the software.
If you use a DHCP server for automatic assignment of the printer's IP address,
printing may no longer be possible after the printer is turned off and on. This is
because an IP address different from before has been assigned. Thus, when using
DHCP server functions, consult your network administrator and con gure the
settings in one of the following ways.
Con gure the setting for dynamic DNS updating
In RemoteUI, activate the setting Enable DNS Dynamic Update. ("Con guring the Printer's TCP/
IP Network Settings," User Manual)
Con gure the setting for assignment of the same IP address each time the printer starts up
Con rm that the required installation
items are selected in the Installation
List window, and then click Next.
4 65
7 8
9
10
1 2 3
10
In the Finish window, select Restart my
computer now and click Restart.
After reviewing the installation results on
the Complete Installation window, click
Next.
The printer driver settings take effect
after the computer restarts. The printer
driver is now installed.
An iPFxxxx Support desktop icon is
created after installation.
(iPFxxxx represents the printer model.)
Next, follow steps 12-16 on page 8 to
install the User Manual.
12
11
13
If your printer cannot be found when
connecting to the network for the rst
time, setup an IP address for the printer
and then con gure it on the printer.
When ink lls the system for the rst
time, after printhead adjustment is
nished, specify the IP address on the
printer's control panel.
Press the Menu button to display MAIN
MENU.
When ink lls the system for the
rst time, do not operate the
printer until printhead adjustment
is nished.
Press or to select Interface Setup,
and then press the button.
OK
Enter the IP address.
1. Press or to move the cursor (_)
to each eld for entering numbers.
6
Press or to select TCP/IP, and
then press the button.
MEM
O
Press the Online button.
Press OK on the registration
con rmation message that appears.
The IP address is set on the printer.
Next, restart installation of the printer
driver.
When the printer cannot be found on the network
1
2
3
7
8
MEM
O
In the Search Results window, select
Specify the IP address of available
printers in the network and click Next.
The IP Address Speci cation window
appears. Follow steps 8-11 on page 12
to nish installing the printer driver.
If the following screen appears, click Retry
and select Specify the IP address of
available printers in the network on the
next screen that appears.
Next, follow steps 12-16 on page 8 to
install the User Manual.
9
Press or to select IP Setting, and
then press the button.
Press or to select IP Address, and
then press the button.
4
5
IP Address
㪇㪇㪇㪅㪇㪇㪇㪅㪇㪇㪇㪅㪇㪇㪇
L/R
Up/Down
[OK] / [Stop]
2. Press or to enter the number,
and then press the OK button.
Holding down either the or keys
continually increases or decreases the
value.
11
MEM
O
MEM
O
MEM
O
MEM
O
MEM
O
When entering the printer's IP address manually
The printer driver settings take effect
after the computer restarts. The printer
driver is now installed. An iPFxxxx
Support desktop icon is created after
installation.
(iPFxxxx represents the printer model.)
Next, follow steps 12-16 on page 8 to
install the User Manual.
If the printer is on, the Link indicator is
green for 100Base-TX connections and
amber for 10Base-T connections.
If the printer is already connected to the
network, con rm the static IP address
assigned to the printer. Ask your network
administrator for further information.
Make sure the printer is on. Turn the
computer on and insert the provided
User Software CD-ROM for your
particular operating system in the CD-
ROM drive.
Available printers are listed in the Search
Results window.
Select the desired printer in the Printer
List. In Method of Printer Selection,
select Use the selected printers, and
then click Next to start the installation
process.
Printers already connected to the network
are labeled Available in the list of IP
addresses.
After reviewing the installation results on
the Complete Installation window, click
Next.
In the Setup Menu window, click Install
Printer Driver .
To choose a different language, click
Language .
Point at a software title to view a summary
of the software.
Make sure the printer is on. Turn the
computer on and insert the provided
User Software CD-ROM for your
particular operating system in the CD-
ROM drive.
If the printer is on, the Link indicator is
green for 100Base-TX connections and
amber for 10Base-T connections.
If the printer is already connected to the
network, con rm the static IP address
assigned to the printer. Ask your network
administrator for further information.
If the printer is already connected to the network
After reading the license agreement,
click Yes.
On the Select Country or Region of
Use window, select the country or region
of use and click Next.
On the Printer Selection window, select
The printer is connected to computers
in a network and click Next.
After reading the precautions in the
Getting Ready window, select Find
available printers in the network and
click Next.
If the desired printer is not shown in
the Printer List, select Specify the IP
address of available printers in the
network in Method of Printer Selection.
The IP Address Speci cation window
appears. Follow steps 8-11 on page 12 to
nish installing the printer driver and the
User Manual.
In the Finish window, select Restart my
computer now and click Restart.
Con rm that the required installation
items are selected in the Installation
List window, and then click Next.
11
1
4 5
6
87
1 2
3
109
12
MEM
O
MEM
O
On the IP Address Speci cation
window, enter the desired printer's IP
address and click Install to start the
installation process.
Ask your network administrator for the IP
address, as needed.
In the Setup Menu window, click Install
Printer Driver .
To choose a different language, click
Language .
Point at a software title to view a summary
of the software.
After reviewing the installation results on
the Complete Installation window, click
Next.
After reading the license agreement,
click Yes.
On the Select Country or Region of
Use window, select the country or region
of use and click Next.
On the Printer Selection window, select
The printer is connected to computers
in a network and click Next.
After reading the precautions in the
Getting Ready window, select Specify
the IP address of available printers in
the network and click Next.
In the Finish window, select Restart my
computer now and click Restart.
The printer driver settings take effect
after the computer restarts. The printer
driver is now installed. An iPFxxxx
Support desktop icon is created after
installation.
(iPFxxxx represents the printer model.)
Next, follow steps 12-16 on page 8 to
install the User Manual.
Con rm that the required installation
items are selected in the Installation
List window, and then click Next.
2 3 4
5 6 7
8
11
910
13
MEM
O
• Be sure to log in as a user with
administrative rights when installing the
printer driver.
If the following screen is displayed, enter
the user name and password of a user
with administrative rights and click OK.
Select the country or region where the
printer will be used and click Next.
Items selected in step 4 are installed.
Click OK.
Con gure the Computer
Install the printer driver
Insert the provided User Software
CD-ROM for your particular operating
system in the CD-ROM drive.
On the desktop, double-click the CD-
ROM icon and then the iPF Printer
Setup icon.
Exit other applications and click
Continue .
After reading the software license
agreement, click Continue .
Click Agree .
Con rm that the required installation
items are selected, and then click Next.
Click Next .
Exit other applications and click
Continue .
Use a cable to connect the printer to a computer or the network.
For USB connections:
For network connections:
Be careful not to insert the USB cable into the Ethernet port.
Connect the Printer to a Computer
Make sure the printer is on.
Turn the computer on.
Connect the cable
Macintosh
Install the printer driver that suits your printing environment.
<Compatible Operating Systems>
Mac OS X 10.3.9 or later
You can print from Macintosh via USB or network connections such as Bonjour or IP.
User Software
1 2
3 4 5
6 7 8
9 10 11
1 2
14
MEM
O
MEM
O
MEM
O
Install the User Manual
Click OK.
If the same model of printer is already
registered on the computer, a screen is
displayed for printer selection. Select the
desired printer and click Next.
The following screen is displayed and
paper information is updated. When the
paper information has been updated, the
screen is no longer displayed.
Next, install the User Manual.
Insert the provided User Manuals CD-
ROM in the CD-ROM drive.
Double-click the iPFxxxx Manual
Installer icon in the CD-ROM.
(iPFxxxx represents the printer model.)
Select the region where the printer will
be used and the language of the user
manual to install, and then click OK .
After installation is complete, click Quit .
Click Install .After reading the software license
agreement, click Continue .
Check the message and click Continue .
The User Manual is now installed.
Click Agree .
Click Quit.
Select the printer to prepare and click
Next.
To register the printer by entering its IP
address, click Registering IP Address.
Enter the IP address of the desired printer
in IP Address and click Next.
The printer driver is now installed.
Next, select the printer to set up.
After entering your preferred name for
the printer in Printer Name and the
installation location in Location, click
Register.
Click Finish.
To register another printer, click Continue
Registration, and repeat steps 14–16.
Click Next .
23
22
21
26
25
24
20
1917 18
12 13
14
15 16
15
Caution
Follow these steps to load a roll and adjust the Printhead alignment.
The included Sample Paper is used in this example.
After the system has lled with ink when
you are nished installing the Printhead
and Ink Tanks, the message Select
type of paper for printhead adj. is
shown on the Display Screen. Press
or to select Roll1 (Upper) (iPF815:
Roll Paper) and press the OK button.
With the edge of the roll paper facing front as shown, insert the
roll on the Roll Holder from the right. Insert the roll rmly until it
touches the ange (a) of the Roll Holder.
Insert the Holder Stopper in the Roll Holder from the left, as
shown. Holding it at the position indicated (b), push it rmly in
until the ange (a) of the Holder Stopper touches the roll. Lock
the Holder Stopper lever (c) by pushing it down toward the shaft
side.
Holding the Roll Holder so that the side with the white gear faces
the side of the Roll Holder Slot with a white gear, load the Roll
Holder shaft (a) into the grooves (b) on both ends of the Roll
Holder Slot.
Pull out the roll paper evenly on both ends, insert the roll paper in
the Paper Feed Slot (a), and advance the roll paper until you hear
a tone.
Remove the Roll Holder from the
printer.
• If the paper is wrinkled or warped, straighten it out before loading it.
Open the Top Cover and lift the
Ejection Guide .
Lift the Holder Stopper lever (a) from the shaft side to unlock the
stopper. Holding the Holder Stopper at the position indicated (b),
remove the stopper from the Roll Holder .
We recommend wearing clean cloth gloves when handling rolls to
protect the printing surface.
Insert the roll rmly so that there is no gap between the roll and
the ange of the Roll Holder . A gap may cause feeding problems.
Set the roll horizontally on a table or other at surface to prevent
the roll from falling. Dropping a roll may cause injury.
When loading a roll, be careful to avoid hitting the Roll Holder hard
with the roll. This may damage the Roll Holder .
Insert the roll rmly to eliminate any gap between the roll and the ange
of the Roll Holder. A gap may cause feeding problems.
Be careful not to cause injury by dropping a roll.
Be careful not to put the ngers between the guide grooves (b) and
the Roll Holder shaft (a) when loading a roll. Otherwise, you may hurt
yourself.
Lower the Ejection Guide .
5
6
2
4
1
a
b
a
a
b
c
7
b
a
b
a
8
a
3
9
OK
Load Paper to Adjust the Printhead
16
MEM
O
The paper is loaded crooked. Lift the
release lever.
No printhead
No ink tank loaded.
Turn off printer, wait, then turn on
again.
Insert the maintenance cartridge.
For some reason, the paper could not be cut. Refer to the provided Basic Guide (2).
Paper cutting failed. Lift the release
lever.
Hardware error. xxxxxxxx-xxxx
Use the manual pocket to store the Basic Guide (which includes descriptions of basic
printer operations, routine maintenance, and troubleshooting tips), so you can refer to it as
needed.
Store the 3-Inch Paper Core
Attachment and other accessories in
the accessory pocket.
If the message The paper is loaded crooked. Lift the release
lever. is displayed, lift the Release Lever, open the Top
Cover, and align the right edge of the roll parallel to the Paper
Alignment Line.
Lift the Release Lever and open the Top Cover.
Align the right edge of the roll paper parallel to the right Paper
Alignment Line.
1.
2.
3. Lower the Release Lever and close the Top Cover.
ERROR Exxx-xxxx
(x represents a letter or number.)
An error requiring service may have occurred. Write down the error code and message, turn off the printer, and
contact your Canon dealer for assistance.
Press the OK button.
The paper is now advanced.
Close the Top Cover . After loading a roll, the printer
automatically shows a menu for selection
of the paper type on the Display Screen
and beeps.
Error messages may appear on the Display Screen of the Control Panel during printer installation in some cases. If so, it may not indicate a problem with the
printer, and the issue may be easily resolved. Common messages and the causes are listed here with corrective actions. To respond to error messages other than
these, refer to the provided Basic Guide (2). For other detailed printer instructions, refer to the User's Guide on the User Manuals CD-ROM.
Message Cause Corrective Action
Paper has been loaded askew.
The Printhead is not installed. Reinstall the Printhead . (See steps 1-10 on page 5-6.)
Fastening tape or the Belt Stopper has not been
removed inside the Top Cover .
There is no Ink Tank of the indicated color in the
printer.
Another kind of error has occurred. Turn off the printer and wait at least three seconds before restoring
the power. If the message is still displayed after this, write down
the error code and message, turn off the printer, and contact your
Canon dealer for assistance.
Turn the printer off.
Open the Top Cover and remove the tape or Belt Stopper .
(See step 3 on page 4.)
1.
2.
3.
Load or reload the Ink Tank .
(See steps 1-8 on page 6-7.)
The Maintenance Cartridge is not installed.
Install the Maintenance Cartridge .
Turn the printer on.
Printhead alignment starts automatically.
This process takes about six minutes.
When the process is complete, Online is displayed.
You are now nished loading the roll.
On the Roll 1 (Upper) Type screen (on the iPF815, the Roll
Media Type screen), press or to select the type of paper
loaded, and then press the OK button.
To identify the type of paper, refer to the label on the box of
sample paper. Select HW Coated for heavyweight coated paper
or Coated Paper for regular coated paper.
Responding to Messages
Store Accessories in the Pockets
21
12
11
10
OK
  • Page 1 1
  • Page 2 2
  • Page 3 3
  • Page 4 4
  • Page 5 5
  • Page 6 6
  • Page 7 7
  • Page 8 8
  • Page 9 9
  • Page 10 10
  • Page 11 11
  • Page 12 12
  • Page 13 13
  • Page 14 14
  • Page 15 15
  • Page 16 16

Ask a question and I''ll find the answer in the document

Finding information in a document is now easier with AI