Zebra 105SL Plus User manual
- Category
- Print & Scan
- Type
- User manual
This manual is also suitable for

P1056468-002 Rev. A
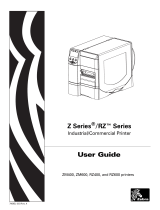
Zebra
®
105SLPlus™
User Guide

© 2013 ZIH Corp. The copyrights in this manual and the software and/or firmware in the printer described
therein are owned by ZIH Corp. and Zebra’s licensors. Unauthorized reproduction of this manual or the software
and/or firmware in the printer may result in imprisonment of up to one year and fines of up to $10,000
(17 U.S.C.506). Copyright violators may be subject to civil liability.
This product may contain ZPL
®
, ZPL II
®
, and ZebraLink™ programs; Element Energy Equalizer
®
Circuit; E
3®
; and
Monotype Imaging fonts. Software © ZIH Corp. All rights reserved worldwide.
ZebraLink and all product names and numbers are trademarks, and Zebra, the Zebra logo, ZPL, ZPL II, Element
Energy Equalizer Circuit, and E
3
Circuit are registered trademarks of ZIH Corp. All rights reserved worldwide.
All other brand names, product names, or trademarks belong to their respective holders. For additional trademark
information, please see “Trademarks” on the product CD.
Proprietary Statement This manual contains proprietary information of Zebra Technologies Corporation and its
subsidiaries. It is intended solely for the information and use of parties operating and maintaining the equipment
described herein. Such proprietary information may not be used, reproduced, or disclosed to any other parties for any
other purpose without the express, written permission of Zebra Technologies.
Product Improvements Continuous improvement of products is a policy of Zebra Technologies. All
specifications and designs are subject to change without notice.
Liability Disclaimer Zebra Technologies takes steps to ensure that its published Engineering specifications and
manuals are correct; however, errors do occur. Zebra Technologies reserves the right to correct any such errors and
disclaims liability resulting therefrom.
Limitation of Liability In no event shall Zebra Technologies or anyone else involved in the creation, production,
or delivery of the accompanying product (including hardware and software) be liable for any damages whatsoever
(including, without limitation, consequential damages including loss of business profits, business interruption, or loss
of business information) arising out of the use of, the results of use of, or inability to use such product, even if Zebra
Technologies has been advised of the possibility of such damages. Some jurisdictions do not allow the exclusion or
limitation of incidental or consequential damages, so the above limitation or exclusion may not apply to you.
Part Number: P1056468-002

3
Declaration of Conformity
7/3/13 P1056468-002
Declaration of Conformity
We have determined that the Zebra printers identified as the
105SLPlus™
manufactured by:
Zebra Technologies Corporation
333 Corporate Woods Parkway
Vernon Hills, Illinois 60061-3109 U.S.A.
Have been shown to comply with the applicable technical standards of the FCC
For Home, Office, Commercial, and Industrial use
If no unauthorized change is made in the equipment,
and if the equipment is properly maintained and operated.

Declaration of Conformity
Compliance Information
4
P1056468-002 7/3/13
Compliance Information
FCC Compliance Statement
This device complies with Part 15 of the FCC Rules. Operation is subject to the following two
conditions:
1. This device may not cause harmful interference, and
2. This device must accept any interference received, including interference that may cause
undesired operation.
Canadian DOC Compliance Statement
This Class B digital apparatus complies with Canadian ICES-003.
Cet appareil numérique de la classe B est conforme à la norme NMB-003 du Canada.
Note • This equipment has been tested and found to comply with the limits for a Class B
digital device, pursuant to part 15 of the FCC Rules. These limits are designed to provide
reasonable protection against harmful interference in a residential installation. This
equipment generates, uses, and can radiate radio frequency energy and, if not installed and
used in accordance with the instructions, may cause harmful interference to radio
communications. However, there is no guarantee that interference will not occur in a
particular installation. If this equipment does cause harmful interference to radio or television
reception, which can be determined by turning the equipment off and on, the user is
encouraged to try to correct the interference by one or more of the following measures:
• Reorient or relocate the receiving antenna.
• Increase the separation between the equipment and receiver.
• Connect the equipment into an outlet on a circuit different from that to which the receiver
is connected.
• Consult the dealer or an experienced radio/TV technician for help.

7/3/13 P1056468-002
Contents
Declaration of Conformity . . . . . . . . . . . . . . . . . . . . . . . . . . . . . . . . . . . . . . . . . . . 3
Compliance Information . . . . . . . . . . . . . . . . . . . . . . . . . . . . . . . . . . . . . . . . . . . . . . . . . . . 4
About This Document . . . . . . . . . . . . . . . . . . . . . . . . . . . . . . . . . . . . . . . . . . . . . . . 9
Who Should Use This Document . . . . . . . . . . . . . . . . . . . . . . . . . . . . . . . . . . . . . . . . . . . 10
How This Document Is Organized . . . . . . . . . . . . . . . . . . . . . . . . . . . . . . . . . . . . . . . . . . 10
Document Conventions . . . . . . . . . . . . . . . . . . . . . . . . . . . . . . . . . . . . . . . . . . . . . . . . . . .11
1 • Introduction . . . . . . . . . . . . . . . . . . . . . . . . . . . . . . . . . . . . . . . . . . . . . . . . . . . 13
Printer Components . . . . . . . . . . . . . . . . . . . . . . . . . . . . . . . . . . . . . . . . . . . . . . . . . . . . . 14
Control Panel . . . . . . . . . . . . . . . . . . . . . . . . . . . . . . . . . . . . . . . . . . . . . . . . . . . . . . . . . . 15
Control Panel Display . . . . . . . . . . . . . . . . . . . . . . . . . . . . . . . . . . . . . . . . . . . . . . . . . . . 17
Navigating in the Display . . . . . . . . . . . . . . . . . . . . . . . . . . . . . . . . . . . . . . . . . . . . . . 17
Changing Password-Protected Parameters . . . . . . . . . . . . . . . . . . . . . . . . . . . . . . . 20
Default Password Value . . . . . . . . . . . . . . . . . . . . . . . . . . . . . . . . . . . . . . . . . . . . . . . 20
Disable the Password Protection Feature . . . . . . . . . . . . . . . . . . . . . . . . . . . . . . . . . 20
Operating Parameters on the Control Panel . . . . . . . . . . . . . . . . . . . . . . . . . . . . . . . 21
2 • Printer Setup and Operation . . . . . . . . . . . . . . . . . . . . . . . . . . . . . . . . . . . . . . 37
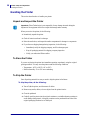
Handling the Printer . . . . . . . . . . . . . . . . . . . . . . . . . . . . . . . . . . . . . . . . . . . . . . . . . . . . . 38
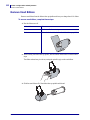
Unpack and Inspect the Printer . . . . . . . . . . . . . . . . . . . . . . . . . . . . . . . . . . . . . . . . . 38
To Store the Printer . . . . . . . . . . . . . . . . . . . . . . . . . . . . . . . . . . . . . . . . . . . . . . . . . . 38
To Ship the Printer . . . . . . . . . . . . . . . . . . . . . . . . . . . . . . . . . . . . . . . . . . . . . . . . . . . 38
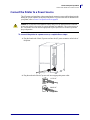
Select a Location for the Printer . . . . . . . . . . . . . . . . . . . . . . . . . . . . . . . . . . . . . . . . . . . . 39
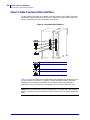
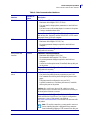
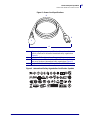
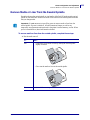
Select a Data Communication Interface . . . . . . . . . . . . . . . . . . . . . . . . . . . . . . . . . . . . . 40
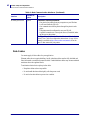
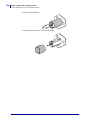
Data Cables . . . . . . . . . . . . . . . . . . . . . . . . . . . . . . . . . . . . . . . . . . . . . . . . . . . . . . . . 42
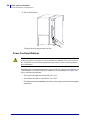
Connect the Printer to a Power Source . . . . . . . . . . . . . . . . . . . . . . . . . . . . . . . . . . . . . . 43
Power Cord Specifications . . . . . . . . . . . . . . . . . . . . . . . . . . . . . . . . . . . . . . . . . . . . . 44
Install the Control Panel Keypad Cover . . . . . . . . . . . . . . . . . . . . . . . . . . . . . . . . . . . . . . 46

Contents
6
P1056468-002 7/3/13
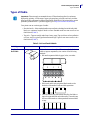
Types of Media . . . . . . . . . . . . . . . . . . . . . . . . . . . . . . . . . . . . . . . . . . . . . . . . . . . . . . . . . 47
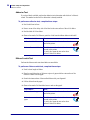
Ribbon Overview . . . . . . . . . . . . . . . . . . . . . . . . . . . . . . . . . . . . . . . . . . . . . . . . . . . . . . . 49
When to Use Ribbon . . . . . . . . . . . . . . . . . . . . . . . . . . . . . . . . . . . . . . . . . . . . . . . . . 49
Coated Side of Ribbon . . . . . . . . . . . . . . . . . . . . . . . . . . . . . . . . . . . . . . . . . . . . . . . . 49
Select a Print Mode . . . . . . . . . . . . . . . . . . . . . . . . . . . . . . . . . . . . . . . . . . . . . . . . . . . . . 51
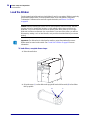
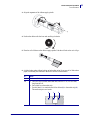
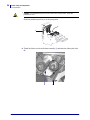
Load the Ribbon . . . . . . . . . . . . . . . . . . . . . . . . . . . . . . . . . . . . . . . . . . . . . . . . . . . . . . . . 54
Load the Media . . . . . . . . . . . . . . . . . . . . . . . . . . . . . . . . . . . . . . . . . . . . . . . . . . . . . . . . 59
3 • Printer Configuration and Adjustment . . . . . . . . . . . . . . . . . . . . . . . . . . . . . 81
Changing Printer Settings . . . . . . . . . . . . . . . . . . . . . . . . . . . . . . . . . . . . . . . . . . . . . . . . 82
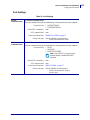
Print Settings . . . . . . . . . . . . . . . . . . . . . . . . . . . . . . . . . . . . . . . . . . . . . . . . . . . . . . . 83
Maintenance and Diagnostic Tools . . . . . . . . . . . . . . . . . . . . . . . . . . . . . . . . . . . . . . 89
Network Settings . . . . . . . . . . . . . . . . . . . . . . . . . . . . . . . . . . . . . . . . . . . . . . . . . . . . 96
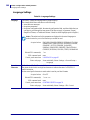
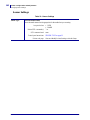
Language Settings . . . . . . . . . . . . . . . . . . . . . . . . . . . . . . . . . . . . . . . . . . . . . . . . . . 100
Sensor Settings . . . . . . . . . . . . . . . . . . . . . . . . . . . . . . . . . . . . . . . . . . . . . . . . . . . . 102
Port Settings . . . . . . . . . . . . . . . . . . . . . . . . . . . . . . . . . . . . . . . . . . . . . . . . . . . . . . 103
Calibrate the Ribbon and Media Sensors Manually . . . . . . . . . . . . . . . . . . . . . . . . . . . . 106
Remove Used Ribbon . . . . . . . . . . . . . . . . . . . . . . . . . . . . . . . . . . . . . . . . . . . . . . . . . . .112
Remove Media or Liner from the Rewind Spindle . . . . . . . . . . . . . . . . . . . . . . . . . . . . . .113
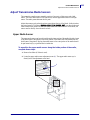
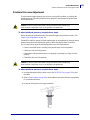
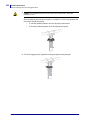
Adjust Transmissive Media Sensors . . . . . . . . . . . . . . . . . . . . . . . . . . . . . . . . . . . . . . . .115
Upper Media Sensor . . . . . . . . . . . . . . . . . . . . . . . . . . . . . . . . . . . . . . . . . . . . . . . . .115
Lower Media Sensor . . . . . . . . . . . . . . . . . . . . . . . . . . . . . . . . . . . . . . . . . . . . . . . . .118
Adjust Printhead Pressure and Toggle Position . . . . . . . . . . . . . . . . . . . . . . . . . . . . . . . .119
Toggle Position Adjustment . . . . . . . . . . . . . . . . . . . . . . . . . . . . . . . . . . . . . . . . . . . .119
Printhead Pressure Adjustment . . . . . . . . . . . . . . . . . . . . . . . . . . . . . . . . . . . . . . . . 121
4 • Routine Maintenance . . . . . . . . . . . . . . . . . . . . . . . . . . . . . . . . . . . . . . . . . . 123
Replacing Printer Components . . . . . . . . . . . . . . . . . . . . . . . . . . . . . . . . . . . . . . . . . . . 124
Ordering Replacement Parts . . . . . . . . . . . . . . . . . . . . . . . . . . . . . . . . . . . . . . . . . . 124
Recycling Printer Components . . . . . . . . . . . . . . . . . . . . . . . . . . . . . . . . . . . . . . . . 124
Lubrication . . . . . . . . . . . . . . . . . . . . . . . . . . . . . . . . . . . . . . . . . . . . . . . . . . . . . . . . . . . 124
Cleaning Schedule and Procedures . . . . . . . . . . . . . . . . . . . . . . . . . . . . . . . . . . . . . . . 125
Clean the Exterior . . . . . . . . . . . . . . . . . . . . . . . . . . . . . . . . . . . . . . . . . . . . . . . . . . 125
Clean the Media Compartment . . . . . . . . . . . . . . . . . . . . . . . . . . . . . . . . . . . . . . . . 126
Clean the Printhead and Platen Roller . . . . . . . . . . . . . . . . . . . . . . . . . . . . . . . . . . 126
Clean the Sensors . . . . . . . . . . . . . . . . . . . . . . . . . . . . . . . . . . . . . . . . . . . . . . . . . . 128
Clean the Snap Plate . . . . . . . . . . . . . . . . . . . . . . . . . . . . . . . . . . . . . . . . . . . . . . . . 130
Clean the Cutter . . . . . . . . . . . . . . . . . . . . . . . . . . . . . . . . . . . . . . . . . . . . . . . . . . . . 134
5 • Troubleshooting . . . . . . . . . . . . . . . . . . . . . . . . . . . . . . . . . . . . . . . . . . . . . . 135
Printing Issues . . . . . . . . . . . . . . . . . . . . . . . . . . . . . . . . . . . . . . . . . . . . . . . . . . . . . . . . 136
Error Messages . . . . . . . . . . . . . . . . . . . . . . . . . . . . . . . . . . . . . . . . . . . . . . . . . . . . . . . 139
Calibration Problems . . . . . . . . . . . . . . . . . . . . . . . . . . . . . . . . . . . . . . . . . . . . . . . . . . . 144

7
Contents
7/3/13 P1056468-002
Communications Problems . . . . . . . . . . . . . . . . . . . . . . . . . . . . . . . . . . . . . . . . . . . . . . 145
Ribbon Problems . . . . . . . . . . . . . . . . . . . . . . . . . . . . . . . . . . . . . . . . . . . . . . . . . . . . . . 146
Miscellaneous Issues . . . . . . . . . . . . . . . . . . . . . . . . . . . . . . . . . . . . . . . . . . . . . . . . . . . 147
Printer Diagnostics . . . . . . . . . . . . . . . . . . . . . . . . . . . . . . . . . . . . . . . . . . . . . . . . . . . . . 148
Power-On Self Test . . . . . . . . . . . . . . . . . . . . . . . . . . . . . . . . . . . . . . . . . . . . . . . . . 148
CANCEL Self Test . . . . . . . . . . . . . . . . . . . . . . . . . . . . . . . . . . . . . . . . . . . . . . . . . . 149
PAUSE Self Test . . . . . . . . . . . . . . . . . . . . . . . . . . . . . . . . . . . . . . . . . . . . . . . . . . . 150
FEED Self Test . . . . . . . . . . . . . . . . . . . . . . . . . . . . . . . . . . . . . . . . . . . . . . . . . . . . 151
FEED + PAUSE Self Test . . . . . . . . . . . . . . . . . . . . . . . . . . . . . . . . . . . . . . . . . . . . 154
CANCEL + PAUSE Self Test . . . . . . . . . . . . . . . . . . . . . . . . . . . . . . . . . . . . . . . . . . 154
Communication Diagnostics Test . . . . . . . . . . . . . . . . . . . . . . . . . . . . . . . . . . . . . . . 155
Sensor Profile . . . . . . . . . . . . . . . . . . . . . . . . . . . . . . . . . . . . . . . . . . . . . . . . . . . . . 156
6 • Specifications . . . . . . . . . . . . . . . . . . . . . . . . . . . . . . . . . . . . . . . . . . . . . . . . 159
Features . . . . . . . . . . . . . . . . . . . . . . . . . . . . . . . . . . . . . . . . . . . . . . . . . . . . . . . . . . . . . 160
Standard Features . . . . . . . . . . . . . . . . . . . . . . . . . . . . . . . . . . . . . . . . . . . . . . . . . . 160
Optional Features . . . . . . . . . . . . . . . . . . . . . . . . . . . . . . . . . . . . . . . . . . . . . . . . . . 160
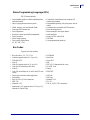
Zebra Programming Language (ZPL) . . . . . . . . . . . . . . . . . . . . . . . . . . . . . . . . . . . 161
Bar Codes . . . . . . . . . . . . . . . . . . . . . . . . . . . . . . . . . . . . . . . . . . . . . . . . . . . . . . . . 161
General Specifications . . . . . . . . . . . . . . . . . . . . . . . . . . . . . . . . . . . . . . . . . . . . . . . . . . 162
Physical Specifications . . . . . . . . . . . . . . . . . . . . . . . . . . . . . . . . . . . . . . . . . . . . . . 162
Electrical Specifications . . . . . . . . . . . . . . . . . . . . . . . . . . . . . . . . . . . . . . . . . . . . . . 162
Environmental Conditions for Operation and Storage . . . . . . . . . . . . . . . . . . . . . . . 162
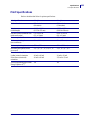
Print Specifications . . . . . . . . . . . . . . . . . . . . . . . . . . . . . . . . . . . . . . . . . . . . . . . . . . . . . 163
Media Specifications . . . . . . . . . . . . . . . . . . . . . . . . . . . . . . . . . . . . . . . . . . . . . . . . . . . 164
Ribbon Specifications . . . . . . . . . . . . . . . . . . . . . . . . . . . . . . . . . . . . . . . . . . . . . . . . . . . 165
Glossary . . . . . . . . . . . . . . . . . . . . . . . . . . . . . . . . . . . . . . . . . . . . . . . . . . . . . . . . 167
Index . . . . . . . . . . . . . . . . . . . . . . . . . . . . . . . . . . . . . . . . . . . . . . . . . . . . . . . . . . . 171

Contents
8
P1056468-002 7/3/13
Notes • ___________________________________________________________________
__________________________________________________________________________
__________________________________________________________________________
__________________________________________________________________________
__________________________________________________________________________
__________________________________________________________________________
__________________________________________________________________________
__________________________________________________________________________
__________________________________________________________________________
__________________________________________________________________________

7/3/13 P1056468-002
About This Document
This section provides you with contact information, document structure and organization, and
additional reference documents.
Contents
Who Should Use This Document. . . . . . . . . . . . . . . . . . . . . . . . . . . . . . . . . . . . . . . . . . . 10
How This Document Is Organized . . . . . . . . . . . . . . . . . . . . . . . . . . . . . . . . . . . . . . . . . . 10
Document Conventions . . . . . . . . . . . . . . . . . . . . . . . . . . . . . . . . . . . . . . . . . . . . . . . . . . 11

About This Document
Who Should Use This Document
10
P1056468-002 7/3/13
Who Should Use This Document
This User Guide is intended for use by any person who needs to perform routine maintenance,
upgrade, or troubleshoot problems with the printer.
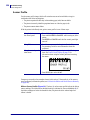
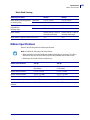
How This Document Is Organized
The User Guide is set up as follows:
Section Description
Introduction on page 13 This section provides a high-level overview of the
printer and its components.
Printer Setup and Operation
on page 37
This section assists the technician with initial setup
and operation of the printer.
Printer Configuration and Adjustment
on page 81
This section assists you with configuration of and
adjustments to the printer.
Routine Maintenance on page 123 This section provides routine cleaning and
maintenance procedures.
Troubleshooting on page 135 This section provides information about errors that
you might need to troubleshoot. Assorted
diagnostic tests are included.
Specifications on page 159 This section provides the features of and
specifications for this printer.
Glossary on page 167 The glossary provides a list of common terms.

11
About This Document
Document Conventions
7/3/13 P1056468-002
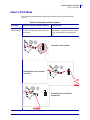
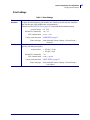
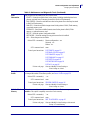
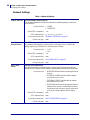
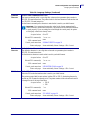
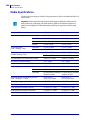
Document Conventions
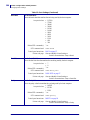
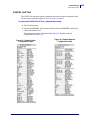
Table 1 shows the way that certain information is conveyed in this document.
Table 1 • Document Conventions
Alternate Color
If you are viewing this guide online, you can click the blue text used for cross-references or
hyperlinks to jump directly to other sections in the guide or to web sites on the internet.
LCD Display Examples
Text from a printer’s Liquid Crystal Display (LCD) appears in Arial font.
Command Line Examples, File Names, and Directories
Command line examples, file names, and directories appear in Courier New font. For
example:
Type
ZTools to get to the Post-Install scripts in the /bin directory.
Open the
Zebra<version number>.tar file in the /root directory.
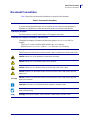
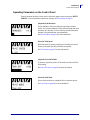
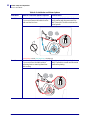
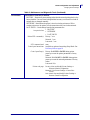
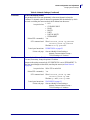
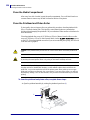
Icons and Advisory Words
The following icons and advisory words are used to draw your attention to certain areas of text.
Caution • Warns you of the potential for electrostatic discharge.
Caution • Warns you of a potential electric shock situation.
Caution • Warns you of a situation where excessive heat could cause a burn.
Caution • Advises you that failure to take or avoid a specific action could result in physical
harm to you.
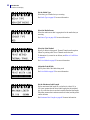
(No icon)
Caution • Advises you that failure to take or avoid a specific action could result in physical
harm to the hardware.
Important • Advises you of information that is essential to complete a task.
Note • Indicates neutral or positive information that emphasizes or supplements important
points of the main text.
Example • Provides an example, often a scenario, to better clarify a section of text.

About This Document
Document Conventions
12
P1056468-002 7/3/13
Notes • ___________________________________________________________________
__________________________________________________________________________
__________________________________________________________________________
__________________________________________________________________________
__________________________________________________________________________
__________________________________________________________________________
__________________________________________________________________________
__________________________________________________________________________
__________________________________________________________________________
__________________________________________________________________________

7/3/13 P1056468-002
1
Introduction
This section provides a high-level overview of the printer and its components.
Contents
Printer Components. . . . . . . . . . . . . . . . . . . . . . . . . . . . . . . . . . . . . . . . . . . . . . . . . . . . . 14
Control Panel . . . . . . . . . . . . . . . . . . . . . . . . . . . . . . . . . . . . . . . . . . . . . . . . . . . . . . . . . . 15
Control Panel Display. . . . . . . . . . . . . . . . . . . . . . . . . . . . . . . . . . . . . . . . . . . . . . . . . . . . 17
Types of Media. . . . . . . . . . . . . . . . . . . . . . . . . . . . . . . . . . . . . . . . . . . . . . . . . . . . . . . . . 47
Ribbon Overview . . . . . . . . . . . . . . . . . . . . . . . . . . . . . . . . . . . . . . . . . . . . . . . . . . . . . . . 49
When to Use Ribbon . . . . . . . . . . . . . . . . . . . . . . . . . . . . . . . . . . . . . . . . . . . . . . . . . . 49
Coated Side of Ribbon. . . . . . . . . . . . . . . . . . . . . . . . . . . . . . . . . . . . . . . . . . . . . . . . . 49

Introduction
Printer Components
14
P1056468-002 7/3/13
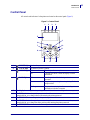
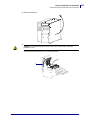
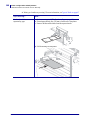
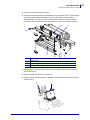
Printer Components
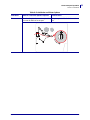
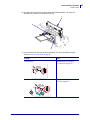
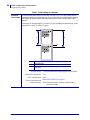
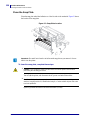
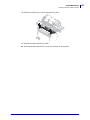
Figure 1 shows the components inside the media compartment of your printer. Depending on
printer model and the installed options, your printer may look slightly different. Familiarize
yourself with these components before continuing with the printer setup procedure.
Figure 1 • Printer Components
1
Platen roller
2
Control panel
3
Printhead assembly
4
Printhead-open lever
5
Ribbon take-up spindle
6
Ribbon supply spindle
7
Media supply guide
8
Media supply hanger
5 6
1
43
2
7
8

15
Introduction
Control Panel
7/3/13 P1056468-002
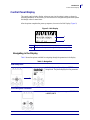
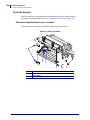
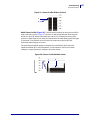
Control Panel
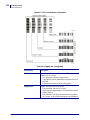
All controls and indicators for the printer are located on the control panel (Figure 2).
Figure 2 • Control Panel
1 2 3 4
5
7
12 13 14
11
6
8
10
9
1
POWER light On when the printer is on.
2
PAUSE light On when the printer is paused.
3
ERROR light Off Normal operation—no printer errors.
On A printer error exists. Check the display for more
information.
4
DATA light Off Normal operation. No data being received or
processed.
On The printer is processing data or is printing. No data is
being received.
Blinking The printer is receiving data from or sending status
information to the host computer.
5
The display shows the printer’s operating status and allows the user to navigate the menu system.
6
The PLUS (+) button changes the parameter values. Common uses are to increase a value, to scroll
through choices, or to change values while entering the printer password.
7
The PREVIOUS button navigates to the previous parameter in the menus.
8
The MINUS (-) button changes the parameter values. Common uses are to decrease a value, to scroll
through choices, or to change the cursor position while entering the printer password.
9
The SETUP/EXIT button enters and exits configuration mode.

Introduction
Control Panel
16
P1056468-002 7/3/13
10
The NEXT/SAVE button
• When in Setup Mode, the NEXT/SAVE button navigates to the next parameter in the menus.
• When exiting Setup Mode, the NEXT/SAVE button initiates various options. (See Exit Setup
Mode on page 19.)
11
The CALIBRATE button
• When the printer is paused and in non-continuous mode, the CALIBRATE button initiates a
SHORT CAL calibration, which sets the media and web thresholds without adjusting sensor gain,
determines the label length, and feeds the media to the next web.
• If the printer is in continuous mode or is not paused, this button has no effect.
12
The PAUSE button starts or stops printer operation when pressed.
13
The FEED button forces the printer to feed one blank label each time the button is pressed.
14
The CANCEL button cancels print jobs when the printer is paused.

17
Introduction
Control Panel Display
7/3/13 P1056468-002
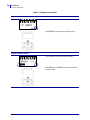
Control Panel Display
The control panel includes a display, where you can view the printer’s status or change its
operating parameters. In this section, you will learn how to navigate through the menu system
and change values for menu items.
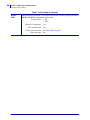
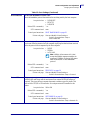
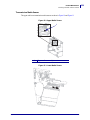
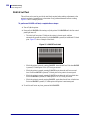
After the printer completes the power-up sequence, it moves to the Idle Display (Figure 3).
Figure 3 • Idle Display
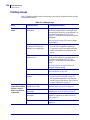
Navigating in the Display
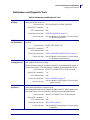
Table 2 shows the options available for navigating through the parameters in the display.
1
The printer’s current status
2
Information that you set through Idle Display on page 95
1
2
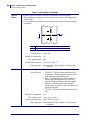
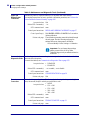
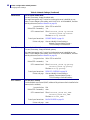
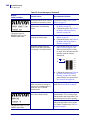
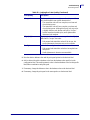
Table 2 • Navigation
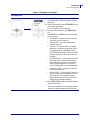
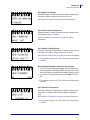
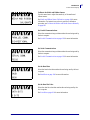
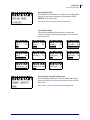
Enter Setup Mode
At the Idle Display (Figure 3), press SETUP to enter
Setup Mode. The printer displays the first parameter.
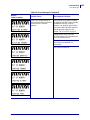
Scroll through the Parameters
To scroll through the parameters, press PREVIOUS
or NEXT/SAVE.

Introduction
Control Panel Display
18
P1056468-002 7/3/13
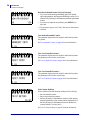
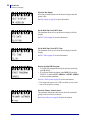
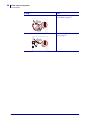
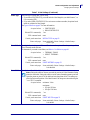
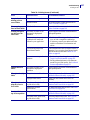
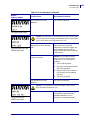
Perform an action
+ indicates that an action can be performed.
Press PLUS (+) to perform the specified action.
Change Parameter Values
- and + indicate that a value can be changed.
Press PLUS (+) or MINUS (-) to scroll through the
accepted values.
Table 2 • Navigation (Continued)

19
Introduction
Control Panel Display
7/3/13 P1056468-002
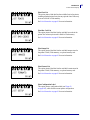
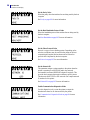
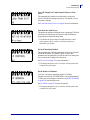
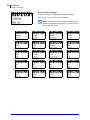
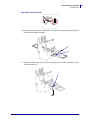
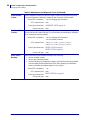
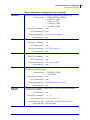
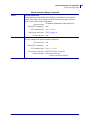
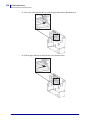
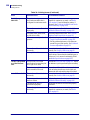
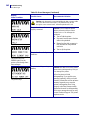
Exit Setup Mode
1. At the Idle Display (Figure 3), press SETUP to
enter Setup Mode. The printer displays the first
parameter.
2. While in Setup Mode, press SETUP/EXIT to exit
the operating parameters.
The LCD displays
SAVE CHANGES.
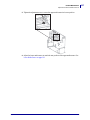
3. To return to the parameters, plus PREVIOUS.
OR
Press PLUS (+) or MINUS (-) to scroll through
the exit options:
• PERMANENT—Stores values in the printer
even when power is turned off.
• TEMPORARY—Saves the changes until
power is turned off.
• CANCEL—This option cancels all changes
made since you entered Setup mode, except
for changes made to DARKNESS, TEAR
OFF, COMMUNICATION, and LANGUAGE
settings, which go into effect as soon as they
are made.
• LOAD DEFAULTS—Use this option to restore
all settings other than the network settings
back to the factory defaults. Use care when
loading defaults because you will need to
reload all settings that you changed manually.
• LOAD LAST SAVE—Loads the values from
the last permanent save.
• DEFAULT NET—Use this option to restore all
print server and network settings back to the
factory defaults. Use care when loading
defaults because you will need to reload all
settings that you changed manually.
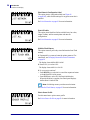
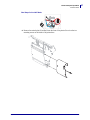
4. Press NEXT/SAVE to select the displayed choice
and exit Setup Mode.
When the configuration and calibration sequence
finishes, the printer returns to the Idle Display.
Table 2 • Navigation (Continued)

Introduction
Control Panel Display
20
P1056468-002 7/3/13
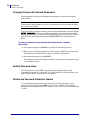
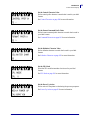
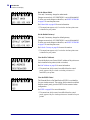
Changing Password-Protected Parameters
Certain parameters, including the communication parameters, are password-protected by
factory default.
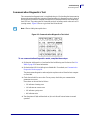
The first time that you attempt to change a password-protected parameter, the printer displays
ENTER PASSWORD. Before you can change the parameter, you must enter the four-digit
numeric password. After you have entered the password correctly, you do not have to enter it
again unless you leave Setup mode by pressing SETUP/EXIT or by turning off (
O) the
printer.
To enter a password for a password-protected parameter, complete
these steps:
1. At the password prompt, use MINUS (-) to change the selected digit position.
2. When you have selected the digit that you wish to change, use PLUS (+) to increase the
selected digit value. Repeat these two steps for each digit of the password.
3. After entering the password, press SELECT.
The parameter you selected to change is displayed. If the password was entered correctly,
you can change the value.
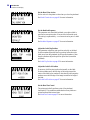
Default Password Value
The default password value is 1234. The password can be changed using the Zebra
Programming Language (ZPL) command
^KP (Define Password) or using the printer’s web
pages (ZebraNet wired or wireless print server required).
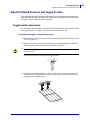
Disable the Password Protection Feature
You can disable the password protection feature so that it no longer prompts you for a
password by setting the password to 0000 via the
^KP ZPL command. To re-enable the
password-protection feature, send the ZPL command
^KPx, where x can be any number from
1 to 9999.
Caution • Do not change password-protected parameters unless you have a complete
understanding of the parameters’ functions. If the parameters are set incorrectly, the printer
may function unpredictably.
Page is loading ...
Page is loading ...
Page is loading ...
Page is loading ...
Page is loading ...
Page is loading ...
Page is loading ...
Page is loading ...
Page is loading ...
Page is loading ...
Page is loading ...
Page is loading ...
Page is loading ...
Page is loading ...
Page is loading ...
Page is loading ...
Page is loading ...
Page is loading ...
Page is loading ...
Page is loading ...
Page is loading ...
Page is loading ...
Page is loading ...
Page is loading ...
Page is loading ...
Page is loading ...
Page is loading ...
Page is loading ...
Page is loading ...
Page is loading ...
Page is loading ...
Page is loading ...
Page is loading ...
Page is loading ...
Page is loading ...
Page is loading ...
Page is loading ...
Page is loading ...
Page is loading ...
Page is loading ...
Page is loading ...
Page is loading ...
Page is loading ...
Page is loading ...
Page is loading ...
Page is loading ...
Page is loading ...
Page is loading ...
Page is loading ...
Page is loading ...
Page is loading ...
Page is loading ...
Page is loading ...
Page is loading ...
Page is loading ...
Page is loading ...
Page is loading ...
Page is loading ...
Page is loading ...
Page is loading ...
Page is loading ...
Page is loading ...
Page is loading ...
Page is loading ...
Page is loading ...
Page is loading ...
Page is loading ...
Page is loading ...
Page is loading ...
Page is loading ...
Page is loading ...
Page is loading ...
Page is loading ...
Page is loading ...
Page is loading ...
Page is loading ...
Page is loading ...
Page is loading ...
Page is loading ...
Page is loading ...
Page is loading ...
Page is loading ...
Page is loading ...
Page is loading ...
Page is loading ...
Page is loading ...
Page is loading ...
Page is loading ...
Page is loading ...
Page is loading ...
Page is loading ...
Page is loading ...
Page is loading ...
Page is loading ...
Page is loading ...
Page is loading ...
Page is loading ...
Page is loading ...
Page is loading ...
Page is loading ...
Page is loading ...
Page is loading ...
Page is loading ...
Page is loading ...
Page is loading ...
Page is loading ...
Page is loading ...
Page is loading ...
Page is loading ...
Page is loading ...
Page is loading ...
Page is loading ...
Page is loading ...
Page is loading ...
Page is loading ...
Page is loading ...
Page is loading ...
Page is loading ...
Page is loading ...
Page is loading ...
Page is loading ...
Page is loading ...
Page is loading ...
Page is loading ...
Page is loading ...
Page is loading ...
Page is loading ...
Page is loading ...
Page is loading ...
Page is loading ...
Page is loading ...
Page is loading ...
Page is loading ...
Page is loading ...
Page is loading ...
Page is loading ...
Page is loading ...
Page is loading ...
Page is loading ...
Page is loading ...
Page is loading ...
Page is loading ...
Page is loading ...
Page is loading ...
Page is loading ...
Page is loading ...
Page is loading ...
Page is loading ...
Page is loading ...
Page is loading ...
Page is loading ...
Page is loading ...
Page is loading ...
Page is loading ...
Page is loading ...
Page is loading ...
Page is loading ...
Page is loading ...
Page is loading ...
Page is loading ...
-
 1
1
-
 2
2
-
 3
3
-
 4
4
-
 5
5
-
 6
6
-
 7
7
-
 8
8
-
 9
9
-
 10
10
-
 11
11
-
 12
12
-
 13
13
-
 14
14
-
 15
15
-
 16
16
-
 17
17
-
 18
18
-
 19
19
-
 20
20
-
 21
21
-
 22
22
-
 23
23
-
 24
24
-
 25
25
-
 26
26
-
 27
27
-
 28
28
-
 29
29
-
 30
30
-
 31
31
-
 32
32
-
 33
33
-
 34
34
-
 35
35
-
 36
36
-
 37
37
-
 38
38
-
 39
39
-
 40
40
-
 41
41
-
 42
42
-
 43
43
-
 44
44
-
 45
45
-
 46
46
-
 47
47
-
 48
48
-
 49
49
-
 50
50
-
 51
51
-
 52
52
-
 53
53
-
 54
54
-
 55
55
-
 56
56
-
 57
57
-
 58
58
-
 59
59
-
 60
60
-
 61
61
-
 62
62
-
 63
63
-
 64
64
-
 65
65
-
 66
66
-
 67
67
-
 68
68
-
 69
69
-
 70
70
-
 71
71
-
 72
72
-
 73
73
-
 74
74
-
 75
75
-
 76
76
-
 77
77
-
 78
78
-
 79
79
-
 80
80
-
 81
81
-
 82
82
-
 83
83
-
 84
84
-
 85
85
-
 86
86
-
 87
87
-
 88
88
-
 89
89
-
 90
90
-
 91
91
-
 92
92
-
 93
93
-
 94
94
-
 95
95
-
 96
96
-
 97
97
-
 98
98
-
 99
99
-
 100
100
-
 101
101
-
 102
102
-
 103
103
-
 104
104
-
 105
105
-
 106
106
-
 107
107
-
 108
108
-
 109
109
-
 110
110
-
 111
111
-
 112
112
-
 113
113
-
 114
114
-
 115
115
-
 116
116
-
 117
117
-
 118
118
-
 119
119
-
 120
120
-
 121
121
-
 122
122
-
 123
123
-
 124
124
-
 125
125
-
 126
126
-
 127
127
-
 128
128
-
 129
129
-
 130
130
-
 131
131
-
 132
132
-
 133
133
-
 134
134
-
 135
135
-
 136
136
-
 137
137
-
 138
138
-
 139
139
-
 140
140
-
 141
141
-
 142
142
-
 143
143
-
 144
144
-
 145
145
-
 146
146
-
 147
147
-
 148
148
-
 149
149
-
 150
150
-
 151
151
-
 152
152
-
 153
153
-
 154
154
-
 155
155
-
 156
156
-
 157
157
-
 158
158
-
 159
159
-
 160
160
-
 161
161
-
 162
162
-
 163
163
-
 164
164
-
 165
165
-
 166
166
-
 167
167
-
 168
168
-
 169
169
-
 170
170
-
 171
171
-
 172
172
-
 173
173
-
 174
174
-
 175
175
-
 176
176
-
 177
177
-
 178
178
-
 179
179
-
 180
180


Zebra 105SL Plus User manual
- Category
- Print & Scan
- Type
- User manual
- This manual is also suitable for
Ask a question and I''ll find the answer in the document
Finding information in a document is now easier with AI
Related papers
-
Zebra ZE500 User manual
-
Zebra Z4Mplus User guide
-
Zebra ZD500 User manual
-
 Zebra Technologies 79695L-002 User manual
-
-
 Zebra Technologies Zebra Zm400 Printers 4 Direct Thermal/Thermal Transfer 203Dpi 16Mb Zplii Xml Serial/Parallel/Usb - Model#: zeb-zm40020010000t User manual
-
Zebra 140Xi4 User manual
-
-
Wells HC100 User guide
-


Other documents
-
OKI 8100e User manual
-
 Zebra Technologies 170PAX2TM User manual
-
 Zebra Technologies R170XI User manual
-
 Zebra Technologies 3ULQWHUV User manual
-
Brady 300X-PLUS User manual
-
-
-
-
-


