StarTech.com SV565UTPUL User manual
- Category
- KVM switches
- Type
- User manual
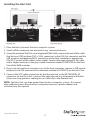
StarTech.com SV565UTPUL extends your computer’s KVM controls up to 984 feet away over a single network cable, featuring intuitive hotkey commands, auto-switching between host and remote users, and support for PS/2 or USB computer interfaces. Ideal for controlling a server in a remote location, this extender can be used as a standalone KVM extender or integrated into an existing KVM switch for managing multiple computers.
StarTech.com SV565UTPUL extends your computer’s KVM controls up to 984 feet away over a single network cable, featuring intuitive hotkey commands, auto-switching between host and remote users, and support for PS/2 or USB computer interfaces. Ideal for controlling a server in a remote location, this extender can be used as a standalone KVM extender or integrated into an existing KVM switch for managing multiple computers.


-
 1
1
-
 2
2
-
 3
3
-
 4
4
-
 5
5
-
 6
6
-
 7
7
-
 8
8
-
 9
9
-
 10
10
-
 11
11
-
 12
12
-
 13
13
-
 14
14
-
 15
15
-
 16
16
-
 17
17
-
 18
18
-
 19
19
-
 20
20


StarTech.com SV565UTPUL User manual
- Category
- KVM switches
- Type
- User manual
StarTech.com SV565UTPUL extends your computer’s KVM controls up to 984 feet away over a single network cable, featuring intuitive hotkey commands, auto-switching between host and remote users, and support for PS/2 or USB computer interfaces. Ideal for controlling a server in a remote location, this extender can be used as a standalone KVM extender or integrated into an existing KVM switch for managing multiple computers.
Ask a question and I''ll find the answer in the document
Finding information in a document is now easier with AI
Related papers
-
StarTech.com PS22USB User manual
-
StarTech.com SV565UTP User manual
-
StarTech.com SV565UTPUEU User manual
-
-
StarTech.com SV565UTPU Specification
-
StarTech.com SV565DUTPU User manual
-
 StarTech.com USB, DVI KVM Console Extender w/ Serial & Audio Owner's manual
-
 StarTech.com SV231DVGAU2A Operating instructions
-
StarTech.com ST121UTPDVGB User manual
-
StarTech.com PS2UTPEXT Installation guide


Other documents
-
Zonet KVM3332 Installation guide
-
-
 StarTech com SV211HDUC 2 Port USB-C Alt-Mode Compact KVM Switch User guide
-
Newstar NS560UTP User manual
-
IC Intracom 524353 User manual
-
StarTech SV221HUC4K Port 60Hz HDMI KVM Switch USB-C Host Port User guide
-
LevelOne KVM-9006 User manual
-
StarTech com C2-H46-UC2-PD-KVM User guide
-
ADDER AdderView CATxIP 1000 User manual
-
Lindy 32530 User manual
