15
English
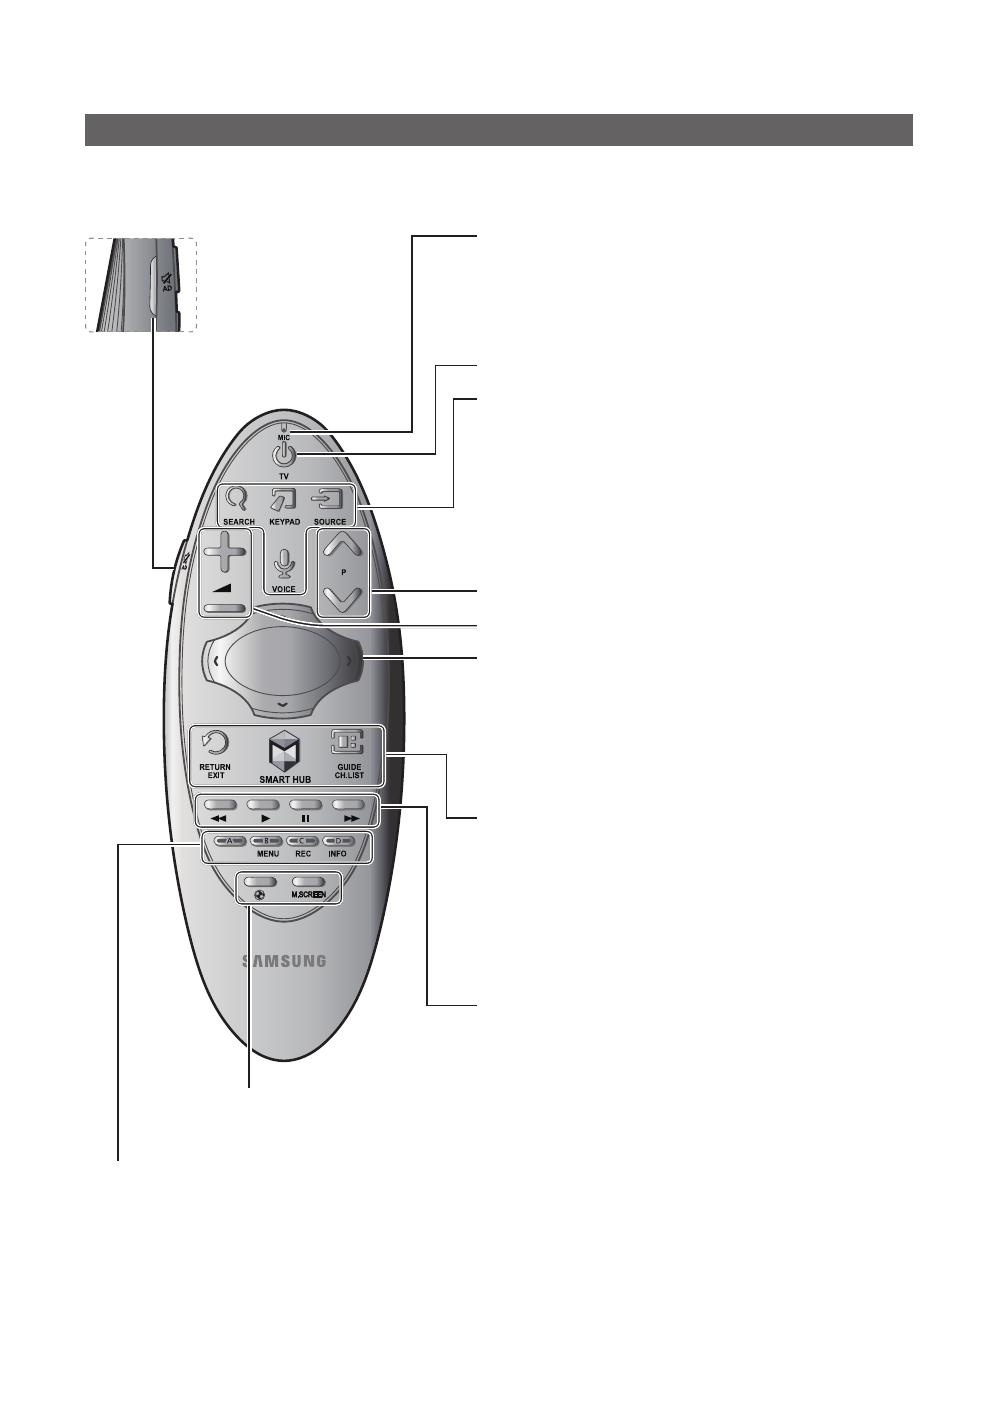
Samsung Smart Control (sold separately)
✎ Colours and shape may vary depending on the model.
¢: Turns the sound on/off.
AD: Press and hold this button
to bring up the Accessibility
Shortcuts panel. Select the
options to turn them on or off.
MIC: Use the microphone with the Voice Control and Voice functions.
– The Voice Control function can be affected by unclear pronuncia-
tion, voice level, or surrounding noise.
Turns the TV on/off.
SEARCH: Press this button to use the search window. (Not availabl)
KEYPAD: With the virtual remote control on the screen, you can easily
enter digits, control content, and use functions.
SOURCE: Changes the source.
VOICE: Starts voice recognition. When the microphone icon appears on
the screen, say a voice command into the microphone. Say "Help" to
learn about basic usage and voice commands.
– Say a voice command 10cm to 15cm from the microphone and at
an appropriate volume.
Changes the channel.
Changes the volume.
– Touchpad: Place a finger on the touch pad and move the Samsung
Smart Control. The pointer on the screen moves in the direction
and as much as the Samsung Smart Control is moved. Press the
touchpad to run the focused item.
– < > ¡ £: Moves the pointer or focus.
RETURN: Returns to the previous menu. Additionally, when you press
this button while watching TV, you can return to the previous channel.
EXIT: Press and hold this button to exit all currently running applications.
SMART HUB: Launches Smart Hub. Pressing SMART HUB while an
application is running terminates the application.
GUIDE: Displays the digital channel broadcasting schedule.
Channel List: Press and hold to launch the Channel List.
Use these buttons with specific features. Use these buttons according to
the directions on the TV screen.
Colours button: Use these colour buttons to access additional options specific to the feature in use.
– MENU: Press and hold to display a menu on the screen.
– REC: Press and hold to record the broadcast.
– INFO: Press and hold to view information about the current digital channel or media file.
¥:Enable Football Mode for an optimal sports viewing experience.
M.SCREEN: You can split the TV screen and use various functions such as watching TV, surfing the web, watching
video, and so on. For more information, refer to the e-Manual.


