Motorola MOTO E5 GO User manual

Category
Mobile phones
Type
User manual
User Guide
Check it out
Contents
Check it out
Get Started
First look
Insert the SIM and microSD cards
Charge up & power on
Sign in
Connect to Wi-Fi
Explore by touch
Improve battery life
Learn the basics
Home screen
Help & more
Search
Notifications
App notifications
Status icons
Volume
Do not disturb
Lock screen
Quick settings
Speak
Direct Share
Customize your phone
Redecorate your home screen
Choose apps & widgets
Customize sounds & appearance
Apps
Phone
Messages
Chrome™
Camera
Photos
Gmail™
Calendar
More apps
Google Play™
Contacts
Maps Go
Music & YouTube
Clock
Connect, share & sync
Connect with Wi-Fi
Connect with Bluetooth wireless
Share files with your computer
Share your data connection
Print
Sync to the cloud
Use a memory card
Airplane mode
Mobile network
Protect your phone
Screen lock
Screen pinning
Backup & restore
Encrypt your phone
Your privacy
App safety
Data usage
Troubleshoot your phone
Restart or remove an app
Restart your phone
Check for software update
Reset
Stolen phone
Accessibility
Create a shortcut
Make your phone speak
Speak to your phone
Change your phone’s display
Change your phone’s sounds
Hearing aids (U.S. only)
Get more help
Where is my legal, safety, & regulatory
information?
Service & repairs
Copyright & trademarks
Check it out
When you’re up and running, explore what your phone can do.
Topic Location
Find these fast: Wi-Fi, airplane mode,
flashlight, and more.
Quick settings
Choose new wallpaper, set ringtones, and
add widgets.
Customize your phone
Experience crisp, clear photos, movies,
and videos.
Camera
Browse, shop, and download apps. Apps
Keep your info safe. Set up your password
and more.
Protect your phone
Ask questions, get answers. Speak
Share your Internet connection. Wi-Fi hotspot
Tip: View all of these topics on your phone, swipe up from the home screen and tap
Moto Help. For FAQs, and other phone support, visit www.motorola.com/support.
This product meets the applicable national or international RF exposure
guidance (SAR guideline) when used normally against your head or, when worn
or carried, at a distance of 5 mm from the body. The SAR guideline includes a
considerable safety margin designed to assure the safety of all persons, regardless of
age and health.
Caution: Before using your phone, please read the Legal information. Swipe up >
Settings > System > Legal information.
Get Started
Get Started
First look
Let’s get started. We’ll guide you through startup and tell you a bit about your phone’s
features.
Phone hardware buttons: top right are Volume up and down keys, middle right is Power button. Bottom middle is charging port. Top right is headset jack. On screen, top left is front camera, top right is flash. Navigation
icons are along the bottom.
Note: Certain apps and features may not be available in all countries.
Power button
Your Power button helps in a few ways.
» Power on/o: Press and hold the Power button, then tap Power o. When your
phone is o, press and hold the Power button to turn it on.
» Sleep: To conserve battery power or prevent accidental touches, put the touchscreen
to sleep by pressing the Power button.
Volume Buttons
Flash
Fr
ont Camera
Speaker
Microphone
Micro USB/
Charger
Back
Camera
Power Button
Press:
Display on/off.
Press & hold:
Phone on/off.
SIM & microSD
Card Slots
(Under back cov
er)
Headset Jack
» Wake up: Press the Power button again.
» Reboot: To reboot your phone, press and hold the Power button, then tap Restart.
Tip: To add security to your phone, see Protect your phone.
Volume buttons
Your volume buttons can help:
» Ringer volume: Press the buttons when your phone is ringing to silence it.
» Earpiece volume: Press the buttons during a call.
» Music/video volume: Press the buttons during a song or video.
Tip: For more on volume control, see Volume.
Get Started
Insert the SIM and microSD cards
To activate phone service, you might need to insert a SIM card, or this may have been
done for you. You can also add a microSD card, which is optional and sold separately.
Remove the back cover
To insert SIM and memory cards, remove the back cover.
Caution: Don’t use tools to remove the cover—doing so may damage your phone.
Back cover removal graphic. Remove the back cover starting at the small opening on the lower left corner [looking at it from the back]. Lift the battery up and out from the bottom.
Caution: Do not pull the USB port
part to remove the back cover.
Take off the back cover.
Put your finger in the notch at
the bottom corner of the back
cover and pry off the cover.
Put in the cards
Caution: Make sure you use the correct size SIM card and don’t cut the SIM card.
SIM card insert graphic. After the battery is removed, the SIM card is inserted in the slot on the left with the clipped corner to the upper left. The SDcard is inserted in the right slot.
Note: If you need to remove the SIM card, follow the instructions below.
Nano SIM
2
1
1. SIM
Insert the SIM card first, then insert an optional
microSD card.
2. microSD
(optional, sold
separately)
(gold contacts
facing down)
Push the SIM card down
from the top of the slot,
then pull the card from the
bottom to remove it
Get Started
Charge up & power on
Put in the battery and put on the back cover. Charge your phone fully and turn the
power on. Follow the screen prompts to get started.
Battery in and power on graphic. Put the battery back in top down first and snap the cover on. After you charge the phone, press and hold the Power button until the screen lights up.
Sign in
If you use Gmail™, you already have a Google™ account—if not, you can create an
account during setup. Signing into your Google account lets you access, sync, and
backup your stu. You can see your Google apps, contacts, calendar, photos, and more.
Tips
» To add, edit, or delete accounts, swipe up > Settings > Users & accounts.
» To set up email accounts, see Gmail™.
» For help with your Google account, visit www.google.com/accounts.
Charge up & power on.
Press & hold Power
until the screen lights
up.
Put in the battery & put on the cover.
Connect to Wi-Fi
For faster Internet access and to conserve data use, swipe the status bar down twice,
then tap to connect to Wi-Fi. For full instructions, see Connect with Wi-Fi.
Note: This phone supports apps and services that may use a lot of data, so make sure
your data plan meets your needs. Contact your service provider for details.
Explore by touch
Find your way around:
» Tap: Choose an icon or option.
» Touch and hold: See more options.
» Drag: Move items on the home screen.
» Swipe: Scroll through lists or between screens.
» Pinch or double-tap: Zoom in and out on websites, photos, and maps.
» Twist: Twist a map with two fingers to rotate it, and pull two fingers down to tilt it.
» Back: Tap Back to go to the previous screen.
» Home: Tap Home to return to the home screen.
» Recents: Tap Recents to see your recent apps (or browser tabs), and tap an app
to reopen it. Double tap to quickly switch between your recent apps. To remove an
app from the recent list, swipe it left, right or tap . To scroll the list, swipe up or
down.
Note: You don’t need to remove apps from Recents for your phone to run eciently.
» Menus: When you see , , or , you can tap it to open options for the current
screen.
» Close Keyboard: To close a keyboard, tap .
Learn the basics
Improve battery life
Your phone processes tons of information. Depending on what you use, that can take a
lot of power.
When your phone is stationary, not charging, or not in use for a period of time,
unnecessary background processes are shut down to optimize battery life.
» To see what’s using up battery power, swipe up > Settings > Battery > USAGE
DETAILS.
» To help improve battery life, swipe up > Settings > Battery > Battery saver,
and turn it on.
Tip: To quickly open Settings, swipe down on the status bar and tap .
Battery Tips
To save even more battery life between charges, you could reduce:
» Widgets that stream information to your home screen, like news or weather.
» Unused accounts: Swipe up > Settings > Users & accounts.
» Recording or streaming videos or music.
Learn the basics
Home screen
The home screen is what you see when you turn on your phone. From here you can
explore apps and more.
Note: Software updates happen frequently, so your screen may look a little dierent.
Home screen. At the top, tap the Google bar to type search options or tap the right hand microphone icon to speak a search. Icons at the top show notifications and phone status icons. Swipe up from center bottom to
get to your apps. App icons along the bottom are commonly used apps: phone, message, Google Chrome, Gallery, and camera.
Tips
» Open app list: Swipe up to see all your apps.
» Return home: To return to the home screen from any location, tap Home .
» Pages: To add a page, drag an app to the right side of the screen until you see a new
page. You can add multiple pages. To see other pages of shortcuts and widgets (if
available), swipe the home screen left.
» Settings: To quickly open common settings, swipe the status bar down. To open
more settings, tap .
VerizonPlay StorePhotosGoogle
73°
7
11:35
3
3
3
APR
3
3
TUE
Search...
Swipe up to see
all your apps.
Search by typing or
say "OK, Google.”
Swipe down for
notifications and
settings.
Learn the basics
» Customization: To personalize your home screen, see Customize your phone.
Help & more
Learn even more about your phone and get support.
Find it: Swipe up > Moto Help
Search
On the home screen, tap the Google Search box for a text search or tap to search by
voice.
When you type, suggestions appear below the search field:
» To search for a suggestion, tap it.
» To search for text in the search field, tap on the keyboard.
Tip: To close the keyboard, tap .
Note: For more on voice search, see Speak.
Notifications
At the top of the screen, icons on the left notify you about new messages or events. If
you don’t know what an icon means, swipe the status bar down for details.
Tip: Getting too many notifications? Touch and hold a notification to see which app is
sending them to you. Then you can turn them o.
Notifications screen. Swipe down from the top of the home screen down to view notifications.
Tue, Apr 3
Weekly Staff Meeting
MARK AS READ REPLY
11:35
Messages now
Calendar 17m
CLEAR ALL
Can you come on Sat.?
10:30 - 11:30
Tip: Swipe left or right to
remove a notification.
Some notifications show
more options when you
slide them halfway.
Swipe down to see
your notifications.
Karen Travis
Tap a notification to open
it, or choose an option,
such as REPLY.
Tip: To quickly change common settings, swipe the status bar down. For more, see
Quick settings.
App notifications
You may see a notification dot on an app. This app notification, or badge,
tells you the app has an update or an announcement, such as a new email
or a missed call. Press and hold the app for more information, options, or
app shortcuts.
Wireless Emergency Alerts (U.S. & some countries)
Wireless Emergency Alerts, also known as CMAS or PLAN,
is a U.S. national emergency alert system. Emergency alerts
can pop up to tell you about a national or local crisis. After
you close an alert, you can reopen it by swiping up >
Settings > Sound > Advanced > Emergency alerts.
Tip: Emergency alerts have a special sound and vibration that is two seconds long,
followed by one second, then another one second.
To choose which types of alerts you receive, swipe up > Settings > Sound >
Advanced > Emergency alerts. The U.S. and local governments send these alerts
through your service provider. So you will always receive alerts for the area where you
are, and you won’t receive alerts if you’re outside of the U.S.
For more, visit www.ctia.org and search “wireless emergency alerts.
A
LERTS
WIRELESS
CAPABLE
EMERGENCY
TM
Learn the basics
Status icons
Icons at the top right of the screen tell you about phone status:
Status Icons
Network strength Do not disturb
/ Wi-Fi in range/connected Alarm set
/ Bluetooth on/connected
Data Saver on
Airplane mode
/ Portrait/Auto-rotate
/ Battery charging/full
/ Location on/o
Volume
Press the side volume buttons up or down to select a ringer volume from high to vibrate
.
Volume screen. Press the Volume keys up or down to control the volume for Ring Notification, Media, and Alarm sounds. On screen, change the volume using slide bars.
Media
Ring
Alarm
Tap to show all volume
controls. Tap again to
show only the ringtone
volume.
Tap an icon to mute
or set to vibrate.
Slide the bar to
increase/decrease
volume.
Do not disturb
To turn o some or all sounds, swipe the status bar down with two fingers, and tap Do
not disturb. Then tap the switch to turn it on, and select one of these options:
» Total silence: Turn o all sounds and alarms. Override sound settings from other
apps. Set how long to stay in this mode, or choose indefinitely.
» Alarms only: Set how long you want to only hear alarms, or choose indefinitely. Tap
MORE SETTINGS to customize which other interruptions to receive.
» Priority only: Set how long you want to only hear priority interruptions, or choose
indefinitely. Tap MORE SETTINGS to customize which interruptions to receive.
Tip: To create an exception for repeat callers that allows a call from the same person
within a 15 minute period, tap MORE SETTINGS > Priority only allows > Repeat callers.
Learn the basics
Lock screen
Your touchscreen is on when you need it and o when you don’t.
Lock screen showing access to voice control on the bottom left and camera on the bottom right. Swipe this screen up to unlock it.
» Screen o and on: Press the Power button to turn the screen o and on.
» Screen lock: To unlock the screen, touch and drag up. To apply security to the
lock screen (recommended), see Screen lock.
» Notifications: Double tap a notification in the lock screen to open it.
Tip: To prevent notifications from appearing in the lock screen, swipe up >
Settings > Apps & notifications > Notifications > On the lock screen > Don’t show
notifications at all.
» Owner info: To add a message to your lock screen, swipe up > Settings >
Security & Location, tap > Lock screen message.
» Screen timeout: To change your timeout (screen locks automatically), swipe up >
Settings > Display > Advanced > Sleep.
11:35
Tuesday, 3 April
Swipe up to unlock your
screen.
Add a lock screen
message for anyone who
finds your phone.
Swipe up to open the
camera.
Swipe up to make a call.
Thanks for finding my phone!
Quick settings
For quick access to Wi-Fi, Bluetooth, Airplane mode, brightness, and other settings,
swipe the status bar or lock screen down. For even more settings, tap .
Tap to rearrange your settings and add or remove settings.
Quick Settings screen that shows options, such as Wi-Fi, Bluetooth, Airplane mode, Location and more. Customizable.
Speak
Voice to text
On a keyboard, tap , then speak your message or search text. You can also speak
punctuation.
Assistant Go
Find it: Swipe up > Assistant Go
Note: This feature may not be available in all languages.
Ask your phone questions, find answers and set tasks using the Assistant Go.
Touch and hold Home from any screen, then speak or type a command. You can also
say, “Ok Google” to open the Assistant Go.
100% 11:35
Wi-Fi Bluetooth Do not disturb
Flashlight
Tue, Apr 3
Battery Saver
Portrait
Turn Wi-Fi on/o.
See all phone settings.
Set screen brightness.
Tap an icon to turn it
on/o.
Customize your phone
Direct Share
In some apps, you can share something directly to a contact, app, or conversation.
Select the share option within an app, then select a contact, choose an app, or type a
name or number to find a contact.
Google Direct Share screen. Tap a contact to share an item. Swipe up to get more options.
Abe
Allie
Create link Shared
album
Gmail Messages
Anna Medina Kevin Astrid Fanning
TO Type an name, phone number, or email
K
Michael
M
Nathan More
N
Swipe up for more
share options.
Tap a contact to
share information.
Customize your phone
Redecorate your home screen
Customize your home screen the way you want.
Home screen showing customize options. Touch and hold the home screen to add a widget. Tap an app to open it. Touch and hold it to move or remove it.
» Change your wallpaper: Touch and hold an empty spot on the home screen, then
tap WALLPAPERS.
» Add a home screen page: Drag an app to the right side of the home screen until a
new page appears. You can add multiple pages.
» Adjust display settings: Adjust brightness, font size, and screen saver. Swipe up >
Settings > Display.
» Rotate: In many apps, the touchscreen switches from portrait to landscape when
you rotate your phone. To turn this on or o, swipe up > Settings > Display >
Advanced > Auto-rotate screen.
VerizonPlay StorePhotosGoogle
73°
7
11:35
3
3
3
APR
TUE
Search...
Tap a shortcut to open.
Touch and hold to move or
delete.
Touch and hold an empty
spot to change wallpaper.
Drag shortcuts on top
of each other to make
a folder.
Apps
Choose apps & widgets
» Add apps to the home screen: Swipe up , touch and hold an app, then drag it to
one of your home screen pages.
» Download new apps: Tap Play Store. For more on apps, see App safety.
» Group apps together: Drag one app onto another. Do it again to add more apps to
the folder. To name the folder, tap it and enter a name below the apps.
» See app options: Touch an hold an app. If the app has quick options (shortcuts),
you’ll see a list.
» Add widgets: Touch and hold an empty spot on the home screen, tap WIDGETS,
touch and hold a widget, then drag it to your home screen.
» Resize widgets: You can resize some widgets—touch and hold a widget until you feel
a vibration, then release. Drag the white circles at the edges to resize.
» Move or delete widgets and apps: Touch and hold a widget or app and drag it to
another spot, another page, or to Remove.
Note: Removing an app from your home screen doesn’t uninstall the app from your
phone.
Customize sounds & appearance
Customize your phone’s sounds and display settings:
» Set ringtone and notifications: Swipe up > Settings > Sound.
Tip: Set notification sounds for individual apps within the app’s settings.
» Add vibrate for calls: To make your phone vibrate, swipe up > Settings >
Sound and tap Also vibrate for calls. To silence incoming calls, see Do not disturb.
» Set ringtone for a contact: Swipe up > Contacts, tap the contact, then tap
Menu > Set ringtone.
» Change language: Swipe up > Settings > System > Languages & input >
Languages.
» Adjust font size: Swipe up > Settings > Display > Advanced > Font size.
Apps
Your phone comes ready with some great apps. To find and add more apps, tap Play
Store. To learn more, see App safety.
Phone
Keep in touch by choosing a contact, returning a missed call.
Make a call
Find it: Phone
» Call a contact: To call a contact or recent call, tap the contact name.
» Dial a phone number: To open the dialpad, tap . Enter a number, then tap to
call it.
» Voice dial: To voice dial, tap on the home screen or say “Ok Google”, then say “Call
<name>”.
» Voicemail: appears in the status bar when you have new voicemail. To hear it,
swipe down and tap the notification.
» Make a contact widget: Touch and hold an empty spot on the home screen, tap
WIDGETS, then touch and hold the Direct dial widget. Drag it to your home screen,
then select the contact. Tap the widget to call the person.
Tip: To enter the international dialing code (+), touch and hold 0. To add a pause or wait
after numbers, tap Menu .
Apps
Calls screen and options that show during a call. To find and call a contact, enter a name in the Search field, tap the Contacts tab at the top right, or tap a contact’s image in the middle of the screen. Tap the dialpad at the
middle bottom of the screen to enter a number. During a call, options from left to right are: Speaker, Mute, Dialpad, Hold, Add Caller.
Receive a call
» Answer a call: When your phone is locked, swipe up to answer. When the phone
is unlocked, tap ANSWER.
» Ignore a call: When your phone is locked, swipe down to reject the call. When the
phone is unlocked, tap DECLINE.
Tip: You can also press the Power button to ignore the call, or press a volume button
to silence the ringer.
» Respond with a text: When your phone is locked, swipe up , and select a message
to respond.
Note: When you hold your phone to your ear, the touchscreen goes dark to avoid
accidental touches. When you move the phone away from your ear, the screen lights
up again. Don’t use covers or screen protectors (even clear ones) that cover the
proximity sensor above the touchscreen.
Search contacts & places
Favorites RecentsContacts
AllieCade
A C
Candace
See recent calls.
See all your contacts.
Dial a number.
Tap a favorite to call
it. Tap the Menu to
see options for the
contact.
During a call
» Mute a call: Tap Mute on the call screen to mute the call. You can hear your caller,
but they can’t hear you.
» Multi-task: While you’re on a call, tap Home to hide the call screen and look up
a phone number, address, or open other apps. To reopen the call screen, swipe the
status bar down and tap Ongoing call.
» Answer a second call: To answer a second call, tap Hold and Answer Voice. The
first call is placed on hold. To switch between calls, tap Swap.
» 3-way call: To join two calls together, answer the second incoming call while your
first call is active, or tap Add call to dial a second call. The first call is placed on
hold. Tap Merge to join the calls together.
» End a call: Tap .
Favorites
See all your favorite contacts together.
Find it: Phone > Favorites
To add favorites, tap Contacts, scroll or search to find the contact, then tap the
picture (or letter, if no picture) and tap Favorites.
Recent calls
View your calls (with newest first), and then call, text, or store them:
Find it: Phone > Recents
» To return a call, tap . next to the caller’s name or number.
» To send a text message, store the number, or other options, tap the caller’s picture.
» To remove an entry from the call log, tap the name or number, then tap Call details
> .
» To clear the list, tap Menu > Call history > Menu > Clear call history.
Your phone number
Find it: Swipe up > Settings > System > About phone > Status > SIM status > My
phone number
Apps
Emergency calls
Your service provider programs one or more emergency phone numbers you can call
under any circumstances, even when your phone is locked. Emergency numbers vary
by country. Your pre-programmed emergency number(s) may not work in all locations,
and sometimes an emergency call cannot be placed due to network, environmental, or
interference issues.
1 Tap Phone (if your phone is locked, drag up to unlock it, then tap Emergency).
2 Enter the emergency number.
3 Tap to call the emergency number.
Note: Your phone can use location based services (GPS and AGPS) to help emergency
services find you. For more information, swipe up > Settings > System > Legal
Information > Legal and safety > Location services.
Messages
Stay in touch with messages and pictures. For tips on using the keyboard, see Use the
keyboard.
Find it: Messages
» Create: Tap .
» Attach: When you’re typing a message, tap to attach a picture, audio, video, or
more.
» Send: Tap to send the message.
» Reply: Open a conversation, then enter your response in the text box at the bottom
and tap .
Message screen showing change and search options in the upper right, a list of previous messages with contacts, and the new message icon in the lower right corner.
Tips
» Add a contact: In a conversation, touch and hold a message for more options, such
as adding another contact.
» Delete thread: To delete a whole thread of messages, touch and hold the thread,
then tap to delete.
» Save pictures: Touch and hold a picture, and then tap to save it. To see the
picture, from the home screen, swipe up > Photos.
» Voice entry: Tap a text box, then tap on the keyboard.
Tip: If you don’t see on the keyboard, swipe up > Settings > System >
Languages & input > Virtual keyboard > Google voice typing to activate voice entry.
» Turn o notifications: Stuck in a busy conversation? You can turn o notifications.
Tap the thread, then tap Menu > People & options > Notifications.
11:35
Messages
You: Hey, where are you?
Astrid Fanning
You: Lunch tomorrow?
Daniel Lester
You: Do we need more treats?
Gracie Jo
Just now
20 min
Wed
Search messages.
Swipe left or right to
archive a message.
Write a new message.
Change settings.
Apps
Set your default messaging app
To set Messages as your default messaging app, swipe up > Settings > Apps
& notifications > Advanced > Default apps > SMS app, and select the messaging app
to use as the default.
Use the keyboard
When you tap a text box, like in a message or search, you have keyboard options.
» Type or gesture: Enter letters by touching them one at a time. Or, enter a word by
tracing a path through the letters. While you’re typing, word suggestions appear
above the keyboard. Tap one to select it.
» Voice entry: Tap on the touchscreen keyboard, then say what you want to type.
» Close the keyboard: Tap .
Keyboard screen. Tap the microphone in the top right to speak a message.
» Symbols and numbers: Touch and hold a letter to enter the number at the top of it.
To enter symbols, tap .
» Capital letters: Tap twice quickly.
Tip: Tap for single capital letter.
» Keyboard options: To customize your keyboard, swipe up > Settings > System
> Languages & input > Virtual keyboard > Gboard.
» Cut, copy and paste: Touch and hold a word to highlight it, tap CUT or COPY. Touch
and hold the location you want to paste the text, and tap PASTE.
I’m IWe
Type an SMS message
See a different
keyboard? It
varies by app.
This one is for
texting.
Chrome™
Access the Internet with the Chrome browser app.
Find it: Chrome
Or, from the home screen, tap the Google search box and enter or speak text to search.
Note: Your phone uses your Wi-Fi network (or your mobile phone network if no Wi-Fi
network is connected) to access the Internet. If you can’t connect, contact your service
provider. Your service provider may charge to surf the web or download data.
Google Chrome browser showing the options menu in the upper right corner.
» Go to a web page: Tap the address bar at the top of a page and enter an address.
» Add a bookmark: Tap Menu > .
» Open a bookmark: Open the address bar, then tap Menu > Bookmarks.
» Web page shortcut: To add a web page shortcut to your home screen, go to the web
page and tap Menu > Add to Home screen.
ALL IMAGES
11:35
https://www.google.com
See options.
Enter text to search.
Apps
» Mobile sites: Some websites automatically show you a “mobile” version of their
page—if you want to show the standard computer versions of all websites, tap Menu
> Desktop site.
» Reload: If a page doesn’t load correctly, tap Menu > .
» Tabs: To open a new tab, tap Menu > New tab. To move from one tab to another,
tap .
» Clear history: In the browser, tap Menu > Settings > Privacy > Clear browsing data.
Then choose history, cache, cookies, and other options.
» Help: For more about Google Chrome, tap Menu > Help & feedback or visit https://
support.google.com/chrome.
Download
Warning: Apps downloaded from the web can be from unknown sources. To protect
your phone and personal data from theft, download apps only on Google Play™.
» Files: Tap the download link. To show the file or app, swipe up > Files Go.
» Pictures: Touch and hold it, then tap Download image. To see the picture, tap
Photos > Download.
Browser settings
To change your browser security settings, text size, and other options, tap Menu >
Settings.
Safe surfing & searching
Keep track of what your browser and searches show:
» Incognito: To open a tab that won’t appear in your browser or search history, Menu
> New Incognito tab.
» Auto complete: Your browser can automatically fill information like names or
addresses in web forms, if you have entered the same information before. If you don’t
want that, tap Menu > Settings > Autofill and payments > Autofill forms, then tap
the switch to turn it o.
» Pop-ups: To stop pop-up windows from opening, tap Menu > Settings > Site
settings > Pop-ups, then tap the switch to turn it o.
Camera
Take crisp, clear photos with the back or front camera.
Take photos
Find it: Camera
» Take a photo: Tap to take a photo.
» Take a selfie: Tap in the camera screen to switch to the front camera.
» Zoom: Drag two fingers apart. To zoom out, drag your fingers together. Or, swipe up
or down with one finger.
» Multi-shot: Touch and hold to take a burst of photos.
Camera viewfinder screen. Take a photo by pressing the shutter button at the bottom middle, switch to front camera on the lower left. Video camera button is at the bottom right while the options menu is at the extreme
right.
Record videos
Find it: Camera, then tap
Switch to front camera.
Tap anywhere to
change the focus.
See more options.
See your last picture.
Ta ke a photo.
Switch to video camera.
Apps
Tap to start recording. Then tap to stop recording. Tap on the screen while
recording to save a photo.
Camera settings
Point, tap, and you’re done, or play with these camera options. You can find these
options along the top of the camera or video screen:
Options
HDR
Turn on HDR (high dynamic range) eect for better pictures
in challenging lighting situations, such as outdoors.
Flash
Set to On, O, or Auto. With the front facing camera, you
can also turn the torch on or o.
Beautify
With the front-facing camera, smooth skin and beautify
faces. Set to Auto, Manual, or O.
Timer
Set a timer to 3 or 10 seconds.
Manual mode
Control camera settings manually.
To see more video and photo options, tap Menu or swipe right on the camera screen:
Options
Panorama
Take a wide-angle shot. Use the on-screen guide to slowly
pan while you are taking the photo.
Slow motion
Take a video that will play in slow motion.
YouTube Live Post your video on YouTube™.
To find these options, tap Settings :
Options
Photo size (rear) Set the photo resolution for the back camera.
Options
Video size (rear) Set the video resolution.
Storage Choose a storage location for your photos and videos
(Phone or Memory card).
Save location Turn on to tag photos with a location.
Quick capture Tap the power button twice to open the camera.
Tap anywhere to
capture
Capture photos or videos by tapping anywhere on the
screen. Zoom by scrolling up or down with one finger.
Shutter sound Turn the shutter sound on or o.
Assistive grid Overlay a grid to help align the subjects in your photos.
Capture your screen
To capture your phone’s screen, press and hold both the Power and the Volume Down
buttons at the same time.
To see the screen capture, tap Photos > Screenshots.
Photos
View, edit & share
Find it: Photos
» Play, share, or delete: Tap a thumbnail to open it, then tap to share, to delete,
or Menu for more options.
Tip: To select multiple files, open a folder, touch and hold a photo, then tap others. Or
group photos in an album and share the whole album.
» Zoom: Open a photo in your gallery, then double-tap or drag two fingers apart or
together on the screen.
Tip: Turn your phone sideways for a landscape view.
Apps
» Wallpaper or contact photo: Open a picture, then tap Menu > Use as > Wallpaper
or Contact photo.
» Edit: Open a picture, then tap .
» Slideshow: Tap a picture, then tap Menu > Slideshow. To stop the slideshow, tap
the screen. To show the slideshow on a television or other device, see Connect, share
& sync.
Tip: For more about Google Photos, visit https://support.google.com/photos.
Gmail™
Send and receive email from all of your personal accounts (even if they’re not Gmail
accounts). You can manage your accounts in Gmail and easily switch between them.
Find it: Swipe up > Gmail
Email screen listing emails for this account. Tap the magnifying icon in the top right to search email. Tap the Pencil icon in the bottom right to start a new email.
» Add Gmail accounts: The first time you turned on your phone, you probably set up
or logged in to your Google account—that sets up the Gmail app for one account.
To add more Google accounts, swipe up > Settings > Users & accounts, then
tap Add account > Google.
1:51PM
10:17AM
8:44AM
Dec 2
Dec 2
Inbox
B
A
H
Search mail.
Swipe left or right to
archive a message.
Touch and hold to choose
multiple messages, then
select an option at the top.
Compose a
new email.
Tip: In the Gmail app, tap > Settings > Add account.
» Add email accounts: The Gmail app manages all of your email accounts. To add
other personal email accounts to the Gmail app, swipe up > Settings > Users
& accounts > Add account. For Microsoft® Exchange server work email accounts,
tap Add account > Exchange, and enter details from your IT administrator.
» Change account settings: To change the settings for a Gmail or email account, swipe
up > Gmail > > Settings, then tap the account name.
» Delete accounts: Swipe up > Settings > Users & accounts > Google, then tap
the account name. Tap Menu > Remove account.
Calendar
See all your events, all in one place.
Find it: Calendar
Google Calendar screen with today’s events shown by the hour. Tap the New item icon to add an event.
» Change the view: Tap the month at the top to choose a date to view. Or tap to
choose Schedule, Day, 3 Day, Week, or Month.
29
January
29
Fri
10 AM
5 PM
4 PM
3 PM
2 PM
1 PM
12 PM
11 AM
Weekly Project Meeting
Start hangout with Alexis
https://plua.Google.com/hangouts
Pick up snacks for the party
11:35
Jump to a dierent day.
Add a new event.
Tap to refresh the
Calendar screen.
Go to today’s date.
Change the calendar view,
adjust settings, get help,
and more.
More apps
» Go to today’s date: Tap at the top.
» Add events: Tap > Event, enter event details, then tap SAVE.
Tip: Alternatively, tap a time on the calendar to enter event details.
» Show, edit, or delete events: Tap an event to open it, then tap to edit it, or tap
Menu > Delete to remove the event.
» Show, hide, or add calendars: Tap , and select which options, such as events,
reminders or other calendars, to show or hide. You can use a computer to add or
remove calendars on your Google account at www.google.com/calendar.
Tip: Add a Calendar widget to your home screen. Touch and hold an empty spot on the
home screen, tap WIDGETS, then touch and hold Calendar and drag it to your home
screen.
More apps
Google Play™
Google Play is a digital content experience from Google where you can find and enjoy
your favorite music, movies, TV shows, books, magazines, and Android apps and games.
» Download apps: Tap Play Store.
» Log in or open a Google account: Visit www.google.com/accounts.
» Google help: See www.google.com/support.
Contacts
Combine information from your Google contacts and social networks for quick access
to everyone you know.
Tip: You can find most of these features on the Contacts tab in the Phone app. See
Phone.
Find it: Swipe up > Contacts
Contacts screen that shows a list of contacts. Scroll bar on the far right to scroll through contacts. Tap the New Contact icon to add a contact.
Contacts
A
Abe
Allie
Anna Medina
Astrid Fanning
Lauren
Gracie Jo
A Alison
G
L
A
Alison
Tap to view contact
information, call, send a
text message, and more.
Sort contacts, change
settings, accounts, and
more.
Add a contact.
More apps
» Add a contact: Tap .
» Edit or delete: Tap a contact, then tap or tap Menu > Delete.
» Call, text, or Set up: Tap a contact, then tap an option.
» Search contacts: In the Contacts list, tap .
Tip: From the home screen, tap the Google search box and enter a contact’s name.
» Share a contact: Tap a contact, then tap Menu > Share to send it in a message or
email, via a Bluetooth connection, or save to Google Drive™.
Tap a contact, then tap Menu > Add to Home screen to add a shortcut for the contact
on your home screen.
» Synchronize: On your phone, swipe up > Settings > Users & accounts, and
choose your Google account. Then tap Account sync > Menu > Sync now. You can
also see these contacts at www.gmail.com.
» Add your details: To store your user profile, tap > Settings > Your info.
Favorites
Set your most-used contacts as favorites, so you can get to them faster.
» To set a favorite, swipe up > Contacts, select a contact and tap .
» To see your favorites, tap Phone > .
Get contacts
Get all your contacts in one place.
» To add your social networking contacts, swipe up > Settings > Users &
accounts, then tap Add account.
» To add your email contacts, see Gmail™.
Tip: If you add an Exchange account, you can send messages to your coworkers,
even if you don’t have them stored in your contacts.
» To import contacts from your SIM card (if it didn’t happen automatically), swipe up
> Contacts > Menu > Settings > Import > Import from SIM card. Tap OK
to confirm.
» To import contacts from your computer, upload the contacts to your Google account
at http://contacts.google.com. On your phone, swipe up > Contacts > Menu
> Settings > Accounts > Automatically sync data. You can also see these contacts at
http://mail.google.com.
For help with transferring contacts, go to www.motorola.com/transfercontacts.
Maps Go
Find a nearby cafe, get directions or step-by-step GPS voice navigation using Google
Maps™.
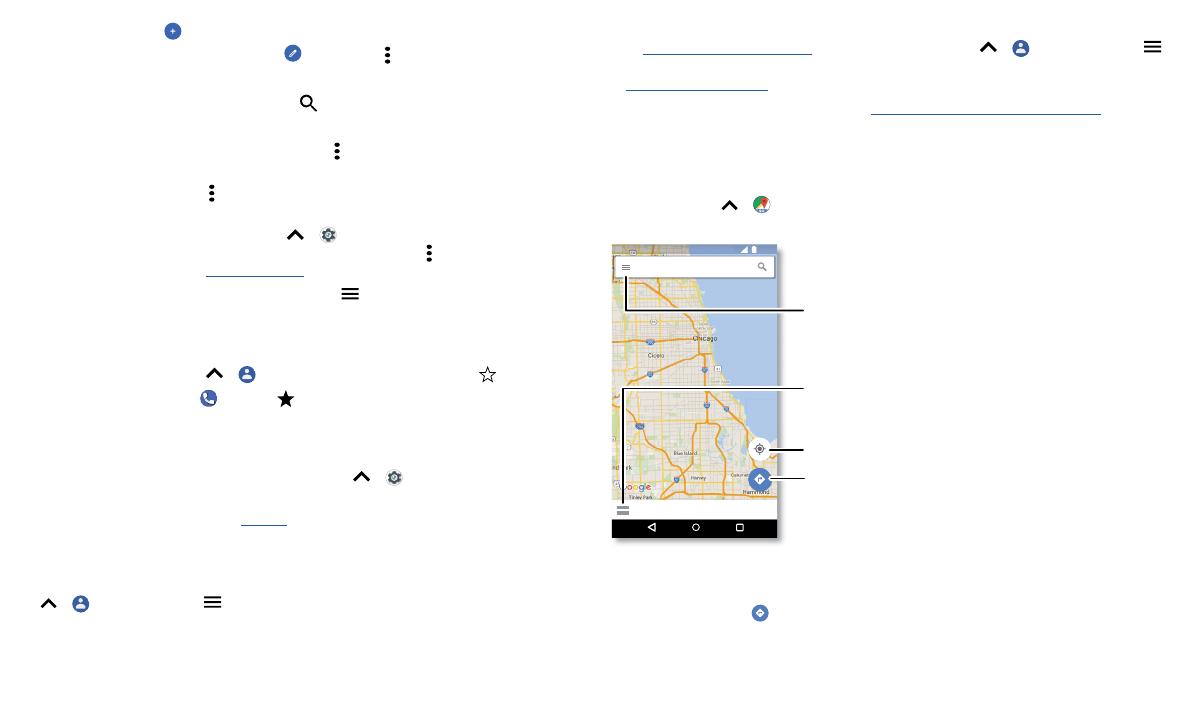
Find it: Swipe up > Maps Go
Your map screen may look dierent.
Google Maps screen. Enter an address or search by voice in the search field at the top of the screen.
» Find an address: In the search field, enter an address or something you’re looking for,
like “restaurant.” Tap a item to see more, or tap CALL or DIRECTIONS.
» Get directions: Tap , then enter a place or address.
» Zoom: To zoom in or out, drag two fingers together or apart on the screen
» Identify address: Touch and hold a spot on the map to show the nearest address.
Tap to see quick actions
Search Google Maps
11:35
See your current location.
Get directions and
navigation instructions.
See directions and map
details.
See your places, map
views, settings, help, and
more.
More apps
» Get map help: Tap > Help.
For more on maps, visit support.google.com/maps.
Music & YouTube
Music
Music everywhere—stream it, buy it, save it, play it. Listen and create playlists anytime.
Find it: Swipe up > Play Music
To upload your music library to Google Play Music, from a computer, visit www.google.
com/music.
Tip: Share songs directly with your contacts. Tap Menu next to a song > Share. See
Direct Share.
For more on the Play Music app, see support.google.com/music.
Note: Copyright—do you have the right? Always follow the rules. See “Content
Copyright” in the legal and safety information on your phone.
FM Radio
Find it: Swipe up > FM Radio
Plug in a headset, then use the arrows to tune to a higher/lower frequency station.
Note: Your phone has the Frequency Modulation (FM) broadcast receiver functionality
for reception without data usage. The phone will perform an auto tuning for the radio
channels with the best signal.
YouTube
Watch videos and podcasts from YouTube users everywhere—or log in to your account
to share your own.
Find it: Swipe up > YouTube
Clock
Swipe up > Clock
Options
Alarm
Tap . Tap an alarm to edit it, or tap to add a new alarm.
Tip: Pressing the volume button up or down while you’re setting
an alarm sets the volume level for that alarm.
When an alarm sounds, tap and drag to to turn it o, or drag
to to snooze for ten minutes.
Clock To change your alarm volume, snooze delay, or other settings, tap
Menu > Settings. For other time zones, tap Home time zone.
Timer For a timer, tap .
Stopwatch
For a stopwatch, tap .
Tip: To set your current date, time, time zone, and formats, swipe up > Settings >
System > Date & time.
  • Page 1 1
  • Page 2 2
  • Page 3 3
  • Page 4 4
  • Page 5 5
  • Page 6 6
  • Page 7 7
  • Page 8 8
  • Page 9 9
  • Page 10 10
  • Page 11 11
  • Page 12 12
  • Page 13 13
  • Page 14 14
  • Page 15 15
  • Page 16 16
  • Page 17 17
  • Page 18 18
  • Page 19 19
  • Page 20 20
  • Page 21 21
  • Page 22 22
  • Page 23 23
  • Page 24 24
  • Page 25 25
  • Page 26 26
  • Page 27 27
  • Page 28 28
  • Page 29 29
  • Page 30 30

Motorola MOTO E5 GO User manual

Category
Mobile phones
Type
User manual

Ask a question and I''ll find the answer in the document

Finding information in a document is now easier with AI