Page is loading ...

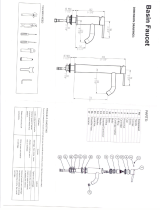
PACKING LIST
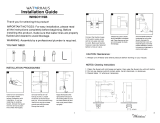
IMPORTANT NOTICES: For easy installation, please read all the instruction completely before beginning.
Before installing this product, make sure that water line trash is cleared to avoid blockage.
YOU MAY NEED
After you open this package, please check to ensure that all of the following items are included.
Two-Handle Basin Faucet
1
EX: E001004 Rev:A
4
TROUBLE-SHOOTING
If you've followed the instruction carefully and your faucet still does not work properly, take these corrective steps.
Problem
Cause
Action
Leaks underneath handle. Cartridge has come loose.
Tighten the cartridge.
Aerator leaks or has an
inconsisitent water flow
pattern.
Aerator is dirty or worn
out or misfitted.
Unscrew the aerator to
clean or replace washer,
or replace the aerator.
Water will not shut off
completely.
Dirty or worn out washer
in cartridge.
Remove handle and cartridge
to check if the washer is damaged
permanently or dirty. Re-install
cartridge.
CAUTION: Maintenance
1. Replacement parts may be available at the store where you purchased your faucet.
2. Always turn off water and relieve pressure before working on your faucet.
NOTES: Cleaning Instructions
1. To keep the faucet clean, you should clean the faucet frequently and regularly.
2. Clean the faucet with clear water or mild liquid, rinse the faucet with clear water and then
dry the faucet with soft cotton cloths.
3. Do not u
se any abrasiv
e cleansers, cloths, or paper towel.
4. Do not use a
ny acid or abrasive detergent.
C
A- Spout Assembly B- Handle Assembly (2) C- Pop-up assembly(Optional)
D-
E-
Rubber Washer (3)
F - Metal Washer (3) Mounting Nut(3)
7. Handle Removal
8. Valve Removal
Optional accessories
A
B
D
E
F
Turn off water and relieve pressure! Detach handle button
using a small flathead screwdriver, unscrew set screw
using Allen Wrench and take off handle.
Remove handles. Unscrew Dome Cap counter clockwise
by hand. Unscrew Retaining Nut using adjustable wrench,
take out cartridge assembly and inspect. Replace parts
as necessary. Reassemble parts by reversing steps.

3
2
2-2
If necessary, tighten screws using a crosshead
screwdriver until the faucet is firmly connected to
the sink.
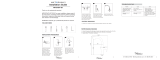
2-3
Place Mounting Nut, Metal Washer and Rubber
Washer over Valve Shank. From underside sink,
insert valve body through mounting holes. The hot
valve, labeled with red tag should be positioned to
the left side of the spout.
F r o m undernea t h s i n k , t igh t e n Moun t i n g N u t
b y T ool . B e f o re f ina l t igh t enin g , m a k e s u r e
V al v e B o d y S i d e C o ] nne c t o r f a c i n g S p o u t
B o d y .
2-4
2-5
F r o m undernea t h s i n k , t igh t e n Moun t i n g N u t
b y Han d . B e f o r e f ina l t igh t enin g , m a k e s u r e
V al v e B o d y S i d e Conne c t o r f a c i n g S p o u t
B o d y .
3
Connect hot and cold water flexible hoses to faucets inlets.
Connect Spout hot water flexible hoses to the Left
Valve Side Connector. Tighten flexible hoses Nut.
Connect Spout cold water supply line to the right
Valve Side Connector.
3. Water Supply Line Connections
4. POP-UP Assembly Installation
As shown. Insert Flange with Washer through Sink
drain Hole. From underside, thread Drain Body into
Flange. Holding the drain body in position with Ball
Rod Opening facing back, tighten Metal Locknut
securely. Thread Drain Tailpiece into Drain body.
2-6
HOT
HOT
COLD
HOT
COLD
COLD
INSTALLATION PROCEDURES
1 2-1
You should clean all the dirts from valve outlets.
Turning off the water supply valves. This is usually
found near the water meter. If you are replacing an
existing faucet, remove the faucet from the sink and
clean the sink surface thoroughly.
1. Turn Off Water Supply
2. Install Faucet
Be sure that O-Ring is placed to the bottom of the
spout body. lnsert Spout Shank through the center
hole of sink. From underneath sink, place Plastic
Washer and Metal Washer onto spout shank and
tighten with Mounting Nut by hand.Before final
tightening, be sure Pop-up Holefacing back.
90
90
Close
Hot
Close
Cold
Open
Open
5.
Valve Function
By rotating the handle closed to the spout, the Valve
will be activated allowing water to flow. The water
flow will increase by continuing to rotate handle. By
rotating the right handle to the left, the water
temperature will decrease to cold flow only. By
ro t a t ing handl e l ef t t o t h e right, t h e w a t er
temperature will increase to hot only.
6.
Faucet Start Up
After installation is complete, remove
aerator and rotate handle to the close
position. Turn on the Water Supply Valves,
and check all connections for leak. Turn
on your faucet and allow both hot and cold
water to run at least one minute each.
Replace Aerator.
MAINTENANCE AND CA RE
/