Real Flame Captiva 900 Installation & Operating Manual

Category
Fireplaces
Type
Installation & Operating Manual

This manual is also suitable for

Real Flame Captiva 900 is a wood-burning fireplace system designed to provide efficient heating and a beautiful focal point for your home. With its 900mm size, it is suitable for larger rooms, offering a generous viewing area of the fire. The Captiva 900 boasts low emissions, complying with Australian Standards AS 2918-1990 and AS4013-1992, ensuring a clean burn and reduced environmental impact.

Real Flame Captiva 900 is a wood-burning fireplace system designed to provide efficient heating and a beautiful focal point for your home. With its 900mm size, it is suitable for larger rooms, offering a generous viewing area of the fire. The Captiva 900 boasts low emissions, complying with Australian Standards AS 2918-1990 and AS4013-1992, ensuring a clean burn and reduced environmental impact.

LIGNA OPEN FIREPLACE SYSTEM
INSTALLATION & OPERATING MANUAL
VERSION 1
2
STANDARDS
DIMENSIONS
The installation detail contained herein complies with Australian Standards AS 2918-1990 for Safe
I
nstallations and AS4013-1992 for Low Emissions, as tested and approved by HRL Technology
Pty. Ltd. an approved testing laboratory of The National Association of Testing Authorities Australia
(NATA).
MODEL DIMENSIONS (mm) FLUES
A B C D E Inner Outer
700 780 706 450 205 680 225 280
800 900 715 475 230 800 250 300
900 1020 780 500 260 920 280 330
75
75
3
Enclosure Requirements. (Fig 2.)
The enclosure must be of non-combustible materials
i.e. masonry, 75mm Hebel blocks or equivalent
material as otherwise specified by the manufacturer
The enclosure must completely surround the sides,
back and breast above the unit, as shown in Fig 2.
Place the insulation on top of the units gather and
tuck into enclosure.
NOTE: Timber framing can directly abut i.e. Zero
Clearance (0mm) the outside faces of the sides and
back of the non-combustible enclosure.
For flue clearances to timber framing above the non-
combustible enclosure refer to instructions headed
Flue Clearance Requirements.
Fig 2.
MINIMUM INSTALLATION REQUIREMENTS
Base & Forehearth Requirements. (Fig 1.)
BASE
Must be constructed of non-combustible materials i.e.
c
oncrete slab, brickwork or Hebel blocks. The base
must be a minimum of 75mm thick.
NOTE: On timber floor applications 6mm cement
sheeting is also required beneath the base and
forehearth in addition to the selected 75mm (min.)
non-combustible base material.
FOREHEARTH
The forehearth must project a minimum of 300mm
forward of the face of the Ligna unit and extend
200mm on each side of the unit. This must also be
constructed of non-combustible materials at least
75mm thick as detailed above.
Fig 1.
Flue Clearance Requirements.
TIMBER FRAMED FLUE ENCLOSURES
(
Fig 3a.)
Use the twin skin ventilated flue system,
(stainless steel inner flue and galvanised outer
flue casing) if the flue is to be enclosed with
combustible materials like timber framing and
plaster board or left exposed.
A minimum clearance of 25mm must be
maintained between the flues galvanised outer
casing and any combustible materials.
MASONRY FLUE ENCLOSURES (Fig 3b.)
Use the single skin stainless steel flue system.
If the flue is to be completely enclosed with non-
combustible materials (i.e. 110mm Brickwork,
75mm Hebel blocks). This can abut (Zero
Clearance) to masonry.
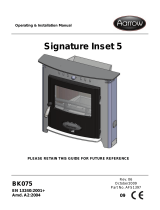
FLUE ROOF PROJECTION REQUIREMENTS
(Fig 3c.)
If dimension (A) is more than 3.6 metres away
from the ridge then the flue must project at least
600mm above the highest point of exit at the
roof line.
If dimension (A) is less than 3.6 metres from the
ridge, the 600mm minimum is to be maintained
plus an additional projection of 300mm above
the ridge height.
NOTE: Use a minimum of 3.6 metres of flue
from the top of the unit.
Timber Mantlepiece Clearance
Requirements.
(Fig 4.)
Timber mantle shelves must not be less than
400mm above the unit and must not project
more than 250mm forward of the face of the
unit.
Timber legs of overmantles must be at least
100mm away from the sides of the opening of
unit at which point the legs must not project
forward of the face of the unit by more than
50mm.
Fascia area can be finished in a suitable non-
combustible material as selected.
NOTE: Some local authorities may require a permit for the
installation. We advise you to check and arrange if so
required.
Fig 3a. Fig 3b.
Fig 3c.
Fig 4.
4
MINIMUM INSTALLATION REQUIREMENTS (Continued)
5
INSTALLATION PROCEDURE
1 Position unit on finished hearth base. Do not restrict air intake at base of unit.
(
Refer minimum requirements, Base & Hearth Fig1.)
2. Ensure gather is bolted tightly onto unit.
3. Fit Flues as follows.
T
WIN SKIN FLUE SYSTEM
Where flues are to be left exposed or surrounded with combustible materials, the twin skin
ventilated flue system is required. (Refer minimum requirements - Flue clearances Fig.3)
Position Stainless Steel Inner Active Flue (crimped end down) into collar of spigot. Rivet to collar at
4 points and thereafter 4 at each flue joint.
Position Outer Flue Casing (crimped end up) over inner flue and space with 25mm self tapping
screws, 4 at bottom then 4 at each flue casing joint. Ensure flues are structurally secure.
Maintain at least 25 mm clearance between outer casing and any combustible materials.
SINGLE SKIN FLUE SYSTEM
Where flue is to be fully enclosed in masonry or other non-combustible material, only the single
skin Stainless Steel Active flue is required.
Position Stainless Steel Inner Active Flue (crimped end down) into collar of spigot. Rivet to collar at
3 points and thereafter 3 at each flue joint.
Clearance between masonry and flue is not necessary.
N.B. FLUE OFFSETS
45 degree flue bends can be positioned directly onto the gather collar of the unit. Use at least 2 x
900mm lengths of flue following last bend upright. Use a minimum 3.6m length of flue from the top
of the unit.
4. Construct enclosure as required and place the insulation provided on top of unit, gather
and below optional brickwork lintel. (Refer minimum requirements, Enclosures Fig 2.)
5. Fit Cowl into inner stainless steel flue and secure. Seal and flash flues appropriately.
6. Place log grate and ashpan in position.
6
INSTALLATION PROCEDURE (Continued)
Cowl Top
7
REAL FLAME PTY LTD
ABN 76 006 311 155
Head Office/Factory/Showroom
1340 Ferntree Gully Rd.
Scoresby Vic 3179
P
h: (03) 8706 2000 Fax: (03) 8706 2001
Richmond - VIC Showroom
300 Swan St.
Richmond Vic 3121
Ph: (03) 9428 4443 Fax: (03) 9428 4445
Dandenong - VIC Showroom
3/328 South Gippsland Highway,
Dandenong South Vic 3164
Ph: (03) 9702 7853
Geelong - VIC Showroom
1/2A Gordon Avenue.
Geelong West Vic 3218
Ph/Fax: 5229 0844
Sydney - NSW Showroom
546 Pacific Highway.
Chatswood NSW 2067
Ph: (02) 8905 0189 Fax: (02) 8905 0192
Miranda - NSW Showroom
36 Kareena Rd
Miranda NSW 2228
Ph: (02) 8513 6202 Fax: (02) 9520 1974
Adelaide - SA Showroom
173 -175 Magill Rd.
Norwood SA 5067
Ph: (08) 8132 0371 Fax: (08) 8132 1687
Miton - QLD Showroom
46 Douglas St,
Milton QLD 4064
Ph: (07) 3368 2011
Perth – WA Showroom
47-53 McDonald St East,
Osborne Park WA 6017
Ph: (08) 9444 9900 Fax: (08) 9444 9800
Fyshwick – ACT Showroom
88 Wollongong St,
Fyshwick ACT 2609
Ph: (02) 6280 5522
Ulverstone – TAS Showroom
31A Victoria St,
Ulverstone TAS 7315
Ph: (03) 6425 4440
  • Page 1 1
  • Page 2 2
  • Page 3 3
  • Page 4 4
  • Page 5 5
  • Page 6 6
  • Page 7 7
  • Page 8 8

Real Flame Captiva 900 Installation & Operating Manual

Category
Fireplaces
Type
Installation & Operating Manual
This manual is also suitable for

Real Flame Captiva 900 is a wood-burning fireplace system designed to provide efficient heating and a beautiful focal point for your home. With its 900mm size, it is suitable for larger rooms, offering a generous viewing area of the fire. The Captiva 900 boasts low emissions, complying with Australian Standards AS 2918-1990 and AS4013-1992, ensuring a clean burn and reduced environmental impact.

Ask a question and I''ll find the answer in the document

Finding information in a document is now easier with AI