Page is loading ...

CUTTING:
Use a fine-tooth hand saw or power saw with a combination blade. Cut into the exposed face of the
material. Carbide-tipped blades are recommended.
FASTENING REQUIREMENTS:
MiraTEC trim is a non-structural decorative trim product and should not be used where structural
lumber properties are required. MiraTEC trim is designed to be applied to structural framing, sheathing
and other materials.
* Note: Nail at least 1/2˝ from the edge. Do not nail into the edges of MiraTEC trim. For 4/4 and 5/4 fascia and soffit
applications, MiraTEC trim can be fastened directly to the rafter ends, double nailed a minimum of 24˝ on center. For 5/8
fascia and soffit applications, MiraTEC trim must have a sub-fascia and be nailed 16˝ on center to the rafter ends or sub-
fascia. For all other horizontal and vertical applications, double nail 16˝ on center, falling on the studs.
Fasten MiraTEC trim from DO NOT nail toward the
one end to the other end. center from both ends.
BUTT JOINTS:
All joints must fall over a framing member. MiraTEC trim can be mitered, scarfed, or beveled as required.
For runs less than 30 feet in length, butt joints should lightly touch. For runs over 30 feet in length, space all
butt and scarf joints 1/8˝ apart and apply sealant into the full depth of the 1/8˝ joint. Double nail all joints
on both sides as noted in the diagram.
When mitering for column wraps or corner boards, JELD-WEN, inc. recommends gluing the edges of the
trim to maintain a tight joint. Use a quality exterior grade yellow carpenters glue or high quality poly-
urethane adhesive. Lightly ease the edge of the finished corner with 220 grit sand paper for best paint
adhesion.
FASTENERS:
Always use fasteners appropriate to the style of construction where the trim is installed. Fasteners must be equal or
better in performance (such as nail withdrawal, bending strength and corrosion resistance) to 6d or 8d 16 gauge finish
nails or headed nails, long enough to penetrate 1 1/4˝ into structural wood studs or studs and structural sheathing
material. Use nails with corrosive resistance equivalent to hot dipped galvanized nails. For buildings utilizing steel studs,
use ET&F fasteners: AST-075 for 4/4 MiraTEC and AST-100 for 5/4 MiraTEC. For installations near oceans, large bod
-
ies of water or in high humidity climates, JELD-WEN, inc. recommends using stainless steel fasteners on MiraTEC trim.
For these installations, do not use electro-galvanized fasteners, due to poor long term rust resistance.
Power or pneumatic nailing systems may be used. Visit www.miratectrim.com for information on air pressure settings
on a variety of pneumatic nailers. Tapered or bugle head fasteners are permitted when the heads are properly sealed
from moisture.
Nail heads, or any other dents, can be filled with exterior grade spackling putty specifically designed for filling nail holes.
Allow putty to dry, sand smooth with 100 grit sandpaper and spot prime before painting. Over time, spackling putty
may need to be replaced or touched up. For the best aesthetic appearance when using the smooth side of MiraTEC
trim, additional work is required. The nails should be set flush or slightly countersunk (not to exceed 1/8˝). Then apply
the spackling putty as outlined above. Reapply the putty as needed for desired appearance.
Use a nail that is appropriate to the style of construction. Do not use staples, braids, or t-nails.
GENERAL INFORMATION: MiraTEC Treated Exterior Composite Trim is an engineered
wood composite trim designed for use in both exterior and interior applications where a non-structural
smooth or wood grain textured blemish-free trim product is desired. MiraTEC trim resists moisture, rot
and termites. Before starting any work, consult all local building codes and follow where applicable when
installing MiraTEC trim. MiraTEC holds ESR-3043 from the ICC-Evaluation Service.
APPLICATION INSTRUCTIONS
Patented
16'' O.C.
Framing
1/2'' min
Continuous
horizontal
flashing with
drip & 2˝ (min.)
overlaps
& joints
Siding
Window or door
head casing, water
table or other
horizontal trim
Gap 1/8''
Seal Joint
Double nail on both sides of butt joint
CORRECT
INCORRECT
16'' max
16˝ O.C.
Fascia Application
Rafter
Fascia
24" max
Sub-fascia is
recommended
in regions of
high humidity
or extreme
humidity changes.
CONDITION
Snug
Flush
Visible ber
Counter sunk
1/16˝ - 1/8˝
Counter sunk
more than 1/8˝
CONDITION
OK
OK
Paint
Exterior putty
Exterior putty &
add nail
16'' O.C.
Framing
1/2'' min
Continuous
horizontal
flashing with
drip & 2˝ (min.)
overlaps
& joints
Siding
Window or door
head casing, water
table or other
horizontal trim
Gap 1/8''
Seal Joint
Double nail on both sides of butt joint
CORRECT
INCORRECT
16'' max
16˝ O.C.
Fascia Application
Rafter
Fascia
24" max
Sub-fascia is
recommended
in regions of
high humidity
or extreme
humidity changes.
Glue
Mitered
Edges
Rafters
Fascia
16"
max
MiraTEC 5/8˝
fascia requires
sub-fascia in
regions of
high humidity
or coastal areas.
5/8˝ Fascia Application

FLASHING AND MOISTURE CONTROL:
The structure on which MiraTEC trim is applied should be well ventilated and dry. Do not apply
MiraTEC trim over wet sheathing, or any closer than 6˝ to finished grade or final landscaping. As with
all wood products, MiraTEC trim shouldnot come in direct contact with masonry or concrete. At
foundations or exterior brick veneer, the product should be separated from the masonry by metal
flashing, polyethylene film, 30 lb. felt or a 1/4˝ to 1/2˝ air space using masonry standoffs. In all applications,
MiraTEC trim should not be allowed to stand in water.
Seal the trim applications to prevent water intrusion. Do not allow water to stand on or leak
behind any MiraTEC trim. MiraTEC trim used in a horizontal application, including window
and door headers, must be properly flashed in accordance with the siding manufacturers’,
window manufacturers’, or door manufacturers’ application requirements and local
building codes.
SPECIFIC APPLICATIONS
For applications near rooflines, such as dormer and chimneys, the trim should be installed with a minimum of 1˝ clearance between the roofing
and the bottom edge of MiraTEC trim. At the junction of the roofing material and vertical surfaces, flashing is required per the roofing manufac-
turers’ application requirements and local building codes.
16'' O.C.
Framing
1/2'' min
Continuous
horizontal
flashing with
drip & 2˝ (min.)
overlaps
& joints
Siding
Window or door
head casing, water
table or other
horizontal trim
Gap 1/8''
Seal Joint
Double nail on both sides of butt joint
CORRECT
INCORRECT
16'' max
16˝ O.C.
Fascia Application
Rafter
Fascia
24" max
Sub-fascia is
recommended
in regions of
high humidity
or extreme
humidity changes.
MiraTEC trim
Flashing
1/2˝ Space
MiraTEC
MiraTEC trim
Flashing
1˝ gap
between
the shingles
and trim
MiraTEC trim
Flashing
1/2˝ Space
MiraTEC
MiraTEC trim
Flashing
1˝ gap
between
the shingles
and trim
MiraTEC
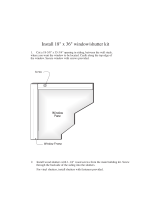
Shutters
24˝ max.
spacing
1/2'' Gap Between
Trim and Flashing
Flashing
MiraTEC
Flashing
MiraTEC
MiraTEC
1/4˝ Clearance
Properly flash and space at
least 1/2˝ from any concrete
flatwork (such as porches,
patios, or driveways) or
horizontal brick ledge.
MiraTEC trim can be used to make
decorative shutters. The shutter must
be fastened to the home a minimum of
24˝ on center around the perimeter of
the shutter as shown in the illustration.
Working shutters will not be covered
under the MiraTEC warranty due to the
inability to provide adequate fastening
on the non hinge side of the shutter.
When facing the skirt boards on deck, prop-
erly flash the top edge to prevent water from
getting behind the trim. As a substitute for
flashing, use 1/2˝ standoffs to provide a space
behind the backside of the trim and the deck
skirt board.
When vertical trim meets
flashing at the top of
trim or siding, provide a
1/4˝ clearance from the
bottom of the trim to the
top of the flashing.
ADHESIVES:
Glues or adhesives can be used on MiraTEC trim such as on mitered joints for outside corners or column wraps. Use a high quality exterior
grade yellow carpenters glue or a high quality polyurethane adhesive.
SEALANT:
Sealant is required at butt joints and where MiraTEC trim abuts siding, windows, doors or other materials. Use only exterior quality sealant
that remains flexible over time. Do not use hard-setting caulk. Apply caulk according to the manufacturer’s written instructions. JELD-WEN,
inc. recommends caulks and sealants that meet ASTM C920. Do not use Bondo
®
or similar hard setting fillers or putties on MiraTEC trim.
They will crack over time due to the natural expansion and contraction of the trim.
SURFACE PREPARATION:
The surface to be painted must be free of dust, dirt, mildew and other foreign materials before painting. Wash with water and a mild deter-
gent to remove dust and dirt. Allow the surface to dry before painting. If mildew is present, contact a paint supply store for recommended
methods of removing and controlling mildew.

GENERAL INFORMATION:
Paint performance is dependent upon the quality and quantity of paint applied, and the conditions under which it is applied. Low quality paint
and/or thinly applied paint tends to last for a relatively short time, resulting in discoloration, premature fading, inadequate substrate protection,
and frequent repainting - sometimes as often as every one or two years. Top quality paint, applied in sufficient quantity, will provide the best
performance with minimum maintenance. Follow the coating manufacturer’s recommendations when selecting and applying
a paint. Refer to the MiraTEC trim warranty for long term care and maintenance guidelines of MiraTEC trim.
PAINTING/FINISHING REQUIREMENTS:
MiraTEC trim is manufactured from wood and must be painted with an exterior coating system in accordance with the following specifica-
tions to fulfill the warranty requirements.
Use a high quality exterior grade acrylic latex paint or oil/alkyd solvent based paint system recommended by the paint manufacturer for ap-
plication over composite wood substrates. Always follow the paint manufacturer’s recommendations for the application and maintenance
of field applied paints. The following topcoats ARE NOT recommended by JELD-WEN, inc. or most paint manufacturers because of short
service life, poor protection against UV light, and higher potential for performance problems:
Shake and shingle paints Vinyl acrylic paint Transparent or semi-transparent stains
Flat oil paint Vinyl acetate paint Opaque solvent stains
Vinyl acetate co-polymer paint Clear coatings
PAINT APPLICATION:
1. Prime all exposed field-cut edges of MiraTEC trim and also topcoat those edges which will be exposed to the weather. Use a high quality
exterior primer formulated for use on composite wood. All cut or raw edges should be primed within 30 days of installation.
2. Coat all exposed surfaces including the bottom edge.
3.
Finish MiraTEC trim with two coats of paint within 90 days of installation. If, due to unforeseen circumstances, the material is not painted
within 90 days, reprime the MiraTEC trim using an exterior primer that is specifically recommended for use on composite wood products
and is compatible with the topcoat to be used. Use the same primer for repair of any damage to the original factory-applied primer.
4.
A total field-applied dry film paint thickness of a minimum of 2½ mils is required on MiraTEC trim.
This requires the application of two or
more unthinned coats of paint at the spread rate recommended by the paint manufacturer. Note: The paint manufacturer may
require a primer and topcoat combination. Follow all paint manufacturers’ recommendations.
5. Paint performance can be impacted by ambient temperature and the time of day the paint is applied. Contact the paint manufacturer for
specific instructions on applying the coating for maximum results. Most companies can be contacted via a toll free number or website
for specific information. Consult your retail store for information.
JELD-WEN, inc. is not responsible for the performance of field applied finishes. Finish performance is dependent upon
coating quality and application methods. These factors are controlled by the finish manufacturer and applicator.
BOARD AND BATTEN APPLICATION
MiraTEC trim is not approved for use as a cladding or siding product. However, the 2˝ MiraTEC batten product is acceptable for use in a
board and batten application. 2˝ MiraTEC batten can be applied directly on top of the board material, including but not limited to: fiber
cement products, composite wood, and other wood products.
• Battens should fall over framing members. The required nailing pattern is
single nails 12˝ on center, staggered pattern. Nails should be of sufficient
length to have 1
¼
˝ penetration into the framing member.
• Vertical battens do not need to be caulked. The board butt joint
behind the batten should be treated per the siding manufacturers’
recommendations.
• Battens can also be screwed into boards and sheathing over framing
members. Screw type should be a minimum of a 6 mm head with full
thread penetration into the board or minimum of 3/4˝ into the framing
member. The required screw pattern is single screws 12˝ on center,
staggered pattern.
• A combination of nails and glue can
also be used to fasten 2˝ MiraTEC
batten.
• Treat all other applications per
the full MiraTEC Application
Instructions, such as inside and
outside corners, butt joints and
horizontal applications.
Staggered Nailing
2˝ MiraTEC battens
Apply caulk
Apply caulk
Caulk optional
Staggered Nailing
2˝ MiraTEC battens
Apply caulk
Apply caulk
Caulk optional
Staggered Nailing
2˝ MiraTEC battens
Apply caulk
Apply caulk
Caulk optional
Staggered Nailing
2˝ MiraTEC battens
Apply caulk
Apply caulk
Caulk optional

MACHINING:
MiraTEC trim can be grooved or machined to produce a variety of decorative applications. The machined
profile should not compromise the physical integrity of the board or induce cracking or splitting of the prod-
uct. Routed or grooved MiraTEC trim should not have any flat surfaces where water can accumulate. Maintain
an angle of at least 100 degrees from the vertical to provide positive drainage and to prevent moisture from
standing on the surface. Re-prime all machined areas with a high quality exterior oil or acrylic latex primer
formulated for composite wood. JELD-WEN, inc. recommends using an oil-based primer.
STORAGE:
Cover when stored outside. Keep MiraTEC trim off the ground and dry. Ex-
cessive moisture pickup from improper storage may affect the performance
of MiraTEC trim. Do not stack material in excess of 3 units high.
For job site storage, the material should be placed on stringers and covered,
preferably on concrete, asphalt, or similar surface. For all other instances, a
tarp should be placed over the ground cover under the stringers, with the
material still under cover.
TYPICAL TRIM USES:
MiraTEC trim can be used in a variety of applications as noted below.
Patented
IMPORTANT: Read and understand all application instructions before installing material. The statements expressed in this technical bulletin are the recommendations for the applica-
tion of the products as outlined and illustrated under normal conditions of installation. JELD-WEN, inc. is a manufacturer of building materials. It does not practice architecture or
engineering. The recommendations provided in this bulletin represent JELD-WEN, inc.’s best judgement based on its experience to date with normal applications. These instructions
supplement standard building practices and building code requirements; they are not to be deemed exclusive or exclusionary of these practices and requirements. Unless prior ap-
proval is obtained in writing from the Product Performance Department of JELD-WEN, inc., PO Box 311, Towanda, PA 18848, any deviation from these recommended procedures
shall be at the risk of the installers.
These application instructions are the minimum requirements for the storage, application, and finishing of the trim products manufactured by JELD-WEN, inc. Where building code
requirements or standards are more restrictive, the applicable regulations must be followed. Consult your local representative or the Product Performance Department for condi-
tions not covered by this bulletin. All drawings are shown for illustration purposes only and are not to scale. Adequate design and bracing of the walls, as well as compliance with
these application instructions, are the responsibility of the architect, builder, applicator and painter.
5/16'' max depth
5/16'' max depth
5/16'' max depth
5/16'' max depth
5/16'' max depth
5/16'' max depth
Examples of machining
Ground tarp
Tarp to cover
MiraTEC
MiraTEC trim
1
2
3
4
5
6
7
6
8
9
10
1
2
3
4
5
6
7
8
9
10
Soffit
Frieze board
Fascia
Belly band or band board
Window trim
Corner board
Rake board or shingle mold
Architectural porch detail
Column wrap
Fluted door casing
© 2013 JELD-WEN, inc. All rights reserved. All
trademarks and service marks (registered and
unregistered) shown are owned by or licensed
to JELD-WEN, inc. or its affiliates.
110 1/14
R 20827
Class C Fire Rating
Flame Spread 120
Smoke Developed 90
1.800.255.0785
miratectrim.com
/