GIRBAU EH030 Operating Instructions Manual
- Category
- Washing machines
- Type
- Operating Instructions Manual

Training – Start up procedures
Vended – Logi – Logi Pro controls
Reference manuals:
(1) Operating Instructions Manual for Vended washers Cod. 598144 Rev.
11/0717 or higher X-Series control with Profit Plus
(2) Operating Instructions Manual for Logi control washers Cod. 523340 Rev.
11/1218 or higher section 1-6 Logi Control
(3) Operating Instructions Manual for Logi Pro control washers Cod. 523340
Rev. 11/1218 or higher section 7-8 Logi Pro Control
Rev. 01/0419

2
Safety Instruction

3
Safety Instructions

4
Safety Instructions

5
Safety Instructions

6
Introduction and Use (Vended control & profit plus)
This guide is intended to inform owner/operator of operation and basic equipment set up
for vended controlled washing machines with extra options.
Vended X-series control for EH20, 030, 040, 060, 080 and 090 soft mount units plus
REM025, RMG033, 040, 055 and 070 rigid mount units.
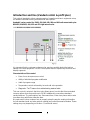
It is important that the customer understand as much as possible during the training
startup of the new equipment. Use the control panel above to explain key functions and
display segments.
Characteristics of the control
• Ease of use microprocessor control
• Ability of individual program modification
• Audit of program usage
• Temperature control achieved by hot and cold valve operation
• Diagnostic “TesT” feature for troubleshooting washer faults
This new control is unique in that it not only allows ease of use but that it has extended
revenue options that can provide up to 30-40% additional income above standard
vended washers. The extra options are: Extra wash time, Extra rinse phase and/or extra
rinse time along with Extra extraction time.
We next want to show customer how to properly setup the washer vending information
for both standard vend and extra options vending best suited for owner’s location. These
settings may vary depending on location. (Consult with owner)

7
Access to Advanced use Mode. All models
With power on, open loading door. Press and hold down key 1 until the COD report
shows on display then release. Next we enter the 4 digit security cod and display will
show “0000”, enter the code a second time and display will show “0000”. Next the
display will show “Pro”. You are now in the advanced menu.
The chart showing all menu’s located in this setup is next. The advanced use mode
offers some menus, which allow the modification of program contents, the price
management of programs and the modification of operation parameters.
Using the washer keypad numbers 2 & 4 you can move back and forth through the menu
choices. Once menu is selected use number 1 to scroll through the menu and use
numbers 2 & 4 to make changes.
For this training the chart provides an explanation of each menu but we will concentrate
on the basic parameters for setting up washer for use. These menus are CASH, EoPt
and Mod. For other menu options refer to the “Operating Instructions Manual for
Vended washers, Cod. 598144 Rev. 11/0717 or later.
Cash (program vend price)
With display showing Pro use key number 2 and move to option indicated CASH. Press
key number 1 to show PR1 indicating program 1, press number 1 to show current price.
To increase price, press number 2 to decrease price or press number 4 until desired
price is showing. Next press number 1 to show PR2 indicating program 2, press number
1 to show current price and use number 2 or 4 to make change. Continue with these
steps until all four programs have been set. Next press Stop 1 time to return to main
menu CASH
EoPt (extra options set up and vend price.
On machines with extra options, the EoPt menu makes it possible to modify the
parameters of these options. With display showing CASH use number 2 key to move to
show EoPt,

8
The extra options are extra wash, extra rinse and extra spin. Each option can be
selected independently from each other, once the washing program has been selected.
In the EoPt menu each of the extra options can be turned off if desired.
In the case of extra wash, the user can choose between turning off and increasing time
of wash phase 2.
In the case of extra rinse, the user can choose between increasing time of wash phase 2
and adding a new phase. Phase 2 and 3 must be active.
This same menu makes it possible to enter pricing for the selected options.
The chart shows each option, option selections and the option default status. Under
EUA we see under options 0 – Off, 1 – Increases the wash time in Phase 2 and 2 –
Adds washing phase. The option 2 adding wash phase is not allowed in USA/Canada
models, only adding of time. The next parameter Ut-x (extra washing time in minutes)
allows for selection of 1 – 9 minutes with default at 1 minute.
Note:
Based on what we see in the open markets these times are normally set at a
minimum of 2 minutes with a cost of $0.25 per minute. In the Eri (extra rinse) when
option 2 is selected (adds rinsing phase 5) the cost needs to increase due to the
added water along with time.

9
With display showing EoPt press number 1 and display will show EUA 1, indicating extra
time selection, if you want to turn off this feature press number 2 – 4 to change. If extra
time is what you want press number 1 and display will show UT-x 1 indicating 1 minute
of time. To increase time press number 2 until desired time shows. Press number 1 and
display will show 00.00 indicating vend price. Press number 2 and price will increase by
0.25 with each press of key, to lower vend press number 4 key. Once vend is satisfied
press number 1 and display will go to next option Eri 1 indicating extra rinse time.
Continue sequence indicated above until all options are selected and priced. To exit
back to main menu press stop and display will show EoPt. Press number 2 until display
shows Nod.
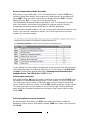
Mod (Nod) Modification of operational parameters
The Mod menu allows the user to modify the operation parameters of all programs, in
this menu any change made affects all 4 programs as a group. Below we see the
summary table of all changeable parameters, at this time we only want to change the
SP-0 setting.

10
As we can see there are several options in this menu screen. The one we want to
address is SP 0 showing in chart as Levels of suds prevention. What it doesn’t tell us
is that it is also the setting for Energy Star programs. These default programs use lower
water levels, lower water temperatures and shorter cycle times.
If we want the washer to work at a standard level of customer satisfaction, we need to
change this setting from SP-0 to SP-1. This will increase the main wash levels,
temperature and times of cycles.
Note:
In order to understand the change of cycles from SP-0 to SP-1 look in section
6.2.2 Program contents. USA configuration, all models. SP-0 and compare to
EH020 and REM025 models. SP-1, SP-2, SP-3. Other EH and RMG models SP-1.
To change setting SP-0 to SP-1, washer display shows Nod, press number 1 until
display shows SP-0, press number 2 and change to SP-1. Press number 1 and you will
hear a long beep then display will show Id-0.
Note: The Id setting is the connection setting for Card systems that allows for the
card provider to communicate directly with washer control through an interface
set up. All washers connected to card systems using this interface requires the Id-
0 setting to be changed to Id-1.
Activation of card system interface;
With display showing Id-0 press number 2 and display will show Id-1 indicating
activation. Press number 1 to confirm change and display will show Nod.
At this time we have completed all standard washer settings and units are now ready for
customer use.
To exit the COD settings press the stop key and display will show door indicating door is
open or Sel indicating door is closed and that washer is in ready mode.
Machine Operation
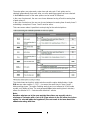
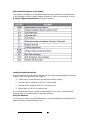
Main reports that appear on washer display are shown in chart;
Loading the washing machine
Open the loading door and load the machine. Washer load recommendations according
to the type of linen to be washed;
a. Cotton fabrics: nominal load of approximate machine capacity
b. Synthetic fabrics: between 80 & 90% of nominal load

11
c. Delicate fabrics: between 50 & 60% of nominal load
d. Mixed fabrics: between 80 & 90% of nominal load
Do not overload the machine; the door must be able to close easily. Overloading the
machine leads to excessive strain on machine operation.
Using the dispenser
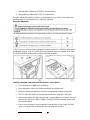
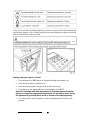
Fill the compartments with the corresponding products, according to these symbols.
In fig. 4.5 we see the front loading dispenser system used only in EH020 models with a
pump drain system. In fig. 4.6 we show the top mounted dispenser system on all other
EH, REM and RMG models with exception of EH090 washers.
Starting a program, machines with Profit plus Control (EoPt)
• Close loading door, SEL report on display.
• Place detergent, bleach and softener products in the dispenser
• Select the desired program by pressing corresponding number on key pad
• The LED light will show next to program selected and vend price will flash
• Select extra options you want by pressing corresponding key of feature, for each
selection the vend price will be added to program selection indicating total vend
for selected options
• Insert correct number of coins required to start washer or insert card. Once all
coins or card has been inserted, the selected program will start.

12
Sequence of starting a program is the same for all vended controls with the Profit Plus
control. Start signal activated by satisfying vend price, signal is sent to door lock to start
locking process and to drain valve causing valve to close.
Door lock normally open: after the lock has received a start signal, a 30 second delay
time is started, during this time the drum rotation and water inlet operate at short
impulses and door remains unlocked. Anytime during this period, the operator can open
the door without losing vend. At the end of the 30 seconds the door will lock and the
cycle time starts.
Door lock normally closed; after lock has received a start signal the door lock starts a
timed count down of 30 seconds during which time the door can be opened and closed
without losing the vend. At the end of the 30 seconds the door will lock, if handle is in
latched position, and cycle time starts. If door handle is left in open position the washer
will go into a door alarm mode, move handle to latched position and cycle will start.
Note: All microprocessor controls will not allow door to be opened if washer still
has water in drum. Level control needs to read empty prior to door unlocking.
Unbalance switch control – EH soft mount models only
After starting the spin (extract), the inner tub moves during the distribution of linen. At
any time the inner drum moves in excess and the balance switch is activated, the drum
will stop, rotate back and forth to redistribute the linen and retry the extraction.
If there’s still unbalance and the balance switch is activated a third time the washer will
end cycle and after the door unlocks, the control will show End/bAL.
Unbalance impedance – All VFD drive models
All washers that use inverter drive systems (VFD) have what we call an impedance
unbalance. This is different than a switch control in that when the micro receives a high
current signal from the VFD, it will hold the power output to motor at a constant level until
the micro signals that current levels are normal.
At that time the increase of speed is resumed. If the current levels remain out of
sequence then the washer will finish the time and end cycle. This means that the washer
could complete cycle at less than normal spin speed.
This anomaly is caused by an inconsistent linen load;
Example would be a heavy quilt and all other items sheets, when items separate in
drum, it takes more motor power to lift the quilt than the sheets, causing a motor
imbalance.
Water valves
We list water valves for sole purpose of explaining the operation when filling. In the CGI
equipment when filling, washer uses a thermistor to control which valve opens.
Example: program calls for 140F water, this signals control to open hot valve only until
the thermistor temperature is satisfied. At that time the hot fill valve closes and the cold
valve opens. The washer will continue fill by alternating hot and cold valves until level
and temperature is reached.
This means that only the hot valve or cold valve is open at any given time never at same
time.

13
Thermister; is a probe located under washer outer drum at its lowest point just left of
center, where it will allow contact with water entering washer drum. The temperature of
the water is sent from thermister to washer control and in turn the control activates fill
valve required to produce programmed temperature of wash bath.
At this point the washer’s control signals the VFD regarding speeds and rotations.
Control times out, allowing washer to drain and start next sequence of programming until
final phase at which time the unit has final draining and extraction starts. After extraction
is completed washer drum rotates to a stop allowing for door to unlock ending
programmed cycle.
Stop modes
• End of cycle; when programmed cycle is finished the display shows “End” with
door open light on is considered normal
• Interrupting a program; during a cycle operation the stop can be activated at
any time. Pressing the “Stop” key and holding for 3 seconds, signals the control
to turn off all power to washers outputs allowing drain to open, door unlock time
count down and all other cycle functions to halt. Once control times out and door
open light shows it is possible to open door. With this scenario, if the door is
opened the customer will lose vend. If customer leaves door closed and presses
the program number that they were using the door will relock and cycle will
resume at the beginning of the phase in which stop was pressed and complete
cycle.
Note: All controls using software 31/65 and later has a 3 second delay when
pressing stop key, indicating key has to be pressed and held in for 3 seconds to
activate.
• Interruption of power supply; In case of a power failure to building or individual
unit, the micro no longer controls the door lock. All locks have a thermal device
that hold door lock in lock position. It can take up to three minutes for this device
to cool down to a point before the customer or person can open door.
Note: If at some time the washer cycle finishes and the door fails to unlock, you
can turn off power to washer and wait for 3-5 minutes, then push in on the door
then pull to open. After door is opened you can restore power.
Introduction and Use (Logi control)
This guide is intended to inform owner/operator of operation and basic equipment set up
for Logi controlled washing machines.

14
On Premise Logi control for EH030, 040, 060, 070, 080 soft mount units with
software version 25 or higher plus REM025 all versions of software.
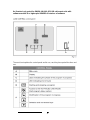
The next chart explains the control panel and its use, each key has special functions and
use.

15
It is important that the owner/operator understand as much as possible during the
training startup of the new equipment. Use the control panel above to explain key
functions and display segments.
Characteristics of the control
• Ease of use microprocessor control
• Ability of individual program modification
• Eight different programs with capacity of 9 complete wash phase contents
• Audit of programs usage
• Temperature control achieved by hot and cold valve operation to within 3-5f
degree differential
• Six separate water level settings
• Program advance feature
• Diagnostic “TesT” feature for troubleshooting washer faults
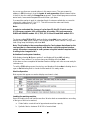
Basic Logi control programs
The standard programs are listed below, these programs can be modified through the
Advanced Use mode Located in “Operations Instruction Manual” Cod. 523340 Rev.
10 or later.
Definition of phases
1-2-3 Soak and pre-wash
4 Main wash
5 Optional wash
6-7-8 Cold water rinses
9 Final rinse and extraction

16

17
Machine Operation
Main reports that appear on washer display are shown in next chart;
Loading the washing machine
Open the loading door and load the machine. Washer load recommendations according
to type of linen to be washed for best results;
a. Cotton fabrics: nominal load of approximate machine capacity
b. Synthetic fabrics: between 80 & 90% of nominal load
c. Delicate fabrics: between 50 & 60% of nominal load
d. Mixed fabrics: between 80 & 90% of nominal load
Do not overload the machine; the door must be able to close easily. Overloading the
machine leads to excessive strain on machine operation.
Using the dispenser
As a precaution, when using liquid detergents, it is recommended that the detergent be
added just prior to starting the wash cycle.
In fig. 4.3 we see the front loading dispenser system used only in EH020 models with a
pump drain system. In fig.4.4 we show the top mounted dispenser system used on all
other models.

18
Starting a program Logi Control
• Close loading door, PR ** report on display(indicating last program run)
• Place laundry products into dispenser
• Select desired program using up arrow or down arrow keys
• Press start key; the display will show a temperature value (f *** ) indicates main
bath temperature of selected program. Using the up arrow or down arrow it is
possible to modify before starting cycle.
• Press start key again to confirm temperature and start wash program.
Sequence of starting a program is the same on all EH030, EH040 & REM025, RMG033,
040 and 055 model washers with normally open door locks. Models EH060, 070, 080
and RMG070 use normally closed door locks.
Start signal activated by operator with press of start key, signal is sent to door lock to
start locking process and drain valve causing valve to close.
Door lock normally open; after the lock has received a start signal, a 30 second delay
time is started, during this time the drum rotation and water inlet operate at short
impulses and door remains unlocked. Anytime during this period, the user can open and
close the door up until it locks. At the end of the 30 seconds the door will lock and cycle
time starts.
Door lock normally closed; after lock has received a start signal the door locks within a
moment and cycle starts. Door remains locked until a signal is sent from contr5ol to
unlock.

19
Drain valve: drain valve closes moment signal received and remains closed till the end
of programmed phase.
Water valves; as soon as door lock signals to micro that door is locked it powers the
water valves. These valves work independently of each other meaning when cold fill
valve has power the hot fill valve does not and vice versa, when hot fill valve has power
the cold does not.
Example: The program calls for 140F water, this signals control to open hot valve only
until the thermistor temperature is satisfied. At that time the hot fill valve closes and the
cold valve opens. The washer will continue fill by alternating hot and cold valves until
level and temperature is reached.
This means that only the hot valve or cold valve is open at any given time, never at
same time.
Thermister; is a probe located under washer outer drum at its lowest point, just left of
center, where it will allow contact with water entering washer drum. The temperature of
the water is sent from thermister to washer control and in turn the control activates fill
valve required to produce programmed temperature of wash bath.
Unbalance switch – EH soft mount models only
During washer operation the control monitors the drum movement as a safety
precaution. At any point during the wash or spin action of the drum and the drum has
excessive movement it can activate the unbalance switch causing the load to redistribute
and then retry operations. If switch activates 3 times the cycle will end and display will
show “End – Bal”
Stop modes
• End of cycle; when programmed cycle is finished the display shows “End” with
door open light on is considered normal
• Interrupting a program; during a cycle operation the stop can be activated at
any time. Pressing the “Stop” key signals the control to turn off all power to
washers outputs allowing drain to open, door unlock time count down and all
other cycle functions to halt. Once the control times out and door is opened cycle
is terminated, if the door is not opened then press start key and cycle will resume
at the beginning of phase when stop key was pressed.
• Emergency stop; pressing the E-Stop interrupts the washer operation similar to
interrupting the program. After a delay of approximately 3 minutes the door
unlocks.
Note: Be sure to open loading door prior to restoring power or door will relock as
soon as power is restored.
Other stopping modes
• Turn off power at I/O switch on front of control panel
• Turn off power at switch disconnector located on left rear of unit
• Turn off power at the power supply source (wall disconnect or breaker panel)

20
Introduction and Use (Logi Pro control)
This guide is intended to inform owner/operator of operation and basic equipment set up
for Logi Pro controlled washing machines.
On Premise Logi Pro control for EH020, EM-REM025, EM-MG-RMG033, 040, 055
and 070
The next chart explains the control panel and its use, each key has special functions.
Page is loading ...
Page is loading ...
Page is loading ...
Page is loading ...
Page is loading ...
Page is loading ...
Page is loading ...
-
 1
1
-
 2
2
-
 3
3
-
 4
4
-
 5
5
-
 6
6
-
 7
7
-
 8
8
-
 9
9
-
 10
10
-
 11
11
-
 12
12
-
 13
13
-
 14
14
-
 15
15
-
 16
16
-
 17
17
-
 18
18
-
 19
19
-
 20
20
-
 21
21
-
 22
22
-
 23
23
-
 24
24
-
 25
25
-
 26
26
-
 27
27


GIRBAU EH030 Operating Instructions Manual
- Category
- Washing machines
- Type
- Operating Instructions Manual
Ask a question and I''ll find the answer in the document
Finding information in a document is now easier with AI
Related papers
Other documents
-
ALLIANCE SYX080V Programming Manual
-
Dexter Laundry T-950 Express Installation guide
-
Dexter Laundry T-450 Express User manual
-
Dexter Laundry T-350 SWD Express User manual
-
Dexter Laundry T-450 SWD Express User manual
-
Dexter Laundry T-750 SWD Express User manual
-
 Dexter Laundry T-300 VENDED User manual
-
 Dexter Laundry T350 User manual
-
Dexter Laundry DC50X2 User manual
-
Maytag MLE22PNAGW0 Installation guide

