Page is loading ...

Carro Basculante
Para Tractor De 10
Pies Cúbicos
Manual del
Propietario
Modelo CCTC-10
Para preguntas acerca del producto:
Tricam Industries
7677 Equitable Drive
Eden Prairie, MN 55344
1-800-867-6763
www.tricam.com
1/07
• Instrucciones Importantes de Seguridad
• Instrucciones de Ensamblaje
• Identificación de Piezas y Herrajes
PRECAUCIÓN :
Antes de utilizar este producto, lea y siga TODAS las instrucciones.
U.S. Patente # 6,851,756
Otras Patentes de los EE.UU. y
Patentes Extranjeras Pendientes
10 cubic foot Tractor
Dump Cart
Owners Manual
Model CCTC-10
For product inquiries:
Tricam Industries
7677 Equitable Drive
Eden Prairie, MN 55344
1-800-867-6763
www.tricam.com
1/07
• Important Safety Instructions
• Assembly Instructions
• Parts and Hardware Identification
CAUTION:
Read, understand and follow ALL instructions before using this product.
U.S. Patent # 6,851,756
Other U.S. and Foreign
Patents Pending

A.
B.
D.
C.
E.
F.
G.
H.
I.
J
K.
L.
M.
N.
O.
A. Tub (1)
B. Lock Assembly (1)
C. Rear Frame (1)
D. Rear Axle Assembly (1)
E. Front Frame (1)
F. Front Struts (2)
G. Front Axle Assembly (1)
H. Steering Linkage Bar (1)
I. 15” Tires (4)
J. Handle (1)
K. Handle yoke (1)
L. Long handle tool holder straps (4)
M.Custom load cover(1)
N.Removable storage bag straps (2)
O.Removable storage bag (1)
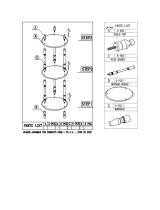
Exploded Drawing for Assembly
Parts List
A. M8x60 round head bolt (1)
B. M8x30 rounded truss head bolts (9)
C. M8x20 hex bolts (10)
D. 8.5x17 washers (22)
E. Spacers (4)
F. M12 Flat washers (4)
G. M8x23 Flat washers (9)
H. M8 lock nuts (20)
I. M12 lock nuts (4)
J. M6x20 sholder bolts (2)
K. M6 washers (2)
L. M6 lock nuts (2)
Hardware List
Images are not to scale
A.
B.
D.
C.
E.
F.
G.
H.
A.
B.
D.
C.
E.
F.
G.
H.
I.
I.
J
K.
A. Caja (1)
B. Ensamblaje de Bloqueo (1)
C. Estructura Trasera (1)
D. Ensamblaje del Eje Trasero (1)
E. Estructura Delantera (1)
F. Puntales Delanteros(2)
G. Ensamblaje del Eje Delantero (1)
H. Barra de Conexión de
Dirección (1)
I. Neumáticos de 15 Pulgadas (4)
J. Mango(1)
K. Horquilla del Mango (1)
L. Soportes para herramientas de
mango largo correas(5)
M. Cubierta para carga a medida (1)
N. Bolsa de almacenamiento
desmontable correas (2)
O. Bolsa de almacenamiento
desmontable (1)
Plano Esquemático de Ensamblaje
Lista de piezas
A. Tornillo de cabeza redonda M8x60 (1)
B. Tornillo para ménsulas de cabeza
redonda M8x30 (9)
C. Tornillo de hexagonel M8x20 (10)
D. Arandelas de 8.5 x 17 (22)
E. Espaciadores (4)
F. Arandela M12 (4)
G. Arandelas llana M8x23 (9)
H. Tuerca de bloqueo M8 (17)
I. Tuerca de bloqueo M12 (7)
J. Tornillade hombro M6x20 (2)
K. Arandelas de M6 (2)
L. Tuerca de bloqueo M6 (2)
Lista de Herrajes
Las imágenes no son a escala
L.
M.
N.
O.
J
K.
L.
A.
B.
D.
C.
E.
F.
G.
H.
I.
J
K.
L.

Step 2
Assemble the front
struts to the front axle
assembly using M8x20
hex bolts (2pcs),
8.5x17 flat washers
(2pcs) and M8 lock
nuts (2pcs). Tighten
securely.
1. READ ALL INSTRUCTIONS CAREFULLY AND BE SURE THEY ARE FULLY UNDERSTOOD BEFORE USING THIS DUMP
CART. If you do not understand these instructions, need clarification or further explanation, please call our toll free
number for assistance at 1-800-867-6763.
2. Do not load the Tractor Dump Cart with more than 1,200 lb (544 kg). Do not use the dumping feature of this cart with a
load of more than 600 lb (272 kg).
3. Distribute load evenly over the surface of the tub.
4. Do not load any items on the top edges of the plastic tub.
5. Do not allow children to use this cart without supervision. This cart is NOT A TOY.
6. Do not use this cart for transporting passengers.
7. Do not use this cart for highway use.
8. Do not exceed 5 mph.
9. Do not use this cart on surfaces or transport objects on surfaces that can cause damage to the pneumatic tires or
tubes. DO NOT INFLATE TIRES TO MORE THAN 32 PSI (2.20 BAR).
10.If any parts become damaged, broken, or misplaced – do not use this cart until replacement parts can be repaired or
replaced.
11.It is recommended this cart be inspected for damage before each use.
12.KEEP THESE INSTRUCTIONS FOR FUTURE REFERENCE.
Verify that all parts and hardware are accounted for before beginning assembly. Do not assemble or use this cart if any parts
are missing or damaged.
Tools required for assembly: standard screwdriver, phillips screwdriver and metric socket set (or two adjustable wrenches).
Step 1
Attach the rear frame to
the rear axle assembly
and tub using M8x30
rounded truss head
bolts (6 pcs), 8.5x17 flat
washers (6pcs), 8x23 flat
washers (6 pcs) and M8
lock nuts (6 pcs).
Tighten securely.
Step 4
Secure the ends of the steering
linkage bar to the front axle
assembly using M6x20
shoulder bolts (2pcs), M6
washers (2pcs) and M6 lock
nuts (2pcs). Tighten securely.
Important Safety Instructions
Assembly Instructions
Step 3
Assemble the front frame
to the front struts and front
axle assembly using
M8x20 hex bolts (6pcs),
8.5x17 flat washers (6pcs)
and M8 lock nuts (6pcs).
Tighten securely.
Step 5
Assemble the rear frame
to the front frame using
M8x20 hex bolts (2pcs),
8.5x17 flat washers (4pcs)
and M8 lock nuts (2pcs).
Tighten securely.
Paso 2
Ensamble los puntales
delanteros al ensamblaje del
eje delantero utilizando
pernos hexagonales M8x20
(2 piezas), arandelas planas
8.5x17 (2 piezas) y tuercas de
bloqueo M8 (2 piezas).
Ajuste firmemente.
1. ANTES DE USAR ESTE CARRO BASCULANTE LEA ATENTAMENTE TODAS LAS INSTRUCCIONES Y ASEGÚRESE DE
HABERLAS ENTENDIDO BIEN. Si no entendió las instrucciones, necesita disipar alguna duda o necesita una
explicación más exhaustiva, solicite asistencia llamando a nuestro número gratuito 1-800-867-6763.
2. No cargue el Carro Basculante para Tractor con más de 1,200 lbs (544 kg). No use el accesorio de descarga de
este carro con una carga de más de 600 lbs (272 kg).
3. Distribuya la carga en forma uniforme sobre la superficie de la caja.
4. No cargue ningún elemento por sobre los bordes de la caja plástica.
5. No permita que los niños usen este carro sin supervisión. Este carro NO ES UN JUGUETE.
6. No use este carro para transportar personas.
7. No use este carro en autopistas.
8. No exceda los 18 Km/n.
9. No use este carro en superficies que puedan dañar los neumáticos o los contenedores o para transportar objetos
en dichas superficies. NO INFLAR LOS NEUMÁTICOS A MÁS DE 32 PSI (2.20 BAR).
10.Si alguna de las piezas se daña, rompe o desubica, no use el carro hasta que no haya reparado o reemplazado
dicha pieza.
11.Se recomienda inspeccionar el carro después de cada uso.
12.GUARDE ESTAS INSTRUCCIONES PARA CONSULTARLAS EN EL FUTURO.
Verifique que no falte ninguna de las piezas ni los herrajes antes de comenzar el montaje. No ensamble ni use este carro
si alguna de las piezas falta o está dañada.
Herramientas necesarias para el ensamblaje: Destornillador Estándar, Destornillador Phillips, Juego de Casquillos
(o dos llaves ajustables)
Paso 1
Una el ensamblaje de la
estructura trasera al
ensamblaje del eje
trasero y a la caja
utilizando pernos M8x30
de cabeza redonda para
ménsulas (6 piezas),
arandelas planas 8x23 (6
piezas) y tuercas de
bloqueo M8 (6 piezas).
Ajuste firmemente.
Paso 4
Ubique el ensamblaje del eje
delantero.
Una la barra de dirección
articulada al ensamblaje del
eje delantero utilizando pernos
con reborde M6x20 (2 piezas),
arandelas M6 (2 piezas) y
tuercas de bloqueo M6 (2
piezas). Ajústelos firmemente.
Información Importante sobre Seguridad
Instrucciones de Ensamblaje
Paso 3
Ensamble la estructura delantera a
los puntales delanteros y al
ensamblaje del eje delantero
utilizando pernos hexagonales
M8x20 (6 piezas), arandelas planas
8.5x17 (6 piezas) y tuercas de
bloqueo M8 (6 piezas). Ajuste
firmemente
Paso 5
Ensamble la estructura
trasera a la delantera
utilizando pernos
hexagonales M8x20 (2
piezas), arandelas M6 (2
piezas) y tuercas de
bloqueo M7 (2 piezas).
Ajuste firmemente.

Paso 6
Ensamble los cuatro
neumáticos utilizando
separadores (4 piezas),
arandelas planas M12 (4
piezas) y tuercas de
bloqueo M12 (4 piezas).
Instrucciones Para Operar El
Mango Giratorio
Paso 1
Quite los sujetadores y los
pasadores partidos.
Paso 2
Gire el mango e inserte el pasador
partido. Asegure el mango en su
lugar uniéndolo con el sujetador.
Paso 3
Utilice el segundo pasador partido para
unir el mango con el enganche para remolque.
Paso 7
Una el ensamblaje de
bloqueo al contenedor
utilizando pernos
M8x30 de cabeza
redonda para
ménsulas (3 piezas),
arandelas planas
8.5x17 (3 piezas) y
tuercas de bloqueo
M8 (3 piezas).
NO EXCEDA LA CAPACIDAD MÁXIMA DE CARGA TOTAL DE 544 kg O LA CARGA
MÁXIMA DE DESCARGA DE 272 kg.EL PESO QUE SOPORTA SE CALCULA CON LA
CARGA DISTRIBUIDA EN FORMA UNIFORME.
PRECAUCIÓN
Cómo Usar El Accesorio De
Descarga
Para utilizar el accesorio de descarga, tire del mango de
liberación de descarga para liberar el mecanismo de
bloqueo de la caja. Levante el mango de liberación para
girar la caja hacia la posición de descarga.
Cómo Volver La Caja A La
Posición Más Baja
Coloque nuevamente la caja en la posición más baja y
verifique que el mango de liberación de descarga esté
bloqueado en su lugar.
PRECAUCIÓN- EVITE PUNTOS DE ENGANCHE
Paso 8
Una el mango al ensamblaje de
la horquilla utilizando un perno
M8x60 de cabeza redonda (1
pieza), una arandela plana
8.5x17 (1 pieza) y una tuerca de
bloqueo M8 (1 pieza).
Step 6
Assemble the four
tires using
spacers (4pcs),
M12 flat washers
(4pcs) and M12
lock nuts (4pcs).
Swivel Handle Instructions
Step 1
Remove the clips and
the cotter pins.
Step 2
Rotate the handle and insert
the cotter pin. Secure the
handle in place by attaching the clip.
Step 3
Use the second cotter pin to
attach the handle to the trailer hitch.
Step 7
Attach the lock
assembly to the tub
using M8x30 rounded
truss head bolts
(3pcs), 8.5x17 flat
washers (3pcs),
M8x23 flat washers
(3pcs) and M8 lock
nuts (3pcs).
DO NOT EXCEED THE OVERALL MAXIMUM LOAD CAPACITY OF 1,200 lb
OR THE MAXIMUM DUMPING LOAD CAPACITY OF 600 lb.
THE WEIGHT RATING IS BASED ON AN EVENLY DISTRIBUTED LOAD.
CAUTION
Using the Dumping Feature
To use the dumping feature, pull the dumping release
handle forward in order to release the tub from the
locking mechanism. Lift the release handle in order to
rotate the tub upward into the dumping position.
Returning The Tub To The
Lowered Position
Return the tub back to the lowered position and verify that
the dumping release handle locks in place.
CAUTION – AVOID PINCH POINTS
Step 8
Attach the handle to the yoke
assembly using the M8x60
round head bolt (1pc), 8.5x17
flat washer (1pc) and M8 lock
nut (1pc).

1 YEAR WARRANTY
This Cub Cadet® product is manufactured by Tricam Industries. Cub Cadet® is a registered trademark,
used under license.
The 10-Cube Poly Dump Cart is warranted against defects in workmanship or materials, under normal
use, to the original owner for a period of one year from the date of purchase. During this warranty
period, we will repair or replace, at our option, any part of the unit demonstrated to be defective in
workmanship or material. This warranty does not apply to damage in transit or damage caused by
misuse, abuse, neglect, or alterations to the product. In all events, the maximum claim liability will be
limited to the purchase price paid.
GARANTÍA DE 1 AÑO
Este producto de Cub Cadet® está fabricado por Tricam Industries. Cub Cadet® es una marca
registrada y se utiliza bajo licencia.
El Carro Basculante de Polipropileno de 10 Pies Cúbicos posee una garantía contra defectos de
fabricación o en los materiales, bajo condiciones de uso normales, que es válida para el dueño original,
durante un período de un año desde la fecha de compra. Durante el período de cobertura de la
garantía, repararemos o reemplazaremos cualquier pieza de la unidad que, según nuestro criterio,
demuestre tener defectos de fabricación o en el material. Esta garantía no se aplica al daño causado
durante el transporte o por el mal uso, maltrato, negligencia o por alteraciones en el producto. En todo
caso, la responsabilidad máxima por la reclamación se limitará al precio pagado por la compra.
Custom Load Cover
Long Handle Tool Holders
Removable Storage Bag
Cubierta Para Carga A Medida
Soportes Para Herramientas
De Mango Largo
Bolsa De Almacenamiento
Desmontable
/