Page is loading ...

Norcold
Refrigerator
N1152
Series
Installation
Manual

2
Contents
1 Introduction. ................................................................................................................... 2
2 Symbols. ......................................................................................................................... 3
3 Regulations and standards. ............................................................................................. 3
4 Serviceability. ................................................................................................................. 4
5 Position and placement. ................................................................................................. 4
6 Installing insulation and sealing . ................................................................................... 8
? Drainage tube . ............................................................................................................. 10
8 Connecting electricity................................................................................................... 10
9 Ventilation. ................................................................................................................... 12
10 Installing door panel..................................................................................................... 14
11 Door conversion. .......................................................................................................... 1?
12 After installation. .......................................................................................................... 19
13 Technical specifications. .............................................................................................. 19
14 Servicing. ...................................................................................................................... 20
15 Questions / customer service. ...................................................................................... 20
1. Introduction
This is the installation manual for the Norcold N1152 series refrigerator. The manual is
meant for those installing the refrigerator in a mobile leisure vehicle. Read the
information and instructions carefully and follow them strictly to install the refrigerator
safely and correctly.
Also read the warnings in the user manual before testing the refrigerator after installation.
Our policy is one of continuous development and improvement. Specifications and
illustrations may change subsequent to publication.
For the latest version of this manual, please visit www.Norcold.com.
If the appliance is not installed in accordance with national regulations, rules
and standards this will void the warranty.
EN
Original Installation
Manual

3
N
2. Symbols
Key to symbols:
Warning. Risk of injury and/or damage.
Attention. Important information.
Note. Additional
information.
EN
3. Regulations and standards
Do not modify this appliance, unless the modification is authorized and carried
out by the manufacturer or their agent.
Use only genuine and approved parts and materials.
Wear the correct Personal Protective Equipment during the installation. Also
follow the applicable safety regulations.
Electrical appliances should only be installed by qualified and certified professionals.
The electronic connections must be installed in accordance with the latest
technical regulations.
Make sure the refrigerator is transported and handled in the upright position, or
on its side with the electronics facing down as depicted in Installing door panel.
Install refrigerator in accordance with the local/national laws.
Never expose the refrigerator to water or moisture.
Never open or damage the cooling system at the back or on the inside of the
refrigerator. The cooling system is pressurized and contains flammable substances.
The performance of the refrigerator may be affected by adjacent heat sources such as
an oven or stove. Protect the refrigerator against any heat sources by fitting
insulation.
Never reposition or change the electronic components.
In order to prevent the risk of fire in the event of uncontrolled leakage of the
refrigerant system, make sure that the refrigerant charge per net room volume does
not exceed
8.6g/m
3
. Net room volume is defined as the gross room volume minus the volume of
any product, equipment, or objects located in the living area. The refrigerant charge
amounts can be found on the serial label.
Make sure no equipment that produces sparks or flames is installed close to the
cooling system.
The refrigerator is intended to be used in a leisure vehicle. The refrigerator is not
suited for use other than in a leisure vehicle.

4
4. Serviceability
The installer of Norcold products is responsible for proper installation to ensure the
correct functionality and serviceability of the appliance. In terms of serviceability, this
means that a dealer or an authorized Norcold service partner must be able to de-install and
re-install the Norcold products within the time that is allowed according to the Norcold
time-list, using standard tools and equipment.
This is to claim any warranty during the period of 3 years after purchase date. In case of
any queries on this subject, please contact the Norcold local service representative before
installing the product.
5. Position and placement
■ Use the mounting dimensions as shown below.
FL
W
H
D
A
FH

5
N
■ Mount the refrigerator in a stable
furniture.
E
N
3.9 in
Table 1: Mounting dimensions (inch)
Model
H
W
D*
FL
FH
A
N1152
59.2
16.5
22.4
1.7
1.1
> 1.6
*Depth is including spacers (1.6 in.] for model N1152.
■ Place the refrigerator partly into the furniture, allowing 3.9in free at the top of the refrigerator.

6
C
B
A
■ Connect the power connector to the 12V power connector in the vehicle.
It is advised to have the power supply in the vehicle to be routed via the roof.
In this way an over-length of cable is not needed and the power supply cable cannot
block the airways.
■ Slide the refrigerator to the back of the furniture.
■ Use a screw suitable for below hole dimensions.
Table 2: Hole dimensions (diameter A & C)
N1152
side
floor
A
.35 in
.35 in
B
.25 in
1.34 in
C
.17 in
.17 in

N1152
■ Fixate the refrigerator with the screws, using the predefined positions in the cabinet.
EN
■ Use the white caps for finishing.
Ensure that the furniture paneling is able to handle the forces created
by the connection.
Do not screw into the refrigerator cabinet.
The refrigerator is prepared for flush build-in.

10
6. Connecting electricity
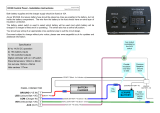
■ Use the following values to connect the power supply.
Table 3: Power supply values
DC
12V
Power requirement 12V DC
10.4-14.4V at the refrigerator
Cable dimensions (Cable thickness vs
cable length]
■
14 AWG = <67.5 in
■
12 AWG = <139 in
■
10 AWG = <221 in
Fuse current
15A in power supply system near the
power supply source
DC supply
Red cable (+] and white cable (-]
Battery capacity
Advised: 2 x 95Ah
12V power connector
Refrigerator: Stocko VV 2041.100 G or
equival- ent
Supply cable counterpart: Stocko
VV 2041.200 G or equivalent

(RED)
(WHITE)
The electrical connections have to comply with EN60335-1.
Connect the device to an on board battery in the vehicle. This battery should be
exclusively intended for powering on board devices. Connecting to the engine
battery is not suitable.
Ensure that wires can't come into contact with hot or sharp parts.
The 12V power supply wiring should incorporate a general main switch that
enables all pole disconnection of the 12V appliances from the 12V power
supply source.
Wiring diagram:
EN
1. Input power 12V DC
2. Fuse 15A
3. Main PCBA cooling unit
■ Connector layout of the input power 12V DC:
White
Black
3
F
D
C
P
T
-
2
Brown
1
Red
FUSE
-
White
+ +

12
7. Ventilation
The refrigerator performance depends on good ventilation. Ventilation takes place
through the front vent openings in the refrigerator. Cold air comes in through the bottom
vent at the front and goes through the top vent. Here it cools the cooling unit system. Hot
air leaves through the top vent opening.
Do not block the bottom and top vent openings.
The bottom vent opening has no filter. Placing a filter is not needed and
might lead to poor performance.
■ Ensure that the minimal distance (1] between the refrigerator and the bottom and the
back is .78 in.
■ Ensure that the minimal distance (2] between the refrigerator and the back and the
top side is 1.57 – 1.96 in.
Floor model
Ensure that the top and bottom vent opening is not obstructed and is able to vent freely.
N1152
2
2
1

8. Installing door panel
To match the refrigerator with the interior, a door panel can be installed as
shown below. The door panel for the door should be fitted before
installing the refrigerator.
■ Place the refrigerator on its side, refer to the handling sticker on the side of the
refrigerator ("This side up allowed during handling"].
EN
Never lift or handle a refrigerator at the power supply cables.
Always pay attention to the label on the side of the refrigerator: "this side up
allowed during transport and handling".
■ Remove the panel retainer.
1. Pull and rotate the panel
re- tainer in the middle.
2. Pull and rotate the panel
re- tainer on the left and
right.
2
2
1

14
■ Slide the panel in the frame of the door.
■ Click the panel retainer in place.
Table 4: Panel sizes
Model
Door type
Thickness (in)
Panel size (in)
N1152
Flat
.106
H 54.9 x W 15.47
N1152
Flat
.078
H 54.9 x W 15.51
N1152
Flat
.060
H 54.9 x W 15.55

1?
9. Door conversion
■ Open the door a little and remove the hinge pin.
EN

18
■ Lift the door out of the hinges.
■ Move the lock on the refrigerator from one side to the other.
A
B

19
■ Move the hinges, handle, hinge pin and hinge hole plug from one side to the other on the door.
EN
10. After installation
■ Ensure that all packaging materials have been removed.
■ Check all electrical connections.
■ Check if the sealing has been applied correctly.
■ Check if the vegetable bins can be removed from the appliance.
■ Check if the door can be closed correctly.
11. Technical specifications
Table 5: Refrigerator specifications
Model
N1152
Display
LED
Total
volume
5.3 cuft(152L)
Freezer volume
0.6 cuft(18L)
Energy consumption day mode
0.50kWh/24h
Energy consumption night mode
0.40kWh/24h
Climate class day mode
T (60°F to
100°F]
Climate class night mode
N (60°F to 90°F]

20
These specifications may differ due to local standards.
12. Servicing
All servicing must be carried out by an authorized person. Before any service work is
started, the appliance must be disconnected from the electrical supplies.
For service, please contact your authorised local Service Centre giving details of the
model and serial number on the data badge plus date of purchase.
13. Questions / customer service
■ Visit www.Norcold.com.
■ Contact Customer Service Norcold in your country.
/