
Thank you for purchasing this Samsung product.
To receive more complete service, please register your product at www.samsung.com
Model Serial No.
If you have any questions, please call us at 1-800-SAMSUNG (1-800-726-7864) for assistance.
USER MANUAL
LSP7T / LSP9T

English - 2
Before Reading This User Manual
This Projector comes with this user manual and an embedded e-Manual.
Before reading this user manual, review the following:
User Manual
Read this provided user manual to see information
about product safety, installation, accessories, initial
configuration, and product specifications.
e-Manual
For more information about this Projector, read the
e-Manual embedded in the product.
• To open the e-Manual,
> Settings > Support > Open e-Manual
Scan this QR code with your smart device to visit Samsung's online Customer Service Center. You can
also use your PC to visit "www.samsung.com" and click Support. On the website, you can download the
manuals and see its contents on your PC or mobile device.
Learning the e-Manual's assistance functions
Search
Select an item from the search results to load the corresponding page.
Index
Select a keyword to navigate to the relevant page.
Sitemap
It displays the lists for each item in e-Manual.
Recently Viewed
Topics
Select a topic from the list of recently viewed topics.
• Some menu screens cannot be accessed from the e-Manual.
Learning the functions of the buttons that appear on e-Manual topic pages
Try Now
Allows you to access the corresponding menu item and try out the feature
right away.
Link
Access an underlined topic referred to on an e-Manual page immediately.
English

English - 3
Warning! Important Safety Instructions
Please read the Safety Instructions before using your Projector.
Refer to the table below for an explanation of symbols which may be on your Samsung product.
CAUTION
RISK OF ELECTRIC SHOCK. DO NOT OPEN.
CAUTION: TO REDUCE THE RISK OF ELECTRIC
SHOCK, DO NOT REMOVE COVER (OR BACK). THERE
ARE NO USER SERVICEABLE PARTS INSIDE. REFER
ALL SERVICING TO QUALIFIED PERSONNEL.
This symbol indicates that high voltage
is present inside. It is dangerous to make
any kind of contact with any internal
part of this product.
This symbol indicates that this product
has included important literature
concerning operation and maintenance.
AC voltage: Rated voltage marked with
this symbol is AC voltage.
DC voltage: Rated voltage marked with
this symbol is DC voltage.
Caution. Consult instructions for use:
This symbol instructs the user to consult
the user manual for further safety
related information.
Installation
• The slots and openings in the cabinet and in the back
or bottom are provided for necessary ventilation. To
ensure reliable operation of this apparatus and to
protect it from overheating, these slots and openings
must never be blocked or covered.
– Do not place this apparatus in a confined space,
such as a bookcase or built-in cabinet, unless
proper ventilation is provided.
– Do not place this apparatus near or over a
radiator or heat register, or where it is exposed to
direct sunlight.
– Do not place vessels (vases etc.) containing
water on this apparatus, as this can result in a
fire or electric shock.
• Do not expose this apparatus to rain or moisture.
• Be sure to contact an authorized Samsung service
center for information if you intend to install your
Projector in a location with heavy dust, high or low
temperatures, high humidity, chemical substances,
or where it will operate 24 hours a day such as in an
airport, a train station, etc. Failure to do so may lead
to serious damage to your Projector.
• Do not expose this apparatus to dripping or
splashing.
• Do not dispose of batteries in a fire.
• Batteries (battery pack or batteries installed) shall
not be exposed to excessive heat such as sunshine,
fire or the like.
• CAUTION: There is danger of an explosion if you
replace the batteries used in the remote with the
wrong type of battery. Replace only with the same or
equivalent type.
• WARNING - TO PREVENT THE SPREAD
OF FIRE, KEEP CANDLES AND OTHER
ITEMS WITH OPEN FLAMES AWAY
FROM THIS PRODUCT AT ALL TIMES.
• Use care when touching the Projector
after it has been on for some time.
Some parts can be warm to the touch.
Operation
• This apparatus uses batteries. In your community,
there might be environmental regulations that
require you to dispose of these batteries properly.
Please contact your local authorities for disposal or
recycling information.
• Do not drop or strike the product. If the product is
damaged, disconnect the power cord and contact a
Samsung service center.
• When you need to turn off the Projector completely,
wait until the fan stops completely so that the Project
can cool down completely.

English - 4
Power
• Do not overload wall outlets, extension cords, or
adaptors beyond their capacity, since this can result
in fire or electric shock.
• Power-supply cords should be placed so that they are
not likely to be walked on or pinched by items placed
upon or against them. Pay particular attention to
cords at the plug end, at wall outlets, and at the point
where they exit from the appliance.
• To protect this apparatus from a lightning storm, or
when left unattended and unused for long periods of
time, unplug it from the wall outlet and disconnect
the antenna or cable system. This will prevent
damage to the set due to lightning and power line
surges.
• Before plugging in the AC power cord of the
Projector, make sure that the operational voltage
of the Projector matches the voltage of your
local electrical power supply. Refer to the power
specifications section of the manual and/or the
power supply label on the product for voltage and
amperage information.
• Never insert anything metallic into the open parts of
this apparatus. This may cause electric shock.
• To avoid electric shock, never touch the inside of this
apparatus. Only a qualified technician should open
this apparatus.
• Be sure to plug in the power cord until it is firmly
seated. When unplugging the power cord from a wall
outlet, always pull on the power cord's plug. Never
unplug it by pulling on the power cord. Do not touch
the power cord with wet hands.
• If this apparatus does not operate normally - in
particular, if there are any unusual sounds or smells
coming from it - unplug it immediately and contact
an authorized dealer or Samsung service center.
• Be sure to pull the power plug out of the outlet if
the Projector is to remain unused or if you are going
to leave the house for an extended period of time
(especially when children, elderly, or disabled people
will be left alone in the house).
– Accumulated dust can cause an electric shock,
an electric leakage, or a fire by causing the power
cord to generate sparks and heat or by causing
the insulation to deteriorate.
• Use only a properly grounded plug and wall outlet.
– An improper ground may cause electric shock or
equipment damage. (Class l Equipment only.)
• To turn off this apparatus completely, disconnect it
from the wall outlet. To ensure you can unplug this
apparatus quickly if necessary, make sure that the
wall outlet and power plug are readily accessible.
Cleaning
• To clean this apparatus, unplug the power cord from
the wall outlet and wipe the product with a soft,
dry cloth. Do not use any chemicals such as wax,
benzene, alcohol, thinners, insecticide, air fresheners,
lubricants, or detergents. These chemicals can
damage the appearance of the Projector or erase the
printing on the product.
• Do not spray water or any liquid directly onto the
Projector. Any liquid that goes into the product may
cause a failure, fire, or electric shock.
Laser
• Do not block the light coming out of the projector
lens when in operation. The light will heat the object
and may melt, cause burns or start a fire.
• Do not look directly at the light from the Projector
lens or project the light into any person's eyes.
• WARNING: MOUNT ABOVE THE HEADS OF
CHILDREN. Additional warning against eye exposure
for close exposures less than 1 m.

English - 5
• As with any bright source, do not stare into the direct
beam, RG2 IEC 62471-5:2015.
• This projector is class 1 laser product of IEC 60825-
1:2014 and risk group 2 with the requirements of IEC
62471-5:2015
• Additional instructions to supervise children, no
staring, and not use optical aids
– Notice is given to supervise children and to never
allow them to stare into the projector beam at
any distance from the projector.
– Notice is given to use caution when using the
remote control for starting the projector while in
front of the projection lens.
– Notice is given to the user to avoid the use of
optical aids such as binoculars or telescopes
inside the beam.
• Do not open or disassemble the projector as this may
cause damage by the exposure of laser Radiation.
Antenna
• Bend down the part where the outdoor antenna line
goes into the inside so that rainwater cannot flow
into it.
• If you are using an outdoor antenna, please install it
away from electrical wires to make sure it does not
touch any nearby wires even when it falls down due
to heavy wind.

English - 6
Internet security
Samsung takes a number of steps to protect its Internet-compatible Projector against unauthorized incursions and
hacking. For example, certain sensitive communications between the Projector and the Internet servers are encrypted.
In addition, the Projector’s operating system has adopted controls to prevent the installation of unauthorized
applications.
Although we take steps to protect your Projector and personal information, no Internet-connected device or
transmission is completely secure. We therefore encourage you to take additional steps to safeguard your Projector,
secure your Internet connection, and minimize the risk of unauthorized access. These steps are listed below:
• When Samsung releases software updates to improve the security of your Projector, you should promptly install
these updates. To automatically receive these updates, turn on Auto Update in the Projector's menu (
>
Settings > Support > Software Update > Auto Update). When an update is available, a popup message appears on
the Projector screen. Accept the software download and update by selecting Yes when prompted. Take steps to
secure your wireless access point and network. Your access point's manual should provide additional details about
how to implement the following measures:
– Secure your wireless access point's management settings with a unique password to prevent unauthorized
changes to security related settings.
– Implement standard encryption (e.g., WPA2 encryption) on your wireless access point to secure your wireless
network signal.
– Secure access to your wireless network with a hard-to-guess password.
– Confirm your access point's firewall setting is enabled (if so equipped).
– Make sure that all your Internet-connected devices are behind your network's firewall.
– If your access point or modem has a standby mode button, use it to disconnect your home network from the
Internet when it is not in use.
• Use strong passwords for all your Internet accounts (Netflix, Facebook, etc.).
• If any unexpected messages appear on your Projector screen requesting permission to link a device or enable a
remote session, do NOT accept.
• Do not visit suspicious web sites and do not install any suspicious programs. We recommend that users install only
those authorized apps provided by Samsung through Samsung Smart Hub.
Figures and illustrations in this User Manual are provided for reference only and may differ from the actual product
appearance. Product design and specifications may change without notice.

English - 7
Contents
Before Reading This User Manual ---------------------------------------------------------------------------- 2
Warning! Important Safety Instructions
---------------------------------------------------------------------------- 3
01 Package Content
02 Product Overview
About the Projector ---------------------------------------------------------------------------- 9
03 The Samsung Smart Remote
About the Buttons on the Samsung Smart Remote ---------------------------------------------------------------------------- 10
Pairing the Projector to the Samsung Smart Remote
---------------------------------------------------------------------------- 11
Installing batteries into the Samsung Smart Remote
---------------------------------------------------------------------------- 11
04 Installing the Projector
Image size and projection distance ---------------------------------------------------------------------------- 13
Using the Power button
---------------------------------------------------------------------------- 14
Mounting the Projector on a wall
---------------------------------------------------------------------------- 15
05 Troubleshooting and Maintenance
Troubleshooting ---------------------------------------------------------------------------- 16
06 Specifications and Other Information
Specifications ---------------------------------------------------------------------------- 17
Environmental Considerations
---------------------------------------------------------------------------- 17
Decreasing power consumption
---------------------------------------------------------------------------- 18
Licenses
---------------------------------------------------------------------------- 18

English - 8
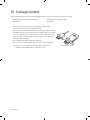
01 Package Content
Make sure the following items are included with your Projector. If any items are missing, contact your dealer.
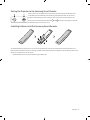
• Samsung Smart Remote & Batteries (AA x 2)
• User Manual
• Warranty Card / Regulatory Guide
• Power Cord
• The items’ colors and shapes may vary depending on the models.
• Cables not included can be purchased separately.
• When connecting an HDMI or USB cable, or connecting a USB flash drive to
the HDMI or USB port, use a product that has a width of 18 mm (0.7 inches)
or less and a height of 10 mm (0.3 inches) or less. If the USB cable or USB
flash drive does not fit the USB ports of the projector, use an extension
cable that supports USB 2.0.
• Use a certified cable with the HDMI logo attached.
• If you do not use a certified HDMI cable, the screen may not display or a
connection error may occur. (Recommended HDMI cable types)
– Ultra High-Speed HDMI Cable (3 m (9.8 feet) or less)
A ≤ 10 mm / B ≤ 18 mm

English - 9
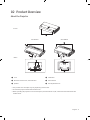
02 Product Overview
About the Projector
<Front>
SP-LSP7TFA SP-LSP9TFA
<Rear>
1
Lens
4
Ventilation
2
Remote control sensor / LED Indicators
5
Power button
3
Speaker
6
Tilt-Adjustment Foot
• The product color and shape may vary depending on the model.
• Do not block projector intake and exhaust vents.
• When operating the projector in an enclosed space, allow at least 50 cm (19˝) clearance around the intake and
exhaust vents.

English - 10
03 The Samsung Smart Remote
About the Buttons on the Samsung Smart Remote
• The images, buttons, and functions of the Samsung Smart Remote may differ depending on the model.
• The Universal Remote function operates normally only when you use the Samsung Smart Remote that comes with
the Projector.
(Power)
Press to turn the Projector on or off.
(Number button)
When pressed, a number strip appears on
the bottom of the screen. Select numbers
and then select Done to enter a numeric
value. Use to change the channel, enter a
PIN, enter a ZIP code, etc.
(Return)
Returns to the previous menu. When
pressed for 1 second or more, the running
function is terminated. When pressed
while you are watching a program, the
previous channel appears.
(Play/pause)
When pressed, the playback controls
appear while the media content is
playing.
(Smart Hub)
Returns to the Home Screen.
(Volume)
Move the button up or down to adjust
the volume. To mute the sound, press
the button. When pressed in and held
for 1 second or more, the Accessibility
Shortcuts menu appears.
(Channel)
Move the button up or down to change
the channel. To see the Guide screen,
press the button.
Select
Selects or runs a highlighted item. When
pressed while you are watching content,
detailed program information appears.
Directional pad (up/down/left/right)
Used to navigate the Projector menu,
highlight items on the Home menu, and
change values seen on the Projector's
menu.
(Voice Assistant)
Runs the Voice Assistant you selected.
Press and hold the button, say a
command, and then release the button to
run the Voice Assistant.
[ Keep the remote more than 0.6
inches (15.24 mm) from your face
when using and speaking to Voice
Assistant through the mic on the
remote.
(Color button)
Use these colored buttons to access
additional options specific to the feature
you are using.

English - 11
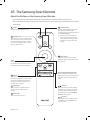
Pairing the Projector to the Samsung Smart Remote
When you turn on the Projector for the first time, the Samsung Smart Remote pairs
to the Projector automatically. If the Samsung Smart Remote does not pair to the
Projector automatically, point it at the remote control sensor of the Projector, and
then press and hold the buttons labeled
and as shown in the figure on the left
simultaneously for 3 seconds or more.
Installing batteries into the Samsung Smart Remote
To install the batteries, push the rear cover open in the direction of the arrow at the bottom of the illustration, and
then insert the batteries as shown in the figure. Make sure that the positive and negative ends are facing in the correct
direction. Close the rear cover as shown.
• Alkaline batteries are recommended for longer battery life.

English - 12
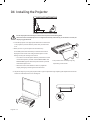
04 Installing the Projector
Install the projector horizontally on a flat surface to prevent it from being tilted.
When the screen and the projector are not aligned horizontally and vertically, or the screen is curved, the
display may get distorted.
1. Place the projector at an appropriate distance from the screen
to be projected, connect with the power cable, and then turn
it on.
• When you turn on your Projector for the first time, it
immediately starts the Initial Setup. Follow the instructions
displayed on the screen and configure the Projector's basic
settings to suit your viewing environment.
– You can turn on the Projector with the power button at the
rear of the Projector, and then use the Control menu. The
Control menu appears when the power button is pressed
while the Projector is On.
– When the screen looks skewed or blurred, adjust the
display settings by following the next instruction.
• The product color and shape may vary
depending on the model.
2. Adjust the angle by moving the projector left or right or adjust the angle adjusting tilt-adjustment foot at the
bottom to make the screen to be rectangular.

English - 13
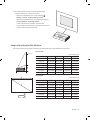
3. Move the projector forward or backward to adjust the
projection distance for a desired screen size.
– When the projected screen is unclear, adjust in
Settings > General > Projector Settings > Focus.
– When the projected screen is not a right angle, adjust in
Projector Settings > Screen Adjustment.
In this case, the screen resolution may decrease.
– For information about the screen sizes for each projection
distance, refer to the following table.
Image size and projection distance
– The screen sizes for each projection distance may differ depending on the installation environment.
Screen
SP-LSP7TFA
Unit: inches (mm)
C X Y A B
90 (2286) 78.4 (1992) 44.1 (1121) 9.7 (247) 13.7 (349)
95 (2413) 82.8 (2103) 46.6 (1183) 10.8 (275) 14.3 (364)
100 (2540) 87.2 (2214) 49.0 (1245) 11.9 (303) 14.9 (379)
105 (2667) 91.5 (2324) 51.5 (1308) 13.0 (331) 15.5 (394)
110 (2794) 95.9 (2435) 53.9 (1370) 14.1 (359) 16.1 (409)
115 (2921) 100.2 (2546) 56.4 (1432) 15.2 (387) 16.7 (424)
120 (3048) 104.6 (2657) 58.8 (1494) 16.3 (415) 17.3 (439)
SP-LSP9TFA
Unit: inches (mm)
C X Y A B
100 (2540) 87.2 (2214) 49.0 (1245) 4.4 (113) 13.8 (351)
105 (2667) 91.5 (2324) 51.5 (1308) 5.3 (134) 14.3 (363)
110 (2794) 95.9 (2435) 53.9 (1370) 6.1 (154) 14.8 (376)
115 (2921) 100.2 (2546) 56.4 (1432) 6.9 (175) 15.3 (388)
120 (3048) 104.6 (2657) 58.8 (1494) 7.7 (196) 15.8 (401)
125 (3175) 108.9 (2767) 61.3 (1557) 8.5 (217) 16.3 (413)
130 (3302) 113.3 (2878) 63.7 (1619) 9.4 (238) 16.8 (426)

English - 14
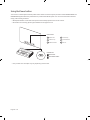
Using the Power button
You can turn on the Projector with the power button at the rear of the Projector, and then use the Control menu. The
Control menu appears when the power button is pressed while the Projector is On. For more information about its
usage, refer to the figure below.
• Manipulate buttons on the side of the product so that the projected screen is not covered.
• Be careful not to directly get the light emitted from the projector lens.
Control menu
:
Power Off
:
Volume Up
:
Channel Up
:
Volume Down
:
Channel Down
:
Source
Power button
Press: Move
Press & Hold: Select
• The product color and shape may vary depending on the model.

English - 15
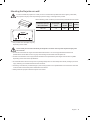
Mounting the Projector on a wall
In order to install the projector on a wall, be sure to consult with a professional service agency. Otherwise,
the projector may slip or fall off, resulting in personal injury or damage to the product.
• The product color and shape may vary
depending on the model.
When installing a wall mount kit, we recommend you fasten all four screws.
Screw hole specs (A *
B) in millimeters
Screw Depth
(mm)
Standard
Screw
Pitch
(mm)
Quantity
235 x 135 7-9 M6 1.0 4
Do not install your wall mount kit while your Projector is turned on. This may result in personal injury from
electric shock.
• Do not use screws that are longer than the standard dimension or do not comply with the standard screw
specifications. Screws that are too long may cause damage to the inside of the Projector set.
• For wall mounts that do not comply with the standard screw specifications, the length of the screws may differ
depending on the wall mount specifications.
• Do not fasten the screws too firmly. This may damage the product or cause the product to fall, leading to personal
injury. Samsung is not liable for these kinds of accidents.
• Samsung is not liable for product damage or personal injury when a non-specified wall mount is used or when the
consumer fails to follow the product installation instructions.
• Always have two people mount the Projector onto a wall.

English - 16
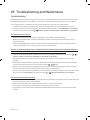
05 Troubleshooting and Maintenance
Troubleshooting
If the Projector seems to have a problem, first review this list of possible problems and solutions. Alternatively, review
the Troubleshooting Section in the e-Manual. If none of the troubleshooting tips apply, please visit "www.samsung.
com" and click Support or contact the Samsung service center listed on the back cover of this manual.
• For detailed information on troubleshooting, watch the troubleshooting videos at www.samsung.com/spsn.
• To keep your Projector in optimum condition, upgrade to the latest software. Use the Update Now or Auto Update
functions on the Projector's menu (
> Settings > Support > Software Update > Update Now or Auto Update).
The Projector won’t turn on.
• Make sure that the AC power cord is securely plugged in to the Projector and the wall outlet.
• Make sure that the wall outlet is working and the power indicator at the front right of the Projector is lit and
glowing a solid red.
• Try pressing the Power button at the rear of the Projector to make sure that the problem is not with the remote
control. If the Projector turns on, refer to “The remote control does not work.”
There is no picture/video/sound, or a distorted picture/video/sound from an external device, or
“Weak or No Signal” is displayed on the Projector, or you cannot find a channel.
• Perform a Projector self diagnosis to determine if the problem is caused by the Projector or the device ( >
Settings > Support > Device Care > Self Diagnosis > Picture Test or Sound Test).
• If the test results are normal, make sure the connection to the device is correct and that all cables are fully
inserted.
• Remove and reconnect all cables connected to the Projector and the external devices. Try new cables if possible
and confirm that the correct input source has been selected (
> Source).
• Reboot the connected devices by unplugging each device's power cord and then plugging it in again. If the issue
persists, refer to the connection guide in the user manual of the connected device.
• If you are not using a cable box or satellite box, and your Projector is receiving TV signals from an antenna or a cable
wall connector, run Auto Program to search for channels (
> Settings > Broadcasting > Auto Program).
The remote control does not work.
• Check if the power indicator at the front right of the Projector blinks when you press the remote's Power button. If it
does not, replace the remote control's batteries.
• Make sure that the batteries are installed with their poles (+/–) in the correct direction.
• Try pointing the remote directly at the Projector from 5 ft. to 6 ft. (1.5-1.8 m) away.
• If your Projector came with a Samsung Smart Remote (Bluetooth Remote), make sure to pair the remote to the
Projector.

English - 17
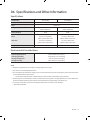
06 Specifications and Other Information
Specifications
Model Name
SP-LSP7TFA SP-LSP9TFA
Display Resolution 3840 x 2160
Lens Fixed Lens
Image Size (Diagonal) 90 - 120 inches
(2286 - 3048 mm)
100 - 130 inches
(2540 - 3302 mm)
Sound (Output) 30 W 40 W
Dimensions (W x H x D)
Body
With Feet
20.9 x 4.7 x 13.5 inches
(532.0 x 119.1 x 342.0 mm)
20.9 x 5.2 x 13.5 inches
(532.0 x 132.7 x 342.0 mm)
21.7 x 5.0 x 14.4 inches
(550.0 x 128.0 x 367.0 mm)
21.7 x 5.6 x 14.4 inches
(550.0 x 141.0 x 367.0 mm)
Weight (With Feet) 20.1 lbs (9.1 kg) 25.4 lbs (11.5 kg)
Environmental Considerations
Operating Temperature
Operating Humidity
Storage Temperature
Storage Humidity
50°F to 104°F (10°C to 40°C)
10% to 80%, non-condensing
-4°F to 113°F (-20°C to 45°C)
5% to 95%, non-condensing
Notes
• Design and specifications are subject to change without prior notice.
• This device is a Class B digital apparatus.
• For information about the power supply, and more information about power consumption, refer to the information
on the label attached to the product.
– For the label-rating and laser-related cautions, see the surface of the bottom of the projector.
• All drawings are not necessarily to scale. Some dimensions are subject to change without prior notice. Refer to the
dimensions before installing your Projector. Not responsible for typographical or printed errors.
• To connect a LAN cable, use a CAT 7 (*STP type) cable for the connection. (100/10 Mbps)
* Shielded Twisted Pair

English - 18
Decreasing power consumption
When you shut the Projector off, it enters Standby mode. In Standby mode, it continues to draw a small amount of
power. To decrease power consumption, unplug the power cord when you don't intend to use the Projector for a long
time.
Licenses
The terms HDMI and HDMI High-Definition Multimedia Interface, and the HDMI Logo are trademarks or registered
trademarks of HDMI Licensing LLC in the United States and other countries.

This page is intentionally
left blank.

Contact SAMSUNG WORLD WIDE
If you have any questions or comments relating to Samsung products, please contact the Samsung
service center.
Country Samsung Service Center Web Site Address
U.S.A 1-800-SAMSUNG (726-7864)
www.samsung.com/us/
support
Samsung Electronics America, Inc.
85 Challenger Road
Ridgefield Park, NJ 07660
accessibility contact information in U.S.A. : [email protected]
If you experience issues, please do not take the Projector back to the store.
In the United States of America, call us at 1-800-SAMSUNG (1-800-726-7864) or visit us at www.samsung.
com or www.samsung.com/spsn for support and warranty service.
-04
© 2020 Samsung Electronics Co., Ltd. All rights reserved.
-
 1
1
-
 2
2
-
 3
3
-
 4
4
-
 5
5
-
 6
6
-
 7
7
-
 8
8
-
 9
9
-
 10
10
-
 11
11
-
 12
12
-
 13
13
-
 14
14
-
 15
15
-
 16
16
-
 17
17
-
 18
18
-
 19
19
-
 20
20


Samsung Samsung Premiere LSP9T User manual
- Type
- User manual
- This manual is also suitable for
Ask a question and I''ll find the answer in the document
Finding information in a document is now easier with AI
Related papers
-
Samsung SP-LSP7TFA User manual
-
-
-
Samsung SP-LSP3BLA User manual
-
-
-
-
Samsung SP-LSP7TUA User manual
-
Samsung SP-LSP3BLAXMM User manual
-
Samsung VG-SOCR85 User manual