ViewSonic NMP520-W Quick start guide

Type
Quick start guide

This manual is also suitable for

The ViewSonic NMP520-W-S is a wireless presentation display device that lets you share content from laptops, tablets, and smartphones to a large display or projector. It supports Full HD 1080p resolution, allowing you to present high-quality videos, images, and presentations. With its plug-and-play simplicity, you can easily connect the NMP520-W-S to your devices without the need for any software installation or complicated setup. The device offers flexible connectivity options, including HDMI, VGA, and USB, ensuring compatibility with a wide range of devices.

The ViewSonic NMP520-W-S is a wireless presentation display device that lets you share content from laptops, tablets, and smartphones to a large display or projector. It supports Full HD 1080p resolution, allowing you to present high-quality videos, images, and presentations. With its plug-and-play simplicity, you can easily connect the NMP520-W-S to your devices without the need for any software installation or complicated setup. The device offers flexible connectivity options, including HDMI, VGA, and USB, ensuring compatibility with a wide range of devices.

N O V I S I G N : D I G I T A L S I G N A G E M A D E E A S Y
QUICK START USER GUIDE
NoviSign
P.O.B. 2341, 6 Yad Harutzim St.
Kfar Saba, Israel
Phone 646-893-7770 eMail: info@novisign.com
N O V I S I G N : D I G I T A L S I G N A G E M A D E E A S Y
TABLE OF CONTENTS
Introduction
Page. 3
Step 1: Getting Started
Page. 4
Step 2: The Creative Screen
Page. 5
Step 3: Select Template
Page. 6
Step 4: Edit & Create
Page. 7
Step 5: Create Playlist
Page. 10
Step 6: Send Playlist to Display
Page. 12
Step 7: Set-Up Media Player
Page. 17
Performance Reports
Page. 19
N O V I S I G N : D I G I T A L S I G N A G E M A D E E A S Y
For assistance please email: Suppo[email protected]
3
Introduction
Welcome! Thank you for choosing NoviSign. You have just joined over 20,000 organizations similar
to your own, that are using NoviSign to design, edit and manage their digital signage content. This
manual will walk you through the steps needed for you to create and manage your digital signage,
by using the NoviSign Online Studio.
NoviSign Online Studio
The NoviSign online Studio is a web-based full design studio that can be accessed from any computer,
at any time. No technical or design skill are required to use the Studio.
With the NoviSign online Studio, you will be able to create media-rich digital signage content. By
using the built-in drag-and-drop widgets; images, videos, vibrant slideshows, RSS feeds, scrolling
text tickers, web pages, Facebook and Twitter feeds, YouTube streams, and much more, you will be
able to create beautiful and dynamic digital signage content!
Customizable Templates
Included with your NoviSign Studio are fully customizable digital signage templates. Text, images,
videos and other widgets in the template that can be edited, deleted, resized or moved. You can
also add new drag & drop widgets to the layout. Templates for education, menus, live social walls,
hotels, clinics & healthcare, corporate, retail, hospitality, spa & salons, internal communication are
all included.
Advanced Scheduling, Admin Control, and Reporting
From one PC, you can broadcast your content, in minutes, to any number of screens and locations.
Using the NoviSign online Studio, you will have the ability create your playlist content and then
schedule it to play, by day, time, recurring times and set up a specific time for the content expire.
You can also create sub-user accounts for location managers that grant limited or full access to
editing or managing content.
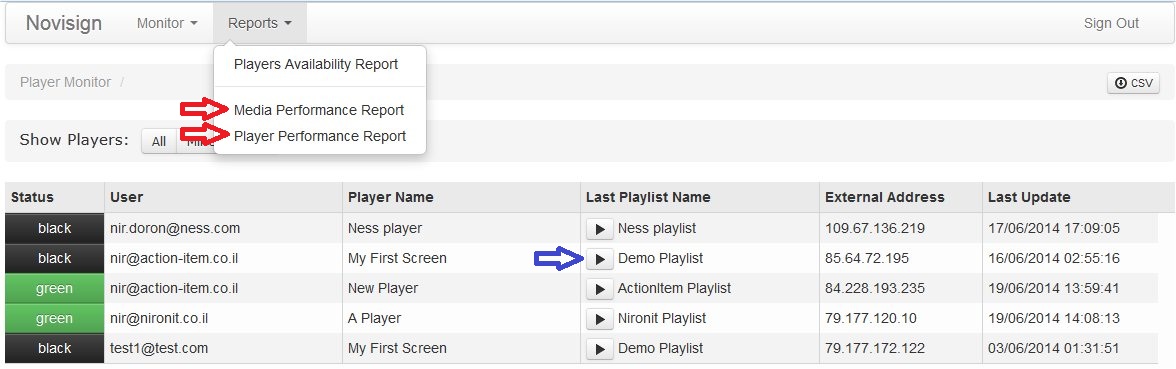
Also, complete reports can be generated, that provide real-time data. The monitor feature: allows
you to control the status of all media players (ON/OFF) and the last time new content was sent to
display. Device performance report: this feature generates a list of how many times the content
played, the user that manages the account, media player name, and the exposure time. Proof-of-
play (media performance report): gives you a detailed list of all media assets that played,
exposures, exposure time and player count.
CONTINUED ON PAGE 4
N O V I S I G N : D I G I T A L S I G N A G E M A D E E A S Y
For assistance please email: Suppo[email protected]
4
Step 1: Getting Started
Image 1.0
Required action:
Log-in to your NoviSign account: https://app.novisign.com/
Description:
This is the website that you will go-to to log-in to your NoviSign Digital Signage account. Once
logged in, you will have full access to edit, update, and manage content. See “Image 1.0” for visual
representation. After logging in, the page will appear featuring a gray top bar that contains the
NoviSign logo in the upper left side with the following tabs “Creative,” “Playlists,” and “Screens.”
CONTINUED ON PAGE 5
N O V I S I G N : D I G I T A L S I G N A G E M A D E E A S Y
For assistance please email: Suppo[email protected]
5
Step 2: The Creative Screen
Image 2.0
Required Action:
Select the button titled “Compose.”
Description:
Your screen should look like “Image 2.0”. This page is called “CREATIVE.” At the top of the screen
is a gray bar with three tabs (just right of NoviSign logo) titled:
CREATIVE: these are your creatives (the building blocks for any playlist)
PLAYLISTS: this is the content (a playlist can be made of one or more creatives) to be
assigned to your media players. Schedule by week, day, hour and expire or by recurring
times
SCREENS: send your playlists to a single display or a group of displays
Under the grey bar are a series of orange buttons titled:
Add”: upload your media files to your Media Library (or just access it), where you have all your
videos and images stored at
Compose”: takes you to Creative Composer, to create new composed creatives (those with the
cool widgets within)
Duplicate”: this makes a copy of an existing creative that you have made (useful for backup or
for creating similar creatives)
CONTINUED ON PAGE 6
N O V I S I G N : D I G I T A L S I G N A G E M A D E E A S Y
For assistance please email: Suppo[email protected]
6
Edit: select a creative then click “Edit.” This opens the creative in edit mode so that you can edit
it
“Add to New Playlist”: add a selected creative to a new playlist
“Delete”: this deletes a selected creative
Step 3: Select template
Image 3.1
Required Action:
A) Type a name in the “Creative nametext box and add a “Description.
o This will be the name of the creative that you create
B) Choose a template to customize or create a creative from scratch, using the blank
template
C) Once you select a template, an orange box will encompass the template
D) After selecting the template, click the button titled “Create (upper right box screen)
E) The Creative Composer will then load
CONTINUED ON PAGE 7
N O V I S I G N : D I G I T A L S I G N A G E M A D E E A S Y
For assistance please email: Suppo[email protected]
7
Additional Details:
To change the orientation of the content, in step B above, select drop-down titled "Template"
and change the default option named Wide screen 16: 9 to another available ratio.
Step 4: Edit and Create
Image 3.1
Description:
The NoviSign Creative Composer: here you will be able to create the content for your digital sign. It
consists of four primary features:
o (1) Drag & drop widgets: 24 feature icons located on the left-hand page of the screen. To
view all widgets, click the button titled “More.
o (2) Canvas: this is where you add your widgets to create the content for the sign
o (3) Properties box: right panel, where you can adjust the settings for each widget
o (4) Preview: few seconds preview of the content that you made
CONTINUED ON PAGE 8
N O V I S I G N : D I G I T A L S I G N A G E M A D E E A S Y
For assistance please email: Suppo[email protected]
8
Required Action:
A) Select drop-down list titled “Fill” (inside of “Properties” box), select your background color
B) Click and drag a widget to the canvas
C) Once dropped onto the screen, you can resize/adjust the widget to your requirements
D) Widget settings can be found in the properties box located on the right pane
E) To preview what you have made click the orange button titled “Preview.
F) Once you have your template created, click the “Save" button” and then click “Close Editor.
Additional Widget Details:
Drag & drop widgets include:
CONTINUED ON PAGE 9
N O V I S I G N : D I G I T A L S I G N A G E M A D E E A S Y
For assistance please email: Suppo[email protected]
9
Widget User Guides:
How to add a Yammer feed
Learn more
How to display a Google slideshow
Learn more
How to set up a game widget
Learn more
How to add a Web Image widget
Learn more
How to display an Excel in digital signage
Learn more
How to add FTP, shuffle, and custom clock
Learn more
How to add a poll
Learn more
How to add a simple queue
Learn more
How to add a Facebook page album
Learn more
How to add touchscreen capability
Learn more
How to add a Twitter feed
Learn more
How to configure for a video wall
Learn more
How to add an Instagram feed
Learn more
How to add advanced weather forecast
Learn more
How to add a Barcode reader.
Learn more
How to add an RFID reader
Learn more
How to add countdown widget
Learn more
How to add synchronized slideshows & Ustream
Learn more
How to set up social widgets
View video
How to add the smart queue widget
Learn more
Media Best Practices:
How to convert from one video type to another, using Any Video Converter
How to convert from one video type to another, using Converter Lite
How to convert a video to MP4, using AnyMP4
MP4 video for Android
This is NoviSign (Selection of YouTube video featuring abilities & features)
Best practices for using media
CONTINUED ON PAGE 10
N O V I S I G N : D I G I T A L S I G N A G E M A D E E A S Y
For assistance please email: Suppo[email protected]
10
Step 5: Create Playlist
Image 3.2
Description:
Playlist: where you can set the play order of creatives and schedule them to play on specific days,
times, and set expiration dates. The “PLAYLIST” page consists of four primary features:
o Add Playlist: Click this option for creating a new playlist
o Duplicate: this makes a copy of an existing playlist
o Edit: select a playlist, then click “Edit.” This opens the playlist in edit mode
o Delete: select and delete a playlist
Required Action:
1) Click the Add Playlist button
2) Add a new playlist name and type the description of the playlist use
3) Click buttonAdd Creative.”
CONTINUED ON PAGE 11
N O V I S I G N : D I G I T A L S I G N A G E M A D E E A S Y
For assistance please email: Suppo[email protected]
11
4) Drag the creatives that you want in the playlist onto the white box
a. To change the order of the creatives, click and drag any of them to rearrange
b. To schedule a specific creative to play, click the calendar icon
i. Additional details on scheduling: read more
c. To schedule how long you want each creative to play, click the 10S text. This controls the
duration (in seconds) of each creative in the playlist
Related Information
10 Common mistakes that prevent playlists from running well
Read more
Detailed how to schedule a creative or a playlist
Read more
CONTINUED ON PAGE 12
N O V I S I G N : D I G I T A L S I G N A G E M A D E E A S Y
For assistance please email: Suppo[email protected]
12
Step 6: Send Playlist to Display
Image 3.3
Description:
This is where you send your playlist’s of content to a media player. Screens in the "SCREENS" page
are supposed to represent screens in the real world. The page consists of four primary features
(orange buttons located under the gray top bar):
o Add Screen: add a new screen that you want to send content to
o Edit: edit an existing screen
o Add to New Group: send same content to multiple screens
o Delete: delete the screen from the system (this does not affect its chosen content)
Under the set of orange buttons is a table. In the upper right side of the table are one textbox (for
searching) and three sub-tabs:
“Search”: search for a screen name
Screens”: manage the content of the screens
Groups: send the same content to multiple screens all at once
Configurations: send a set of configured app settings to any screen
CONTINUED ON PAGE 13
N O V I S I G N : D I G I T A L S I G N A G E M A D E E A S Y
For assistance please email: Suppo[email protected]
13
The table is broken down into categories:
“Name”: name of the screen
“Description: description of the screen this could be location (better name your screens
according to their location, so you'll be able to know who is what and where, i.e., if you have a
couple of screen in the University of Texas and one of them is in the cafeteria of the faculty of
humanities, you can name it "Texas uni. - humanities cafe front")
“Group: indicates if the screen belongs to a group of screens
“Config”: shows if there is a selected configuration which was applied on that screen
Screen Link: ability to live preview (in your browser) the content playing on the screen
How to Send Content to One Screen:
Image 3.4
CONTINUED ON PAGE 14
N O V I S I G N : D I G I T A L S I G N A G E M A D E E A S Y
For assistance please email: Suppo[email protected]
14
Required Action:
1) Select theAdd Screen” orange button. Once selected, your screen should like "Image 3.4."
2) Add a new screen and fill the description of the display use
3) Drag and drop the playlist to the box below;
a. To change the order of the playlists (a screen can have multiple playlists if you like), click
and drag it to rearrange
b. To schedule a specific playlist to play, click the calendar icon
4) Press the "Create" button
Image 3.5
1) Your screen will then take you back to the primary “SCREENStab
2) The Studio will update to look like "Image 3.6."
3) You can live to preview the content by clicking the screen link
4) You can email the live preview content to someone else to view the screen key: Click theSend
to Email” button
CONTINUED ON PAGE 15
N O V I S I G N : D I G I T A L S I G N A G E M A D E E A S Y
For assistance please email: Suppo[email protected]
15
How to Send the Content to Multiple Screens:
Image 3.6
Required Action:
1) Select the screens that you would like to send the same content to all at once
2) Select the “Add to New Group” button
CONTINUED ON PAGE 16
N O V I S I G N : D I G I T A L S I G N A G E M A D E E A S Y
For assistance please email: Suppo[email protected]
16
Image 3.7
3) Type in “Group Name” and addDescription.
4) Press the "Add Playlist" button
5) Drag and drop the playlists (one or more) that you want that group of screens to play
6) Press the “Create” button
7) You are done! The content will update and begin playing on the screens in your group
Note:
Make sure that you have added the Screen Key to each NoviSign app that is installed onto the
media players or displays. The screen key is the ID of the app this way the app knows who it is,
and the Studio knows to send that signage device with that app, which has that unique ID, the
content which you have assigned it, in your Studio.
CONTINUED ON PAGE 17
N O V I S I G N : D I G I T A L S I G N A G E M A D E E A S Y
For assistance please email: Suppo[email protected]
17
Step 7: Setup Media Player
Required Action:
A) Purchase a media player of your choice:
a. Android
b. Chrome OS
c. Windows
B) Connect your media player to a TV using an HDMI cable
C) Download the NoviSign media player app on to your media player
a. Android
b. ChromeOS Player
c. Windows
D) Log-in to your NoviSign account and select “Screens.
E) Select the name of the playlist that you would like to send to a screen
F) Select the button in orange titled “Add Screen.
G) Type in the screen name and add a description
H) Click the orange button titled “Add Playlist.
I) Drag and drop the playlists that you would like sent to that specific screen/media player
J) Click the orange button titled “Create.
K) The screen will close and change to a list: “Name,” “Description,” “Playlist,” “Group,”
“Config” and “Screen Link.
L) Double click the playlist name that you want to send to a display
CONTINUED ON PAGE 18
N O V I S I G N : D I G I T A L S I G N A G E M A D E E A S Y
For assistance please email: Suppo[email protected]
18
M) The screen will change. On the bottom of the page you will see:
a. "Screen Link": this is a web-link that shows the content playing
b. "Screen Key": this is what activates the software on the media player
N) Write down or email yourself the “Screen Key.
O) Goto your media player and open the NoviSign app
P) Add the “Screen Key” (you can manually type it or paste it from an email sent to that unit or
just by logging in to your account from the app itself using the login/password text boxes
in the top right corner of that screen and then choosing the screen key by clicking the
magnifying glass icon, which is right to the screen key textbox)
Q) You are done! The content will be pulled from the cloud and will begin playing!
Related information:
Android
Most recommended Android media player
Learn more
List of approved Android media players
Learn more
Installing the NoviSign app onto an Android media player
Learn more
Quick reference for Android media player settings
Learn more
How to configure the Android media downloading best
Learn more
How to rotate your Android screen without flashing firmware
Learn more
How to upgrade your NoviSign Android app from remote
Learn more
MP4 video for Android
Learn more
How to remotely access an Android media player
Learn more
Video about setting up an Android media player
View video
How to put Android devices in showcase mode for visitors in your store
View video
Minix Android Media Players
Updating the Minix Neo X7 (16GB) firmware for supporting screen rotation
Learn more
Updating the Minix Neo X7 mini (8GB) firmware for supporting screen rotation
Learn more
Updating the Minix Neo X7 firmware for supporting portrait orientation
View video
Chrome
Installing the NoviSign app onto a Chrome device
Learn more
Recommended Chromeboxes
Learn more
Chromebox Device Management Console and Kiosk mode
Learn more
How to put your non-managed Chromebox in Kiosk mode
Learn more
Recommended Chromebits
Learn more
CONTINUED ON PAGE 19
N O V I S I G N : D I G I T A L S I G N A G E M A D E E A S Y
For assistance please email: Suppo[email protected]
19
Windows
Installing Windows device manual
Learn more
LG
Installing NoviSign onto webOS 3.x LG Smart TV manual
Learn More
General
Tips & tricks
Learn more
How to make Kiosk mode
View video
How to synchronize separate units
Learn more
How to remotely alter player’s settings (remote config)? (tech post)
Learn more
Performance Reports
We have 2 performance reports for proof of play. The 2 reports come in addition to the 2 monitors
(which show data from the last 24 hours) and the availability report (which shows the history of
availability percentage).
The reports are accessible through the regular link, either https://reports.novisign.com/.
What is proof of play? Imagine you have advertisers in your ad-network, and you need to show
them how many times that ad was broadcasted or for how long was this ad being played, on how
many stations and so on. These reports will provide this data.
CONTINUED ON PAGE 19
  • Page 1 1
  • Page 2 2
  • Page 3 3
  • Page 4 4
  • Page 5 5
  • Page 6 6
  • Page 7 7
  • Page 8 8
  • Page 9 9
  • Page 10 10
  • Page 11 11
  • Page 12 12
  • Page 13 13
  • Page 14 14
  • Page 15 15
  • Page 16 16
  • Page 17 17
  • Page 18 18
  • Page 19 19
  • Page 20 20
  • Page 21 21
  • Page 22 22
  • Page 23 23
  • Page 24 24

ViewSonic NMP520-W Quick start guide

Type
Quick start guide
This manual is also suitable for

The ViewSonic NMP520-W-S is a wireless presentation display device that lets you share content from laptops, tablets, and smartphones to a large display or projector. It supports Full HD 1080p resolution, allowing you to present high-quality videos, images, and presentations. With its plug-and-play simplicity, you can easily connect the NMP520-W-S to your devices without the need for any software installation or complicated setup. The device offers flexible connectivity options, including HDMI, VGA, and USB, ensuring compatibility with a wide range of devices.

Ask a question and I''ll find the answer in the document

Finding information in a document is now easier with AI